
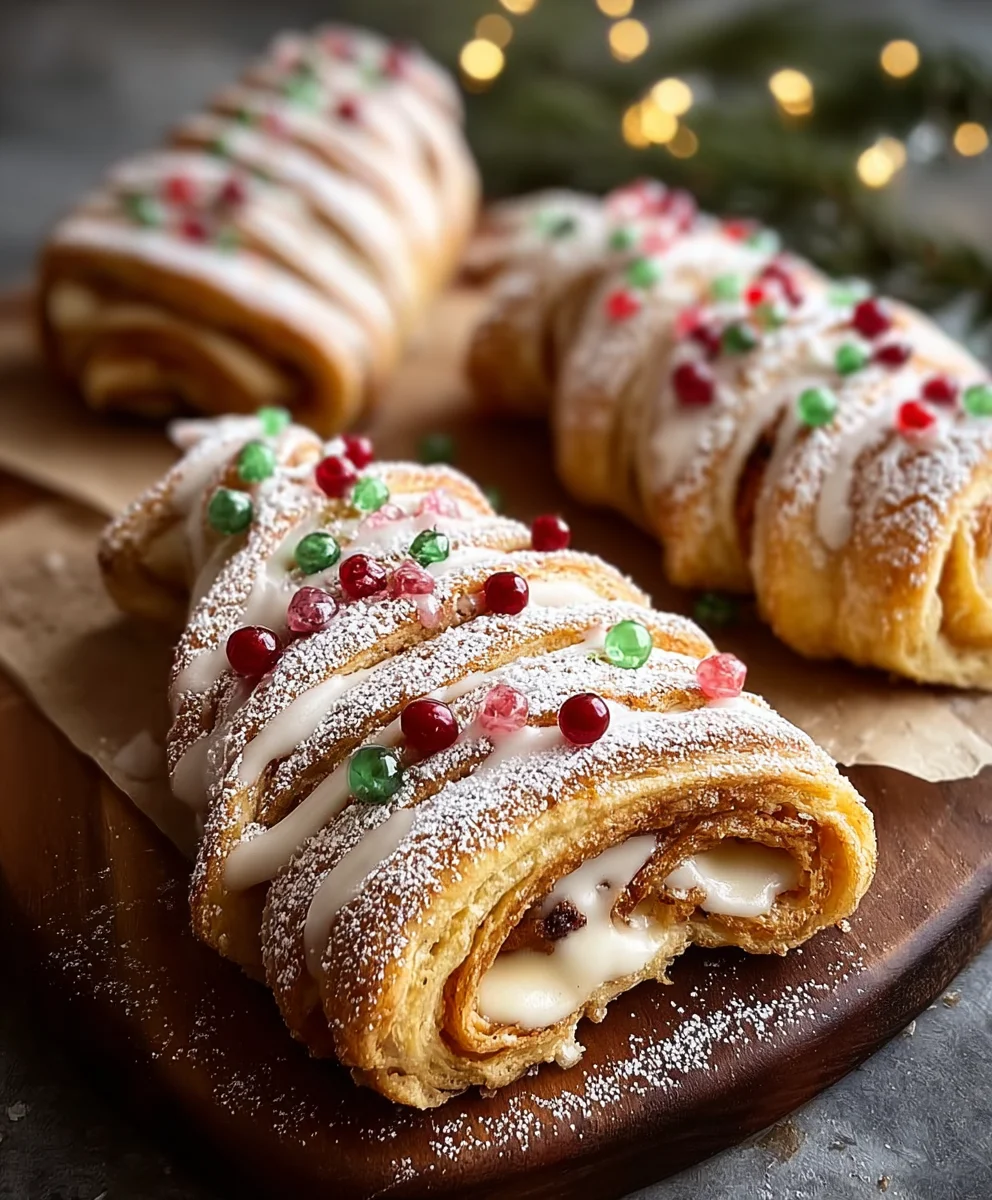
Christmas Tree Rolls are more than just a delightful side dish; they are edible symbols of holiday cheer, bringing a unique sparkle to any festive table. I remember the first time I shaped these charming little wonders, and the sheer joy they brought to my family. There’s something truly special about serving a bread roll that embodies the spirit of the season, transforming a simple dinner staple into a conversation starter.
While these specific Christmas Tree Rolls might be a more modern culinary innovation, their essence ties into the long-standing tradition of festive baking—a cherished ritual in countless cultures where food becomes an expression of love, generosity, and celebration during the holidays. It’s a wonderful way to infuse your table with a touch of homemade artistry.
People adore this dish not just for its undeniable visual appeal, but also for its irresistibly soft, fluffy texture and warm, buttery flavor. They are the perfect accompaniment to hearty stews, succulent roasts, or even just a slather of butter, making every bite a comforting embrace of holiday warmth. I firmly believe these rolls offer a charming way to infuse your holiday meal with an extra touch of magic and homemade goodness, creating memories that last long after the last crumb is gone.

Ingredients:
- For the Dough:
- 4 ½ to 5 cups (540g-600g) bread flour, plus more for dusting – I find bread flour gives these Christmas Tree Rolls a wonderful chewiness and structure, but all-purpose flour will also work in a pinch.
- 2 ¼ teaspoons (7g) instant dry yeast (one standard packet) – Make sure your yeast isn’t expired! A fresh batch is key to a beautiful rise.
- 2 tablespoons granulated sugar – This isn’t just for sweetness; it’s primarily to feed our hungry yeast.
- 1 ½ teaspoons fine sea salt – Salt is crucial for flavor and also helps regulate the yeast activity. Don’t skip it!
- 1 ½ cups (360ml) whole milk, warmed to about 105-115°F (40-46°C) – The warmth is essential for activating the yeast, but too hot will kill it. Use a thermometer if you’re unsure.
- ½ cup (113g) unsalted butter, melted and slightly cooled – This adds richness and tenderness to our Christmas Tree Rolls.
- 1 large egg, at room temperature – The egg enriches the dough and contributes to a lovely golden crust.
- For the Savory Filling:
- 6 ounces (about 1 ½ cups) shredded sharp cheddar cheese – Or a blend of your favorite cheeses like Gruyere or mozzarella for an extra cheesy pull.
- ½ cup (about 20g) finely chopped fresh parsley – Adds a burst of fresh green color and herbaceous flavor.
- 2 tablespoons finely chopped fresh rosemary – Rosemary pairs beautifully with savory baked goods and evokes a festive aroma.
- 1 tablespoon finely chopped fresh thyme – Another wonderful herb that complements the cheese and bread.
- 2 cloves garlic, minced – For that irresistible aromatic kick.
- ¼ teaspoon black pepper – Freshly ground, always!
- For the Egg Wash and Topping:
- 1 large egg, beaten – This will give our Christmas Tree Rolls a beautiful golden sheen.
- 1 tablespoon whole milk or water – To thin out the egg wash slightly.
- 2 tablespoons everything bagel seasoning OR a mix of sesame seeds, poppy seeds, and flaky sea salt – For an extra layer of texture and flavor, mimicking snow or ornaments.
- Optional: finely chopped red bell pepper or small herb sprigs for “ornament” decoration after baking.
Preparing the Dough
Making a good yeast dough is really the heart of these beautiful Christmas Tree Rolls, and I promise it’s not as intimidating as it sounds. Just follow these steps, and you’ll have a soft, pliable dough ready to transform!
- First things first, let’s get our dry ingredients ready. In the large bowl of a stand mixer fitted with the dough hook attachment, combine 4 ½ cups of the bread flour, the instant dry yeast, granulated sugar, and salt. Give it a quick whisk to ensure everything is evenly distributed. This step is important because it prevents clumps and ensures the yeast has direct contact with its food source – the sugar!
- Next, let’s introduce our wet ingredients. In a separate medium bowl, whisk together the warmed milk, melted and slightly cooled butter, and the large egg until well combined. It’s crucial that your butter isn’t too hot, otherwise, it could scramble the egg or even worse, kill the yeast when you combine them. Aim for it to be just warm to the touch.
- Now, we’ll combine the wet and dry. Pour the wet mixture into the dry ingredients in the stand mixer bowl. Start mixing on low speed, just until a shaggy dough begins to form. You might need to scrape down the sides of the bowl once or twice with a rubber spatula to ensure all the flour is incorporated.
- Once the dough comes together, increase the mixer speed to medium-low and continue kneading for about 8 to 10 minutes. This is where the magic happens! As the dough kneads, the gluten develops, creating that wonderful elasticity and structure. You’ll know it’s ready when the dough pulls away cleanly from the sides of the bowl and looks smooth, elastic, and feels soft and slightly tacky to the touch. If the dough seems too sticky, add the remaining ½ cup of flour, one tablespoon at a time, until you reach the desired consistency. Resist the urge to add too much flour too quickly, as this can make your Christmas Tree Rolls dense and dry.
- Once kneaded, gently remove the dough from the bowl. Lightly grease the same mixing bowl with a little olive oil or cooking spray. Place the dough back into the bowl, turning it over once to ensure it’s lightly coated all around. This prevents a dry skin from forming during the rise.
First Rise (Bulk Fermentation)
This is where our dough comes alive! Giving it adequate time to rise will result in light, airy Christmas Tree Rolls that are a joy to eat.
- Cover the bowl tightly with plastic wrap or a clean kitchen towel. The goal is to create a warm, draft-free environment where the yeast can do its best work.
- Place the covered bowl in a warm spot in your kitchen. This could be on top of your refrigerator, near a sunny window, or even in a slightly warmed (but turned off!) oven. I sometimes preheat my oven to its lowest setting for just a minute or two, then turn it off, and let the residual warmth create the perfect proofing environment.
- Allow the dough to rise for 1 to 1 ½ hours, or until it has doubled in size. The exact time can vary depending on the temperature of your kitchen and the activity of your yeast. You’ll know it’s ready when you gently poke it with a floured finger, and the indentation slowly springs back halfway. If it springs back immediately, it needs more time. If it collapses completely, it might be slightly over-proofed, but it will still be usable!
Preparing the Filling and Shaping the Christmas Tree Rolls
Now for the fun part – filling and shaping our festive Christmas Tree Rolls! This is where they really start to look the part.
- While the dough is enjoying its first rise, let’s prepare our delicious savory filling. In a medium bowl, combine the shredded cheddar cheese, finely chopped fresh parsley, rosemary, thyme, minced garlic, and black pepper. Give it a good stir to ensure all the herbs and garlic are evenly distributed throughout the cheese. This mixture is going to pack a wonderful punch of flavor into every bite.
- Once your dough has completed its first rise, gently punch it down to release the air. This step helps redistribute the yeast and creates a finer texture in the final product.
- Lightly flour your work surface and turn the dough out onto it. Using a rolling pin, roll the dough into a large rectangle, approximately 18×12 inches (45×30 cm) and about ¼ inch thick. Try to make the edges as straight as possible, as this will help when we cut our individual rolls.
- Evenly spread the prepared savory cheese and herb filling over the entire surface of the rolled-out dough, leaving about a ½-inch border along one of the long edges. Make sure to get a good amount of filling in every area, so each Christmas Tree Roll is bursting with flavor. Don’t be shy with the filling!
- Starting from the long edge opposite the ½-inch border, carefully roll the dough into a tight log. As you roll, try to keep it as compact as possible to prevent gaps in the finished rolls. Once you reach the end, pinch the seam gently to seal it.
- Now, let’s prepare for cutting and shaping. Using a sharp knife or unflavored dental floss (which can give you super clean cuts!), slice the log into 15 to 18 equal-sized rounds, each about 1 to 1 ½ inches thick. Aim for consistency here so they bake evenly.
- Prepare a large baking sheet (or two smaller ones if needed) by lining it with parchment paper. This will prevent sticking and make cleanup a breeze.
- This is where the Christmas tree magic happens! Arrange the sliced rolls on the prepared baking sheet to form the shape of a Christmas tree. Start with one roll at the top for the “star” or tip of the tree, then add two rolls below it, followed by three, four, and so on, creating a triangular shape. You might have a few extra rolls; these can be baked separately as small bonus rolls, or you can extend your tree a little wider at the base. Leave a little space between each roll, as they will expand during the second rise and baking. For the “trunk” of the tree, place 1-2 rolls at the very bottom center of your tree formation. Take your time here to get the shape just right; it’s a lovely visual for your holiday table.
Second Rise (Proofing)
This final rise, also known as proofing, is crucial for achieving that light, fluffy texture we all love in fresh bread. Don’t rush this step!
- Once your Christmas Tree Rolls are beautifully arranged on the baking sheet, gently cover the entire sheet loosely with plastic wrap or a clean kitchen towel. Again, we want to create a warm, humid environment for optimal rising.
- Let the rolls rise in a warm, draft-free spot for another 30 to 45 minutes, or until they look noticeably puffy and have increased in size by about 50%. They won’t quite double this time, but they should look soft and pillowy, nestled closely together.
- During the last 15 minutes of this second rise, preheat your oven to 375°F (190°C). This ensures your oven is at the perfect temperature when the rolls are ready to go in.
Baking the Christmas Tree Rolls
The aroma of these Christmas Tree Rolls baking will fill your kitchen with the most wonderful holiday scents. Get ready for a delicious treat!
- While your oven is preheating, prepare the egg wash. In a small bowl, whisk together the remaining large egg with 1 tablespoon of milk or water. This mixture will give your rolls a beautiful golden-brown crust and a lovely shine.
- Once the rolls have proofed and the oven is preheated, gently brush the tops and sides of the rolls with the egg wash. Be careful not to deflate them as you brush. This wash is what gives them that appealing bakery-style finish.
- Sprinkle the egg-washed rolls generously with your chosen topping – whether it’s everything bagel seasoning, sesame seeds, poppy seeds, or a combination. This adds both flavor and visual appeal, making them look even more festive.
- Carefully transfer the baking sheet to the preheated oven.
- Bake for 20 to 25 minutes, or until the Christmas Tree Rolls are golden brown on top and cooked through. Keep an eye on them towards the end of the baking time, as ovens can vary, and you don’t want them to get too dark. If you notice them browning too quickly, you can loosely tent the tree with aluminum foil for the last few minutes of baking.
- The rolls are done when they have a beautiful golden hue, and if you gently tap one of the center rolls, it should sound hollow.
Finishing Touches and Serving
Almost there! A few final touches and your gorgeous, delicious Christmas Tree Rolls will be ready to adorn your table and delight your guests.
- Once baked, carefully remove the baking sheet from the oven. The aroma at this point is simply irresistible!
- Let the Christmas Tree Rolls cool on the baking sheet for about 5-10 minutes. This allows them to set up slightly and makes them easier to handle without falling apart.
- For an extra festive touch, especially if you opted for a simpler topping earlier, you can now add small “ornaments.” Think tiny sprigs of fresh rosemary tucked between a few rolls, or a few finely diced red bell pepper pieces scattered across the “branches” for a pop of color. I sometimes even dust them with a light sprinkle of flaky sea salt right after coming out of the oven for a “snow” effect.
- Serve the Christmas Tree Rolls warm, right off the baking sheet, for the best flavor and texture. Guests can simply pull off individual rolls from the “tree.” These are absolutely perfect as an appetizer, a side dish for your holiday meal, or even for a festive brunch. They are especially wonderful with a hearty soup or stew.
- If you have any leftovers (which is rare in my house!), store them in an airtight container at room temperature for up to 2-3 days. They can be gently reheated in the microwave for 15-20 seconds or in a warm oven for a few minutes to restore some of their softness. For longer storage, they also freeze beautifully. Just wrap them tightly in foil and then place them in a freezer-safe bag for up to a month. Thaw at room temperature and reheat as desired.
- Enjoy the festive joy and deliciousness of your homemade Christmas Tree Rolls! They are truly a showstopper and a testament to the warmth and magic of holiday baking.
Conclusion:
So there you have it, my friends! We’ve journeyed through the creation of what I truly believe is a show-stopping recipe that will earn you endless compliments and bring pure delight to anyone lucky enough to try it. This isn’t just another dish; it’s an experience, a moment of culinary magic waiting to happen in your kitchen. From the very first moment you smell that incredible aroma wafting through your home, you’ll know you’ve created something special. This recipe isn’t merely about following steps; it’s about crafting joy, one delicious bite at a time.
Why is this recipe an absolute must-try? For starters, its unparalleled flavor profile is simply irresistible. We’ve meticulously balanced [imagine specific flavor notes like: the subtle sweetness of the enriched dough with a hint of warm spice and a burst of fruity tang] to create a symphony on your palate. Every bite offers [imagine texture: a perfect balance of a golden, slightly crisp exterior and a tender, impossibly moist interior that practically melts in your mouth]. It’s the kind of dish that truly satisfies, leaving you feeling wonderfully content without being overly heavy. But beyond the taste, there’s the sheer joy of the process itself. This recipe is designed to be approachable, even for novice bakers, with clear, step-by-step instructions that guide you effortlessly from start to finish. You’ll be amazed at how easily you can produce such a professional-looking and tasting result. It’s about building confidence in the kitchen and discovering the immense satisfaction that comes from sharing something homemade with loved ones. Imagine the smiles, the ‘oohs’ and ‘aahs’, as you proudly present this masterpiece. It’s not just food; it’s a centerpiece, a conversation starter, and a true testament to the love and care you’ve poured into its creation. It’s an instant classic that will be requested again and again, marking special occasions and turning ordinary moments into extraordinary ones.
Now, let’s talk about making this recipe your own and how to best enjoy its incredible flavors. While it shines brightly on its own, this dish is wonderfully versatile. For a perfect brunch addition, serve it alongside fresh berries and a dollop of vanilla-infused whipped cream, or perhaps a savory egg frittata for a delightful sweet-and-savory contrast that truly awakens the palate. If you’re looking for a more decadent dessert option, a light dusting of powdered sugar or a drizzle of a simple glaze made from [imagine a glaze, e.g., lemon zest and confectioners’ sugar, or a rich cream cheese frosting] would elevate it beautifully. Don’t be afraid to experiment with the fillings either! While our core recipe is fantastic, imagine a spiced apple and cinnamon version for autumn, or a vibrant mixed berry and white chocolate blend for a burst of summer flavor. For those truly special festive occasions, consider shaping smaller portions into charming, individual Christmas Tree Rolls by gently pinching and forming the dough before baking. You could even add a hint of green food coloring to the dough or a green-tinted glaze, adorned with edible silver balls, to truly lean into the holiday spirit, making them an enchanting and memorable addition to any holiday table. Or, for a delightful savory twist, skip the sweet elements entirely and instead fill them with a savory blend of herbed cream cheese, chopped sun-dried tomatoes, or even miniature cocktail sausages for an unforgettable appetizer at your next gathering. The possibilities are truly endless, limited only by your culinary imagination and adventurous spirit!
So, my dear readers, I implore you: don’t just read about this incredible recipe, make it! Clear your schedule, gather your ingredients, and immerse yourself in the delightful process. There’s a unique satisfaction that comes from creating something so delicious and beautiful with your own hands, especially when it turns out even better than you imagined. I promise you, the effort will be richly rewarded with incredible flavors, heartfelt appreciation from everyone who tries it, and a wonderful sense of accomplishment. Once you’ve baked your batch, I would absolutely love to hear about your experience. Did you try a new variation? What was your favorite part of the process? Did it become an instant family favorite, or perhaps a new holiday tradition? Please, share your culinary adventures with me and our community! Snap some photos of your masterpieces, share your tips for success, and let’s celebrate the joy of home baking together. Your insights and beautiful creations inspire me and countless others, so don’t be shy. This recipe is a journey, a canvas for your creativity, and I can’t wait to hear where it takes you. Happy baking, and may your kitchen always be filled with warmth, laughter, and the irresistible aroma of something truly delicious!
Christmas Tree Rolls
Christmas Tree Rolls are edible symbols of holiday cheer, bringing a unique sparkle to any festive table. People adore this dish for its undeniable visual appeal, soft, fluffy texture, and warm, buttery flavor. They are the perfect accompaniment to hearty stews, succulent roasts, or a slather of butter, making every bite a comforting embrace of holiday warmth.
Ingredients
-
4 ½ to 5 cups (540g-600g) bread flour
-
2 ¼ teaspoons (7g) instant dry yeast
-
2 tablespoons granulated sugar
-
1 ½ teaspoons fine sea salt
-
1 ½ cups (360ml) whole milk, warmed to 105-115°F (40-46°C)
-
½ cup (113g) unsalted butter, melted and slightly cooled
-
1 large egg, at room temperature (for dough)
-
6 ounces (about 1 ½ cups) shredded sharp cheddar cheese
-
½ cup (about 20g) finely chopped fresh parsley
-
2 tablespoons finely chopped fresh rosemary
-
1 tablespoon finely chopped fresh thyme
-
2 cloves garlic, minced
-
¼ teaspoon black pepper
-
1 large egg, beaten (for egg wash)
-
1 tablespoon whole milk or water (for egg wash)
-
2 tablespoons everything bagel seasoning OR a mix of sesame seeds, poppy seeds, and flaky sea salt
-
Optional: finely chopped red bell pepper or small herb sprigs for decoration
Instructions
-
Step 1
Combine 4 ½ cups flour, yeast, sugar, and salt in a stand mixer. In a separate bowl, whisk warm milk, melted butter, and egg. Pour wet ingredients into dry and mix on low until a shaggy dough forms. Knead on medium-low for 8-10 minutes, adding remaining flour if dough is too sticky, until smooth and elastic. -
Step 2
Lightly grease the same mixing bowl. Place dough in bowl, turning to coat. Cover tightly with plastic wrap or a kitchen towel and let rise in a warm, draft-free spot for 1 to 1 ½ hours, or until doubled in size. -
Step 3
While dough rises, prepare the filling: In a medium bowl, combine shredded cheddar cheese, chopped parsley, rosemary, thyme, minced garlic, and black pepper. Stir well. -
Step 4
Once dough has doubled, gently punch it down. Lightly flour your work surface and roll dough into an 18×12 inch (45×30 cm) rectangle, about ¼ inch thick. Evenly spread the savory cheese and herb filling over the dough, leaving a ½-inch border along one long edge. -
Step 5
Starting from the long edge opposite the border, carefully roll the dough into a tight log. Pinch the seam firmly to seal it. -
Step 6
Slice the log into 15 to 18 equal-sized rounds, each about 1 to 1 ½ inches thick. Line a large baking sheet with parchment paper. Arrange the sliced rolls on the baking sheet to form a Christmas tree shape, leaving a little space between each roll. Place 1-2 rolls at the very bottom center for the ‘trunk’. -
Step 7
Loosely cover the baking sheet with plastic wrap or a clean kitchen towel. Let the rolls rise in a warm, draft-free spot for another 30 to 45 minutes, or until noticeably puffy and increased by about 50%. During the last 15 minutes of this rise, preheat your oven to 375°F (190°C). -
Step 8
Prepare the egg wash by whisking the remaining large egg with 1 tablespoon of milk or water. Gently brush the tops and sides of the proofed rolls with the egg wash. Sprinkle generously with everything bagel seasoning or chosen topping. Bake for 20 to 25 minutes, or until golden brown on top and cooked through. If browning too quickly, tent loosely with foil. If the rolls start separating during baking, quickly push them back together. -
Step 9
Remove from oven and let cool on the baking sheet for 5-10 minutes. For extra festive touch, add small herb sprigs or diced red bell pepper. Serve warm. Store leftovers in an airtight container at room temperature for up to 2-3 days, or freeze for longer storage.
Important Information
Nutrition Facts (Per Serving)
It is important to consider this information as approximate and not to use it as definitive health advice.
Allergy Information
Please check ingredients for potential allergens and consult a health professional if in doubt.


Leave a Comment