
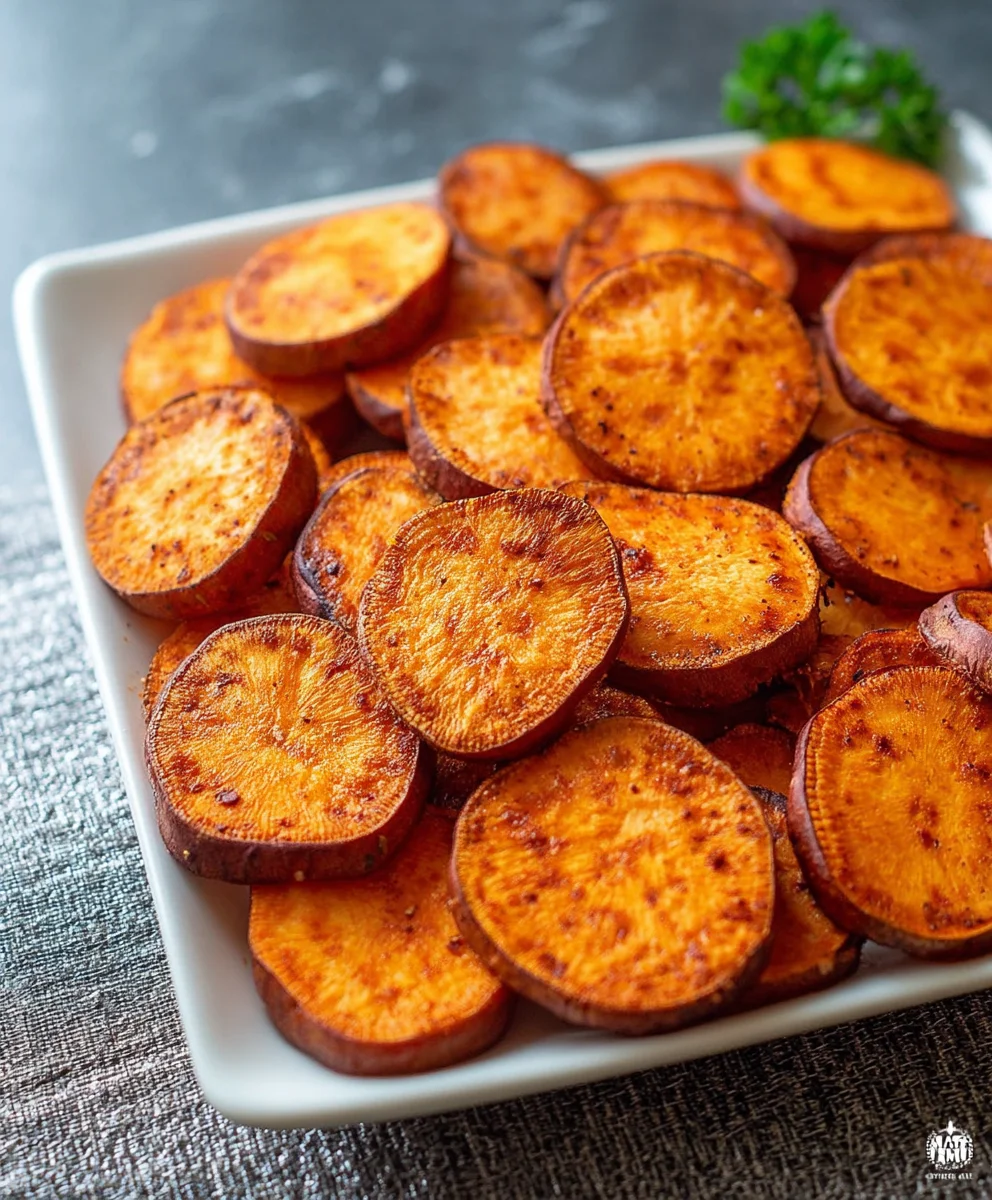
Baked Sweet Potato Slices are more than just a simple side dish; they are a golden ticket to a world of flavor, comfort, and effortless nutrition. I often find myself reaching for this incredibly versatile vegetable, knowing that with just a few simple steps, I can transform it into something truly extraordinary. Whether you’re seeking a wholesome snack, a vibrant addition to your dinner plate, or a foundation for a more elaborate meal, these sweet, tender slices deliver every time. Sweet potatoes boast a fascinating history, originating from the Americas thousands of years ago before spreading their delightful roots across the globe. From ancient Incan tables to modern-day holiday feasts, their inherent sweetness and nutritional powerhouse status have cemented their place in culinary traditions worldwide. It’s this blend of ancient heritage and modern appeal that makes these
Baked Sweet Potato Slices
so universally adored. Their caramelized edges, soft interior, and naturally sweet profile make them an irresistible, guilt-free indulgence that I’m thrilled to share with you today.

Ingredients:
- 2 large sweet potatoes (about 2.5 – 3 pounds total), firm and unblemished. I find the orange-fleshed varieties like Beauregard or Jewel work wonderfully for their natural sweetness and vibrant color.
- 3 tablespoons olive oil. You can also use melted coconut oil or avocado oil for a slightly different flavor profile and equally great results.
- 2 tablespoons light brown sugar, packed. This adds that delightful touch of caramelization and balances the savory spices perfectly. If you prefer, maple syrup can be a fantastic substitute for a deeper, more earthy sweetness.
- 1 teaspoon smoked paprika. This is my secret weapon for adding a rich, smoky depth that elevates these simple sweet potato slices to something truly special.
- 1 teaspoon garlic powder. A pantry staple that provides a foundational savory note without the sharpness of fresh garlic.
- ½ teaspoon onion powder. Complements the garlic powder and adds a subtle allium sweetness.
- ½ teaspoon cayenne pepper (optional). For those who love a little kick! Adjust to your heat preference, or omit entirely for a milder dish.
- 1 teaspoon sea salt, or to taste. Fine-grained sea salt helps to distribute evenly and enhance all the other flavors.
- ½ teaspoon freshly ground black pepper, or to taste. Freshly ground always makes a difference!
- 2 sprigs fresh rosemary or thyme (optional, for aroma during baking). I love to tuck a few sprigs under the slices on the baking sheet; it infuses a subtle herbaceous fragrance without being overwhelming.
- Fresh parsley or chives, finely chopped (for garnish). Adds a burst of color and freshness right before serving.
Preparing the Sweet Potatoes: The Foundation for Perfect Baked Sweet Potato Slices
- Selecting and Cleaning Your Sweet Potatoes: My journey to perfect “Baked Sweet Potato Slices” always begins with choosing the best sweet potatoes. Look for ones that are firm to the touch, without any soft spots, bruises, or sprouting eyes. I usually aim for medium to large-sized potatoes that are relatively uniform in shape, as this helps with even slicing. Once you have your star ingredients, give them a good scrub under cold running water to remove any dirt or debris. I like to use a vegetable brush for this to ensure they are squeaky clean. Pat them thoroughly dry with a clean kitchen towel or paper towels. Dry potatoes are essential for a good oil coating and crispy edges!
- To Peel or Not to Peel: A Culinary Quandary: This is often a personal preference when making “Baked Sweet Potato Slices.” I generally choose to peel my sweet potatoes for a smoother texture and a more refined presentation. The skin can sometimes be a bit fibrous, and peeling ensures every bite is tender. However, sweet potato skins are packed with nutrients and fiber, so if you prefer a rustic look and don’t mind the texture, you can certainly leave them on! If you opt to peel, use a sharp vegetable peeler and carefully remove the outer skin, working your way around the potato until it’s completely peeled.
- Mastering the Art of Slicing: This step is critical for achieving evenly cooked and beautifully presented “Baked Sweet Potato Slices.” I aim for slices that are about ¼ to ⅓ inch thick. If they’re too thin, they might crisp up too much and even burn before the inside is tender. If they’re too thick, they’ll take a very long time to cook through, and might not get those lovely caramelized edges. I find that using a sharp chef’s knife or a mandoline slicer (with caution and a guard, please!) yields the most consistent results. Uniformity is key here – slices of similar thickness will cook at the same rate, preventing some from being undercooked while others are overcooked. Slice the potatoes into rounds, or if your potatoes are very long, you can cut them in half crosswise first, then slice them into half-moons. As you slice, place them in a large mixing bowl; we’ll be coating them soon!
Crafting the Flavorful Coating: The Heart of Delicious Baked Sweet Potato Slices
- Assembling Your Aromatic Spice Blend: In a small bowl, I like to combine all my dry seasonings before adding them to the sweet potatoes. This ensures an even distribution of flavor across every single “Baked Sweet Potato Slice.” Whisk together the 2 tablespoons of light brown sugar, 1 teaspoon of smoked paprika, 1 teaspoon of garlic powder, ½ teaspoon of onion powder, ½ teaspoon of cayenne pepper (if using), 1 teaspoon of sea salt, and ½ teaspoon of freshly ground black pepper. Give it a good whisk until everything is well combined. This blend creates that irresistible sweet, savory, and subtly spicy profile we’re aiming for.
- Coating the Sweet Potato Slices with Love: Now for the fun part! Drizzle the 3 tablespoons of olive oil over the sliced sweet potatoes in the large mixing bowl. Using your clean hands (or a sturdy spatula), gently toss the slices to ensure they are all lightly coated with the oil. This oil layer is crucial; it helps the seasonings adhere, promotes even browning, and contributes to that desirable tender-crisp texture. Once the potatoes are oiled, sprinkle your carefully prepared spice blend over them. Again, use your hands to gently toss and massage the spices into every nook and cranny of the sweet potato slices. I really take my time with this step, ensuring each slice is beautifully coated – it makes all the difference in the final flavor of your “Baked Sweet Potato Slices.” You want to see that rich, reddish-orange coating on every piece.
- Flavor Variations and Customization: While my preferred blend offers a wonderful balance, feel free to experiment! For a more herbaceous touch, you could add a pinch of dried rosemary or thyme to the spice mix. If you’re leaning more towards a purely savory profile, you might reduce the brown sugar and increase the garlic and onion powder, perhaps adding a touch of dried oregano. For a spicier kick, a little more cayenne or a dash of chili powder would be fantastic. On the flip side, for a sweeter, dessert-like side dish, consider increasing the brown sugar and adding a sprinkle of cinnamon or nutmeg, omitting the savory spices. The beauty of “Baked Sweet Potato Slices” is their versatility!
Baking the Perfect Sweet Potato Slices: Achieving Golden Perfection
- Preheating Your Oven and Preparing the Baking Sheet: This is a non-negotiable step for perfectly “Baked Sweet Potato Slices”! Always preheat your oven fully to 400°F (200°C) before you even think about putting those sweet potatoes in. A hot oven ensures a quick sear on the outside, locking in moisture and preventing the potatoes from steaming rather than roasting. While the oven is preheating, line one or two large baking sheets with parchment paper. I highly recommend parchment paper because it prevents sticking, makes cleanup a breeze, and helps with even browning. If you don’t have parchment, you can lightly grease the baking sheet with a little extra olive oil, but parchment truly is superior for this recipe.
- Arranging for Success: The Single Layer Rule: Carefully arrange the seasoned sweet potato slices on the prepared baking sheets in a single layer. This is perhaps the most important tip for crispy, delicious “Baked Sweet Potato Slices.” Do not overcrowd the pan! If the slices are too close together or piled on top of each other, they will steam instead of roast, resulting in soft, soggy potatoes instead of beautifully caramelized ones. If you have a lot of sweet potatoes, use two baking sheets. It’s better to bake in batches than to overcrowd a single pan. Make sure there’s a little space between each slice. If using the optional fresh rosemary or thyme sprigs, tuck them under a few of the sweet potato slices on the baking sheet for added aromatic infusion during baking.
- The Initial Bake and the Crucial Flip: Once your oven is at the correct temperature and your sweet potato slices are beautifully arranged, slide the baking sheets into the preheated oven. Bake for 15-20 minutes. During this initial bake, the sweet potatoes will start to soften and the edges will begin to caramelize. After this time, carefully remove the baking sheets from the oven. Using a sturdy spatula, flip each “Baked Sweet Potato Slice” to ensure even browning and crispness on both sides. This flip is absolutely essential for achieving that delightful texture all around. You’ll already start to see some gorgeous golden-brown spots forming.
- The Final Bake and Checking for Doneness: Return the baking sheets to the oven for an additional 10-15 minutes, or until the sweet potato slices are fork-tender and deeply golden brown with slightly crispy edges. The total baking time can vary slightly depending on the thickness of your slices and your oven’s calibration. I always recommend keeping an eye on them during the last few minutes to prevent overcooking. You’re looking for that perfect balance – tender on the inside, with a wonderfully caramelized and slightly crisp exterior. Don’t be afraid to pull out one of your “Baked Sweet Potato Slices” and give it a taste test! It’s the best way to ensure they’re exactly to your liking.
Serving and Storage Suggestions: Enjoying Your Baked Sweet Potato Slices
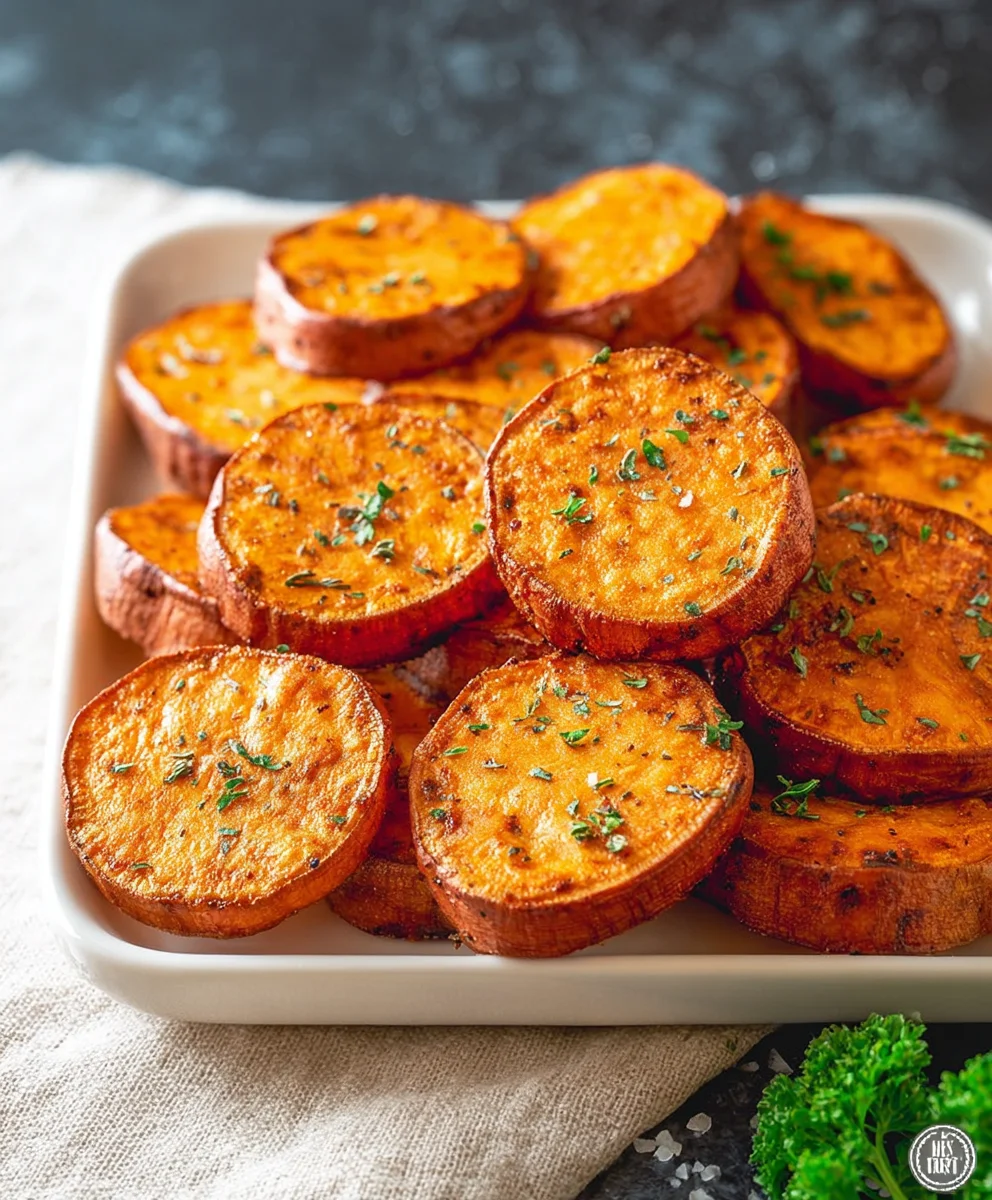
- The Grand Reveal and Immediate Enjoyment: Once your “Baked Sweet Potato Slices” have reached their peak of golden-brown perfection, carefully remove the baking sheets from the oven. The aroma alone will be intoxicating! If you used rosemary or thyme sprigs, you can remove and discard them at this point, as they’ve imparted their flavor. Transfer the hot sweet potato slices to a serving platter. I highly recommend serving these immediately! They are at their absolute best when fresh out of the oven, with those warm, tender interiors and slightly crisp edges.
- Garnishing for a Fresh Finish: To add a final touch of brightness and freshness, sprinkle your finely chopped fresh parsley or chives over the “Baked Sweet Potato Slices.” Not only does this add a lovely pop of color, but the herbaceous notes also provide a wonderful contrast to the sweet and savory flavors of the potatoes. A small dusting of extra sea salt, if desired, can also enhance the overall taste just before serving.
- Perfect Pairings and Complementary Dishes: These “Baked Sweet Potato Slices” are incredibly versatile and make a fantastic side dish for almost any meal. They pair beautifully with roasted chicken or turkey, grilled fish, or a juicy steak. For a vegetarian meal, I often serve them alongside black bean burgers, a hearty lentil soup, or a vibrant mixed green salad with a light vinaigrette. They’re also excellent as part of a brunch spread or even as a standalone snack. If you’re feeling extra indulgent, a drizzle of maple-tahini sauce or a dollop of Greek yogurt mixed with a little lime juice could take them to the next level.
- Storing Leftovers: While these “Baked Sweet Potato Slices” are definitely best enjoyed fresh, you might have some delicious leftovers! Allow them to cool completely to room temperature before transferring them to an airtight container. They can be stored in the refrigerator for up to 3-4 days. Proper cooling is important to prevent sogginess.
- Reheating for Continued Enjoyment: To reheat, I find the best method for maintaining some crispness is to spread them out on a baking sheet and warm them in a preheated oven at 350°F (175°C) for 8-10 minutes, or until heated through. You can also use an air fryer for a similar effect, which is quicker at around 3-5 minutes at 375°F (190°C). Microwaving is an option for convenience, but it will make the slices softer, losing some of that lovely texture. Regardless of how you reheat them, these “Baked Sweet Potato Slices” remain a delightful and flavorful addition to any meal. Enjoy!
Conclusion:
So, there you have it! We’ve journeyed through the simple steps to creating what I genuinely believe will become a staple in your kitchen: a dish that is as effortlessly elegant as it is deeply satisfying. What makes this recipe an absolute must-try, you ask? Well, for starters, its unparalleled ease of preparation is a game-changer. We’re talking minimal prep, basic ingredients, and a cooking method that allows the oven to do most of the heavy lifting. This means less time fussing in the kitchen and more time enjoying the delicious results with your loved ones, or perhaps, a moment of quiet indulgence just for yourself. This recipe truly proves that gourmet flavors don’t always require complicated techniques or a pantry full of obscure ingredients. It’s about letting the natural goodness of the star ingredient shine through with just a little help from your oven.
Beyond its simplicity, the sheer versatility of these sweet potatoes is truly remarkable. They seamlessly transition from a humble side dish to a star player on your dinner table, offering a vibrant burst of color and a naturally sweet, earthy flavor that complements almost any main course. Their texture, once perfectly roasted, achieves that coveted balance: delightfully crispy edges giving way to a wonderfully tender, almost creamy interior. It’s a culinary experience that genuinely elevates the humble sweet potato to something extraordinary, showcasing its inherent deliciousness in the most straightforward yet impactful way. Plus, let’s not forget the nutritional powerhouse that sweet potatoes are – packed with vitamins, fiber, and antioxidants, making this not just a treat for your taste buds, but also a fantastic choice for a healthy lifestyle. I find immense joy in knowing that I’m serving up something so wholesome and delicious, and I’m confident you’ll feel the same satisfaction when you witness the smiles around your table.
Now, for the exciting part – the endless possibilities once you have these golden treasures ready! While they are absolutely divine enjoyed straight from the baking sheet, hot and fragrant, I love experimenting with different serving suggestions and variations to keep things fresh and exciting. For a delightful savory twist, imagine them alongside a perfectly grilled chicken breast, a succulent steak, or a flaky baked salmon. Their natural sweetness provides a beautiful counterpoint to rich proteins, creating a balanced and harmonious meal. If you’re looking for a quick and nutritious snack, a handful of these wonderful slices can be incredibly satisfying, perhaps dipped in a dollop of Greek yogurt mixed with a pinch of smoked paprika, or even a homemade avocado dip for an extra layer of creaminess and healthy fats. For breakfast, I often chop up any leftovers and toss them into a scramble with eggs and spinach, or serve them warm with a sprinkle of cinnamon and a drizzle of maple syrup alongside my morning oatmeal. It’s a fantastic way to add a wholesome, filling, and slightly sweet element to your first meal of the day, setting you up for success.
Feeling a bit more adventurous? Transform your basic plate into a loaded masterpiece! Picture this: your warm, tender sweet potato slices piled high with a sprinkle of sharp cheddar or crumbled feta, a generous scattering of crispy bacon bits, a dollop of sour cream or a dairy-free alternative, and a flourish of fresh chives or green onions. This turns them into a meal in themselves, perfect for a cozy weeknight dinner or even a casual gathering with friends where everyone can customize their own plate. For those with a sweeter tooth, you could experiment with a dessert-like preparation: after baking, sprinkle them with a little brown sugar, cinnamon, and perhaps some chopped pecans, then briefly broil until caramelized and bubbly. A scoop of vanilla bean ice cream on the side? Pure bliss! Or, for a more aromatic savory profile, try tossing them with fresh rosemary and thyme before baking, or a dash of garlic powder and smoked paprika for a robust flavor kick. The world of flavor combinations truly opens up once you master the foundational technique of perfectly roasted sweet potatoes, and you’ll find yourself constantly discovering new favorites.
This is where I truly encourage you to take the plunge and make these Baked Sweet Potato Slices your own. Don’t just read about them; experience the delightful aroma filling your kitchen and the incredible taste for yourself. I promise, you won’t regret it. It’s a recipe that delivers on all fronts: flavor, nutrition, and sheer ease, making it an indispensable addition to your culinary repertoire. Once you’ve had a chance to whip up your own batch, I would absolutely love to hear about your experience. Did you stick to the original recipe, or did you get creative with your own unique twist? What were your favorite toppings or serving combinations? Did you discover a new way to enjoy them, perhaps a pairing I haven’t even thought of? Please, share your culinary adventures with me and our community! Your feedback, your photos, and your imaginative modifications are what truly make cooking a shared and joyful journey, inspiring us all to try something new. So go on, preheat that oven, grab those sweet potatoes, and get ready to create something truly delicious and memorable!
Easy Baked Sweet Potato Slices: Your New Favorite Side!
Baked Sweet Potato Slices are more than just a simple side dish; they are a golden ticket to a world of flavor, comfort, and effortless nutrition. Whether you’re seeking a wholesome snack, a vibrant addition to your dinner plate, or a foundation for a more elaborate meal, these sweet, tender slices deliver every time. Their caramelized edges, soft interior, and naturally sweet profile make them an irresistible, guilt-free indulgence.
Ingredients
-
2 large sweet potatoes (2.5 – 3 lbs)
-
3 tbsp olive oil
-
2 tbsp light brown sugar, packed
-
1 tsp smoked paprika
-
1 tsp garlic powder
-
½ tsp onion powder
-
½ tsp cayenne pepper (optional)
-
1 tsp sea salt
-
½ tsp black pepper, freshly ground
-
2 sprigs fresh rosemary or thyme (optional)
-
Fresh parsley or chives, finely chopped (for garnish)
Instructions
-
Step 1
Select firm sweet potatoes, scrub clean, and pat dry. Peel (optional) and slice into ¼ to ⅓ inch thick rounds. Place in a large mixing bowl. -
Step 2
In a small bowl, whisk together light brown sugar, smoked paprika, garlic powder, onion powder, cayenne pepper (if using), sea salt, and black pepper. -
Step 3
Drizzle olive oil over the sliced sweet potatoes and toss to coat. Sprinkle the spice blend over the potatoes and toss thoroughly until every slice is evenly coated. -
Step 4
Preheat oven to 400°F (200°C). Line 1-2 large baking sheets with parchment paper. Arrange sweet potato slices in a single layer, ensuring no overcrowding. Tuck optional fresh rosemary or thyme sprigs under slices. -
Step 5
Bake for 15-20 minutes. Remove from oven, flip each slice, and return to bake for another 10-15 minutes, or until fork-tender and golden brown with crispy edges. -
Step 6
Remove from oven, discard herb sprigs. Transfer to a serving platter, garnish with fresh parsley or chives, and serve immediately. -
Step 7
Cool any leftovers completely, then store in an airtight container in the refrigerator for up to 3-4 days. Reheat in an oven at 350°F (175°C) for 8-10 minutes or an air fryer at 375°F (190°C) for 3-5 minutes.
Important Information
Nutrition Facts (Per Serving)
It is important to consider this information as approximate and not to use it as definitive health advice.
Allergy Information
Please check ingredients for potential allergens and consult a health professional if in doubt.


Leave a Comment