
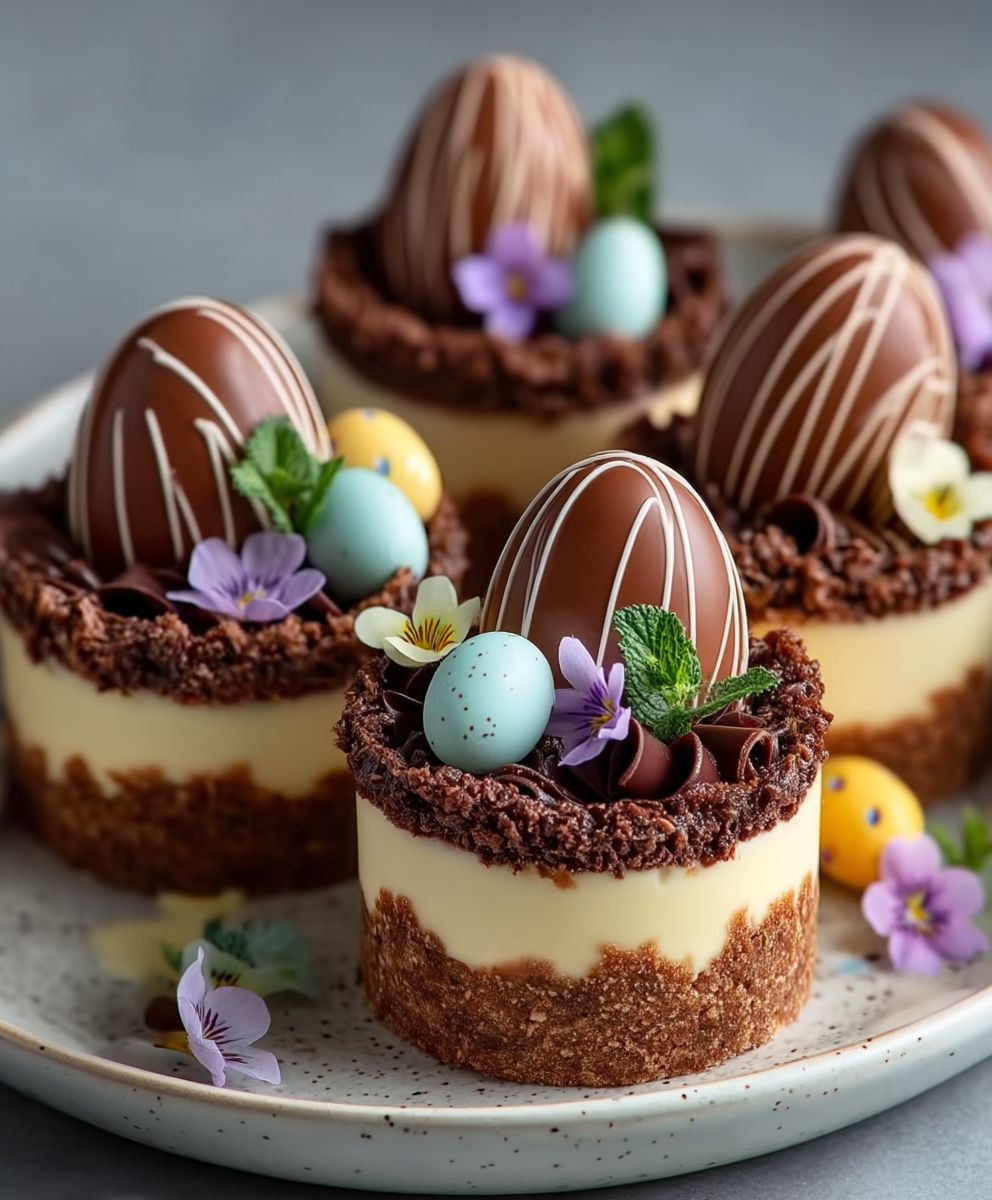
Easter Egg Cheesecake: Prepare to be amazed! Imagine sinking your fork into a creamy, decadent cheesecake, its smooth texture perfectly complementing the rich, chocolatey surprise hidden within. This isn’t just dessert; it’s an Easter celebration in every bite! This show-stopping treat is guaranteed to be the star of your Easter gathering, captivating both young and old with its whimsical charm and irresistible flavor.
While cheesecake itself boasts a long and storied history, dating back to ancient Greece, the addition of Easter eggs is a relatively modern, playful twist. It’s a delightful way to incorporate the quintessential symbol of Easter the egg into a beloved classic. Think of it as a delicious edible Easter egg hunt, where every slice reveals a colorful, chocolatey treasure!
People adore this Easter Egg Cheesecake for so many reasons. First, the taste is simply divine the creamy cheesecake filling, the satisfying crunch of the graham cracker crust, and the burst of chocolate from the Easter eggs create a symphony of flavors and textures. Second, it’s visually stunning! The vibrant colors of the Easter eggs peeking through the cheesecake make it a feast for the eyes. Finally, while it looks impressive, this Easter Egg Cheesecake is surprisingly easy to make, making it the perfect dessert to impress your guests without spending hours in the kitchen. So, are you ready to create a memorable and delicious Easter dessert? Let’s get baking!

Ingredients:
- For the Crust:
- 250g Digestive Biscuits (or Graham Crackers)
- 100g Unsalted Butter, melted
- 2 tbsp Granulated Sugar
- For the Cheesecake Filling:
- 600g Full-Fat Cream Cheese, softened
- 200g Caster Sugar
- 2 large Eggs
- 2 large Egg Yolks
- 1 tsp Vanilla Extract
- 150ml Double Cream (Heavy Cream)
- 100g White Chocolate, melted and cooled slightly
- For the Easter Egg Decoration:
- 200g Milk Chocolate, melted
- Assorted Mini Easter Eggs (e.g., Cadbury Mini Eggs, M&M’s Eggs)
- Optional: Sprinkles, Edible Glitter
Preparing the Crust:
- Crush the Biscuits: First, you’ll need to crush the digestive biscuits into fine crumbs. You can do this in a food processor, pulsing until they’re finely ground. Alternatively, place the biscuits in a large zip-lock bag and bash them with a rolling pin until you achieve the same result. Make sure there are no large chunks remaining!
- Combine with Butter and Sugar: In a medium-sized bowl, combine the crushed biscuit crumbs, melted butter, and granulated sugar. Mix well until all the crumbs are evenly coated with the butter. The mixture should resemble wet sand.
- Press into the Pan: Press the mixture firmly into the base of a 23cm (9-inch) springform pan. Use the bottom of a measuring cup or a flat-bottomed glass to ensure the crust is evenly compacted. This is important for a stable base for your cheesecake.
- Pre-bake the Crust: Bake the crust in a preheated oven at 180°C (350°F) for 8-10 minutes. This will help it set and prevent it from becoming soggy. Remove from the oven and let it cool completely while you prepare the filling.
Making the Cheesecake Filling:
- Cream the Cream Cheese: In a large bowl, beat the softened cream cheese with an electric mixer until it’s smooth and creamy. Make sure there are no lumps! This is crucial for a silky-smooth cheesecake. If you have lumps, it will affect the final texture.
- Add Sugar Gradually: Gradually add the caster sugar to the cream cheese, beating until well combined. Scrape down the sides of the bowl occasionally to ensure everything is evenly mixed.
- Incorporate the Eggs and Yolks: Add the eggs one at a time, beating well after each addition. Then, add the egg yolks and beat until just combined. Be careful not to overmix at this stage, as it can incorporate too much air into the batter, which can cause the cheesecake to crack during baking.
- Add Vanilla Extract: Stir in the vanilla extract. This will enhance the flavor of the cheesecake.
- Incorporate the Double Cream: Gently fold in the double cream until just combined. Again, avoid overmixing.
- Add the Melted White Chocolate: Gradually drizzle the slightly cooled melted white chocolate into the cheesecake batter, folding gently until evenly distributed. Make sure the white chocolate isn’t too hot, or it could cook the eggs in the batter.
Baking the Cheesecake:
- Pour Filling into Crust: Pour the cheesecake filling over the cooled biscuit crust, spreading it evenly.
- Bake in a Water Bath (Recommended): To prevent the cheesecake from cracking, it’s best to bake it in a water bath. Wrap the bottom of the springform pan tightly with heavy-duty aluminum foil (at least two layers) to prevent water from seeping in. Place the wrapped pan in a larger roasting pan.
- Add Hot Water: Carefully pour hot water into the roasting pan, reaching about halfway up the sides of the springform pan.
- Bake: Bake in a preheated oven at 160°C (320°F) for 60-75 minutes, or until the cheesecake is set around the edges but still has a slight wobble in the center. The wobble is important; it means the cheesecake will be perfectly creamy when cooled.
- Turn off Oven and Cool: Turn off the oven and leave the cheesecake in the oven with the door slightly ajar for about an hour. This allows the cheesecake to cool gradually, which helps prevent cracking.
- Refrigerate: Remove the cheesecake from the water bath and let it cool completely at room temperature. Then, cover it with plastic wrap and refrigerate for at least 6 hours, or preferably overnight. This allows the cheesecake to set completely and develop its flavor.
Decorating with Easter Eggs:
- Melt the Milk Chocolate: Melt the milk chocolate in a heatproof bowl set over a saucepan of simmering water (double boiler), or in the microwave in 30-second intervals, stirring in between, until smooth. Be careful not to overheat the chocolate, or it will seize.
- Prepare the Easter Eggs: Sort your mini Easter eggs and other decorations.
- Decorate the Cheesecake: Once the cheesecake is completely chilled and set, carefully remove it from the springform pan. Place it on a serving plate.
- Drizzle with Chocolate: Drizzle the melted milk chocolate over the top of the cheesecake. You can create a simple drizzle pattern or be more elaborate.
- Arrange the Easter Eggs: Arrange the mini Easter eggs on top of the chocolate drizzle. Get creative with your arrangement! You can create a border around the edge of the cheesecake or scatter them randomly across the top.
- Add Sprinkles (Optional): If desired, sprinkle with sprinkles or edible glitter for extra sparkle.
- Chill Again (Optional): If you have time, chill the decorated cheesecake for another 30 minutes to allow the chocolate to set completely. This will make it easier to slice and serve.
Tips for Success:
- Use Full-Fat Cream Cheese: This is essential for a rich and creamy cheesecake. Low-fat cream cheese will result in a less satisfying texture.
- Soften the Cream Cheese: Make sure the cream cheese is completely softened before you start mixing. This will prevent lumps in the batter.
- Don’t Overmix: Overmixing the batter can incorporate too much air, which can cause the cheesecake to crack. Mix until just combined.
- Water Bath is Key: Baking the cheesecake in a water bath helps to prevent cracking and ensures even baking.
- Cool Gradually: Allowing the cheesecake to cool gradually in the oven helps to prevent cracking.
- Chill Thoroughly: Chilling the cheesecake for at least 6 hours, or preferably overnight, allows it to set completely and develop its flavor.
Serving Suggestions:
- Serve the Easter Egg Cheesecake chilled.
- Slice with a sharp knife.
- Garnish with fresh berries or whipped cream, if desired.
- Enjoy!
Conclusion:
And there you have it! This Easter Egg Cheesecake isn’t just a dessert; it’s a showstopper, a conversation starter, and a guaranteed crowd-pleaser. I truly believe this recipe is a must-try for anyone looking to add a touch of whimsy and deliciousness to their Easter celebration, or really, any celebration at all! The creamy, dreamy cheesecake filling, combined with the vibrant, chocolatey crunch of the Easter eggs, creates a symphony of textures and flavors that will leave everyone wanting more.
But why is this particular cheesecake so special? It’s more than just a pretty face. The balance of sweet and tangy is perfectly calibrated, preventing it from being overly rich. The crust provides a sturdy and flavorful foundation, and the Easter eggs, well, they’re the star of the show! They add a playful element that makes this dessert undeniably festive and fun. Plus, it’s surprisingly easy to make! Don’t let the impressive appearance intimidate you; with a little patience and these simple instructions, you’ll be whipping up a masterpiece in no time.
Now, let’s talk serving suggestions and variations. While this Easter Egg Cheesecake is divine on its own, a few simple additions can elevate it even further. Consider serving it with a dollop of freshly whipped cream, a drizzle of chocolate sauce, or a scattering of fresh berries. For a truly decadent experience, try adding a layer of ganache on top before decorating with the Easter eggs.
If you’re feeling adventurous, you can also experiment with different flavor combinations. Try using a chocolate cheesecake base instead of vanilla, or add a hint of citrus zest to the filling for a brighter flavor. You could even incorporate different types of Easter eggs, such as those filled with caramel or peanut butter, for an extra layer of surprise.
Another fun variation is to make mini Easter Egg Cheesecakes in individual ramekins. This is a great option for parties or gatherings, as it allows everyone to have their own personal dessert. Simply adjust the baking time accordingly.
I’m so excited for you to try this recipe! I know you’ll love it as much as I do. It’s the perfect way to celebrate Easter, or any occasion that calls for a little bit of sweetness and joy.
So, what are you waiting for? Gather your ingredients, preheat your oven, and get ready to create a truly unforgettable dessert. And most importantly, have fun! Baking should be a joyful experience, so don’t be afraid to experiment and put your own personal touch on this recipe.
Once you’ve made your own Easter Egg Cheesecake, I would absolutely love to hear about your experience! Share your photos and stories with me on social media using [Your Hashtag Here]. I can’t wait to see your creations and hear what you think. Did you make any variations? What were your favorite parts? What did your friends and family think? Your feedback is invaluable, and it helps me to continue creating delicious and inspiring recipes for you. Happy baking!
Easter Egg Cheesecake: A Deliciously Festive Recipe
Creamy cheesecake with a digestive biscuit crust, topped with melted chocolate and festive mini Easter eggs. Perfect for Easter!
Ingredients
- 250g Digestive Biscuits (or Graham Crackers)
- 100g Unsalted Butter, melted
- 2 tbsp Granulated Sugar
- 600g Full-Fat Cream Cheese, softened
- 200g Caster Sugar
- 2 large Eggs
- 2 large Egg Yolks
- 1 tsp Vanilla Extract
- 150ml Double Cream (Heavy Cream)
- 100g White Chocolate, melted and cooled slightly
- 200g Milk Chocolate, melted
- Assorted Mini Easter Eggs (e.g., Cadbury Mini Eggs, M&M’s Eggs)
- Optional: Sprinkles, Edible Glitter
Instructions
- Crush the digestive biscuits into fine crumbs using a food processor or by placing them in a zip-lock bag and crushing with a rolling pin.
- In a medium bowl, combine the crushed biscuit crumbs, melted butter, and granulated sugar. Mix well until evenly coated.
- Press the mixture firmly into the base of a 23cm (9-inch) springform pan, using a measuring cup or glass to compact it evenly.
- Pre-bake the crust in a preheated oven at 350°F (180°C) for 8-10 minutes. Remove and let cool completely.
- In a large bowl, beat the softened cream cheese with an electric mixer until smooth and creamy.
- Gradually add the caster sugar, beating until well combined. Scrape down the sides of the bowl as needed.
- Add the eggs one at a time, beating well after each addition. Then, add the egg yolks and beat until just combined. Be careful not to overmix.
- Stir in the vanilla extract.
- Gently fold in the double cream until just combined. Avoid overmixing.
- Gradually drizzle the slightly cooled melted white chocolate into the batter, folding gently until evenly distributed.
- Pour the cheesecake filling over the cooled biscuit crust, spreading it evenly.
- Wrap the bottom of the springform pan tightly with heavy-duty aluminum foil (at least two layers). Place the wrapped pan in a larger roasting pan.
- Carefully pour hot water into the roasting pan, reaching about halfway up the sides of the springform pan (water bath).
- Bake in a preheated oven at 320°F (160°C) for 60-75 minutes, or until the cheesecake is set around the edges but still has a slight wobble in the center.
- Turn off the oven and leave the cheesecake in the oven with the door slightly ajar for about an hour to cool gradually.
- Remove the cheesecake from the water bath and let it cool completely at room temperature. Then, cover it with plastic wrap and refrigerate for at least 6 hours, or preferably overnight.
- Melt the milk chocolate in a heatproof bowl set over a saucepan of simmering water (double boiler), or in the microwave in 30-second intervals, stirring in between, until smooth.
- Sort your mini Easter eggs and other decorations.
- Once the cheesecake is completely chilled and set, carefully remove it from the springform pan. Place it on a serving plate.
- Drizzle the melted milk chocolate over the top of the cheesecake.
- Arrange the mini Easter eggs on top of the chocolate drizzle.
- If desired, sprinkle with sprinkles or edible glitter for extra sparkle.
- If you have time, chill the decorated cheesecake for another 30 minutes to allow the chocolate to set completely. This will make it easier to slice and serve.
Notes
- Use full-fat cream cheese for the best texture.
- Ensure the cream cheese is completely softened before mixing.
- Avoid overmixing the batter to prevent cracking.
- A water bath is highly recommended to prevent cracking and ensure even baking.
- Cool the cheesecake gradually in the oven to further prevent cracking.
- Chill the cheesecake thoroughly for at least 6 hours, or preferably overnight, to allow it to set completely.
- Serve chilled and garnish with fresh berries or whipped cream, if desired.
Leave a Comment