
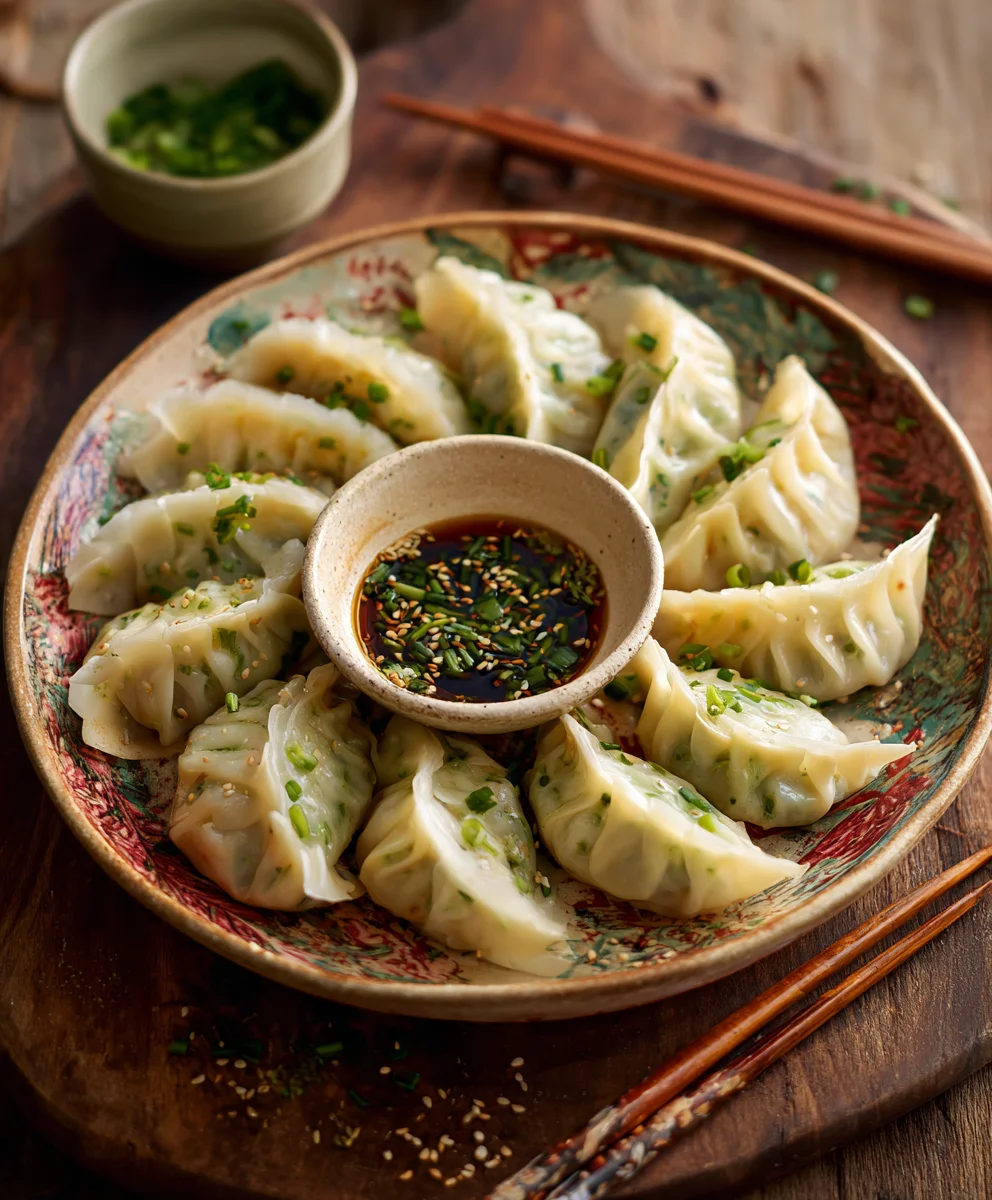
Shrimp And Chive Dumplings are more than just a dish; they are a culinary embrace, a little parcel of joy that transports you straight to the heart of authentic Asian flavors. Imagine biting into a delicate, silky wrapper, revealing a perfectly seasoned filling of succulent shrimp, vibrant chives, and a whisper of ginger – it’s an experience that awakens the senses and leaves you craving another. For centuries, dumplings have held a revered place in many cultures, particularly in Chinese cuisine, symbolizing prosperity and family togetherness, especially during festive occasions like the Lunar New Year. There’s a profound satisfaction, both in crafting these edible masterpieces and in sharing them with loved ones.
People absolutely adore this dish not only for its incredible balance of savory and aromatic flavors but also for the delightful textural contrast: the tender chew of the wrapper against the juicy, flavorful filling. Plus, making homemade Shrimp And Chive Dumplings can be a wonderfully rewarding project, offering a delicious reward that far surpasses any store-bought alternative. I am thrilled to guide you through creating these exquisite bites right in your own kitchen.

Ingredients:
-
For the Irresistible Shrimp And Chive Dumpling Filling:
- 1 pound (approximately 450g) fresh shrimp, peeled, deveined, and tails removed. I always go for the freshest I can find!
- 1/2 cup (approximately 50g) Chinese garlic chives, sometimes called “gao choi” or “jiu cai.” Make sure they are washed and thoroughly dried.
- 1 tablespoon fresh ginger, finely minced.
- 2 cloves garlic, finely minced.
- 1/4 cup (approximately 25g) green onions (scallions), finely chopped, white and light green parts only.
- 1 tablespoon light soy sauce.
- 1 teaspoon sesame oil. I love the aroma this adds!
- 1/2 teaspoon white pepper.
- 1/2 teaspoon granulated sugar. Just a touch to balance the flavors.
- 1 tablespoon cornstarch. This is our secret weapon for a wonderfully cohesive filling.
- 1/2 teaspoon salt, or to taste.
- (Optional) 1 tablespoon finely minced pork fat or rendered bacon fat. This isn’t strictly necessary for a shrimp and chive dumpling, but trust me, it adds an incredible juiciness and depth of flavor if you’re feeling a little extra indulgent!
-
For the Dumpling Wrappers:
- 1 package (approximately 50-60 count) round dumpling wrappers. I usually opt for thin, round wrappers designed for gyoza or potstickers. Fresh is always best if you can find them!
- A small bowl of water, for sealing the dumplings.
-
For the Dipping Sauce (my go-to combination!):
- 2 tablespoons light soy sauce.
- 1 tablespoon rice vinegar.
- 1 teaspoon sesame oil.
- 1/2 teaspoon chili oil, or to taste (I like a little kick!).
- 1/2 teaspoon finely minced fresh ginger.
- A pinch of sugar, if you prefer a slightly sweeter sauce.
Preparing the Flavorful Shrimp And Chive Dumpling Filling:
- Prepare Your Shrimp: First things first, let’s get those beautiful shrimp ready. Give them a good rinse under cold water, then pat them absolutely dry with paper towels. This step is crucial! Excess moisture can make your filling watery, which we definitely don’t want. Now, here’s where we create some lovely texture: I like to take about two-thirds of the shrimp and give them a rough chop into small, bite-sized pieces. For the remaining one-third, I’ll go a bit finer, mincing them into a paste-like consistency. This combination gives you both tender chunks and a sticky, well-bound filling. If you’re using my optional pork fat, mince it very finely now too. Place all the prepared shrimp (and pork fat, if using) into a large mixing bowl.
- Chop Your Chives: Now for the vibrant green chives! Ensure they are perfectly dry after washing; I sometimes even lay them out on a clean towel for a few minutes. Finely chop the chives – aim for pieces no longer than about a quarter of an inch. Add these chopped chives to the bowl with your shrimp. The distinct, mild oniony flavor of chives is what truly makes these “Shrimp And Chive Dumplings” sing!
- Mince the Aromatics: Peel and finely mince your fresh ginger. Do the same for the garlic cloves. Chop the white and light green parts of your green onions very finely. These aromatics are going to infuse our filling with incredible depth. Add the minced ginger, garlic, and chopped green onions to the shrimp and chives.
- Season and Mix: It’s time to bring all those beautiful flavors together! Add the light soy sauce, sesame oil, white pepper, granulated sugar, and salt to the bowl. Now, for the magic ingredient: the cornstarch. Sprinkle the cornstarch over everything. The cornstarch acts as a binder, helping the filling stay together and giving it a lovely, slightly bouncy texture once cooked.
- The Art of Mixing: This step is more important than you might think! Using clean hands (or a sturdy spoon), mix all the ingredients thoroughly. I recommend mixing in one direction consistently for about 2 to 3 minutes. You’ll notice the mixture becoming stickier and more cohesive as the proteins in the shrimp and the cornstarch activate. This creates a wonderfully emulsified filling that won’t fall apart inside your dumpling. Don’t rush this part; it’s key to perfect Shrimp And Chive Dumplings!
- Chill for Flavor Development: Once everything is beautifully mixed, cover the bowl with plastic wrap and refrigerate the filling for at least 30 minutes. This allows the flavors to meld and deepen, and the filling will become firmer and much easier to handle when you start assembling your dumplings. You can even prepare the filling several hours in advance or the night before; just be sure to give it a good stir before you start wrapping.
Crafting the Perfect Dipping Sauce:
- Combine the Sauce Ingredients: In a small bowl, whisk together the light soy sauce, rice vinegar, sesame oil, chili oil (if you like a little heat!), and the finely minced fresh ginger. If you enjoy a touch of sweetness in your sauce, add that pinch of sugar now.
- Taste and Adjust: Give it a good stir and then taste. This is where you can truly make it your own! Do you prefer it tangier? Add a little more rice vinegar. Spicier? A bit more chili oil. I often find myself tweaking it slightly each time, depending on my mood. Set this aside; it’s the perfect companion for your freshly cooked Shrimp And Chive Dumplings.
Assembling Your Shrimp And Chive Dumplings:
- Set Up Your Dumpling Station: Find a clean, spacious work surface. You’ll need your chilled filling, your stack of dumpling wrappers, the small bowl of water for sealing, and a parchment-lined baking sheet or tray to place your finished dumplings on. It’s important to have everything within easy reach before you begin.
- Care for Your Wrappers: Dumpling wrappers can dry out quickly, making them brittle and difficult to seal. Keep the stack of unused wrappers covered with a slightly damp (but not wet!) kitchen towel or a piece of plastic wrap. This will ensure they remain pliable.
- Filling Each Wrapper: Take one wrapper and lay it flat in the palm of your non-dominant hand. Scoop about one tablespoon (or a slightly generous teaspoon, depending on the size of your wrappers and how plump you like your dumplings) of the shrimp and chive filling into the center of the wrapper. Be careful not to overfill, as this makes sealing difficult and can cause them to burst during cooking.
- The Simple Half-Moon Fold: This is the easiest way to start! Dip your fingertip into the small bowl of water and moisten half of the edge of the wrapper (or the entire circumference for extra security). Fold the wrapper in half over the filling, creating a half-moon shape. Press firmly along the edges to seal completely, ensuring there are no air pockets. You can press the edges with a fork for a decorative crimp and an even better seal.
- The Classic Pleated Fold (My Favorite!): For a more traditional and visually appealing dumpling, try this. Moisten the top half of the wrapper’s edge. Fold the wrapper in half, but don’t seal it completely yet. Holding the folded edge with your non-dominant hand, use the thumb and forefinger of your dominant hand to create small pleats along one side of the wrapper’s edge, pressing each pleat firmly against the unpleated back edge. Work your way from one end to the other, making about 3-5 pleats. Then, repeat this process on the other side. This creates a beautiful, sealed crescent that not only looks professional but also helps contain the juicy filling. A tight seal is paramount to preventing your delicious filling from escaping!
- Arranging Your Dumplings: As you finish each Shrimp And Chive Dumpling, place it on your parchment-lined baking sheet. Make sure they don’t touch each other. This prevents them from sticking together, which can be a real headache when you go to cook them. If you’re making a large batch, you can freeze them at this stage: place the tray in the freezer until the dumplings are solid, then transfer them to a freezer-safe bag or container. They can be cooked directly from frozen, just add a few extra minutes to the cooking time!
Cooking Your Homemade Shrimp And Chive Dumplings to Perfection:
Once you’ve lovingly assembled your Shrimp And Chive Dumplings, it’s time to cook them! You have a few fantastic options, each yielding a slightly different texture. I often do a mix, but for a classic experience, steaming is wonderful.
Method A: Steaming (The Classic, Healthy Approach)
- Prepare Your Steamer: Fill the bottom of a large pot or wok with about 1-2 inches of water. Place your steaming basket (bamboo or metal) over the water, ensuring the water doesn’t touch the bottom of the basket. Bring the water to a rolling boil over high heat.
- Line the Steamer Basket: To prevent sticking, you can line the bottom of your steamer basket with a piece of parchment paper (punched with a few holes to allow steam to pass through) or, for an authentic touch and subtle aroma, a few large Napa cabbage leaves.
- Arrange the Dumplings: Carefully place your Shrimp And Chive Dumplings in the prepared steamer basket, making sure to leave a little space between each one. Do not overcrowd the basket, as this can prevent even cooking. You’ll likely need to steam them in batches.
- Steam to Perfection: Cover the steamer with a lid. Reduce the heat slightly to medium-high and steam the dumplings for about 8-10 minutes. The exact timing can vary slightly based on the size of your dumplings and the thickness of the wrappers. You’ll know they’re done when the wrappers become translucent and plump, and the shrimp filling is opaque and cooked through.
- Serve Immediately: Carefully remove the steamed dumplings from the basket using tongs or a spatula. Be gentle, as they can be delicate when hot. Serve them piping hot with your delicious dipping sauce.
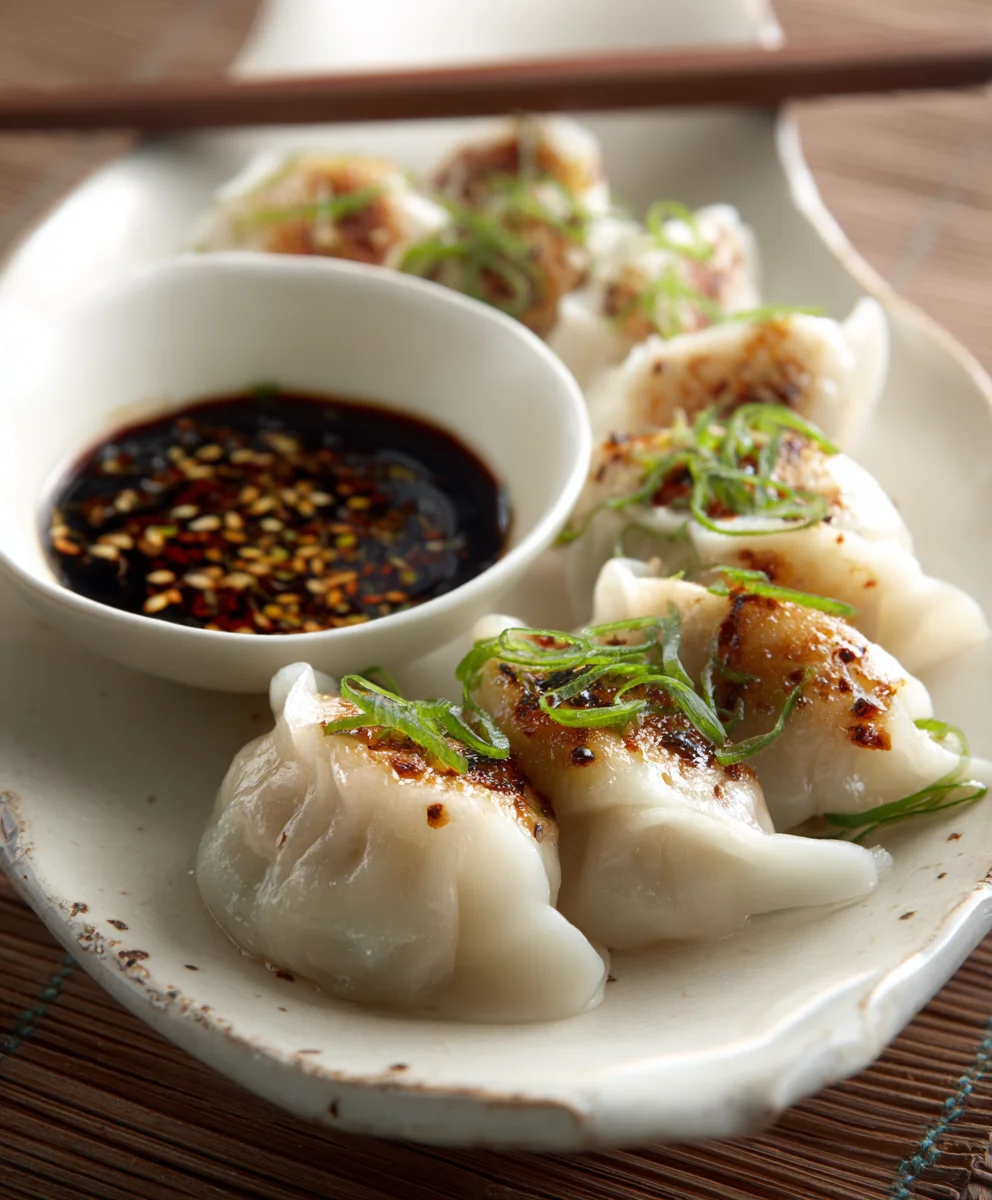
Method B: Pan-Frying (For Crispy Potstickers!)
This method gives you that wonderfully crispy, golden-brown bottom while keeping the tops tender and soft. It’s a delightful contrast!
- Heat Your Pan: Heat a large non-stick skillet or cast-iron pan over medium-high heat. Add 1-2 tablespoons of neutral cooking oil (like vegetable or canola oil). Swirl the oil to coat the bottom of the pan evenly.
- Sear the Bottoms: Once the oil is shimmering, carefully place your Shrimp And Chive Dumplings into the hot pan in a single layer, flat side down. Make sure they don’t touch each other. Cook for 2-3 minutes, or until the bottoms are a beautiful golden brown and crispy. Keep a close eye on them to prevent burning!
- Add Water and Cover: Once you’ve achieved that perfect crisp on the bottom, carefully pour in about 1/2 cup of water (or chicken broth for extra flavor). Be careful, as the oil and water will sizzle and spit. Immediately cover the pan with a tight-fitting lid.
- Steam to Cook Through: Reduce the heat to medium-low and let the dumplings steam for 6-8 minutes, or until all the water has evaporated and the dumplings are cooked through. The steam will cook the top and sides of the dumplings, ensuring the filling is thoroughly heated and the wrappers are tender.
- Re-Crisp (Optional): Once the water has evaporated, remove the lid. If the bottoms aren’t as crispy as you’d like, continue to cook for another 1-2 minutes, uncovered, until they reach your desired crispiness.
- Serve Hot: Transfer the pan-fried Shrimp And Chive Dumplings to a serving platter, crispy side up! Serve immediately with your dipping sauce.
Method C: Boiling (A Quick and Easy Option)
Boiling is a straightforward method, especially if you’re cooking a larger batch or prefer a very tender wrapper.
- Bring Water to a Rolling Boil: Fill a large pot with plenty of water (at least 2-3 quarts) and bring it to a vigorous rolling boil over high heat. Add a pinch of salt to the water; this helps flavor the wrappers.
- Add the Dumplings: Gently drop your Shrimp And Chive Dumplings into the boiling water, one by one. Don’t overcrowd the pot; cook them in batches if necessary. They will likely sink to the bottom at first.
- The “Cold Water” Method: Once the dumplings float to the surface, add about 1/2 cup of cold water to the pot. This temporarily stops the boil, preventing the wrappers from becoming mushy while allowing the filling to cook thoroughly. Bring the water back to a boil. Repeat this process (adding cold water once they float and bringing it back to a boil) 2 to 3 times. This technique ensures that your wrappers are tender yet firm, and your filling is perfectly cooked.
- Check for Doneness: The dumplings are done when they are plump, translucent, and have consistently floated at the surface for a sustained period after the last cold water addition. The shrimp filling should be opaque.
- Drain and Serve: Use a slotted spoon or a fine-mesh skimmer to carefully remove the cooked dumplings from the water. Let any excess water drain off. Serve your boiled Shrimp And Chive Dumplings immediately with your prepared dipping sauce.
Serving Your Delicious Shrimp And Chive Dumplings:
No matter which cooking method you choose, your homemade Shrimp And Chive Dumplings are best enjoyed fresh off the heat. Arrange them beautifully on a platter. I sometimes like to garnish with a sprinkle of extra chopped fresh chives or a dash of toasted sesame seeds for an extra pop of color and texture. Have your dipping sauce ready and waiting. These dumplings are a testament to the simple joy of fresh ingredients coming together in perfect harmony. Dive in and savor every bite of these delightful Shrimp And Chive Dumplings!
Conclusion:
So, there you have it! We’ve journeyed through the steps of creating truly remarkable dumplings. I genuinely believe that this recipe for Shrimp And Chive Dumplings isn’t just another dish; it’s an experience waiting to unfold in your kitchen. What makes these particular dumplings an absolute must-try? It’s the impeccable balance of flavors, for one. The fresh, succulent shrimp provides a sweet, tender bite that contrasts beautifully with the aromatic, slightly pungent chives. Each bite is a little parcel of joy, perfectly seasoned, and incredibly satisfying. The delicate wrapper, whether you choose to steam them to a translucent perfection or pan-fry them for that irresistible crispy bottom, encases a filling that sings with freshness and vibrant taste. This isn’t just a meal; it’s a testament to how simple, quality ingredients, when brought together with a little care, can create something truly extraordinary. You’ll find yourself reaching for these again and again, whether for a cozy weeknight dinner or as an impressive appetizer for guests. The satisfaction of making them from scratch, seeing those beautiful pleats come to life, is truly unmatched, and the taste, well, the taste speaks for itself – it’s pure deliciousness that will transport your taste buds straight to culinary heaven. The light, yet flavorful filling ensures they are never heavy, allowing you to enjoy every single delightful morsel without feeling overwhelmed.
Unleash Your Inner Chef with Serving Suggestions!
Now that you’ve mastered the art of making these exquisite dumplings, let’s talk about how to present and enjoy them. While they are undoubtedly stellar on their own, a thoughtfully chosen dipping sauce can elevate the experience even further. My personal go-to is a classic soy-ginger concoction – a simple mix of light soy sauce, a splash of rice vinegar, a touch of sesame oil, and freshly grated ginger. For those who enjoy a little heat, a drizzle of chili oil or a more robust chili garlic sauce can add a fantastic kick. Don’t be afraid to experiment with black vinegar, known for its deep, complex, and slightly sweet flavor, or even a creamy sriracha mayo for a fusion twist. Beyond dipping, consider these dumplings as versatile players in your culinary repertoire. They make a fantastic starter for any Asian-themed meal, but they can also be the star of the show. Imagine them floating in a delicate clear broth with some fresh greens and thin egg noodles for a comforting noodle soup, or alongside a vibrant stir-fry as a delightful textural contrast. For a lighter meal, a simple side salad with a sesame dressing complements their richness beautifully. The possibilities are truly endless, limited only by your imagination; you could even serve them with a dollop of a vibrant mango salsa for a tropical twist, or alongside some crispy spring rolls for a varied appetizer platter. The key is to think about contrasting textures and balancing flavors to make each bite an adventure.
Get Creative: Explore Delightful Variations!
One of the most exciting aspects of cooking is making a recipe your own, and this dumpling base is incredibly adaptable. While the classic Shrimp And Chive Dumplings are divine, don’t hesitate to play around with the ingredients to suit your palate or what you have on hand. Craving more texture? Finely chopped water chestnuts or bamboo shoots can add a wonderful crunch to the filling. For an extra layer of umami, rehydrated shiitake mushrooms, minced finely, work wonders. If you’re feeling adventurous with proteins, a small amount of finely ground pork can be mixed with the shrimp for a richer, more substantial bite, creating a classic combination that many adore. Vegetarian options are also a breeze; simply swap the shrimp for a mix of finely crumbled firm tofu, chopped cabbage, carrots, and perhaps some glass noodles for a satisfying plant-based version. Experiment with different herbs too – a touch of cilantro or a hint of dill can introduce entirely new flavor profiles, giving your dumplings a fresh, unique twist. And remember, the cooking method can also be varied. While steaming gives a wonderfully tender result and pan-frying offers that sought-after crispy bottom, you could even try boiling them like potstickers in a simmering broth, or frying them entirely for a super crispy treat that resembles a fritter. Each variation offers a unique journey for your taste buds, making this recipe a truly versatile cornerstone for your cooking adventures that you can adapt season after season, or for any occasion.
So, what are you waiting for? Take this recipe as your invitation to dive into the rewarding world of homemade dumplings. I promise you, the effort is well worth it, and the pride you’ll feel when you bite into your perfectly crafted dumpling is immense. Don’t be intimidated by the pleating; practice makes perfect, and even imperfectly folded dumplings taste absolutely incredible! I genuinely encourage you to set aside some time, gather your ingredients, and give these magnificent dumplings a try. Once you’ve experienced the sheer deliciousness and the joy of creating them, I would absolutely love to hear about it! Please, share your culinary triumphs – tell me about your favorite dipping sauce combinations, any variations you experimented with, or perhaps a funny anecdote from your dumpling-making session. Snap a photo of your beautiful creations and let me know how it went. Your feedback and experiences not only bring a smile to my face but also inspire others in our cooking community to embark on their own culinary journeys. Let’s celebrate the joy of good food and shared experiences together. Happy dumpling making!
Homemade Shrimp & Chive Dumplings
Delicious homemade shrimp and chive dumplings, a traditional Asian dish symbolizing prosperity and togetherness. Features a succulent shrimp, chive, and ginger filling in delicate wrappers, served with a savory dipping sauce.
Ingredients
-
1 lb (450g) fresh shrimp, peeled, deveined, tails removed
-
1/2 cup (50g) Chinese garlic chives, chopped
-
1 tbsp fresh ginger, finely minced
-
2 cloves garlic, finely minced
-
1/4 cup (25g) green onions, finely chopped
-
1 tbsp light soy sauce (for filling)
-
1 tsp sesame oil (for filling)
-
1/2 tsp white pepper
-
1/2 tsp granulated sugar (for filling)
-
1 tbsp cornstarch
-
1/2 tsp salt (for filling), or to taste
-
(Optional) 1 tbsp finely minced beef fat
-
1 package (50-60 count) round dumpling wrappers
-
Water, for sealing dumplings
-
2 tbsp light soy sauce (for dipping sauce)
-
1 tbsp rice vinegar
-
1 tsp sesame oil (for dipping sauce)
-
1/2 tsp chili oil, or to taste
-
1/2 tsp finely minced fresh ginger (for dipping sauce)
-
A pinch of sugar (for dipping sauce, optional)
Instructions
-
Step 1
Rinse and pat 1 lb shrimp dry. Roughly chop 2/3 of shrimp; mince 1/3 into a paste. Combine in a bowl with optional 1 tbsp minced beef fat. Add 1/2 cup chopped Chinese garlic chives, 1 tbsp minced ginger, 2 minced garlic cloves, and 1/4 cup chopped green onions. Season with 1 tbsp light soy sauce, 1 tsp sesame oil, 1/2 tsp white pepper, 1/2 tsp granulated sugar, 1 tbsp cornstarch, and 1/2 tsp salt. Mix thoroughly for 2-3 minutes until cohesive and sticky. Cover and refrigerate for at least 30 minutes to allow flavors to meld. -
Step 2
In a small bowl, whisk together 2 tbsp light soy sauce, 1 tbsp rice vinegar, 1 tsp sesame oil, 1/2 tsp chili oil, 1/2 tsp minced fresh ginger, and an optional pinch of sugar. Taste and adjust to your preference. Set aside. -
Step 3
Set up a clean work surface with chilled filling, dumpling wrappers, a small bowl of water for sealing, and a parchment-lined tray. Keep unused wrappers covered with a damp towel to prevent drying. Place about 1 tablespoon of filling in the center of a wrapper. Moisten half or the entire edge of the wrapper with water. Fold the wrapper in half to form a half-moon, pressing edges firmly to seal. For a pleated design, create small pleats along the sealed edge. Place assembled dumplings on the lined tray, ensuring they do not touch. Freeze for later use if desired. -
Step 4
{‘@type’: ‘HowToStep’, ‘name’: ‘Cook Dumplings (Choose a Method)’, ‘itemListElement’: [{‘@type’: ‘HowToStep’, ‘name’: ‘Method A: Steaming’, ‘text’: ‘Fill the bottom of a pot with 1-2 inches of water and bring to a rolling boil. Line a steamer basket with parchment paper or Napa cabbage leaves. Arrange dumplings in the basket, leaving space between them. Cover and steam for 8-10 minutes, or until wrappers are translucent and the filling is opaque. Serve immediately.’}, {‘@type’: ‘HowToStep’, ‘name’: ‘Method B: Pan-Frying (Potstickers)’, ‘text’: ‘Heat 1-2 tablespoons neutral oil in a large non-stick skillet over medium-high heat. Place dumplings flat-side down in a single layer and sear for 2-3 minutes until bottoms are golden brown and crispy. Carefully pour in about 1/2 cup water (or broth). Immediately cover the pan with a tight-fitting lid. Reduce heat to medium-low and steam for 6-8 minutes, or until water has evaporated and dumplings are cooked through. Optionally, cook uncovered for another 1-2 minutes for extra crispiness. Serve immediately.’}, {‘@type’: ‘HowToStep’, ‘name’: ‘Method C: Boiling’, ‘text’: ‘Bring a large pot of salted water (2-3 quarts) to a vigorous rolling boil. Gently drop dumplings into the boiling water, avoiding overcrowding. Once they float to the surface, add about 1/2 cup cold water to the pot to stop the boil. Bring the water back to a boil. Repeat this process (adding cold water and re-boiling) 2 to 3 times. The dumplings are done when plump, translucent, and consistently floating. Use a slotted spoon to remove and drain. Serve immediately.’}]} -
Step 5
Arrange your hot, freshly cooked dumplings on a platter. Garnish with a sprinkle of extra chopped chives or toasted sesame seeds, if desired. Serve immediately with the prepared dipping sauce.
Important Information
Nutrition Facts (Per Serving)
It is important to consider this information as approximate and not to use it as definitive health advice.
Allergy Information
Please check ingredients for potential allergens and consult a health professional if in doubt.

Leave a Comment