
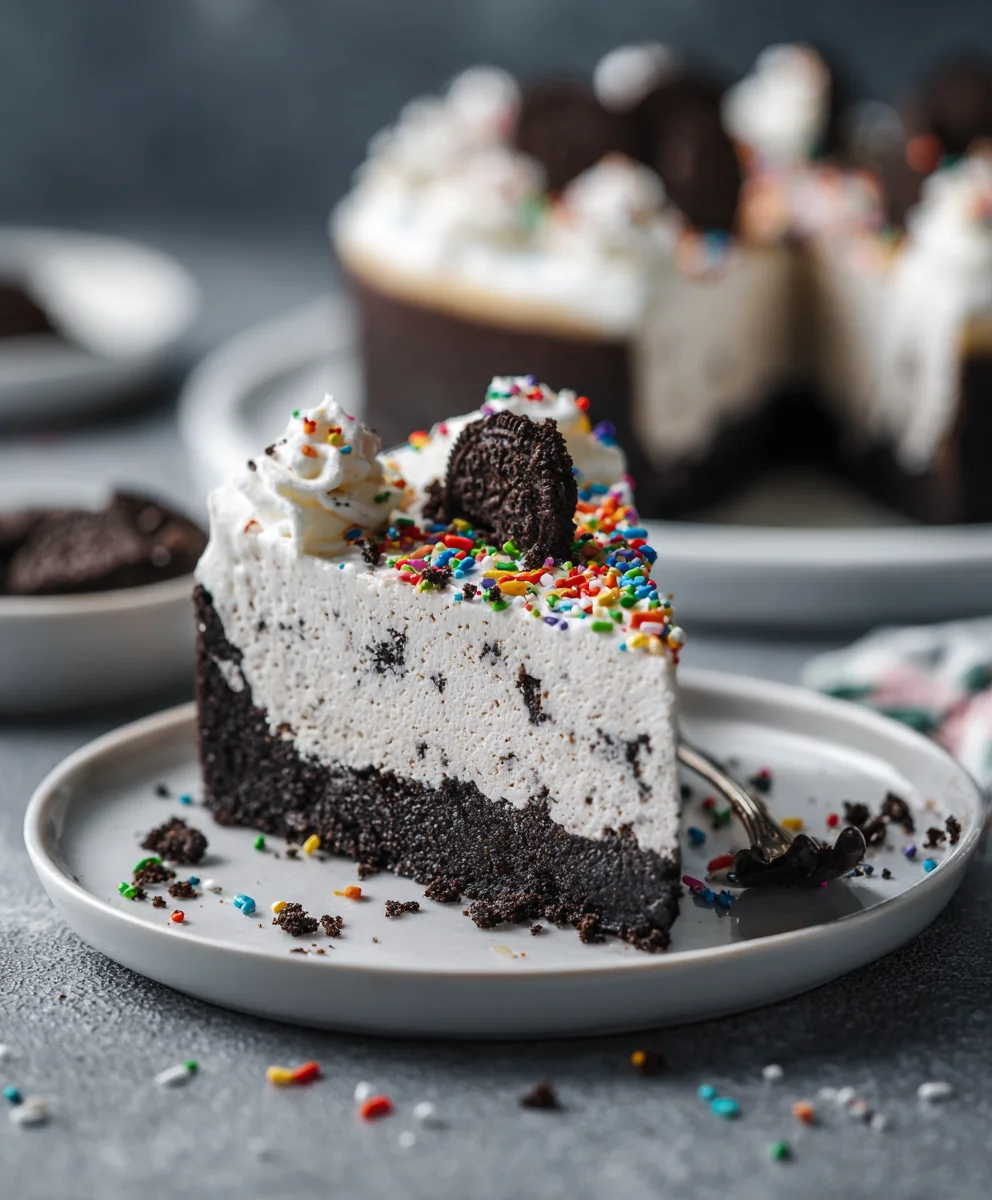
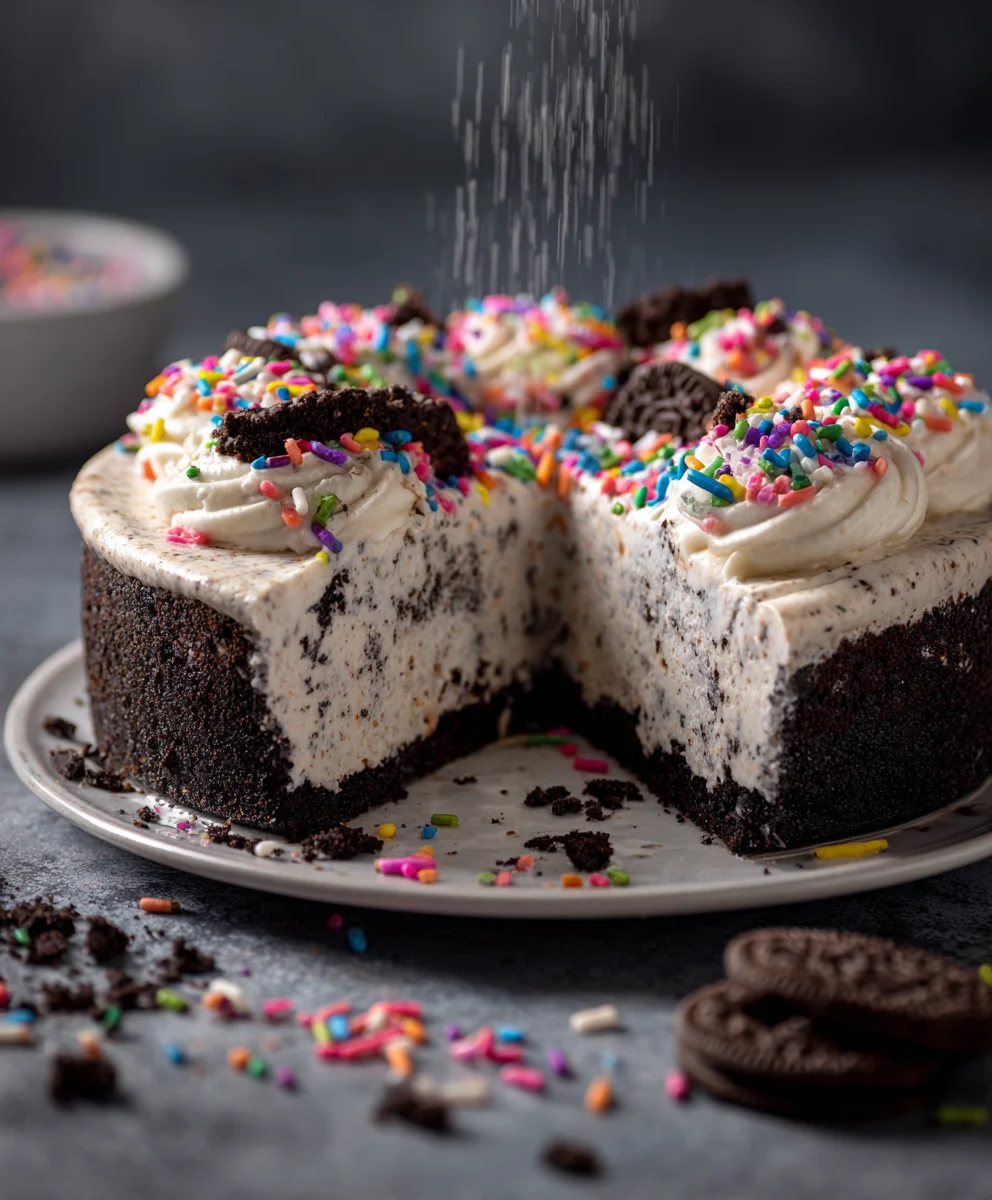
No Bake Oreo Cheesecake Sprinkles – doesn’t that just sound like pure dessert magic? I’m absolutely thrilled to share a recipe that promises an explosion of classic flavor and festive cheer, all without ever needing to turn on your oven. Imagine a velvety smooth cheesecake filling, studded with crunchy Oreo cookie pieces, resting on a decadent Oreo crust, and crowned with a vibrant scattering of colorful sprinkles. This isn’t just a dessert; it’s a celebration in every bite, designed to bring joy and effortless elegance to any occasion.
A Timeless Treat, Reimagined for Modern Indulgence
The humble Oreo cookie, first introduced in 1912, has become an iconic treat, beloved across generations, and its versatility in desserts is legendary. Combining this chocolatey wonder with the creamy indulgence of cheesecake, a dessert with origins tracing back to ancient Greece, creates a modern classic that truly stands the test of time. People adore this dish for so many reasons. Its incredibly rich yet balanced flavor profile, combining the tang of cream cheese with the sweet bitterness of chocolate, is simply irresistible. The contrasting textures – the buttery, crumbly crust, the luxuriously smooth filling, and the delightful chew of cookie bits – make each spoonful an adventure.
But perhaps its greatest appeal lies in its incredible convenience. Perfect for busy hosts, summer gatherings, or simply when you’re craving something spectacular without the fuss, this delightful No Bake Oreo Cheesecake Sprinkles recipe truly embodies ease and elegance. I promise, once you experience how simple and satisfying it is to create such a show-stopping dessert, it will quickly become a cherished favorite in your repertoire.

Ingredients:
-
For the Oreo Crust:
- 2 ½ cups (approximately 30-36 whole cookies) Oreo cookie crumbs (about 1 ½ packages of regular Oreos), finely crushed. You can use a food processor for best results, ensuring there are no large chunks.
- ½ cup (1 stick) unsalted butter, melted.
-
For the Cheesecake Filling:
- 24 ounces (three 8-ounce blocks) full-fat cream cheese, softened to room temperature. This is absolutely crucial for a smooth, lump-free filling!
- 1 ½ cups powdered sugar (confectioners’ sugar), sifted. Sifting helps prevent lumps and ensures a silky texture.
- 1 teaspoon pure vanilla extract.
- ¼ teaspoon fine sea salt.
- 1 ¾ cups heavy cream (also known as heavy whipping cream), very cold.
- 1 ½ cups (approximately 18-20 cookies) additional Oreo cookie crumbs, coarsely crushed (larger pieces than the crust crumbs, for texture within the filling).
-
For the Topping and Decoration:
- 1 cup heavy cream, very cold (for whipped cream topping).
- 2-3 tablespoons powdered sugar, or to taste (for whipped cream topping).
- ½ teaspoon pure vanilla extract (for whipped cream topping).
- ½ cup various colorful sprinkles. This is where the “Sprinkles” in our No Bake Oreo Cheesecake Sprinkles really shine!
- 6-8 whole Oreo cookies, roughly chopped or halved, for garnish.
Preparing the Perfect Oreo Crust
Alright, let’s kick things off with the foundation of our incredible No Bake Oreo Cheesecake Sprinkles – the crust! This first step is simple but oh-so-important for setting the stage for a truly delightful dessert.
- First things first, we need to get our Oreo cookies into crumb form. If you’re using a food processor, which I highly recommend for efficiency and consistency, simply toss your Oreo cookies (about 30-36 of them, including the cream filling!) into the bowl. Pulse until they’re finely ground into beautiful, dark crumbs. We want these crumbs to be as fine as possible, almost like sand, to ensure a compact and sturdy crust. If you don’t have a food processor, don’t fret! You can place the cookies in a large zip-top bag, seal it, and then go to town with a rolling pin or the bottom of a heavy pot. Just make sure to really pulverize them.
- Once your Oreo crumbs are perfectly pulverized, transfer them to a medium-sized mixing bowl. Now, it’s time for the binding agent: our melted unsalted butter. Gradually pour the ½ cup of melted butter over the Oreo crumbs.
- Using a sturdy spoon or a rubber spatula, mix the crumbs and butter together until they are thoroughly combined. You’re looking for a consistency that resembles wet sand. Every single crumb should be coated in butter. If you press a small amount between your fingers, it should hold its shape. This ensures our crust will be firm and won’t crumble apart when sliced.
- Next, prepare your pan. I usually use a 9-inch springform pan for this recipe. If you want extra assurance for easy removal, you can lightly grease the bottom of the pan or line it with a parchment paper circle. However, with a good springform pan, simply pressing the crust firmly should suffice.
- Carefully transfer the buttered Oreo crumbs into the bottom of your prepared springform pan. Now, this is where you get to be a bit firm! Using the bottom of a flat-bottomed glass or a measuring cup, press the crumbs down very firmly and evenly across the bottom of the pan. The goal is to create a compact, even layer that will serve as the stable base for our luscious cheesecake filling. Make sure the edges are just as pressed as the center.
- Once your crust is perfectly pressed, pop the springform pan into the refrigerator. We’ll let it chill for at least 30 minutes while we prepare the filling. This chilling time is vital as it allows the butter to solidify, setting the crust and preventing it from becoming crumbly when you eventually slice into our magnificent No Bake Oreo Cheesecake Sprinkles.
Crafting the Velvety Cheesecake Filling
Now for the heart of our dessert – the rich, creamy, and utterly irresistible cheesecake filling. This is where the magic truly happens, transforming simple ingredients into a dreamy treat. Remember, room temperature cream cheese is non-negotiable for a lump-free filling!
- In a large mixing bowl, using an electric mixer (either a stand mixer with the paddle attachment or a handheld mixer), beat the 24 ounces of softened cream cheese on medium speed until it is completely smooth and creamy. This usually takes about 2-3 minutes. Scrape down the sides of the bowl frequently to ensure everything gets incorporated. We want absolutely no lumps here!
- Once the cream cheese is silky smooth, gradually add the 1 ½ cups of sifted powdered sugar. Start on low speed to avoid a cloud of sugar dusting your kitchen, then increase to medium speed. Beat until the sugar is fully incorporated and the mixture is light and fluffy, another 2-3 minutes. Again, scrape down the sides of the bowl.
- Stir in the 1 teaspoon of pure vanilla extract and ¼ teaspoon of fine sea salt. Beat for about 30 seconds until just combined. The salt helps to balance the sweetness and really brings out the rich flavor of the cream cheese.
- Now, in a separate, very clean, and very cold mixing bowl (I often chill my bowl and whisk attachment in the freezer for 10-15 minutes beforehand), pour in the 1 ¾ cups of very cold heavy cream. Using your electric mixer (with the whisk attachment this time), beat the heavy cream on high speed until stiff peaks form. This means that when you lift the whisk, the cream stands up straight without drooping. Be careful not to overbeat, or you’ll end up with butter! This usually takes 3-5 minutes, but keep a close eye on it.
- Once your whipped cream is ready, it’s time to gently fold it into the cream cheese mixture. This step requires a delicate hand to maintain the airiness of the whipped cream, which is what gives our no-bake cheesecake its light, yet rich, texture. Add about a third of the whipped cream to the cream cheese mixture and gently fold it in with a rubber spatula until mostly combined. Then, add the remaining whipped cream and continue to fold until the mixture is uniform and smooth. Avoid aggressive mixing, as this can deflate the whipped cream.
- Finally, let’s add those delicious Oreo pieces into our filling! Take your 1 ½ cups of coarsely crushed Oreo crumbs and gently fold them into the cheesecake mixture. You want these chunks to be noticeable, providing a wonderful textural contrast in every bite of our No Bake Oreo Cheesecake Sprinkles. Distribute them evenly throughout the filling.
Assembling and Chilling Our No Bake Oreo Cheesecake Sprinkles
We’re on the home stretch! The next step is bringing all these wonderful components together and giving our cheesecake the time it needs to set up beautifully. Patience is a virtue, especially when it comes to no-bake desserts!
- Retrieve your chilled Oreo crust from the refrigerator.
- Carefully spoon the entire cheesecake filling mixture over the prepared crust in the springform pan.
- Using an offset spatula or the back of a spoon, gently spread the filling evenly across the crust, smoothing out the top as much as possible. Make sure it’s level from edge to edge. A smooth top makes for a beautiful presentation once decorated.
- Now comes the hardest part: the waiting game! Cover the springform pan loosely with plastic wrap, being careful not to touch the surface of the cheesecake. Transfer it to the refrigerator and let it chill for a minimum of 6-8 hours. For the best possible results and a truly firm, sliceable cheesecake, I highly recommend chilling it overnight. This extended chilling time allows all the flavors to meld together beautifully and, more importantly, gives the cream cheese and whipped cream ample time to set up, ensuring perfect slices. This is key to a successful No Bake Oreo Cheesecake Sprinkles!
The Grand Finale: Decorating and Serving
After all that patient waiting, it’s time for the most fun part – making our No Bake Oreo Cheesecake Sprinkles look as good as it tastes! This is where we add the final touches that make it truly spectacular.
- Once your cheesecake has thoroughly chilled and set, carefully remove the springform pan. Run a thin knife around the edge of the pan before releasing the spring and lifting the ring away. If you used parchment paper on the bottom, you can slide the cheesecake onto a serving platter, or simply leave it on the pan base.
- In another very clean and cold bowl, pour the 1 cup of very cold heavy cream. Add 2-3 tablespoons of powdered sugar (adjust to your sweetness preference) and ½ teaspoon of pure vanilla extract.
- Using your electric mixer with the whisk attachment, beat the cream on high speed until soft to medium peaks form. We want this whipped cream to be soft and spreadable, not as stiff as the cream we used in the filling.
- You have a couple of options for applying the whipped cream:
- Spread it: Spoon the whipped cream onto the top of the cheesecake and gently spread it evenly with an offset spatula.
- Pipe it: For a fancier presentation, transfer the whipped cream to a piping bag fitted with your favorite decorative tip (a star tip works wonderfully!) and pipe dollops or a border around the edge of the cheesecake.
- Now for the “Sprinkles” part of our No Bake Oreo Cheesecake Sprinkles! Generously sprinkle the colorful sprinkles all over the top of the whipped cream. Don’t be shy; more sprinkles mean more fun! This adds a fantastic pop of color and a playful texture.
- Finally, take your 6-8 whole Oreo cookies and either roughly chop them or halve them. Arrange these Oreo pieces artfully on top of the cheesecake, nestled amongst the sprinkles. This provides a clear visual cue of the delicious Oreo goodness hidden within.
- Your show-stopping No Bake Oreo Cheesecake Sprinkles is now ready to be admired and, more importantly, devoured! Use a sharp knife to cut slices, wiping the knife clean between each cut for the neatest presentation.
- Store any leftover cheesecake in an airtight container in the refrigerator for up to 3-4 days. Enjoy every single delightful bite!
Conclusion:
And there you have it, my friends! We’ve reached the sweet finale of our delicious journey together, and I truly hope you’re feeling inspired and ready to get into your kitchen – or rather, not get into your oven – to create something truly special. This recipe isn’t just another dessert; it’s a promise of joy, a testament to the power of simple ingredients coming together in a spectacular way. If you’re looking for that show-stopping treat that requires minimal effort but delivers maximum impact, then believe me, this No Bake Oreo Cheesecake Sprinkles recipe is precisely what you need in your life right now.
I cannot emphasize enough how incredibly satisfying it is to make something so utterly delightful without ever having to turn on your oven. That’s the true beauty of a no-bake dessert: it’s perfect for those scorching summer days when the thought of extra heat is unbearable, but it’s equally fantastic during the busy holiday season when oven space is a precious commodity. It’s also an absolute dream for beginner bakers, or really, anyone who appreciates a straightforward path to an extraordinary result. Imagine the look on your family’s faces, or the delighted gasps from your guests, when you present this stunning creation. They’ll never guess how effortlessly it came together. The rich, creamy cheesecake base, the unmistakable crunch of the Oreo cookie crust, and that whimsical, celebratory burst of sprinkles on top – it’s a symphony of textures and flavors that consistently earns rave reviews.
Serving Suggestions to Elevate Your Dessert:
While this cheesecake is undoubtedly a star all on its own, a few thoughtful serving touches can truly take it to the next level. I absolutely adore serving individual slices with a generous dollop of freshly whipped cream, perhaps infused with a hint of vanilla bean paste for an extra layer of aroma. For a refreshing contrast, a scattering of fresh berries – think vibrant raspberries, plump blueberries, or glistening strawberries – provides a wonderful tartness that cuts through the richness beautifully. If you’re feeling particularly indulgent, a drizzle of chocolate fudge sauce or a warm caramel topping can transform each piece into an even more decadent experience. Pair it with a strong espresso after dinner, a glass of cold milk for a comforting treat, or even a sparkling glass of Moscato for a touch of celebratory elegance. The visual appeal alone, with its striking layers and colorful sprinkles, makes it a centerpiece dessert that demands attention.
Creative Variations for Endless Fun:
One of the things I love most about this recipe is its incredible versatility. While the classic Oreo is divine, feel free to unleash your inner culinary artist and experiment with different cookie crumbs for the crust. Imagine a mint chocolate chip cookie crust, or perhaps a gingersnap crust during the autumn months for a spicy twist. You could even swap out the sprinkles for different toppings entirely – think mini chocolate chips, toasted coconut flakes, or a sprinkle of finely chopped nuts for added texture. For a truly festive touch, customize your sprinkles to match the occasion: red and green for Christmas, pastels for Easter, or even school colors for a graduation party. You can also easily transform this into individual mini cheesecakes by pressing the crust into cupcake liners and spooning the filling on top, chilling them, and then decorating. These bite-sized delights are perfect for parties and potlucks, offering a charming, single-serving option that guests adore. The possibilities are genuinely endless, and I encourage you to make this recipe truly your own.
Now, It’s Your Turn!
So, what are you waiting for? I sincerely hope that by now, your sweet tooth is tingling, and your mind is buzzing with ideas for your very own creation. This recipe is not just about following steps; it’s about making memories, sharing joy, and treating yourself and your loved ones to something truly special, all without the stress of complicated baking. It’s a foolproof path to dessert glory, promising a delightful texture and an explosion of flavor in every single bite. Trust me when I say this is one of those recipes that will quickly become a cherished favorite in your household, a go-to for celebrations, impromptu gatherings, or simply when you need a little sweet pick-me-up.
Please, I implore you, give this fantastic recipe a try. You won’t regret it! And when you do, I would absolutely love to hear all about your experience. Did you add any unique twists? What did your family and friends think? Did it disappear in minutes, as it often does in my home? Share your culinary adventures with me! Tag me on social media if you post pictures of your gorgeous creation – I genuinely get so much joy from seeing your delicious triumphs. Your feedback and beautiful photos are what inspire me to keep sharing more wonderful recipes with you all. Happy no-baking, my friends, and may your dessert dreams be ever so sweet and sprinkle-filled!
Delicious No Bake Oreo Cheesecake: Quick & Easy Sprinkles!
No Bake Oreo Cheesecake Sprinkles – doesn’t that just sound like pure dessert magic? I’m absolutely thrilled to share a recipe that promises an explosion of classic flavor and festive cheer, all without ever needing to turn on your oven. Imagine a velvety smooth cheesecake filling, studded with crunchy Oreo cookie pieces, resting on a decadent Oreo crust, and crowned with a vibrant scattering of colorful sprinkles. This isn’t just a dessert; it’s a celebration in every bite, designed to bring joy and effortless elegance to any occasion.
Ingredients
-
2 ½ cups Oreo cookie crumbs, finely crushed
-
½ cup (1 stick) unsalted butter, melted
-
24 ounces (three 8-ounce blocks) full-fat cream cheese, softened
-
1 ½ cups powdered sugar, sifted
-
1 teaspoon pure vanilla extract
-
¼ teaspoon fine sea salt
-
1 ¾ cups heavy cream, very cold
-
1 ½ cups additional Oreo cookie crumbs, coarsely crushed
-
1 cup heavy cream, very cold (for whipped cream topping)
-
2-3 tablespoons powdered sugar (for whipped cream topping)
-
½ teaspoon pure vanilla extract (for whipped cream topping)
-
½ cup various colorful sprinkles
-
6-8 whole Oreo cookies, roughly chopped or halved
Instructions
-
Step 1
Finely crush 2 ½ cups Oreo cookies (about 30-36 whole cookies) in a food processor or zip-top bag. Transfer crumbs to a bowl. -
Step 2
Pour ½ cup melted unsalted butter over the Oreo crumbs. Mix until thoroughly combined, resembling wet sand. -
Step 3
Press the mixture firmly into the bottom of a 9-inch springform pan to form the crust. -
Step 4
Refrigerate the crust for at least 30 minutes while preparing the filling. -
Step 5
In a large bowl, beat 24 ounces softened full-fat cream cheese with an electric mixer on medium speed until completely smooth and creamy (2-3 minutes), scraping down bowl frequently. -
Step 6
Gradually add 1 ½ cups sifted powdered sugar; beat until fully incorporated and fluffy (2-3 minutes). Stir in 1 teaspoon pure vanilla extract and ¼ teaspoon fine sea salt; beat for 30 seconds. -
Step 7
In a separate, very cold bowl, beat 1 ¾ cups very cold heavy cream on high speed with a whisk attachment until stiff peaks form (3-5 minutes). Be careful not to overbeat. -
Step 8
Gently fold the whipped cream into the cream cheese mixture in thirds until uniform. Then, gently fold in 1 ½ cups coarsely crushed Oreo crumbs. -
Step 9
Spoon the cheesecake filling over the chilled crust in the springform pan. Spread evenly and smooth the top. -
Step 10
Cover loosely with plastic wrap and refrigerate for a minimum of 6-8 hours, or ideally overnight, for best setting. -
Step 11
Once cheesecake is set, remove from pan. In a clean, cold bowl, beat 1 cup very cold heavy cream with 2-3 tablespoons powdered sugar and ½ teaspoon pure vanilla extract until soft to medium peaks form. -
Step 12
Spread or pipe the whipped cream onto the top of the cheesecake. Generously sprinkle ½ cup colorful sprinkles. Arrange 6-8 chopped or halved Oreo cookies on top for garnish. Slice with a sharp knife, wiping clean between cuts, and serve. Store leftovers in an airtight container in the refrigerator for up to 3-4 days.
Important Information
Nutrition Facts (Per Serving)
It is important to consider this information as approximate and not to use it as definitive health advice.
Allergy Information
Please check ingredients for potential allergens and consult a health professional if in doubt.

Leave a Comment