
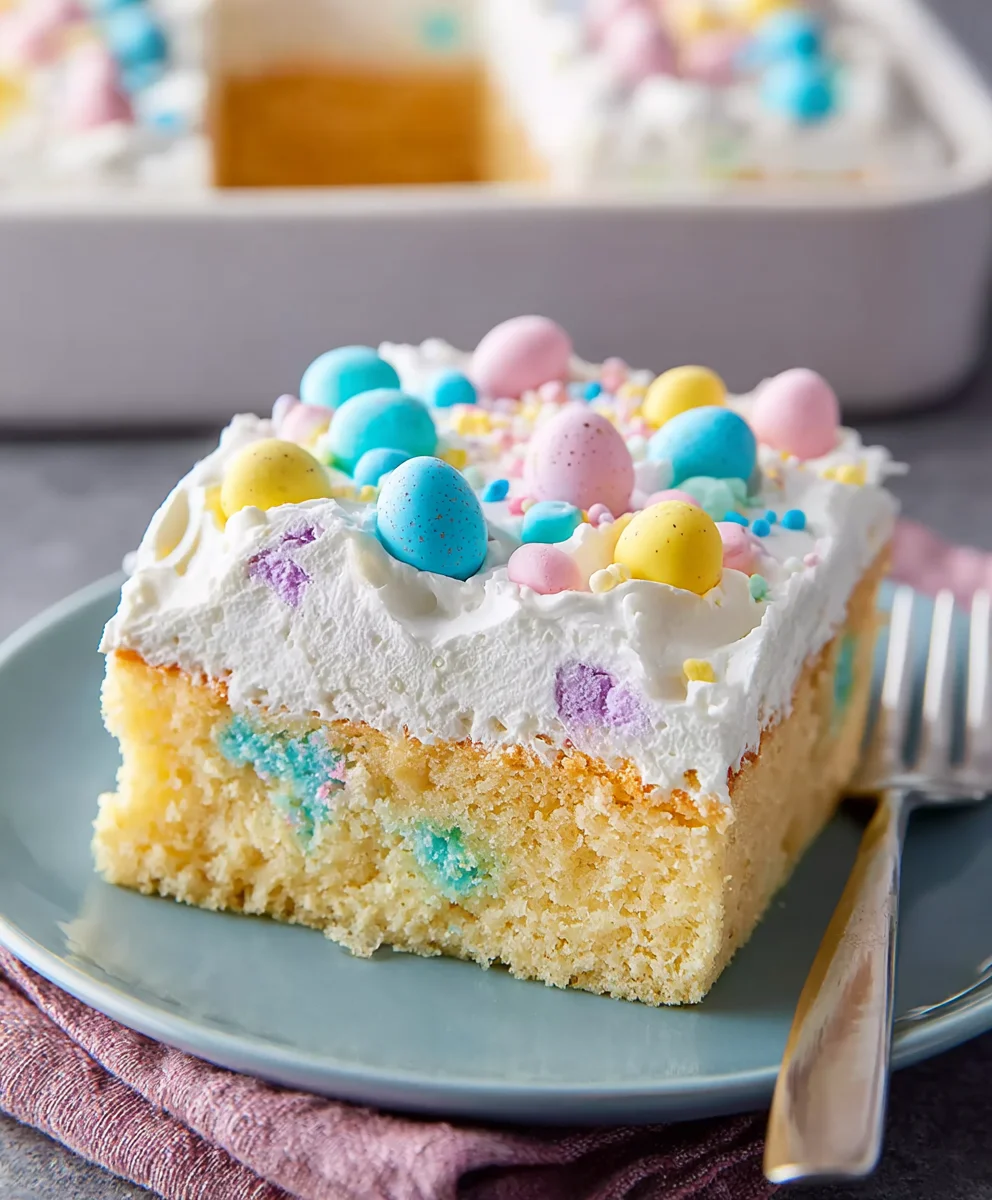
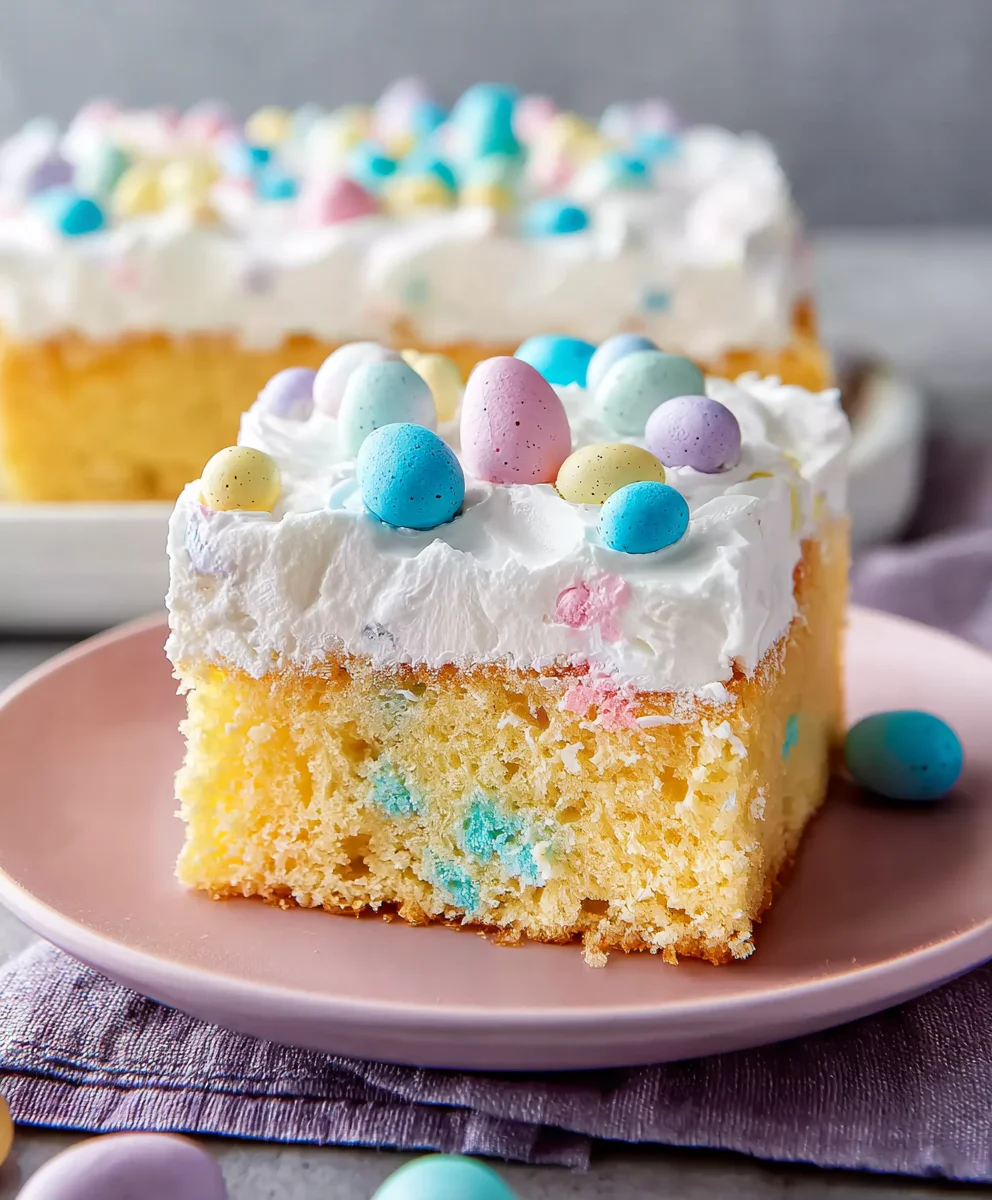
Easter Poke Cake is more than just a dessert; it’s a vibrant celebration on a plate, perfectly encapsulating the joy and freshness of spring. Imagine a remarkably moist vanilla cake, infused with a kaleidoscope of fruity flavors, and crowned with a luscious, creamy topping—all adorned with delightful spring-themed embellishments. This dessert has become a cherished staple for many families during their Easter festivities, offering a delightful departure from traditional pies and cookies that often dominate other holidays.
The beauty of a poke cake lies in its ingenious design: after baking, holes are ‘poked’ into the warm cake, allowing a liquid (often gelatin or pudding) to seep in, creating an incredibly tender, moist, and flavorful crumb with every single bite. It’s this unique texture and burst of flavor that makes the Easter Poke Cake so universally adored. While its origins trace back to simpler boxed cake and Jell-O combinations popular in the mid-20th century, its adaptability has allowed it to evolve into a sophisticated yet wonderfully simple holiday showstopper. It’s not just a treat for the palate; its colorful presentation brings an undeniable cheer to any holiday table, making it an ideal centerpiece for your spring gatherings.
I believe you’ll find this particular Easter Poke Cake recipe to be an absolute delight, combining ease of preparation with an unforgettable taste that will have everyone asking for a second slice.

Ingredients:
- For the Cake:
- 1 (15.25 ounce) package white cake mix (or your favorite flavor like vanilla or lemon)
- 1 1/4 cups water (or amount specified on cake mix box)
- 1/2 cup vegetable oil (or amount specified on cake mix box)
- 3 large eggs (or amount specified on cake mix box)
- For the “Poke” Filling:
- 1 (14 ounce) can sweetened condensed milk
- Food coloring gels (pastel shades like pink, blue, green, yellow are perfect for Easter)
- For the Cream Cheese Whipped Topping:
- 1 (8 ounce) package cream cheese, softened to room temperature
- 1/2 cup powdered sugar (or more, to taste)
- 1 teaspoon vanilla extract
- 1 (8 ounce) container frozen whipped topping (like Cool Whip), thawed in the refrigerator
- Optional: 1-2 tablespoons milk, if needed for consistency
- For Easter Decorations:
- 1 cup shredded coconut, flaked (optional, for “grass”)
- Green food coloring gel (if making coconut “grass”)
- Assorted Easter candies (mini chocolate eggs, jelly beans, marshmallow Peeps, malted milk robin eggs)
- Easter-themed sprinkles
Preparing the Cake Base for Your Easter Poke Cake
Creating the perfect foundation for your beautiful Easter Poke Cake is the first essential step. While we’re using a convenient box mix today, the care you put into this stage will truly make a difference in the final texture and taste of your cake. Trust me, even a box mix can taste incredibly homemade with a little love!
- Preheat Your Oven and Prepare Your Pan: First things first, let’s get that oven ready. Preheat your oven to 350°F (175°C). While it’s heating up, grab a 9×13-inch baking pan. You’ll want to generously grease and flour this pan, or spray it with a non-stick baking spray that contains flour. This crucial step ensures that your cake releases cleanly from the pan, preventing any frustrating sticking mishaps later on. I always like to give it an extra once-over, just to be sure.
- Combine Dry and Wet Ingredients: In a large mixing bowl, empty the entire package of white cake mix. To this, add your water, vegetable oil, and eggs. If your cake mix box specifies slightly different quantities for these liquid ingredients, always follow the instructions on your specific brand of cake mix for the best results. Box mixes are formulated precisely, and sticking to their recommendations will give you the ideal cake consistency.
- Mix the Cake Batter: Using an electric mixer on low speed, beat the ingredients for about 30 seconds until they are just combined. Then, increase the speed to medium and continue beating for another 2 minutes. During this time, scrape down the sides of the bowl with a rubber spatula periodically to ensure all the dry ingredients are fully incorporated into the batter. You’re looking for a smooth, homogenous batter without any lumps of dry mix. Overmixing can lead to a tougher cake, so be mindful of the time.
- Pour and Bake: Once your batter is perfectly mixed, carefully pour it into your prepared 9×13-inch baking pan. Gently tap the pan on your counter a few times to release any large air bubbles and level the batter evenly. Place the pan into your preheated oven. Bake for approximately 28-33 minutes, or until a wooden skewer or toothpick inserted into the center of the cake comes out clean. Every oven is a little different, so start checking around the 28-minute mark. The cake should be lightly golden on top and spring back when gently pressed.
- Cool the Cake: After baking, remove the cake from the oven. This is a very important step: allow the cake to cool in the pan on a wire rack for at least 15-20 minutes. This initial cooling period allows the cake to set and firm up, making it easier to handle for the next steps. Do not try to poke it or remove it from the pan while it’s still piping hot, as it could crumble.
The “Poke” Process: Infusing Color and Sweetness into Your Easter Poke Cake
This is where our Easter Poke Cake truly gets its name and its magical, colorful character! The “poke” process is not only fun but also creates those beautiful pockets of color and sweetness that make this dessert so unique and festive for Easter. Get ready to transform a simple cake into a vibrant masterpiece.
- Prepare for Poking: Once your cake has cooled for at least 15-20 minutes in the pan, it’s ready for its signature “poke.” Grab a sturdy fork, a wooden skewer, or even the blunt end of a wooden spoon. I personally prefer a wooden spoon handle because it creates wider holes, allowing more of that delicious colored milk to seep in, but a fork works perfectly well for smaller, more delicate pockets of color.
- Poke the Cake: Carefully and systematically poke holes all over the top surface of the cake. Aim for holes that are about 1/2 to 3/4 inch deep and spaced about 1/2 to 1 inch apart. Try to make them relatively even across the entire surface. Don’t be shy, but also don’t completely decimate the cake. You want distinct holes, not a crumbled mess. The goal is to create pathways for our colored filling to penetrate the cake.
- Divide and Color the Sweetened Condensed Milk: Now for the fun, colorful part! Open your can of sweetened condensed milk. Divide the milk into several small bowls – one bowl for each color you plan to use. For a lovely pastel Easter Poke Cake, I usually opt for three or four colors like pink, blue, yellow, and green. Add a few drops of your chosen food coloring gel to each bowl and stir gently until the color is evenly distributed. Gel food colorings work best here as they provide vibrant colors without adding too much liquid. You can make some colors more intense than others for a varied look, or keep them all soft and pastel.
- Pour the Colored Milk: This is the moment of truth! Carefully spoon or drizzle the colored sweetened condensed milk into the holes you’ve created in the cake. You can alternate colors randomly, or create sections of color for a more organized look. Try to fill each hole as much as possible, allowing the milk to seep down into the cake. Don’t worry if some of the milk pools on top; it will eventually soak in. If you have extra, you can just drizzle it over the entire surface of the cake, as it will add an extra layer of sweetness and moisture.
- Chill for Absorption: Once all the colored milk has been poured, cover the cake pan loosely with plastic wrap. Transfer the cake to the refrigerator and chill for at least 2-3 hours, or preferably overnight. This chilling time is absolutely crucial. It allows the sweetened condensed milk to fully absorb into the cake, creating that wonderfully moist, sweet, and colorful interior that defines an Easter Poke Cake. It also helps the cake to set up before you add the frosting. Patience truly is a virtue here!
Crafting the Dreamy Cream Cheese Whipped Topping
A glorious Easter Poke Cake deserves a frosting that’s just as delightful and easy to make! This cream cheese whipped topping is light, fluffy, and perfectly balanced in sweetness, providing a wonderful contrast to the rich, sweet interior of the cake. It’s truly the perfect cloud-like finish.
- Soften the Cream Cheese: Before you start, ensure your cream cheese is at true room temperature. This is key for a smooth, lump-free frosting. If it’s too cold, you’ll end up with frustrating lumps that are hard to beat out. You can achieve this by leaving it on the counter for at least 30-60 minutes, or carefully softening it in the microwave for a few seconds at a time until pliable.
- Whip the Cream Cheese: In a medium-sized mixing bowl, combine the softened cream cheese, powdered sugar, and vanilla extract. Using an electric mixer (handheld or stand mixer with a paddle attachment), beat these ingredients together on medium-high speed until the mixture is completely smooth, creamy, and free of any lumps. This should take about 2-3 minutes. Make sure to scrape down the sides of the bowl with a spatula to incorporate everything evenly.
- Fold in the Whipped Topping: Gently, but thoroughly, fold the thawed whipped topping into the cream cheese mixture. Use a large rubber spatula for this step. The goal is to incorporate it without deflating the airiness of the whipped topping. Continue folding until no streaks of white whipped topping remain, and the mixture is uniformly combined and light. If you find the frosting is a little too thick to spread easily, you can add 1-2 tablespoons of milk, a little at a time, until you reach your desired spreadable consistency. Remember, we want a light and airy texture to complement our moist Easter Poke Cake.
Decorating Your Festive Easter Poke Cake
Now for the grand finale – transforming your colorful poke cake into a stunning, festive center-piece for your Easter celebration! This is where your creativity can truly shine, making your Easter Poke Cake not just delicious, but also visually captivating.
- Frost the Cake: Once your cake has been thoroughly chilled and the sweetened condensed milk has absorbed, remove it from the refrigerator. Evenly spread the cream cheese whipped topping over the entire surface of the cake. You can use an offset spatula or the back of a spoon to create lovely swirls and peaks, giving it a charming homemade look. Don’t worry about perfection; rustic charm is part of the appeal of an Easter Poke Cake!
- Prepare Coconut “Grass” (Optional but Recommended): If you’re going for a whimsical “Easter basket” look, this step is fantastic! Place the shredded coconut in a small bowl. Add a few drops of green food coloring gel. Using a fork, your fingers, or by shaking it in a sealed bag, toss the coconut until it’s evenly coated and resembles grass. This vibrant green “grass” adds a wonderful texture and color pop.
- Arrange Your Easter Candies: Now, let’s decorate! Scatter your prepared green coconut “grass” over a section of the cake, or all over, as a base for your candies. Then, arrange your assorted Easter candies on top of the frosting. This is your chance to get creative! You can create a “nest” in one corner with coconut and fill it with mini chocolate eggs, or line up colorful jelly beans along the edges. Marshmallow Peeps can perch adorably on top, perhaps in a little group. Think about creating a scene that evokes the joy of Easter.
- Add Sprinkles: Finish your decoration with a generous scattering of Easter-themed sprinkles. Look for pastel-colored jimmies, nonpareils, or fun Easter shapes like bunnies or carrots. Sprinkles add that extra touch of sparkle and festivity that truly elevates your Easter Poke Cake.
- Final Chill Before Serving: After decorating, it’s best to return the Easter Poke Cake to the refrigerator for at least 30 minutes. This allows the frosting to set slightly and ensures everything stays perfectly in place. It also makes for cleaner slices.
Tips and Variations for Your Perfect Easter Poke Cake
Making an Easter Poke Cake is an absolute delight, and there are so many ways to customize it to your taste or make the process even smoother. Here are some of my go-to tips and variations to ensure your cake is a showstopper every time!
- Cake Flavor Experimentation: While white cake mix creates a lovely canvas for the vibrant colors, feel free to try other flavors! A lemon cake mix would offer a bright, zesty contrast to the sweet filling, perfect for spring. Even a funfetti cake could add an extra layer of whimsy to your Easter Poke Cake.
- Alternative “Poke” Fillings: If sweetened condensed milk isn’t your preferred choice, you can also use Jell-O! Prepare a few different colors of Jell-O according to package directions, but use slightly less water for a more concentrated flavor and firmer set. Pour into the holes and chill. The Jell-O will create a jiggly, fruity surprise within the cake. Pudding mixes (like vanilla or pistachio) can also be used, prepared a bit thicker than usual.
- Make Ahead Magic: This cake is a fantastic make-ahead dessert! You can bake the cake and complete the “poke” and chilling steps (up to step 10) the day before. Store it covered in the refrigerator. Then, on the day of your gathering, simply prepare the frosting and decorate. This significantly cuts down on stress on the day of your Easter celebration.
- Storage: Because of the dairy in the frosting and filling, your Easter Poke Cake must be stored in the refrigerator. Cover it loosely with plastic wrap or foil. It will stay fresh and delicious for 3-4 days. The cake often tastes even better the next day as the flavors meld!
- Portion Control and Presentation: For neat slices that really show off those beautiful colored streaks, use a sharp knife that has been run under hot water and wiped clean between each slice. This keeps the frosting from tearing and ensures every piece of your Easter Poke Cake looks picture-perfect.
- Kid-Friendly Decorating: This is an amazing recipe to get kids involved in! Let them help with adding the food coloring to the milk, drizzling it into the holes, and especially with arranging the Easter candies. They’ll love personalizing the Easter Poke Cake and feeling like a chef.
- Varying Decorations: Beyond traditional Easter candies, consider using fresh berries (like raspberries or blueberries) for a touch of freshness, or even edible flowers for an elegant look. You could also pipe additional designs with frosting using a pastry bag fitted with a star tip around the edges.
- Embrace Imperfection: Remember, homemade desserts are about love and enjoyment, not absolute perfection. Don’t stress if your holes aren’t perfectly uniform or your frosting isn’t impeccably smooth. The charm of an Easter Poke Cake lies in its vibrant, fun, and slightly whimsical nature.
Why Chilling is Non-Negotiable for Your Easter Poke Cake
I cannot stress enough the importance of chilling the cake after pouring in the sweetened condensed milk. This step is absolutely crucial for the success of your Easter Poke Cake. The chilling time allows the thick, sweet milk to fully seep into the cake, transforming its texture from a simple cake into a wonderfully moist, dense, and flavorful dessert. Without adequate chilling, the milk will just sit on the surface or create a soggy layer, rather than becoming one with the cake. It’s what gives an Easter Poke Cake its signature melt-in-your-mouth quality and ensures those beautiful, distinct color veins are perfectly set for when you slice into it.
Conclusion:
As we wrap up our delightful journey with this incredible recipe, I truly hope you’re feeling inspired and excited to get into your kitchen. There’s something uniquely satisfying about creating a dessert that not only tastes phenomenal but also looks absolutely stunning, and this recipe delivers on both fronts with remarkable ease. It’s more than just a cake; it’s a celebration in every single bite, a testament to how simple ingredients can come together to form something truly spectacular. I’ve personally found immense joy in perfecting this, and I can assure you that your loved ones will be equally thrilled when they taste your creation.
Why this recipe is an absolute must-try: First and foremost, the texture is simply divine. The way the Jell-O seeps into the cake creates an unbelievably moist, tender crumb that melts in your mouth, perfectly complemented by the creamy pudding layer and the light, airy whipped topping. Then there’s the flavor – a harmonious blend of sweet, fruity, and creamy notes that dance on your palate, leaving you craving just one more slice. But perhaps what makes it truly irresistible is its visual appeal. The vibrant colors peeking through the cake, especially when cut, make it an instant showstopper at any gathering. It looks intricate and fancy, but as you now know, it’s surprisingly straightforward to assemble, making you look like a culinary genius without all the fuss. This is truly the kind of dessert that gathers compliments and requests for the recipe, every single time.
Unleash Your Creativity: Serving Suggestions & Variations
One of the aspects I adore most about this recipe is its incredible versatility. While the core recipe is a winner, don’t hesitate to put your own spin on it!
-
Topping Transformations: While whipped cream is classic, consider elevating your dessert with a sprinkle of toasted coconut flakes, a dusting of colorful sprinkles for an extra festive touch, or a drizzle of white chocolate or caramel sauce. For an elegant touch, arrange fresh berries like sliced strawberries, blueberries, or raspberries on top – their tartness provides a wonderful contrast to the sweetness of the cake.
-
Flavor Adventures: The base cake and Jell-O flavors are ripe for experimentation. Instead of a white cake mix, try a lemon cake with lemon Jell-O for a zesty, bright treat, or a strawberry cake with cherry Jell-O for a vibrant, fruity explosion. Chocolate cake with raspberry or cherry Jell-O creates a decadent combination. As for the pudding layer, vanilla is great, but imagine the delightful surprise of banana cream, coconut cream, or even cheesecake-flavored pudding! You could even combine different Jell-O flavors in streaks for a rainbow effect, perfect for children’s parties or just to add more cheer.
-
Holiday Adaptations: This cake isn’t just for one occasion. For Christmas, use red and green Jell-O with a vanilla cake. For the Fourth of July, opt for red (cherry/strawberry) and blue (berry blue) Jell-O. Halloween could see orange and purple Jell-O. The possibilities are endless, making it a go-to dessert for any festive event you can imagine. And of course, for its namesake, the Easter Poke Cake, we love those pastel shades of green, pink, and yellow that just scream spring and new beginnings!
-
Miniature Delights: For individual servings, bake the cake in muffin tins, creating delightful poke cupcakes. These are fantastic for portion control and make serving a breeze at larger gatherings.
Your Turn to Bake and Share!
Now that you have all the knowledge, all the tips, and a plethora of ideas, it’s time to roll up your sleeves and bring this magic to life in your own kitchen. I truly believe that the best recipes are those that are made with love and shared with joy, and this one embodies that spirit perfectly. Don’t be intimidated; if I can do it, you absolutely can too!
I am genuinely excited for you to experience the satisfaction of pulling this beautiful dessert out of your fridge and seeing the delighted expressions on the faces of your family and friends. Once you’ve made it, I would absolutely love to hear about your experience. Did you stick to the classic? Did you try a fun new variation? What were your favorite flavors? Please come back and share your thoughts, your successes, and even your funny kitchen anecdotes in the comments section below. Your feedback and stories are what make this community so special, and I can’t wait to celebrate your culinary triumphs with you. Happy baking, and enjoy every single delightful bite!
Delicious Easter Poke Cake
A vibrant and moist vanilla cake infused with colorful sweet milk, topped with a luscious cream cheese whipped topping and festive Easter decorations. Perfect for spring celebrations.
Ingredients
-
1 (15.25 oz) package white cake mix
-
1 1/4 cups water
-
1/2 cup vegetable oil
-
3 large eggs
-
1 (14 oz) can sweetened condensed milk
-
Pastel food coloring gels (e.g., pink, blue, green, yellow)
-
1 (8 oz) package cream cheese, softened
-
1/2 cup powdered sugar
-
1 tsp vanilla extract
-
1 (8 oz) container frozen whipped topping, thawed
-
Optional: 1-2 tbsp milk
-
1 cup shredded coconut (optional, for “grass”)
-
Green food coloring gel (optional, for coconut “grass”)
-
Assorted Easter candies (e.g., mini chocolate eggs, jelly beans, marshmallow Peeps)
-
Easter-themed sprinkles
Instructions
-
Step 1
Preheat oven to 350°F (175°C). Generously grease and flour a 9×13-inch baking pan. -
Step 2
In a large mixing bowl, combine cake mix, water, vegetable oil, and eggs according to cake mix package directions. Beat with an electric mixer for 2-3 minutes until smooth. -
Step 3
Pour batter into the prepared pan and bake for approximately 28-33 minutes, or until a wooden skewer inserted into the center comes out clean. -
Step 4
Remove cake from oven and let cool in the pan on a wire rack for 15-20 minutes. -
Step 5
Using a sturdy fork or the blunt end of a wooden spoon, systematically poke holes about 1/2 to 3/4 inch deep and 1/2 to 1 inch apart all over the top surface of the cooled cake. -
Step 6
Divide the sweetened condensed milk into several small bowls (one for each desired color). Add a few drops of pastel food coloring gel to each bowl and stir until evenly colored. -
Step 7
Carefully spoon or drizzle the colored sweetened condensed milk into the poked holes. Cover the cake pan loosely with plastic wrap. -
Step 8
Chill the cake in the refrigerator for at least 2-3 hours, or preferably overnight, to allow the milk to fully absorb. -
Step 9
For the topping, beat softened cream cheese, powdered sugar, and vanilla extract in a medium bowl with an electric mixer until smooth and creamy (2-3 minutes). -
Step 10
Gently fold in the thawed whipped topping until uniformly combined. If needed for consistency, add 1-2 tablespoons of milk. -
Step 11
Once the cake is thoroughly chilled, spread the cream cheese whipped topping evenly over the entire surface of the cake. -
Step 12
Optional: Place shredded coconut in a small bowl, add green food coloring gel, and toss until evenly coated to create “grass”. -
Step 13
Decorate the cake with the prepared green coconut “grass” (if using), assorted Easter candies, and Easter-themed sprinkles. Arrange creatively. -
Step 14
Return the decorated cake to the refrigerator for at least 30 minutes to set the frosting before serving for cleaner slices.
Important Information
Nutrition Facts (Per Serving)
It is important to consider this information as approximate and not to use it as definitive health advice.
Allergy Information
Please check ingredients for potential allergens and consult a health professional if in doubt.


Leave a Comment