
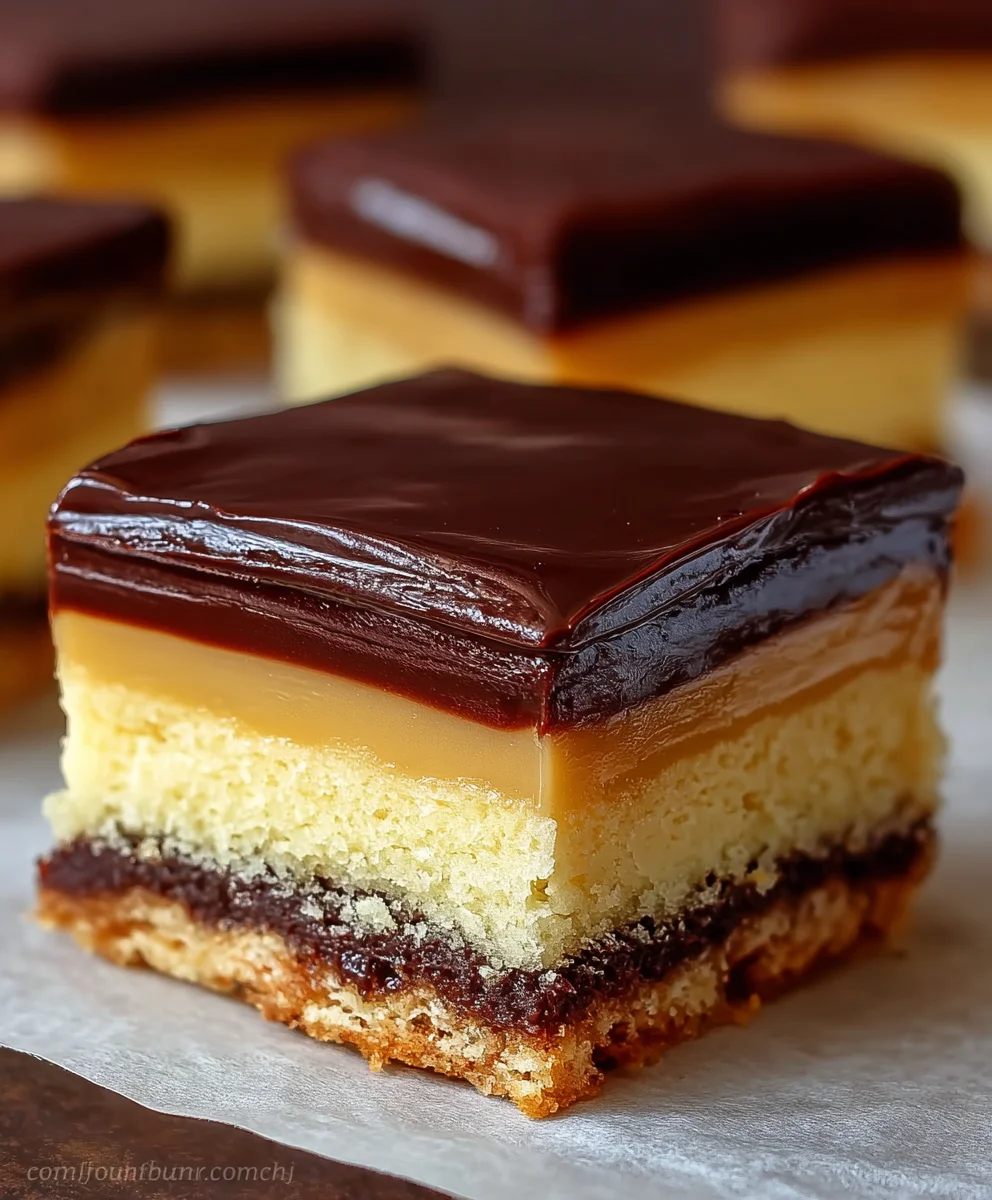
Elegant Boston Cream Dessert Bars are about to become your new favorite indulgent treat. Imagine all the luscious layers of a classic Boston cream pie, transformed into a convenient, handheld delight perfect for any occasion. This innovative twist takes the beloved flavors of a historical dessert and presents them in an effortlessly enjoyable bar format.
The original Boston Cream Pie, famously dubbed a ‘pie’ but truly a delightful cake, boasts a rich history dating back to the mid-19th century at Boston’s Omni Parker House Hotel. It holds the esteemed title of Massachusetts’ official state dessert, a testament to its enduring appeal and iconic status in American cuisine. I’ve always been captivated by the harmonious blend of its tender vanilla cake, the silky-smooth custard filling, and that glistening, rich chocolate glaze.
Now, take that cherished experience and envision it in a format that’s ideal for parties, lunchboxes, or simply a sophisticated afternoon treat without the fuss of slicing a traditional pie. These Elegant Boston Cream Dessert Bars capture every iconic flavor and texture beautifully, offering a truly special slice of dessert heaven in an approachable, grab-and-go package. They are cherished for their exquisite taste, the delightful interplay of creamy and tender textures, and the sheer convenience they bring to any gathering. I’m thrilled to share this recipe, promising a creation that’s as impressive to look at as it is utterly irresistible to savor.

Ingredients:
For me, the key to truly remarkable Elegant Boston Cream Dessert Bars lies in the quality of each component. Here’s everything you’ll need to create this classic, layered treat. I always recommend having all your ingredients measured and ready before you begin, a practice I call ‘mise en place’ – it makes the whole process so much smoother!
- For the Light Vanilla Cake Base:
- 1 ½ cups (190g) all-purpose flour, sifted
- 1 ½ teaspoons baking powder
- ½ teaspoon salt
- ½ cup (113g) unsalted butter, softened to room temperature
- 1 cup (200g) granulated sugar
- 2 large eggs, at room temperature
- 1 teaspoon pure vanilla extract
- ¾ cup (180ml) whole milk, at room temperature
- For the Velvety Pastry Cream (Crème Pâtissière):
- 2 cups (480ml) whole milk
- ½ cup (100g) granulated sugar, divided
- ¼ cup (30g) cornstarch
- 4 large egg yolks
- 2 tablespoons unsalted butter, cut into small pieces
- 1 ½ teaspoons pure vanilla extract
- Pinch of salt
- For the Silky Chocolate Ganache Topping:
- ½ cup (120ml) heavy cream (at least 36% milk fat)
- 4 ounces (113g) good quality semi-sweet chocolate, finely chopped (I find a good bar chocolate melts much smoother than chips)
- 1 tablespoon unsalted butter, optional, for extra shine and richness
Preparing the Cake Base
Let’s start with the foundation of our Elegant Boston Cream Dessert Bars – a wonderfully light and tender vanilla cake. This cake is designed to be sturdy enough to hold the creamy filling but delicate enough to melt in your mouth. Getting the oven temperature and ingredient temperatures right here is paramount for that perfect texture!
- First things first, preheat your oven to 350°F (175°C). Line a 9×13 inch baking pan with parchment paper, allowing an overhang on the sides. This thoughtful step will make lifting the finished cake out of the pan a breeze, which is crucial for neat cutting of your dessert bars. I always spray the pan lightly with non-stick spray first to help the parchment adhere, then spray the parchment itself for extra assurance.
- In a medium bowl, whisk together the sifted all-purpose flour, baking powder, and salt. Sifting the flour is a step I never skip, as it aerates the flour and helps prevent lumps, contributing to a lighter cake. Set this dry mixture aside for a moment.
- In a separate, larger bowl, using either an electric hand mixer or a stand mixer fitted with the paddle attachment, cream together the softened unsalted butter and granulated sugar on medium speed. You’re looking for a light, fluffy, and pale mixture, which usually takes about 3-5 minutes. This creaming process incorporates air into the butter and sugar, creating pockets that will expand during baking and give your cake its delightful structure.
- Next, beat in the eggs, one at a time, mixing well after each addition. It’s important to ensure each egg is fully incorporated before adding the next. Then, stir in the pure vanilla extract. The mixture might look a little curdled at this point, but don’t fret; it will come together beautifully once the dry ingredients are added.
- With the mixer on low speed, gradually add about one-third of the dry ingredient mixture to the wet ingredients, mixing just until combined. Then, pour in half of the whole milk and mix again. Repeat this process, alternating with another third of the dry ingredients, the remaining milk, and finally the last third of the dry ingredients. Always begin and end with the dry ingredients. Be careful not to overmix the batter at this stage; overmixing can develop the gluten in the flour too much, leading to a tough cake. I usually stop mixing as soon as no streaks of flour are visible.
- Pour the batter evenly into your prepared 9×13 inch baking pan. Give the pan a gentle tap or two on the counter to help settle the batter and release any large air bubbles.
- Bake for 25-30 minutes, or until a wooden skewer or toothpick inserted into the center of the cake comes out clean. The top should be a lovely golden brown and spring back lightly when touched.
- Once baked, remove the cake from the oven and let it cool in the pan on a wire rack for about 15-20 minutes. This allows the cake to firm up slightly before you attempt to move it. After this initial cooling, use the parchment paper overhang to carefully lift the cake out of the pan and transfer it directly to the wire rack to cool completely. It is absolutely essential that the cake is completely cooled before you even think about adding the pastry cream; otherwise, the cream will melt and make a mess, ruining the layers of your future Elegant Boston Cream Dessert Bars.
Crafting the Velvety Pastry Cream
The heart and soul of any Boston Cream creation, including our magnificent dessert bars, is the pastry cream. This component must be silky smooth, rich, and perfectly set. I always take my time with this step, as it truly elevates the entire dish.
- In a medium saucepan, combine 1 ¾ cups of the whole milk (reserve the remaining ¼ cup), half of the granulated sugar (¼ cup), and a pinch of salt. Heat this mixture over medium heat, stirring occasionally, until it just begins to simmer around the edges. You don’t want a rolling boil, just a gentle simmering action.
- While the milk is heating, in a separate medium bowl, whisk together the remaining ¼ cup of granulated sugar, cornstarch, and the 4 egg yolks until completely smooth and pale yellow. The cornstarch is your thickening agent, and mixing it thoroughly with the sugar and yolks prevents lumps. Then, whisk in the reserved ¼ cup of cold whole milk into the egg yolk mixture. This step thins the mixture slightly, making it easier to temper.
- Once the milk in the saucepan is simmering, it’s time to temper the egg yolks. This means gradually raising the temperature of the egg yolks without scrambling them. Slowly ladle about half of the hot milk mixture into the egg yolk mixture, whisking continuously and vigorously as you pour. This step is critical; if you add the hot milk too quickly, you’ll end up with scrambled eggs.
- Pour the tempered egg yolk mixture back into the saucepan with the remaining hot milk. Return the saucepan to medium heat and cook, whisking constantly, until the mixture thickens considerably and comes to a boil. Once it starts boiling, continue to whisk for another 1-2 minutes. This ensures the cornstarch is fully cooked and activated, which prevents a starchy taste and ensures maximum thickening power. The cream should be thick enough to coat the back of a spoon.
- Remove the saucepan from the heat. Stir in the 2 tablespoons of unsalted butter and the 1 ½ teaspoons of pure vanilla extract until the butter is fully melted and incorporated. The butter adds a wonderful richness and sheen to the pastry cream.
- For the smoothest possible pastry cream, I always recommend straining it through a fine-mesh sieve into a clean bowl. This catches any small bits of cooked egg yolk or lumps, ensuring a truly velvety texture for your Elegant Boston Cream Dessert Bars.
- Press a piece of plastic wrap directly onto the surface of the pastry cream to prevent a skin from forming as it cools. Place the bowl in the refrigerator and chill for at least 4 hours, or preferably overnight. This chilling step is non-negotiable! The pastry cream needs to be completely cold and set before you can spread it onto the cake.
Assembling the Elegant Boston Cream Dessert Bars
Now for the exciting part – bringing all the components together to form our beautiful Elegant Boston Cream Dessert Bars! This is where the magic truly happens, and careful handling ensures a professional-looking finish.
- Once your cake is completely cool and your pastry cream is thoroughly chilled and firm, gently lift the cake out of the baking pan using the parchment paper overhang and place it on a clean cutting board or work surface. I find it helpful to trim any uneven edges of the cake to create perfectly straight lines for our dessert bars.
- Carefully remove the plastic wrap from the chilled pastry cream. Give the cold pastry cream a good whisk or beat it briefly with an electric mixer on low speed to loosen it up and make it smooth and spreadable again. It will have stiffened significantly in the fridge, and this whisking action restores its creamy texture.
- Evenly spread the entire amount of pastry cream over the top of the cooled cake base. Use an offset spatula or the back of a spoon to create a smooth, level surface. Try to get the layer as uniform as possible; this precision contributes to the elegance of the finished bars. Extend the cream right to the edges of the cake.
- Once the pastry cream is spread, place the cake with its cream layer back into the refrigerator to chill for another 30 minutes to an hour. This brief chilling period allows the pastry cream to firm up slightly on the cake, making the subsequent ganache application much cleaner and preventing the warm ganache from melting the cream layer underneath.
Creating the Silky Chocolate Ganache Topping
No Boston Cream is complete without that glistening, rich chocolate ganache. This topping provides the perfect contrast in flavor and texture to the vanilla cake and creamy filling. Achieving a smooth, pourable ganache is simple, but a few key steps will ensure perfection for your Elegant Boston Cream Dessert Bars.
- In a small saucepan, heat the heavy cream over medium-low heat until it just begins to simmer around the edges. Do not let it boil vigorously. You’re simply looking to warm the cream enough to melt the chocolate efficiently.
- Remove the hot cream from the heat and immediately add the finely chopped semi-sweet chocolate and the optional tablespoon of butter (if using). Let the mixture stand undisturbed for about 5 minutes. This allows the residual heat from the cream to melt the chocolate evenly without scorching it.
- After 5 minutes, begin to gently whisk the mixture from the center outwards until the chocolate is completely melted and the ganache is smooth, glossy, and uniform in color. If you whisk too aggressively at the start, you might incorporate too much air, which can lead to a duller finish. Keep whisking until no lumps remain. The optional butter, I find, adds a gorgeous shine and an extra touch of decadence.
- Allow the ganache to cool for about 10-15 minutes, stirring occasionally, until it has thickened slightly but is still pourable. You want it warm enough to spread easily but not so hot that it melts the pastry cream. It should have the consistency of warm honey.
- Retrieve the chilled cake and pastry cream from the refrigerator. Pour the slightly cooled ganache evenly over the top of the pastry cream layer. Gently tilt the pan or use an offset spatula to help spread the ganache all the way to the edges, creating a smooth, even layer. I often give the pan a gentle shake or two to settle the ganache and remove any lines from the spatula.
Chilling and Serving Your Elegant Boston Cream Dessert Bars
The final, crucial step to perfect Elegant Boston Cream Dessert Bars is allowing them to set properly. Patience here truly pays off, yielding clean slices and firm layers that are a joy to eat.
- Once the ganache is applied, place the entire pan back into the refrigerator and chill for at least 2-4 hours, or until the ganache is completely set and firm to the touch. This firming time is absolutely essential for clean cuts and for all the layers to meld beautifully. I often leave mine overnight for the best results.
- When you’re ready to serve, lift the entire cake from the pan using the parchment paper overhang and place it on a clean cutting board.
- To achieve perfectly neat slices, I always use a very sharp, long knife. For the cleanest cuts, dip your knife in hot water and wipe it clean between each slice. This keeps the chocolate ganache from sticking and dragging, ensuring those elegant, distinct layers. I usually cut the large slab into 12-16 equally sized bars, depending on how generous I’m feeling.
- Serve your glorious Elegant Boston Cream Dessert Bars chilled. They are absolutely divine on their own, but a sprinkle of cocoa powder or a fresh berry on the side can add an extra touch of finesse. These bars keep well in an airtight container in the refrigerator for up to 3-4 days, though I doubt they’ll last that long once your family and friends discover them!
Conclusion:
And there you have it, dear bakers and dessert lovers! We’ve journeyed through the steps of creating a truly remarkable treat, and I sincerely hope you’re feeling inspired to roll up your sleeves and give this recipe a try. What makes these dessert bars an absolute must-bake, you ask? Well, it’s the sheer genius of taking all the beloved elements of a classic Boston cream pie – the tender, airy vanilla cake, the rich, silky custard filling, and that luscious, glossy chocolate ganache – and transforming them into a convenient, delightful, and utterly irresistible bar form. No more wrestling with multiple cake layers or worrying about a perfectly domed pie; these bars offer all the flavor with a fraction of the fuss, making them approachable for even novice bakers while still impressing seasoned dessert connoisseurs.
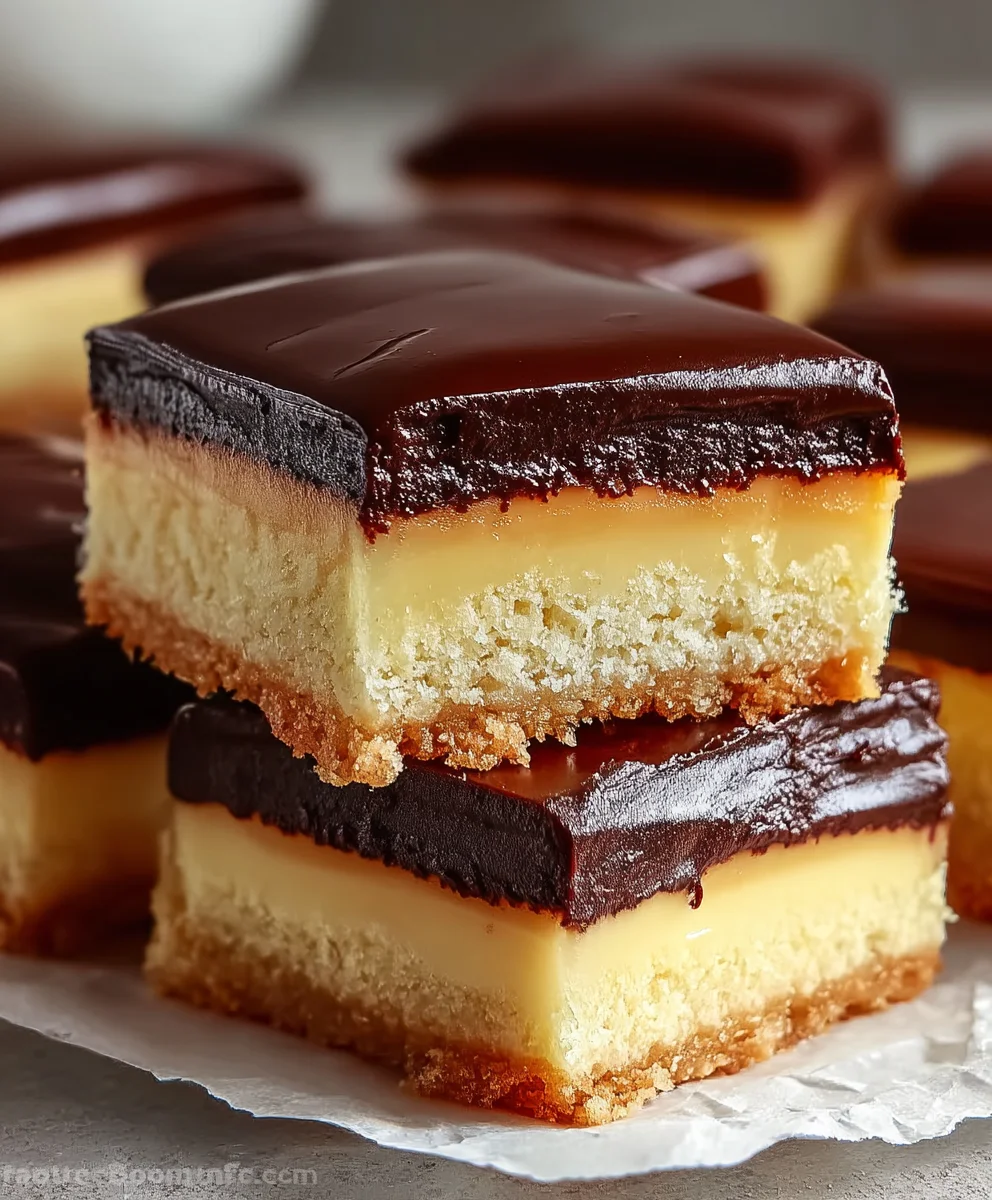
I find immense joy in how effortlessly these bars come together, yet they present themselves with such undeniable elegance. They strike that perfect balance between comfort food and gourmet delight. The distinct layers are a feast for the eyes before they even reach your palate, and that first bite, combining the soft cake, the creamy custard, and the decadent chocolate, is nothing short of heavenly. It’s a symphony of textures and flavors that will undoubtedly become a staple in your recipe repertoire. Imagine the compliments you’ll receive when you present a tray of these beauties at your next gathering! They’re perfect for potlucks, celebratory brunches, or simply as a special treat to elevate a quiet evening at home. The convenience of cutting them into individual portions makes serving a breeze, and they hold up beautifully, meaning you can prepare them ahead of time and relax when your guests arrive.
Now, while I adore this recipe exactly as written, a part of the fun in baking is making it your own! For serving, I highly recommend chilling the bars thoroughly before slicing; this ensures clean cuts and enhances the creamy texture of the custard. Garnish possibilities are endless: a light dusting of cocoa powder or powdered sugar adds a touch of sophistication, or for a burst of freshness, a few fresh raspberries or sliced strawberries on top of each bar would be absolutely divine. A tiny sprig of fresh mint can also add a beautiful pop of color and a subtle aromatic lift.
Feeling adventurous with variations? Here are a few ideas to spark your creativity. If you’re looking to alter the base, consider a graham cracker crust for a textural contrast, or even a shortbread crust for a buttery, cookie-like foundation. For the custard layer, you could infuse it with different flavors – a hint of almond extract alongside the vanilla would be lovely, or a touch of orange zest could add a bright, citrusy note. Coffee extract in the custard could transform it into a mocha Boston cream bar, which I assure you, is simply magnificent. And the chocolate ganache? While our recipe calls for a classic semi-sweet, don’t hesitate to experiment with dark chocolate for a more intense flavor, or even a white chocolate ganache for a completely different aesthetic and taste profile. You could even swap out the chocolate entirely for a berry glaze made with pureed and strained raspberries or blackberries for a vibrant, fruity twist, especially delightful during warmer months. Think seasonally, too! A pinch of pumpkin spice in the custard could make these perfect for a fall dessert spread, or a peppermint extract could turn them into a festive treat for the holidays. The beauty of this recipe is its adaptability, allowing you to tailor it perfectly to your preferences and the occasion.
So, please, take this recipe, make it your own, and enjoy the process of creating something truly special. I am incredibly excited for you to experience the joy of biting into one of these sensational
Elegant Boston Cream Dessert Bars
. There’s a profound satisfaction that comes from baking something so delicious and sharing it with loved ones. Once you’ve whipped up your batch, I would absolutely love to hear about your experience! Did you stick to the original? Did you try a variation? How did your family and friends react? Your feedback and shared stories are what make this baking community so vibrant and inspiring. Don’t be shy; share your creations and your thoughts!
Happy baking, and may your kitchen be filled with the wonderful aroma of these incredible Boston Cream Dessert Bars!
Elegant Boston Cream Dessert Bars
Elegant Boston Cream Dessert Bars are about to become your new favorite indulgent treat. Imagine all the luscious layers of a classic Boston cream pie, transformed into a convenient, handheld delight perfect for any occasion. This innovative twist takes the beloved flavors of a historical dessert and presents them in an effortlessly enjoyable bar format.
Ingredients
-
1 cup all-purpose flour
-
½ cup granulated sugar (for cake base)
-
½ cup unsalted butter, softened (for cake base)
-
2 cups milk (for pastry cream)
-
½ cup granulated sugar (for pastry cream)
-
¼ cup cornstarch
-
1 cup heavy cream (for ganache)
-
1 cup dark chocolate, chopped (for ganache)
Instructions
-
Step 1
For the Base: Preheat oven to 350°F (175°C). Line a 9×13 inch pan with parchment. In a bowl, combine 1 cup all-purpose flour, ½ cup granulated sugar (for cake base), and ½ cup unsalted butter, softened. Mix until crumbly. Press evenly into the prepared pan. -
Step 2
Bake the Base: Bake for 25-30 minutes, or until lightly golden. Remove from oven and cool completely on a wire rack. -
Step 3
For the Pastry Cream: In a medium saucepan, heat 2 cups milk with ½ cup granulated sugar (for pastry cream) until just simmering. In a separate bowl, whisk ¼ cup cornstarch with a small amount of the cold milk until smooth. Temper the cornstarch mixture by gradually whisking in about half of the hot milk. Pour this mixture back into the saucepan with the remaining hot milk. -
Step 4
Cook Pastry Cream: Return saucepan to medium heat and cook, whisking constantly, until the mixture thickens considerably and comes to a boil. Continue whisking for 1-2 minutes. Remove from heat. Strain into a clean bowl, cover surface directly with plastic wrap, and chill for at least 4 hours, or preferably overnight, until completely cold and set. -
Step 5
Assemble the Bars: Once the base is cool and pastry cream is chilled, whisk the pastry cream briefly to loosen. Evenly spread the pastry cream over the cooled base. Chill for another 30-60 minutes. -
Step 6
For the Ganache: In a small saucepan, heat 1 cup heavy cream until it just begins to simmer. Remove from heat and immediately add 1 cup dark chocolate, chopped. Let stand for 5 minutes, then whisk gently until smooth and glossy. Let cool for 10-15 minutes until slightly thickened but still pourable. -
Step 7
Finish with Ganache: Pour the slightly cooled ganache evenly over the chilled pastry cream layer. Gently tilt the pan to spread to the edges. -
Step 8
Chill and Serve: Place the entire pan back into the refrigerator and chill for at least 2-4 hours, or until the ganache is completely set. To serve, lift the dessert from the pan using the parchment overhang. Use a very sharp, hot knife (wiping clean between slices) to cut into 12-16 bars. Serve chilled.
Important Information
Nutrition Facts (Per Serving)
It is important to consider this information as approximate and not to use it as definitive health advice.
Allergy Information
Please check ingredients for potential allergens and consult a health professional if in doubt.
Leave a Comment