
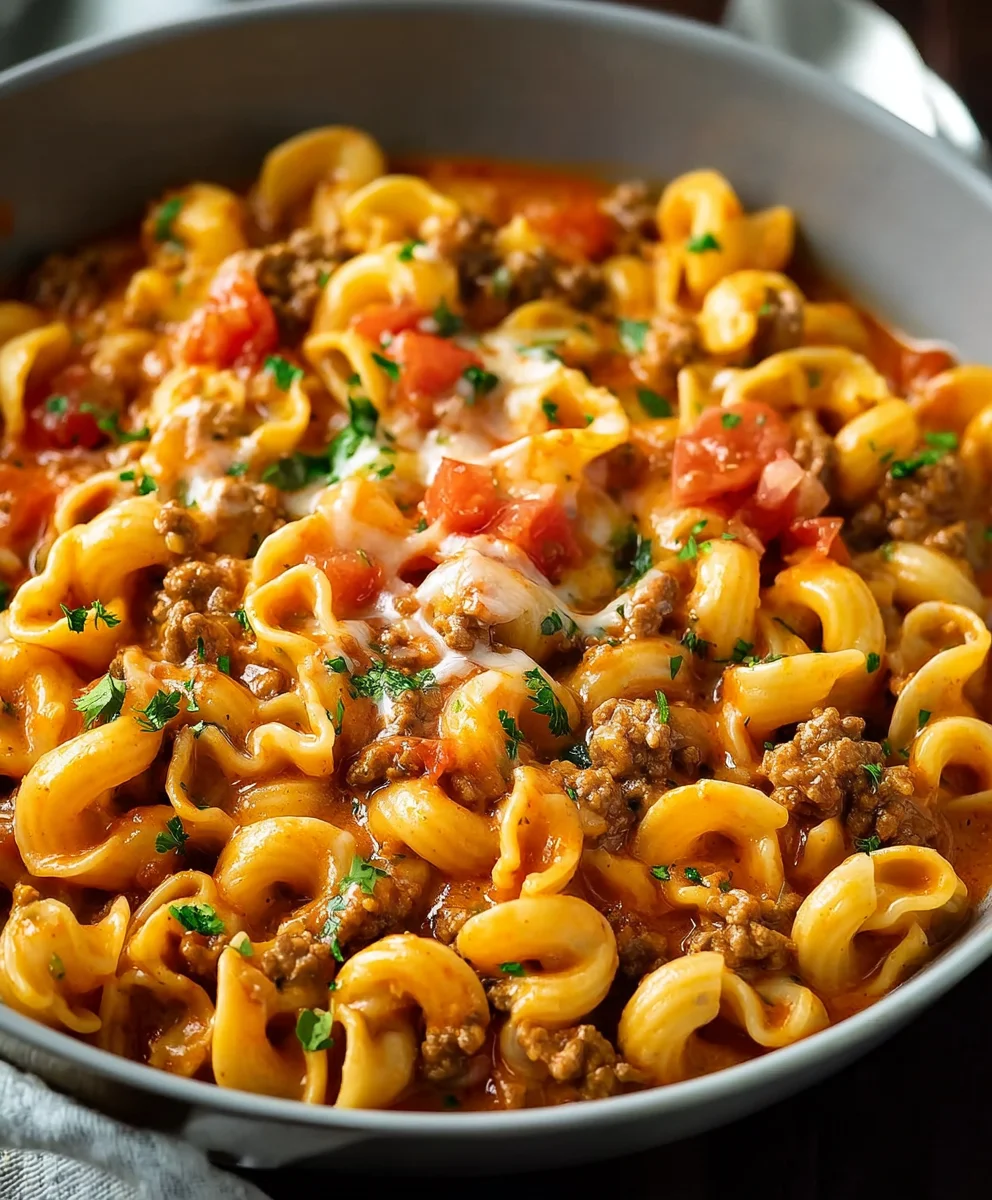
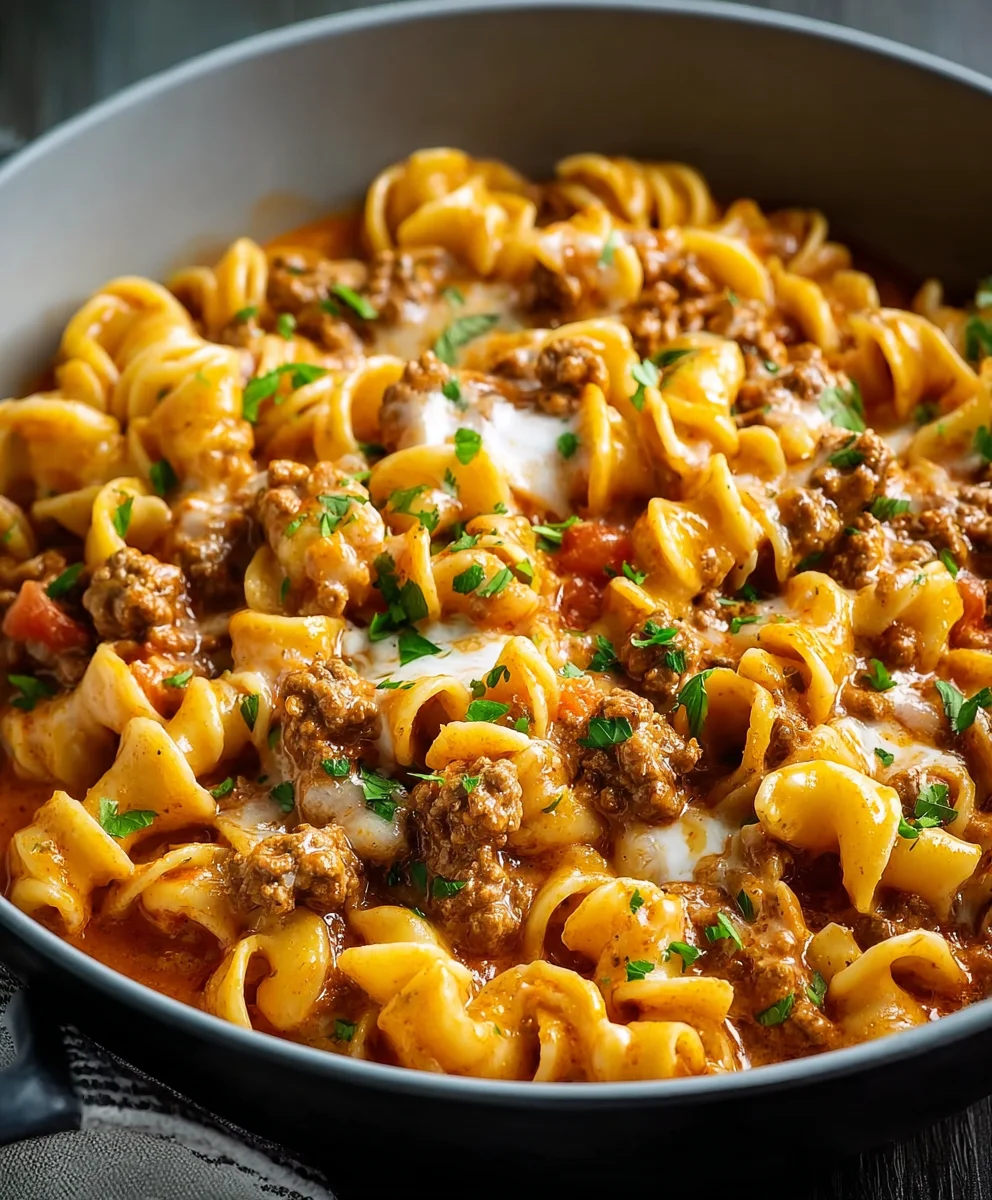
Creamy Taco Pasta is more than just a meal; it’s a vibrant celebration of flavor, bringing together two beloved culinary worlds into one unforgettable dish. Have you ever wished you could capture the zesty, savory essence of taco night and combine it with the comforting embrace of a creamy pasta? Well, your culinary dreams are about to come true! This ingenious creation, while not steeped in ancient tradition, represents a modern-day fusion masterpiece born from a desire for convenience and an unapologetic love for bold flavors. It’s the perfect answer to those weeknights when you crave something exciting yet effortlessly satisfying.
What truly makes this dish a standout is its incredible versatility and the sheer joy it brings to the dinner table. We find ourselves constantly drawn to its rich, velvety texture, the tantalizing blend of spices, and the wholesome goodness that makes every bite a delightful experience. This Creamy Taco Pasta embodies comfort food perfection, offering a unique twist on familiar favorites that appeals to all ages. It’s quick to prepare, incredibly customizable with your favorite taco toppings, and guarantees smiles all around. Get ready to transform your dinner routine with a recipe that is destined to become a new family favorite!

Ingredients:
- 1 tablespoon olive oil: Just a touch to get things going and prevent sticking when we start browning our beef.
- 1 ½ pounds ground beef (80/20 or 85/15 recommended): This fat content provides excellent flavor and keeps the meat wonderfully juicy, which is crucial for a rich Creamy Taco Pasta. While you can opt for ground turkey or chicken for a leaner alternative, I personally find that ground beef delivers the most robust and satisfying base for this specific dish.
- 1 large yellow onion, finely chopped: This humble ingredient builds a foundational layer of aromatic sweetness that really elevates the taco meat flavor. Don’t skip the fine chop; it ensures the onion melts into the sauce without being too chunky.
- 2 cloves garlic, minced: Fresh garlic is absolutely non-negotiable here! It provides that pungent, essential flavor pop that defines so much of our favorite comfort food, including our fabulous Creamy Taco Pasta.
- 1 (1.25 ounce) packet taco seasoning: Your trusty shortcut to classic, perfectly balanced taco flavor. Feel free to use a low-sodium version if that’s your preference, or if you’re feeling ambitious, a homemade taco seasoning blend works wonderfully too.
- 1 (14.5 ounce) can diced tomatoes, undrained: The diced tomatoes, along with their flavorful liquid, will provide acidity and moisture, helping the taco meat simmer beautifully and infusing it with a bright, tangy depth that cuts through the richness.
- ½ cup beef broth (or water): This adds further moisture and a rich, savory depth to our meat mixture, preventing it from becoming dry and ensuring every bite of our Creamy Taco Pasta is packed with flavor.
- 12 ounces pasta (medium shells, rotini, or penne work beautifully): I adore how these particular pasta shapes, with their nooks and crannies, are absolutely perfect for capturing every last bit of that luscious, creamy sauce. Be sure to cook your pasta to a perfect al dente for the best texture in the finished dish.
- 2 tablespoons butter: We’ll use this golden, rich fat to create the base of our incredibly creamy sauce, starting with a delicious roux.
- 2 tablespoons all-purpose flour: This is our thickening agent. When combined with the butter, it will form a classic roux, ensuring our sauce for the Creamy Taco Pasta is velvety smooth and perfectly luscious, not watery.
- 2 cups milk (whole milk or 2% recommended for maximum creaminess): This is the primary liquid base for our wonderfully rich and creamy sauce. Using whole milk will undoubtedly yield the most indulgent and satisfyingly creamy result, making your Creamy Taco Pasta truly spectacular.
- 4 ounces cream cheese, softened and cut into cubes: Ah, the secret weapon! Cream cheese provides an unparalleled level of creaminess and introduces a subtle, delightful tang that beautifully complements the savory taco flavors. Softening and cubing it helps it melt smoothly into the sauce.
- 1 cup shredded Colby Jack cheese (or a Mexican blend): This cheese melts like a dream, contributing that essential gooey, savory, cheesy goodness that makes any pasta dish, especially a Creamy Taco Pasta, utterly irresistible.
- ½ cup sour cream: Swirled in right at the end, sour cream adds an extra layer of cooling creaminess and a delightful, zesty tang that brightens the entire dish and truly completes the taco flavor profile.
Optional Toppings (Highly Recommended for the Ultimate Creamy Taco Pasta Experience):
- Shredded lettuce: For a crisp, fresh contrast.
- Diced fresh tomatoes: Adds a juicy, vibrant pop of flavor and color.
- Diced red onion: A bit of sharpness and crunch.
- Sliced black olives: A classic taco topping that brings a briny touch.
- Fresh cilantro, chopped: For a bright, herbaceous finish.
- Extra shredded cheese: Because can you ever have too much cheese?
- Jalapeño slices (fresh or pickled): For those who love a little extra heat and a zesty kick in their Creamy Taco Pasta.
- Crushed tortilla chips or strips: Adds a wonderful textural crunch.
Instructions:
Phase 1: Preparing the Flavorful Taco Meat Mixture
- Begin with the Ground Beef: Place a large skillet or Dutch oven over medium-high heat. Add the 1 tablespoon of olive oil and allow it to shimmer. Once hot, add the 1 ½ pounds of ground beef. Break up the meat with a spoon or spatula as it cooks. Your goal here is to brown the beef thoroughly, ensuring there’s no pink remaining, and to render out some of its fat. This browning step is absolutely crucial for developing deep, rich flavors that will be the backbone of your Creamy Taco Pasta.
- Drain and Sauté Aromatics: Once the ground beef is fully browned, carefully drain off any excess fat. This prevents the final dish from being overly greasy. Return the skillet to medium heat. Add the finely chopped yellow onion to the browned beef. Cook, stirring occasionally, for about 5-7 minutes, or until the onion has softened and become translucent. Next, add the minced garlic and cook for another minute, until it becomes wonderfully fragrant. Be careful not to burn the garlic, as burnt garlic can taste bitter. The aroma filling your kitchen right now is the beginning of something truly delicious!
- Infuse with Taco Flavor: Sprinkle the entire 1.25 ounce packet of taco seasoning over the beef and onion mixture. Stir well to ensure the seasoning evenly coats all the meat. Cook for about 1-2 minutes, stirring constantly, allowing the spices to toast slightly and release their full aromatic potential. This step really awakens those classic taco flavors that we love in our Creamy Taco Pasta.
- Simmer the Taco Meat: Pour in the undrained can of diced tomatoes and the ½ cup of beef broth (or water). Stir everything together, scraping up any browned bits from the bottom of the skillet – those are packed with flavor! Bring the mixture to a gentle simmer, then reduce the heat to low, cover the skillet, and let it cook for at least 10-15 minutes. This simmering time allows all the flavors to meld beautifully, the meat to become incredibly tender, and the sauce to thicken slightly. This deep, rich taco meat is key to the overall success and authentic taste of your Creamy Taco Pasta.
Phase 2: Cooking the Pasta and Building the Irresistible Creamy Taco Pasta Sauce
- Cook the Pasta: While your taco meat is simmering away, bring a large pot of heavily salted water to a rolling boil. Add your chosen 12 ounces of pasta (medium shells, rotini, or penne are fantastic choices for catching the sauce). Cook according to package directions until it is perfectly al dente. This means it should be tender but still have a slight bite to it. Under-cooked pasta will be hard, and over-cooked pasta will be mushy, neither of which we want in our Creamy Taco Pasta. Once cooked, drain the pasta well and set it aside. Do not rinse the pasta; the starchy water clinging to it helps the sauce adhere better.
- Prepare the Roux for Creaminess: In a separate large saucepan or a clean skillet (if your taco meat pan is still in use), melt the 2 tablespoons of butter over medium heat. Once the butter is melted and slightly foamy, sprinkle in the 2 tablespoons of all-purpose flour. Whisk constantly for 1-2 minutes, creating a smooth paste known as a roux. This mixture will turn a pale golden color and develop a nutty aroma. The roux is essential for thickening our sauce and giving it that luxurious, velvety texture that defines a truly great Creamy Taco Pasta.
- Whisk in the Milk: Slowly pour the 2 cups of milk into the roux, a little bit at a time, whisking continuously to prevent lumps. Continue to whisk until the sauce is smooth and no flour lumps remain. Increase the heat to medium-high and bring the mixture to a gentle simmer, stirring frequently. As it heats, the sauce will begin to thicken. Reduce the heat to low once it has thickened to your desired consistency – you’re looking for something that coats the back of a spoon.
- Melt in the Cream Cheese and Shredded Cheese: Reduce the heat to the lowest setting. Add the 4 ounces of softened cream cheese, cut into cubes, to the thickened milk sauce. Stir gently until the cream cheese is completely melted and smoothly incorporated into the sauce. Then, gradually add the 1 cup of shredded Colby Jack cheese (or your Mexican blend), a handful at a time, stirring after each addition until it is fully melted and the sauce is wonderfully smooth and glossy. This combination of cream cheese and shredded cheese is what truly makes our Creamy Taco Pasta spectacularly rich and indulgent.
- Finish with Sour Cream: Remove the sauce from the heat. Stir in the ½ cup of sour cream until it is fully incorporated. This step adds a final touch of cooling creaminess and a delightful tang that brightens the entire sauce. Taste the sauce and adjust seasonings if necessary; you might want a pinch of salt or a twist of black pepper, depending on your taco seasoning’s salt content.
Phase 3: Combining and Serving Your Delicious Creamy Taco Pasta
- Combine the Components: Add the drained, cooked pasta directly into the skillet with your simmering taco meat mixture. Give it a good stir to ensure the pasta is thoroughly coated with that savory, spicy meat sauce.
- Introduce the Creamy Sauce: Now, pour the luxurious, cheesy cream sauce from your separate saucepan over the pasta and taco meat. Stir gently but thoroughly, ensuring every piece of pasta and every morsel of meat is bathed in that irresistible creamy goodness. Cook for another 1-2 minutes over low heat, stirring constantly, just long enough for everything to be heated through and perfectly combined. The aroma emanating from your kitchen right now will confirm that your Creamy Taco Pasta is ready to be devoured!
- Final Taste and Adjustments: Take a small spoonful and taste your magnificent Creamy Taco Pasta. This is your chance to make any final adjustments. Perhaps a little more salt, a dash of hot sauce for extra kick, or even a tiny splash of milk if you prefer a looser consistency. Remember, personal preference is key to making this dish truly yours.
- Serve Immediately: Ladle generous portions of your hot and fresh Creamy Taco Pasta into bowls. This dish is best enjoyed immediately while it’s warm and wonderfully creamy.
Phase 4: Optional Garnish and Expert Tips for the Best Creamy Taco Pasta
- Garnish for Perfection: Now for the fun part! This is where you can truly elevate your Creamy Taco Pasta experience. Scatter your favorite optional toppings generously over each serving. A handful of fresh, crisp shredded lettuce adds a wonderful cool crunch. Diced fresh tomatoes provide a burst of juicy acidity, while a sprinkle of diced red onion introduces a sharp, fresh bite. Don’t forget the fresh cilantro for an herbaceous lift, or a few slices of jalapeño for a spicy kick. For ultimate indulgence, add an extra sprinkle of shredded cheese and a dollop of sour cream on top. Crushed tortilla chips also add a fantastic textural contrast and reinforce that taco flavor.
- Make Ahead Tips for Convenience: While this Creamy Taco Pasta is undoubtedly best served fresh, you can certainly prepare components ahead of time. The taco meat mixture can be cooked up to 2-3 days in advance and stored in an airtight container in the refrigerator. The cheesy cream sauce can also be made ahead, but you may need to gently reheat it with a splash of milk and whisk vigorously to restore its creamy texture before combining. Cook your pasta just before serving for the best results, as pasta tends to absorb a lot of sauce and can become too soft if left sitting for too long.
- Leftovers and Reheating: If you happen to have any leftovers of this delectable Creamy Taco Pasta, store them in an airtight container in the refrigerator for up to 3-4 days. When reheating, I recommend doing so gently on the stovetop over low heat, adding a splash of milk or broth to help loosen the sauce and restore its creamy consistency. Stir frequently until heated through. The microwave can work too, but the stovetop method generally yields a better texture.
-
Variations to Personalize Your Creamy Taco Pasta:
- Protein Swap: As mentioned, ground turkey or chicken can be substituted for ground beef for a leaner version. You could even try shredded chicken!
- Spice It Up: For those who love heat, add a pinch of cayenne pepper or a dash of your favorite hot sauce to the taco meat while it simmers, or to the creamy sauce.
- Add Veggies: Feel free to toss in some drained corn, black beans, or even diced bell peppers along with the onion for extra nutrition and color. Just make sure they are well-drained to avoid making the dish watery.
- Cheesy Choices: Experiment with different cheeses! Pepper Jack will add a lovely kick, while sharp cheddar can deepen the cheesy flavor.
- Smoky Notes: A pinch of smoked paprika in the taco seasoning or the sauce can add a wonderful depth.
The beauty of Creamy Taco Pasta lies in its versatility and ability to be customized to your family’s preferences.
- Why Al Dente Matters for Creamy Taco Pasta: I cannot stress enough the importance of cooking your pasta to an al dente texture. When pasta is cooked perfectly, it retains a slight firmness that provides a pleasant chew and prevents it from becoming mushy once combined with the hot, creamy sauce. Overcooked pasta will break down and essentially disappear into the sauce, diminishing the overall texture and appeal of your otherwise perfect Creamy Taco Pasta. Follow the package directions for cooking time, but always taste a piece a minute or two before the suggested time to ensure it’s just right.
- The Role of Fat in Flavor: While some might be tempted to use extra-lean ground beef, I strongly recommend sticking with 80/20 or 85/15. The fat content contributes significantly to the flavor and juiciness of the taco meat, which translates directly into a more satisfying and rich Creamy Taco Pasta. Draining the excess fat after browning ensures you get all the flavor without the grease. It’s a balance that truly makes a difference.
Conclusion:
And there you have it, my friends! We’ve journeyed through the simple steps to create what I genuinely believe will become a staple in your home: the incredible Creamy Taco Pasta. I can’t emphasize enough just how much this dish brings to the table. It’s not merely a meal; it’s an experience, a delightful fusion that effortlessly marries the zesty, familiar flavors of your favorite tacos with the comforting, hearty embrace of a perfectly cooked pasta dish. If you’re looking for a weeknight hero that pleases even the pickiest eaters, offers immense satisfaction after a long day, and still manages to feel like a special treat, then this recipe is an absolute must-try. It truly delivers on all fronts – convenience, incredible taste, and that wonderful feeling of a home-cooked meal made with love. I’ve made it countless times for family gatherings, casual dinners with friends, and even just for a cozy night in, and it never, ever disappoints. The rich, savory notes from the taco seasoning, combined with the smooth, cheesy sauce clinging to every noodle, create a symphony of flavors that will have everyone asking for seconds.
When it comes to serving this magnificent pasta, you have a plethora of options to truly complete the meal. On its own, the Creamy Taco Pasta is incredibly fulfilling, but pairing it with a fresh, crisp side salad tossed in a bright vinaigrette can add a wonderful counterpoint to its richness. Imagine a simple mixed green salad with cherry tomatoes, cucumber, and perhaps some avocado slices – refreshing and light! For those who love a bit of extra texture and flavor, a side of warm, fluffy cornbread or garlic bread for dipping into any leftover sauce would be an absolute dream. And don’t forget the beverages! A cold glass of agua fresca, a sparkling limeade, or even a chilled beer can perfectly complement the vibrant flavors of the dish. I personally love to have a bowl of tortilla chips nearby for extra crunch, as if you were truly enjoying tacos, allowing me to scoop up some of that delicious pasta directly onto the chip – a truly indulgent bite!
Endless Possibilities for Customization!
One of the aspects I adore most about this recipe is its incredible versatility. While the core recipe is stellar as written, please feel empowered to make it your own! Don’t be afraid to experiment and tailor it to your family’s preferences or whatever ingredients you have on hand. For a different protein, ground chicken or ground turkey work beautifully, offering a slightly lighter take without sacrificing flavor. If you’re aiming for a vegetarian option, simply swap out the meat for black beans, pinto beans, or a mix of sautéed mushrooms and bell peppers. You could even incorporate some corn kernels or diced tomatoes right into the sauce for extra texture and freshness. Want to dial up the heat? A pinch more chili powder, a dash of your favorite hot sauce, or finely diced jalapeños (seeds removed for less intensity) will definitely awaken your taste buds. For cheese lovers, feel free to experiment with different varieties; while cheddar is classic, a blend of Monterey Jack, pepper jack for a little kick, or even some cotija cheese crumbled in at the end can elevate the flavor profile. As for toppings, the sky’s the limit! Fresh cilantro, thinly sliced green onions, a dollop of sour cream or Greek yogurt, a scoop of guacamole, or even some crushed tortilla chips for an added crunch are all fantastic additions that truly enhance the experience. I’ve even seen people add a sprinkle of crispy fried onions for an unexpected twist!
Your Culinary Adventure Awaits
So, my dear friends, I implore you: don’t let another week go by without experiencing the magic of this Creamy Taco Pasta. It’s deceptively simple to prepare, yet it delivers a depth of flavor that tastes like you’ve spent hours in the kitchen. I promise, the moment that first forkful hits your palate, you’ll understand why I’m so enthusiastic about it. It’s comforting, it’s exciting, and it’s undeniably delicious. This is more than just a recipe; it’s an invitation to create joy in your kitchen and at your dinner table. Whether you’re a seasoned chef or a kitchen novice, you’ll find this recipe incredibly forgiving and rewarding.
I would absolutely love to hear about your experience! Once you’ve whipped up your own batch, please come back and share your thoughts. Did you add any unique twists? What were your favorite toppings? Did your family rave about it as much as mine does? Your feedback and creative modifications not only inspire me but also help build a wonderful community of fellow food lovers. So, gather your ingredients, turn on some of your favorite tunes, and get ready to create a meal that will bring smiles and satisfaction to everyone lucky enough to enjoy it. Happy cooking, and I can’t wait to hear all about your delicious journey!
Recipe
A delicious recipe
Ingredients
Instructions
Important Information
Nutrition Facts (Per Serving)
It is important to consider this information as approximate and not to use it as definitive health advice.
Allergy Information
Please check ingredients for potential allergens and consult a health professional if in doubt.


Leave a Comment