
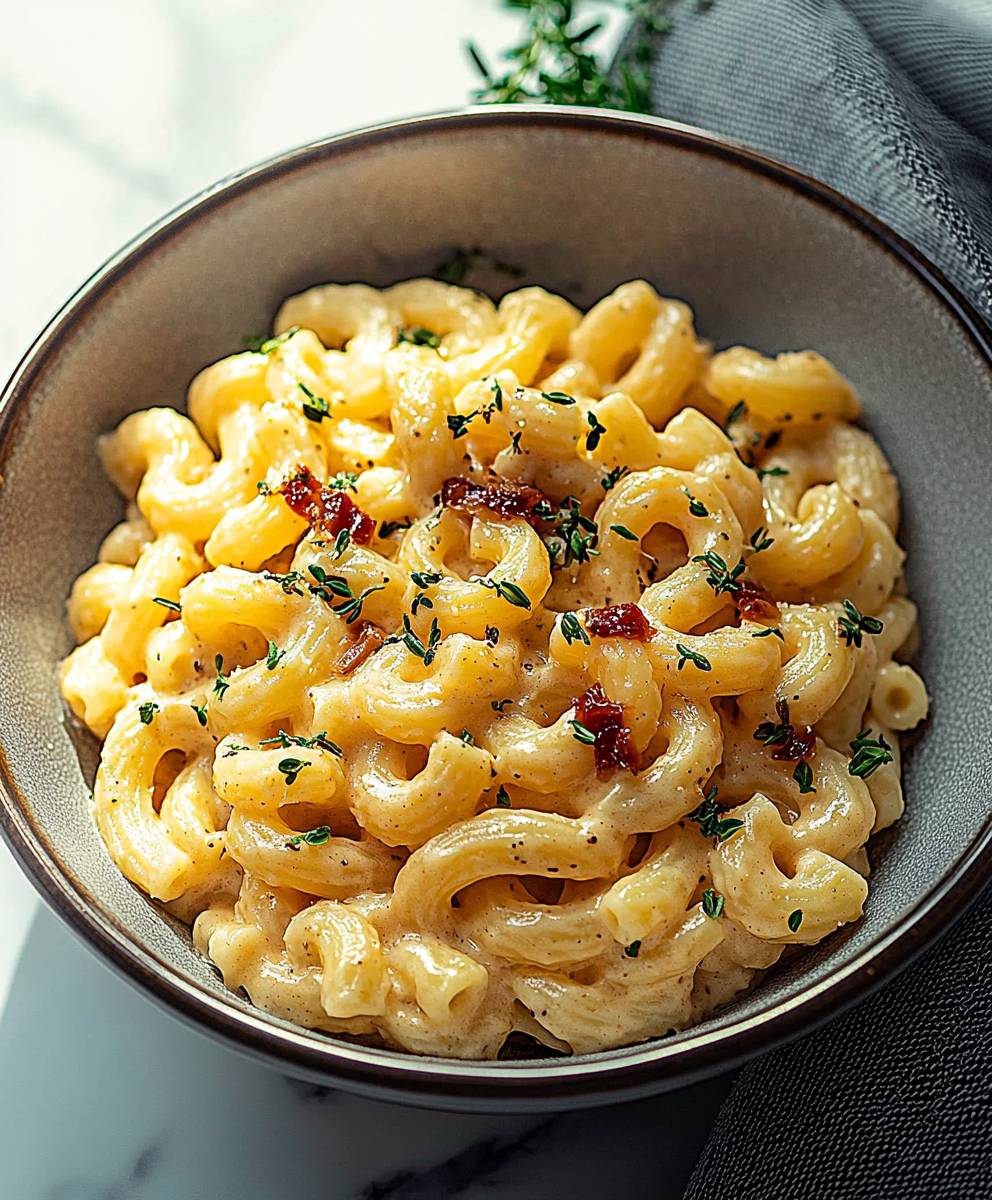
Creamy Cavatappi Pasta: Prepare to be utterly captivated by this dish, a symphony of textures and flavors that will redefine your weeknight dinner routine. Imagine perfectly cooked, ridged cavatappi pasta, each spiral cradling a luscious, velvety sauce that clings with delightful tenacity. This isn’t just pasta; it’s an experience.
While the exact origins of creamy cavatappi pasta are somewhat shrouded in mystery, its modern popularity likely stems from the comfort food renaissance of recent decades. People crave dishes that are both satisfying and easy to prepare, and this recipe delivers on both fronts. It’s a celebration of simplicity, transforming humble ingredients into something truly extraordinary.
What makes this dish so irresistible? It’s the harmonious blend of creamy richness and satisfying chew. The cavatappi pasta, with its unique shape, provides the perfect canvas for the sauce, ensuring that every bite is bursting with flavor. The creamy sauce, often featuring a blend of cheeses and herbs, elevates the pasta to a whole new level of indulgence. Whether you’re looking for a quick and easy weeknight meal or a crowd-pleasing dish for a gathering, this creamy cavatappi pasta is guaranteed to be a hit. I know my family asks for it at least once a week!

Ingredients:
- 1 pound cavatappi pasta
- 6 tablespoons unsalted butter
- 4 cloves garlic, minced
- 1/4 cup all-purpose flour
- 4 cups whole milk
- 1 cup heavy cream
- 1 teaspoon salt, or more to taste
- 1/2 teaspoon black pepper, or more to taste
- 1/4 teaspoon nutmeg
- 1/4 teaspoon cayenne pepper (optional, for a little kick)
- 4 cups shredded sharp cheddar cheese
- 2 cups shredded Gruyere cheese
- 1 cup grated Parmesan cheese, plus more for serving
- 1/2 cup chopped fresh parsley, for garnish (optional)
- Breadcrumbs (optional, for topping)
- 2 tablespoons olive oil (if using breadcrumbs)
Cooking the Pasta:
- First things first, let’s get that pasta cooking! Bring a large pot of salted water to a rolling boil. The salt is important it seasons the pasta from the inside out.
- Add the cavatappi pasta to the boiling water and cook according to the package directions, usually around 8-10 minutes, or until al dente. Al dente means “to the tooth” in Italian you want the pasta to be firm but cooked through, not mushy.
- Once the pasta is cooked, reserve about 1 cup of the pasta water. This starchy water is liquid gold! We’ll use it later to help create a super creamy sauce.
- Drain the pasta in a colander and set it aside. Don’t rinse it! Rinsing removes the starch, which we want to keep for the sauce.
Making the Cheese Sauce:
- Now for the star of the show: the cheese sauce! In a large, heavy-bottomed saucepan or Dutch oven, melt the butter over medium heat. A heavy-bottomed pan will help prevent the sauce from scorching.
- Add the minced garlic to the melted butter and cook for about 1 minute, or until fragrant. Be careful not to burn the garlic, as it will become bitter.
- Whisk in the flour and cook for 1-2 minutes, stirring constantly. This creates a roux, which is the base of our cheese sauce. Cooking the flour removes the raw flour taste.
- Slowly whisk in the milk, a little at a time, making sure to incorporate it fully before adding more. This will help prevent lumps from forming.
- Once all the milk is added, whisk in the heavy cream.
- Bring the mixture to a simmer over medium heat, stirring constantly. Simmer for about 5-7 minutes, or until the sauce has thickened slightly. It should be thick enough to coat the back of a spoon.
- Remove the saucepan from the heat and stir in the salt, pepper, nutmeg, and cayenne pepper (if using). Taste and adjust the seasonings as needed. Remember, you can always add more, but you can’t take it away!
- Now it’s time for the cheese! Add the shredded cheddar cheese, Gruyere cheese, and grated Parmesan cheese to the sauce, a handful at a time, stirring until each addition is completely melted and smooth before adding more. This will ensure that the cheese melts evenly and doesn’t clump together.
- If the sauce is too thick, add a little of the reserved pasta water, a tablespoon at a time, until it reaches your desired consistency. The pasta water will also add extra starch, making the sauce even creamier.
Combining and Baking (Optional):
- Add the cooked cavatappi pasta to the cheese sauce and stir to coat evenly. Make sure every nook and cranny of the pasta is covered in that glorious cheese sauce!
- At this point, you can either serve the pasta immediately or bake it for an extra layer of cheesy goodness.
- For baking: Preheat your oven to 350°F (175°C).
- Pour the pasta and cheese sauce mixture into a greased 9×13 inch baking dish.
- Optional Breadcrumb Topping: In a small bowl, combine breadcrumbs with olive oil. Sprinkle evenly over the pasta.
- Bake for 20-25 minutes, or until the top is golden brown and bubbly.
- Let the pasta stand for a few minutes before serving. This will allow the sauce to thicken slightly.
Serving:
- Serve the creamy cavatappi pasta hot, garnished with chopped fresh parsley and extra grated Parmesan cheese, if desired.
- This pasta is delicious on its own, or you can serve it as a side dish with grilled chicken, steak, or vegetables.
- Enjoy!
Tips and Variations:
- Cheese Variations: Feel free to experiment with different types of cheese! Fontina, mozzarella, provolone, or even pepper jack would be delicious additions or substitutions.
- Add-Ins: Get creative with add-ins! Cooked bacon, ham, sausage, or vegetables like broccoli, peas, or mushrooms would all be great additions.
- Spice it Up: If you like a little heat, add a pinch of red pepper flakes or a dash of hot sauce to the cheese sauce.
- Make it Ahead: You can prepare the pasta and cheese sauce ahead of time and store them separately in the refrigerator. When you’re ready to serve, simply combine them and bake as directed.
- Gluten-Free Option: Use gluten-free cavatappi pasta and gluten-free all-purpose flour to make this dish gluten-free.
- Creaminess Factor: For an even richer and creamier sauce, you can substitute half-and-half for some of the milk.
- Garlic Lovers: If you’re a garlic fanatic like me, don’t be afraid to add an extra clove or two!
- Breadcrumb Perfection: For the breadcrumb topping, you can use panko breadcrumbs for extra crunch or Italian breadcrumbs for added flavor. Toasting the breadcrumbs in a dry skillet before adding the olive oil will also enhance their flavor and texture.
- Preventing a Skin: If you’re not serving the pasta immediately after making it, you can prevent a skin from forming on the surface of the sauce by pressing a piece of plastic wrap directly onto the surface of the sauce.
- Reheating: To reheat leftover pasta, add a splash of milk or cream to the pasta before microwaving or reheating on the stovetop. This will help to prevent the pasta from drying out.
Troubleshooting:
- Lumpy Sauce: If your sauce becomes lumpy, try whisking it vigorously or using an immersion blender to smooth it out. You can also strain the sauce through a fine-mesh sieve to remove any lumps.
- Thick Sauce: If your sauce is too thick, add a little more milk or pasta water until it reaches your desired consistency.
- Thin Sauce: If your sauce is too thin, simmer it for a few more minutes, stirring constantly, until it thickens. You can also whisk in a cornstarch slurry (1 tablespoon cornstarch mixed with 2 tablespoons cold water) to help thicken the sauce.
- Burnt Garlic: If you accidentally burn the garlic, discard it and start over with fresh garlic. Burnt garlic will make the entire sauce taste bitter.
- Cheese Not Melting: Make sure the sauce is hot enough to melt the cheese. If the cheese is not melting, increase the heat slightly and stir constantly until it melts. Also, make sure you’re using freshly grated cheese, as pre-shredded cheese often contains cellulose, which can prevent it from melting properly.
Conclusion:
This Creamy Cavatappi Pasta isn’t just another pasta dish; it’s a comforting, flavorful experience that’s surprisingly easy to create. From the satisfying chew of the cavatappi to the rich, velvety sauce clinging to every groove, this recipe is a guaranteed crowd-pleaser. I truly believe it’s a must-try for anyone looking for a quick weeknight dinner or a simple yet impressive dish to serve at a gathering. The beauty of this recipe lies in its adaptability.
Think of it as a blank canvas for your culinary creativity! Feeling adventurous? Add a sprinkle of red pepper flakes for a touch of heat. Craving something green? Toss in some steamed broccoli florets or sautéed spinach during the last few minutes of cooking. For a protein boost, grilled chicken, shrimp, or even crumbled Italian sausage would be fantastic additions. You could also experiment with different cheeses. While I’m partial to the classic combination of Parmesan and Gruyere, a sharp cheddar or a creamy fontina would also work beautifully.
Serving suggestions are endless! This Creamy Cavatappi Pasta is delicious on its own, but it also pairs perfectly with a crisp green salad and some crusty bread for dipping into that luscious sauce. For a more substantial meal, serve it alongside roasted vegetables like asparagus or Brussels sprouts. And don’t forget the wine! A crisp white wine like Pinot Grigio or Sauvignon Blanc would complement the richness of the pasta perfectly.
But the real magic happens when you make it your own. Don’t be afraid to experiment with different ingredients and flavors to create a dish that truly reflects your personal taste. Maybe you’ll discover a new favorite combination that you’ll want to make again and again. That’s the joy of cooking, isn’t it?
I’m so excited for you to try this recipe and experience the deliciousness for yourself. I poured my heart into perfecting it, and I truly believe you’ll love it as much as I do. Once you’ve had a chance to whip up a batch of this Creamy Cavatappi Pasta, I’d absolutely love to hear about your experience. Did you make any modifications? What were your favorite additions? What did your family and friends think?
Please, share your photos and stories in the comments below! Your feedback is invaluable, and it helps me to continue creating recipes that you’ll love. I can’t wait to see what culinary masterpieces you create with this recipe as your starting point. Happy cooking, and bon appétit! I am confident that this will become a staple in your recipe book.
Creamy Cavatappi Pasta: The Ultimate Comfort Food Recipe
Creamy, cheesy cavatappi pasta with a rich sauce featuring cheddar, Gruyere, and Parmesan. Perfect as a main course or side.
Ingredients
- 1 pound cavatappi pasta
- 6 tablespoons unsalted butter
- 4 cloves garlic, minced
- 1/4 cup all-purpose flour
- 4 cups whole milk
- 1 cup heavy cream
- 1 teaspoon salt, or more to taste
- 1/2 teaspoon black pepper, or more to taste
- 1/4 teaspoon nutmeg
- 1/4 teaspoon cayenne pepper (optional, for a little kick)
- 4 cups shredded sharp cheddar cheese
- 2 cups shredded Gruyere cheese
- 1 cup grated Parmesan cheese, plus more for serving
- 1/2 cup chopped fresh parsley, for garnish (optional)
- Breadcrumbs (optional, for topping)
- 2 tablespoons olive oil (if using breadcrumbs)
Instructions
- Cook the Pasta: Bring a large pot of salted water to a rolling boil. Add the cavatappi pasta and cook according to package directions (8-10 minutes) until al dente. Reserve 1 cup of pasta water, then drain the pasta (do not rinse).
- Make the Cheese Sauce: In a large, heavy-bottomed saucepan or Dutch oven, melt the butter over medium heat. Add the minced garlic and cook for about 1 minute, or until fragrant. Whisk in the flour and cook for 1-2 minutes, stirring constantly. Slowly whisk in the milk, a little at a time, making sure to incorporate it fully before adding more. Once all the milk is added, whisk in the heavy cream. Bring the mixture to a simmer over medium heat, stirring constantly. Simmer for about 5-7 minutes, or until the sauce has thickened slightly. Remove from heat and stir in the salt, pepper, nutmeg, and cayenne pepper (if using). Taste and adjust seasonings. Add the shredded cheddar cheese, Gruyere cheese, and grated Parmesan cheese to the sauce, a handful at a time, stirring until each addition is completely melted and smooth before adding more. If the sauce is too thick, add a little of the reserved pasta water, a tablespoon at a time, until it reaches your desired consistency.
- Combine and Bake (Optional): Add the cooked cavatappi pasta to the cheese sauce and stir to coat evenly.
- For baking: Preheat oven to 350°F (175°C). Pour the pasta and cheese sauce mixture into a greased 9×13 inch baking dish.
- Optional Breadcrumb Topping: Combine breadcrumbs with olive oil. Sprinkle evenly over the pasta.
- Bake for 20-25 minutes, or until the top is golden brown and bubbly.
- Let stand for a few minutes before serving.
- Serve: Serve hot, garnished with chopped fresh parsley and extra grated Parmesan cheese, if desired.
Notes
- Cheese Variations: Experiment with different cheeses like Fontina, mozzarella, or provolone.
- Add-Ins: Add cooked bacon, ham, sausage, or vegetables like broccoli or mushrooms.
- Spice it Up: Add red pepper flakes or hot sauce for heat.
- Make it Ahead: Prepare pasta and sauce separately, then combine and bake when ready.
- Gluten-Free: Use gluten-free pasta and flour.
- Creaminess: Substitute half-and-half for some milk for a richer sauce.
- Garlic Lovers: Add extra garlic cloves.
- Breadcrumb Perfection: Use panko or Italian breadcrumbs. Toast breadcrumbs before adding oil.
- Preventing a Skin: Press plastic wrap on the sauce surface if not serving immediately.
- Reheating: Add milk or cream when reheating to prevent drying.
- Lumpy Sauce: Whisk vigorously, use an immersion blender, or strain.
- Thick Sauce: Add more milk or pasta water.
- Thin Sauce: Simmer longer or add a cornstarch slurry.
- Burnt Garlic: Discard and start over.
- Cheese Not Melting: Ensure sauce is hot enough and use freshly grated cheese.
Leave a Comment