
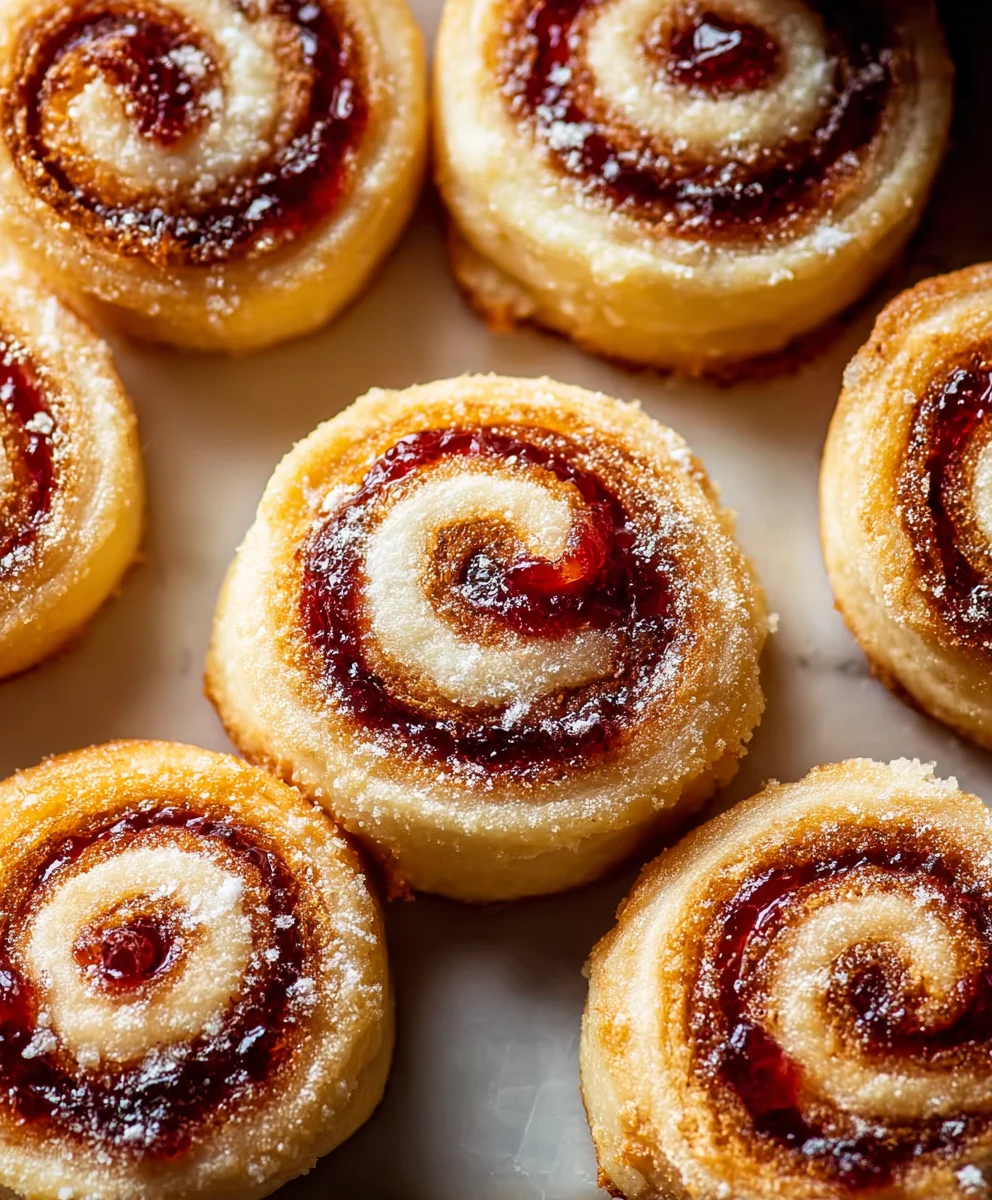
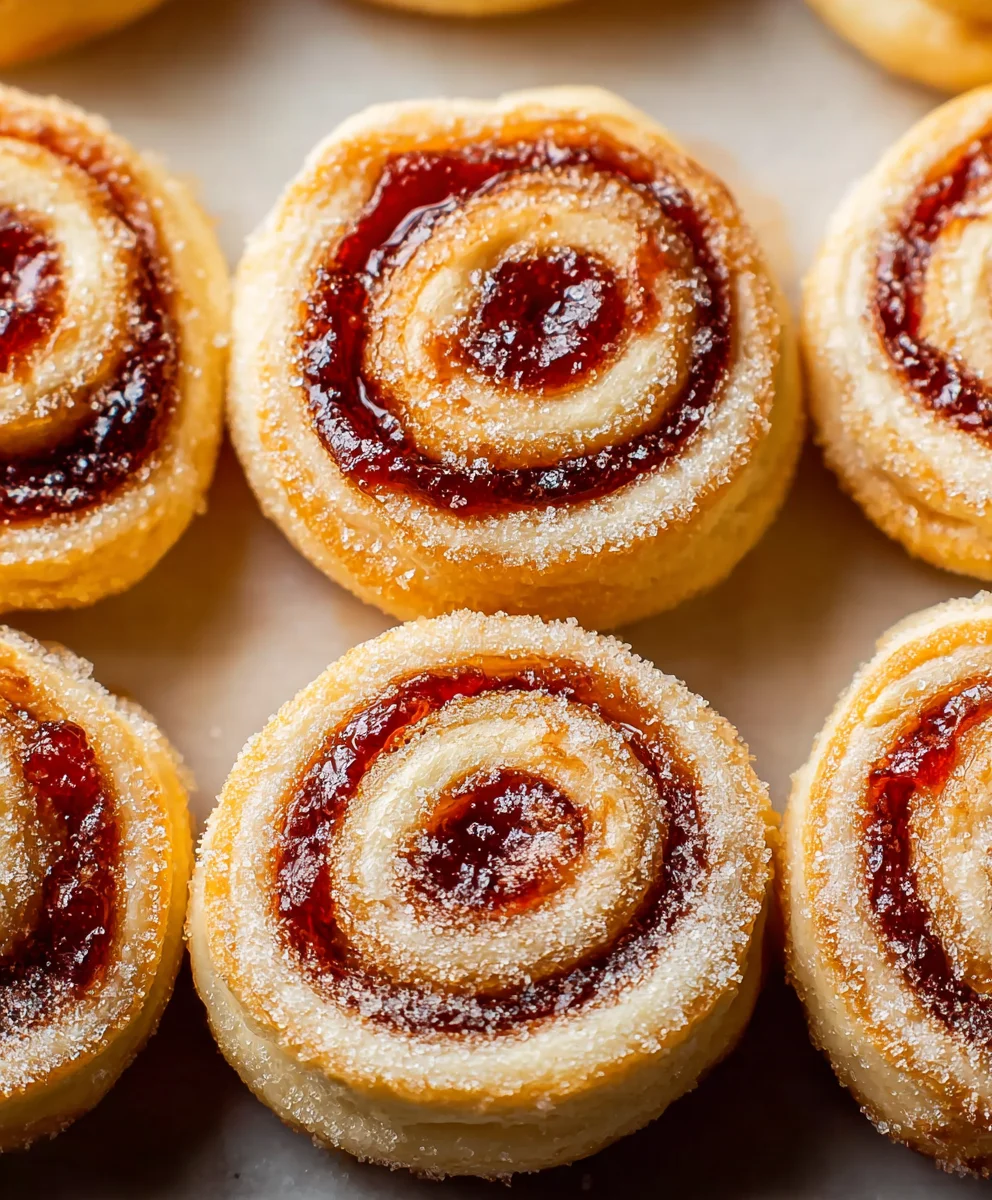
Cream Cheese Jam Pinwheels are more than just a delightful snack; they are a charming invitation to a moment of pure culinary bliss. Imagine delicate swirls of golden-brown pastry, generously filled with luscious cream cheese and a vibrant ribbon of your favorite fruit jam, all baked to tender perfection. I often find that these delightful morsels evoke a sense of nostalgic comfort, reminiscent of cozy weekend brunches or elegant afternoon teas. While their precise origin is a bit whimsical, similar pastry roll-ups have been cherished across various cultures for their simplicity and universal appeal, evolving into this beloved American classic, perfect for any gathering.
What truly makes Cream Cheese Jam Pinwheels a perennial favorite is their irresistible combination of flavors and textures.
The flaky, tender pastry perfectly complements the rich, tangy cream cheese, which in turn harmonizes beautifully with the sweet, often slightly tart, fruit jam. They are incredibly versatile, serving as a sophisticated breakfast treat, an elegant dessert, or a charming addition to any party platter. I am thrilled to guide you through creating these easy yet impressive pastries that are guaranteed to bring smiles to every face!

Ingredients:
- All-Purpose Flour: 3 cups (about 360g), plus extra for dusting your work surface. I always recommend weighing your flour for the most consistent results, but if you’re measuring, make sure to spoon and level it into your measuring cup. This forms the tender backbone of our pastry dough, ensuring a delightful bite every time.
- Unsalted Butter: 1 cup (226g or 2 sticks), softened to room temperature. This is absolutely crucial for achieving that light, flaky texture and smooth creaming process. If your butter is too cold, it won’t cream properly with the cream cheese; if it’s melted, your dough will be greasy and hard to work with. Plan ahead and let it sit out for at least an hour before you start.
- Full-Fat Cream Cheese: 8 ounces (226g or 1 block), softened to room temperature. Just like the butter, this needs to be perfectly soft to blend smoothly into the dough and create that signature tang and tenderness. Don’t be tempted to use low-fat varieties here; the full fat is essential for texture and flavor.
- Granulated Sugar: ½ cup (100g). This adds a lovely touch of sweetness to our pastry dough, balancing the richness of the butter and cream cheese.
- Fine Sea Salt: ½ teaspoon. A little salt goes a long way in enhancing all the other flavors, making the sweetness and tang truly shine. Don’t skip it!
- Pure Vanilla Extract: 1 teaspoon. A classic flavor enhancer that brings warmth and depth to the dough.
- Large Egg: 1, for the dough. This acts as a binder and helps with the structure.
- Powdered Sugar: 1 cup (120g). This is the base for our luscious cream cheese filling. Its fine texture ensures a super smooth and creamy filling.
- Pure Vanilla Extract: ½ teaspoon, for the cream cheese filling. An extra dash of vanilla here complements the cream cheese beautifully.
- Your Favorite Jam or Preserve: ½ cup to ¾ cup. I absolutely adore using a vibrant raspberry or strawberry jam for its contrasting color and tartness, but apricot, cherry, or even a citrus marmalade would be fantastic. Choose something you genuinely love! Make sure it’s not too runny, or it might seep out during baking. If it’s a very thick jam, you might want to give it a quick stir to loosen it slightly.
- Large Egg: 1, for the egg wash. This will give our pinwheels a beautiful golden-brown, glossy finish.
- Water or Milk: 1 tablespoon, for the egg wash. This thins out the egg, making it easier to brush evenly.
- Optional Garnish: A dusting of powdered sugar for serving. This adds a pretty, finished look and a delicate extra layer of sweetness.
Preparing the Cream Cheese Pastry Dough
-
Start with the Wet Ingredients:
In the large bowl of a stand mixer fitted with the paddle attachment (or a large mixing bowl with a hand mixer), combine the softened unsalted butter and the softened cream cheese. Beat on medium speed for about 2-3 minutes, until the mixture is incredibly light, fluffy, and perfectly uniform. You’ll want to scrape down the sides of the bowl periodically to ensure everything is fully incorporated. This initial creaming step is vital for a tender, easy-to-work-with dough. The goal here is to incorporate air, which contributes to the pastry’s lightness.
-
Add Sweetness and Flavor:
Reduce the mixer speed to low and gradually add the granulated sugar and fine sea salt. Continue to beat for another 1-2 minutes, scraping down the sides as needed, until the mixture is well combined and slightly paler in color. Next, beat in the vanilla extract and the large egg for the dough, mixing until just incorporated. Be careful not to overmix once the egg is added, as we don’t want to develop too much gluten at this stage.
-
Incorporate the Dry Ingredients:
In a separate medium bowl, whisk together the all-purpose flour. With the mixer on its lowest speed, gradually add the flour to the wet ingredients, about a third at a time, mixing until just combined after each addition. The key here is to mix only until no streaks of dry flour remain. Overmixing the dough is a common pitfall that can lead to tough pinwheels, and we definitely want ours to be tender and delicate! The dough will be soft, almost like a very thick cookie dough.
-
Chill the Dough:
Gently gather the dough into a ball and divide it into two equal portions. Flatten each portion into a disk, wrap tightly in plastic wrap, and refrigerate for at least 2 hours, or preferably overnight. This chilling step is non-negotiable! It allows the gluten to relax, the butter to firm up, and the flavors to meld, making the dough much easier to roll out and preventing it from becoming sticky. Trust me, patience here will pay off with beautifully structured pinwheels. If you’re short on time, try to give it at least 90 minutes.
Crafting the Cream Cheese Filling
-
Prepare the Cream Cheese Base:
While your dough is chilling, or just before you’re ready to assemble, prepare your filling. In a medium bowl, combine the softened full-fat cream cheese (yes, it needs to be soft for the filling too!) and the powdered sugar. Using a hand mixer or a stand mixer with the paddle attachment, beat on medium speed for 2-3 minutes until the mixture is incredibly smooth, creamy, and completely free of lumps. Scrape down the sides of the bowl frequently to ensure everything is thoroughly combined. The goal is a light, airy, and spreadable consistency.
-
Add the Finishing Touch:
Stir in the ½ teaspoon of vanilla extract. Mix just until combined. Taste and adjust sweetness if you like, though I find this ratio to be perfect. Cover the cream cheese filling and refrigerate until you’re ready to assemble. Keeping it chilled will help it stay firm and easy to spread.
Assembling Your Cream Cheese Jam Pinwheels
-
Prepare Your Work Surface:
Remove one disk of chilled dough from the refrigerator. Lightly flour your work surface and your rolling pin. Flour generously, but not excessively, to prevent sticking. I find a pastry mat very helpful for this step.
-
Roll Out the Dough:
Place one dough disk on your floured surface. Begin rolling the dough out into a rectangle, aiming for a size of approximately 12×16 inches and about ⅛ to ¼ inch thick. Try to keep your rectangle as even as possible, with straight edges, as this will make rolling the pinwheels much easier and result in more uniform slices. If the dough starts to stick, gently lift it and add a little more flour underneath. If the dough becomes too soft or difficult to handle, pop it back into the refrigerator for 10-15 minutes to firm up again – this is a common pastry chef’s trick!
-
Spread the Cream Cheese Filling:
Carefully spread half of the prepared cream cheese filling evenly over the rolled-out dough, leaving about a ½-inch border along one of the longer edges and all other edges. This border will help seal the pinwheel when you roll it up and prevent the filling from oozing out. Aim for a nice, consistent layer – too thick and it might squeeze out, too thin and you won’t get that wonderful creamy contrast.
-
Layer with Jam:
Now, dollop half of your favorite jam over the cream cheese layer. Using the back of a spoon or a small offset spatula, gently spread the jam evenly over the cream cheese. Again, try to keep it within the cream cheese layer, maintaining that ½-inch border. The vibrant color of the jam against the white cream cheese is already a beautiful sight!
-
Roll It Up:
Starting from one of the longer edges (the one without the border you left), carefully and tightly roll the dough into a log. The tighter you roll, the better your pinwheel shape will be and the less likely it is to unravel during baking. Apply gentle, consistent pressure as you roll, ensuring no air pockets are trapped inside. Once rolled, pinch the seam closed along the ½-inch border you left earlier to seal the log securely. You might need to gently stretch the dough slightly to meet the seam.
-
Chill the Log (Again!):
Wrap the dough log tightly in plastic wrap. Repeat steps 1-5 with the second disk of dough and remaining fillings. Place both wrapped logs in the refrigerator for at least 1-2 hours. This chilling period is absolutely crucial for clean, neat slices. If you try to slice the log when it’s too warm, the dough will squish, and the fillings will ooze, resulting in misshapen pinwheels. Don’t rush this step! For best results, I often chill them overnight.
-
Preheat Your Oven:
About 20 minutes before you’re ready to bake, preheat your oven to 375°F (190°C). Line two large baking sheets with parchment paper. This prevents sticking and makes cleanup a breeze.
-
Slice the Pinwheels:
Remove one chilled log from the refrigerator. Using a sharp knife, carefully slice the log into ¾-inch thick rounds. A very sharp, un-serrated knife works best here to achieve clean cuts. If your knife starts to stick, you can wipe it clean between slices. You should get about 16-20 pinwheels per log, depending on how thick you slice them. Arrange the sliced pinwheels on your prepared baking sheets, leaving about 1-1½ inches of space between each one to allow for spreading.
-
Prepare the Egg Wash:
In a small bowl, whisk together the remaining large egg and 1 tablespoon of water or milk until well combined. This is our egg wash.
-
Brush and Bake:
Lightly brush the tops of each pinwheel with the egg wash. This will give them a beautiful golden sheen and help them brown evenly.
Baking Your Pinwheels to Golden Perfection
-
Into the Oven They Go:
Place the baking sheets in your preheated oven. If you can fit both sheets on separate racks without them touching, great; otherwise, bake one sheet at a time for optimal browning. Bake for 15-20 minutes, or until the edges are lightly golden brown and the tops are a beautiful deep golden hue. Keep a close eye on them, as oven temperatures can vary. The delightful aroma that will fill your kitchen is truly one of the best parts of this recipe!
-
Cooling Process:
Once baked, remove the pinwheels from the oven. Let them cool on the baking sheets for about 5 minutes before carefully transferring them to a wire rack to cool completely. Allowing them to cool on the rack is important as it prevents the bottoms from becoming soggy and helps them firm up properly. While they’re tempting to eat immediately, they truly shine once they’ve had a chance to set.
Finishing Touches and Serving
-
The Optional Dusting:
Once the Cream Cheese Jam Pinwheels have cooled completely, you can optionally dust them with a light coating of powdered sugar using a fine-mesh sieve. This adds a lovely, delicate sweetness and a beautiful visual appeal, making them look even more professional and inviting.
-
Serve and Enjoy:
These Cream Cheese Jam Pinwheels are absolutely delightful served at room temperature. They are perfect for breakfast, brunch, an afternoon tea, or as a sweet treat anytime. I love them with a cup of coffee or a comforting cup of herbal tea.
-
Storage:
Store any leftover pinwheels in an airtight container at room temperature for up to 2-3 days, or in the refrigerator for up to 5 days. If you store them in the fridge, I recommend letting them come back to room temperature for about 15-20 minutes before serving, as the flavors and textures are best when not too cold. You can even gently warm them slightly in a microwave or a low oven for a few minutes for a “freshly baked” experience. They also freeze wonderfully for up to 1 month; simply thaw at room temperature.
Tips for Success:
- Room Temperature Ingredients: I cannot stress this enough – make sure your butter and cream cheese are truly at room temperature. This is the foundation for a smooth dough and filling.
- Don’t Overmix: Work the dough as little as possible once the flour is added. Overmixing develops gluten, leading to tough pastries.
- Chill, Chill, Chill: The chilling steps are your best friends. They ensure the dough is manageable and the pinwheels hold their shape beautifully. Patience is a virtue in baking!
- Sharp Knife: A very sharp knife makes a world of difference when slicing the logs into individual pinwheels, preventing squishing and preserving that gorgeous spiral.
There you have it! A truly delightful recipe for Cream Cheese Jam Pinwheels that I know you and your loved ones will adore. The combination of the tender, slightly tangy cream cheese pastry, the rich cream cheese filling, and the bright burst of fruity jam is simply irresistible. Happy baking!
Conclusion:
And there you have it, my friends! We’ve journeyed through the simple steps, the delightful ingredients, and the sheer joy of creating a treat that genuinely stands out. I truly believe that this recipe isn’t just another item in your culinary repertoire; it’s an experience waiting to unfold in your kitchen, delivering smiles and satisfied palates with every single bite. The magic lies in that wonderful combination of tender, slightly crisp pastry, the smooth, tangy cream cheese filling, and the burst of fruity jam, all coming together in a beautifully swirled package. It’s comforting yet sophisticated, easy enough for a beginner yet impressive enough for a seasoned baker. Trust me when I say, once you smell these baking, your kitchen will transform into the warmest, most inviting space imaginable.
Why This Recipe Is an Absolute Must-Try
Why is this recipe for these delightful little swirls a non-negotiable addition to your baking list? It’s simple: they embody everything wonderful about homemade treats. They are incredibly versatile, making them perfect for literally any time of day. Picture this: a lazy Saturday morning, a warm cup of coffee, and one of these freshly baked pinwheels – pure bliss! Or perhaps a spontaneous gathering with friends, where these become the star of your snack spread, sparking conversation and compliments. They’re also incredibly forgiving, allowing you to experiment with various jams and flavors to suit your mood or what you have on hand. The texture is what truly captivates me: a delicate exterior that yields to a soft, sweet interior, creating a harmony of tastes and sensations that you won’t soon forget. It’s truly a labor of love that feels effortless to create, and the payoff is immense joy.
I find them to be an extraordinary testament to how simple ingredients, combined with a little love and creativity, can produce something truly spectacular. They carry a homemade charm that no store-bought item can ever replicate. The vibrant swirls of jam against the creamy white of the cream cheese and the golden pastry are a feast for the eyes even before you take that first delectable bite. This recipe isn’t just about baking; it’s about creating memories, sharing warmth, and indulging in a moment of pure, unadulterated pleasure. And for me, that’s what cooking and baking are all about – connection and comfort.
Serving Suggestions and Delightful Variations to Explore
Now, while these pinwheels are utterly divine straight out of the oven, cooled to room temperature, or even slightly warmed the next day, there are so many ways to enjoy and customize them! For serving, I absolutely adore them alongside a rich, dark roast coffee for breakfast or brunch. They pair equally well with a comforting mug of tea in the afternoon or a cold glass of milk for a simple, sweet treat. You could dust them lightly with powdered sugar just before serving for an extra touch of elegance, or even drizzle a simple vanilla or lemon glaze over them once cooled for an added layer of sweetness and tang. Imagine serving them on a pretty platter with some fresh berries on the side – absolutely gorgeous!
But the real fun begins with variations! While I’m a huge fan of classic strawberry or raspberry jam, don’t limit yourself. Think about the seasons: a vibrant apricot jam for spring, a rich fig jam for autumn, or a zesty orange marmalade for a bright, citrusy kick. You could even try a mixed berry compote for a more complex flavor profile. For those who love a hint of spice, a touch of cinnamon or nutmeg mixed into the cream cheese filling could add a wonderful warmth. Or, if you’re feeling extra indulgent, a thin layer of Nutella beneath the jam layer would transform these into a chocolate-hazelnut dream. For a truly gourmet touch, finely chopped toasted nuts, like pecans or walnuts, can be sprinkled over the jam before rolling, adding a delightful crunch. The possibilities are truly endless, and each variation offers a chance to make these delightful pastries uniquely yours. The base recipe is so solid, it welcomes all your creative additions!
Your Turn: Bake, Savor, and Share!
So, what are you waiting for? I sincerely encourage you to roll up your sleeves, gather your ingredients, and give these incredible Cream Cheese Jam Pinwheels a try. Don’t be intimidated; the process is incredibly rewarding and straightforward. I promise you’ll feel a wonderful sense of accomplishment as you pull these golden, fragrant beauties from your oven. There’s an undeniable magic that happens when you create something delicious with your own hands, and I want you to experience that joy. Whether it’s for a special occasion or just a quiet treat for yourself, these pinwheels are guaranteed to brighten your day.
Once you’ve made them, I would absolutely love to hear about your experience! What jam did you choose? Did you add any unique twists? How did your family and friends react? Please, share your baking triumphs, your photos, and your feedback. Your insights not only inspire me but also help others in our wonderful community of home bakers. Let’s spread the joy of homemade goodness, one delicious pinwheel at a time. Happy baking, everyone!
Cream Cheese Jam Pinwheels
Delicate swirls of golden-brown pastry, generously filled with luscious cream cheese and a vibrant ribbon of your favorite fruit jam, baked to tender perfection. Perfect for breakfast, brunch, or a sweet treat.
Ingredients
-
3 cups (360g) All-Purpose Flour, plus extra for dusting
-
1 cup (226g) Unsalted Butter, softened
-
8 ounces (226g) Full-Fat Cream Cheese, softened (for dough)
-
½ cup (100g) Granulated Sugar
-
½ teaspoon Fine Sea Salt
-
1 teaspoon Pure Vanilla Extract (for dough)
-
1 Large Egg (for dough)
-
1 cup (120g) Powdered Sugar (for filling)
-
8 ounces (226g) Full-Fat Cream Cheese, softened (for filling)
-
½ teaspoon Pure Vanilla Extract (for filling)
-
½ to ¾ cup Your Favorite Jam or Preserve
-
1 Large Egg (for egg wash)
-
1 tablespoon Water or Milk (for egg wash)
-
Optional: Powdered sugar for dusting
Instructions
-
Step 1
In a mixer, beat 1 cup softened unsalted butter and 8 oz softened cream cheese (for dough) for 2-3 minutes until light and fluffy. Scrape bowl. -
Step 2
On low speed, gradually add ½ cup granulated sugar and ½ tsp fine sea salt; beat 1-2 minutes. Beat in 1 tsp pure vanilla extract and 1 large egg (for dough) until just combined. -
Step 3
Gradually add 3 cups all-purpose flour to wet ingredients, mixing on lowest speed until just combined. Do not overmix. -
Step 4
Divide dough into two disks, wrap tightly in plastic wrap, and refrigerate for at least 2 hours (preferably overnight). -
Step 5
In a medium bowl, beat 8 oz softened cream cheese (for filling) and 1 cup powdered sugar until smooth and creamy. Stir in ½ tsp pure vanilla extract. Refrigerate until needed. -
Step 6
Lightly flour your work surface and rolling pin. Roll one dough disk into an approximate 12×16 inch rectangle, ⅛ to ¼ inch thick. -
Step 7
Spread half of the prepared cream cheese filling evenly over the rolled dough, leaving a ½-inch border along one long edge and all other edges. Dollop and gently spread half of your jam over the cream cheese layer, keeping within the cream cheese border. -
Step 8
Starting from the long edge without the border, carefully and tightly roll the dough into a log. Pinch the seam closed. Repeat steps 6-8 with the second dough disk and remaining fillings. -
Step 9
Wrap both dough logs tightly in plastic wrap and refrigerate for at least 1-2 hours (preferably overnight) for clean slicing. -
Step 10
About 20 minutes before baking, preheat oven to 375°F (190°C). Line two large baking sheets with parchment paper. -
Step 11
Remove one chilled log from the refrigerator. Using a sharp, un-serrated knife, slice into ¾-inch thick rounds. Arrange pinwheels on prepared baking sheets, 1-1½ inches apart. -
Step 12
In a small bowl, whisk together 1 large egg (for egg wash) and 1 tbsp water or milk. Lightly brush the tops of each pinwheel with the egg wash. Bake for 15-20 minutes, or until edges are lightly golden brown and tops are deep golden. -
Step 13
Remove from oven and let cool on the baking sheets for 5 minutes, then carefully transfer to a wire rack to cool completely. -
Step 14
Once cooled, optionally dust with powdered sugar using a fine-mesh sieve. Serve at room temperature. -
Step 15
Store leftovers in an airtight container at room temperature for 2-3 days, or in the refrigerator for up to 5 days. Can be frozen for up to 1 month; thaw at room temperature before serving.
Important Information
Nutrition Facts (Per Serving)
It is important to consider this information as approximate and not to use it as definitive health advice.
Allergy Information
Please check ingredients for potential allergens and consult a health professional if in doubt.


Leave a Comment