
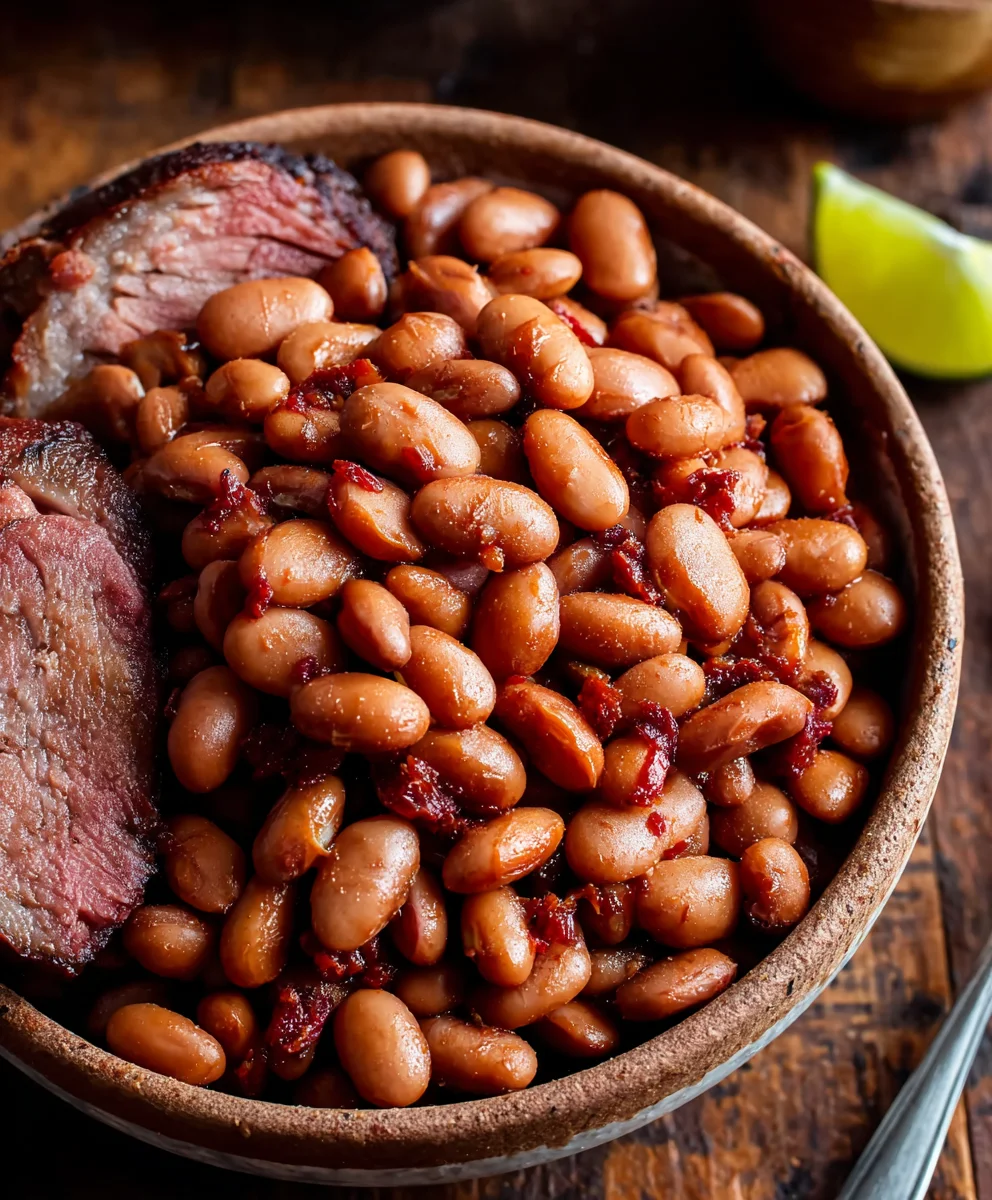
Santa Maria Pinquito Beans are more than just a side dish; they are the very heart and soul of authentic Santa Maria-style barbecue, offering a culinary experience steeped in Californian history. Have you ever wondered what truly elevates a plate of perfectly grilled tri-tip from good to unforgettable? For me, the secret lies in these unique, small, and irresistibly flavorful beans.
Indigenous to California’s Santa Maria Valley, these pinquito beans have been an integral part of the local ranching traditions for generations. They are the traditional accompaniment to the region’s iconic red oak-smoked meats, embodying a cultural legacy of outdoor cooking and communal feasts. This isn’t just a recipe; it’s an invitation to partake in a storied tradition that has delighted palates for over a century.
What makes people fall in love with these beans, myself included, is their exceptional character. They boast a wonderfully creamy texture while maintaining their distinct shape, a rare quality that prevents them from becoming mushy even after long, slow cooking. Their mild, earthy flavor profile is remarkably adept at absorbing the rich, smoky notes from their cooking environment, making them the ultimate versatile companion to any hearty meal. Learning how to properly prepare these incredible Santa Maria Pinquito Beans will undoubtedly become a cherished addition to your culinary repertoire, bringing robust flavor and a touch of heritage to your table.

Ingredients:
-
For the Santa Maria Pinquito Beans:
- 1 pound (approximately 2 cups) dry Santa Maria Pinquito Beans, picked over and rinsed
- 1 tablespoon olive oil or bacon fat
- 1 large yellow onion, finely diced
- 4 cloves garlic, minced
- 1 green bell pepper, finely diced
- 1 (14.5-ounce) can diced tomatoes, undrained
- 4 cups (32 fl oz) chicken or vegetable broth, plus more if needed
- 1/2 cup tomato sauce (plain, unsalted)
- 1/4 cup brown sugar, packed
- 2 tablespoons apple cider vinegar
- 1 tablespoon Worcestershire sauce
- 1 teaspoon smoked paprika
- 1 teaspoon dried oregano
- 1/2 teaspoon black pepper, freshly ground
- 1 teaspoon salt, or to taste
- Optional: 1/2 teaspoon red pepper flakes for a touch of heat
- Optional: 1/4 cup chopped fresh cilantro or parsley for garnish
-
For the Santa Maria Style Tri-Tip:
- 1 (2-3 pound) beef tri-tip roast, trimmed of excess fat
- 2 tablespoons garlic powder
- 2 tablespoons onion powder
- 2 tablespoons kosher salt (or coarse sea salt)
- 1 tablespoon black pepper, freshly ground
- 1 tablespoon dried rosemary, crushed
- 1 teaspoon dried oregano
- 1/2 teaspoon cayenne pepper (optional, for a subtle kick)
- 2 tablespoons olive oil (for rubbing before seasoning)
-
For the Fresh Salsa (Pico de Gallo):
- 3-4 ripe Roma tomatoes, diced
- 1/2 red onion, finely diced
- 1-2 jalapeños, seeded and minced (adjust to your spice preference)
- 1/2 cup fresh cilantro, chopped
- Juice of 1-2 limes (about 2-3 tablespoons)
- 1/2 teaspoon salt, or to taste
- 1/4 teaspoon black pepper, or to taste
Preparing the Santa Maria Pinquito Beans:
-
Soaking the Beans (Overnight Method):
Before you begin the main cooking process, it’s crucial to properly prepare your dry Santa Maria Pinquito Beans. First, carefully inspect the beans and remove any small stones, debris, or shriveled beans. Rinse them thoroughly under cold running water. Place the rinsed beans in a large bowl and cover them with at least three times their volume of cold water. Soaking them overnight, typically for 8-12 hours, allows them to rehydrate, reducing cooking time and ensuring a more even texture. This also helps break down some of the complex sugars, making them easier to digest. If you’re short on time, you can use the quick soak method: bring the beans to a boil in water for 5 minutes, then remove from heat, cover, and let them stand for 1 hour before draining.
-
Sautéing the Aromatics:
Once your Santa Maria Pinquito Beans are soaked and drained, it’s time to build a flavorful base. Heat the olive oil or bacon fat in a large, heavy-bottomed pot or Dutch oven over medium heat. When the fat is shimmering, add the finely diced yellow onion. Sauté, stirring occasionally, for 5-7 minutes until the onion has softened and become translucent. Next, add the minced garlic and diced green bell pepper. Continue to cook for another 3-4 minutes, or until the bell pepper has softened and a wonderfully fragrant aroma fills your kitchen. Be careful not to burn the garlic, as this can introduce a bitter taste.
-
Combining Ingredients and Simmering:
Drain the soaked Santa Maria Pinquito Beans and add them to the pot with the sautéed aromatics. Pour in the chicken or vegetable broth, ensuring the beans are fully submerged. Add the canned diced tomatoes (undrained), tomato sauce, brown sugar, apple cider vinegar, Worcestershire sauce, smoked paprika, dried oregano, black pepper, and salt. If you like a little heat, now is the time to add the red pepper flakes. Stir everything together gently to combine. Bring the mixture to a rolling boil over medium-high heat, then immediately reduce the heat to low, cover the pot, and let it simmer. Patience is key here; a slow simmer allows the flavors to meld beautifully and the beans to become incredibly tender.
-
The Long Simmer and Final Adjustments:
Allow the Santa Maria Pinquito Beans to simmer for a minimum of 1.5 to 2 hours, or even longer, depending on how tender you prefer your beans and how much liquid they absorb. Check the beans periodically, stirring every 20-30 minutes to prevent sticking and to ensure even cooking. If the liquid level drops too low and the beans are not yet tender, add more hot broth or water, about 1/2 cup at a time, to keep them adequately covered. The beans should be creamy and soft when done, but still hold their shape. Once they reach your desired tenderness, taste and adjust the seasoning. You might find they need a bit more salt, pepper, or even a touch more vinegar or brown sugar to balance the flavors. If the sauce is too thin, you can uncover the pot and simmer for an additional 15-20 minutes to reduce it slightly. Garnish with fresh cilantro or parsley before serving.
Preparing the Santa Maria Style Tri-Tip:
-
Trimming the Tri-Tip:
Take your tri-tip roast out of its packaging. The tri-tip cut typically has a fat cap on one side and sometimes a bit of silver skin on the other. While a little fat can add flavor, too much will prevent the seasoning from penetrating and can lead to a greasy result. Carefully trim any excessive fat from the fat cap, leaving about 1/4 inch thickness. Also, remove any tough silver skin using a sharp knife; this membrane can contract during cooking, making the meat chewy. Pat the tri-tip thoroughly dry with paper towels. A dry surface is essential for achieving a beautiful sear and allowing the rub to adhere properly.
-
Creating the Signature Rub:
In a small bowl, combine the garlic powder, onion powder, kosher salt, black pepper, dried rosemary, dried oregano, and cayenne pepper (if using). Mix these spices thoroughly with a spoon to ensure an even distribution. This blend of simple yet robust seasonings is characteristic of authentic Santa Maria style barbecue. The coarse salt and pepper provide a foundational savory punch, while the garlic, onion, and herbs contribute aromatic depth. The optional cayenne pepper adds a very subtle warmth without overwhelming the other flavors.
-
Applying the Rub:
Drizzle the olive oil evenly over all sides of the trimmed and dried tri-tip roast. Use your hands to rub the oil into the meat, ensuring it’s lightly coated. The oil acts as a binder, helping the dry rub adhere effectively to the meat. Now, generously sprinkle the prepared spice rub over the entire surface of the tri-tip. Don’t be shy; you want a good, even coating. Use your hands to gently press the rub into the meat, ensuring it sticks well. Make sure to get the sides and edges too. This comprehensive coating is what will form that delicious, flavorful crust as the tri-tip cooks.
-
Marinating/Resting the Tri-Tip:
Once seasoned, place the tri-tip on a plate or in a shallow dish, cover it loosely with plastic wrap or aluminum foil, and refrigerate it. Ideally, you want to let the tri-tip rest and marinate for at least 2 hours. For an even more intense flavor, you can let it sit in the refrigerator for up to 24 hours. This resting period allows the salt and other spices to draw out some moisture from the meat, forming a flavorful brine that is then reabsorbed, leading to a more tender and seasoned result. About 30-45 minutes before you plan to grill, remove the tri-tip from the refrigerator and let it come to room temperature. This helps the meat cook more evenly.
Grilling the Tri-Tip:
-
Setting Up Your Grill:
Santa Maria style barbecue traditionally uses an open-pit grill with red oak wood, known for imparting a distinct, smoky flavor. However, you can achieve excellent results on a charcoal or gas grill. If using a charcoal grill, arrange the hot coals to create two zones: a hot direct-heat zone and a cooler indirect-heat zone. For a gas grill, preheat it to medium-high heat (around 450-500°F / 230-260°C) on one side, leaving the other side unlit for indirect cooking. Ensure your grill grates are clean and lightly oiled to prevent sticking. A good, hot grill is crucial for developing a beautiful crust on the tri-tip.
-
Searing the Tri-Tip:
Place the tri-tip directly over the hot, direct heat. Sear the meat for 5-7 minutes per side, turning it only once. You’re looking for a rich, dark brown crust to form on both sides. This searing process is essential for developing flavor and creating that desirable texture on the exterior of the tri-tip. During this stage, keep a close eye on the meat to prevent burning, especially if your grill runs very hot. You’ll notice the intoxicating aroma of the spices caramelizing on the surface.
-
Indirect Cooking and Temperature Monitoring:
Once both sides are nicely seared, move the tri-tip to the cooler, indirect-heat zone of your grill. Close the lid and continue to cook, allowing the internal temperature to rise slowly and evenly. Insert an accurate meat thermometer into the thickest part of the roast, avoiding bone or fat pockets. You’ll want to cook the tri-tip until it reaches your desired level of doneness. For medium-rare, aim for 130-135°F (54-57°C); for medium, target 135-140°F (57-60°C). Cooking time will vary depending on the thickness of your roast and grill temperature, but typically ranges from 20-35 minutes for the indirect phase. Check the temperature every 10 minutes or so to ensure you don’t overcook it.
-
Resting the Tri-Tip:
This step is absolutely critical for a juicy and tender tri-tip. Once the meat reaches your target internal temperature, remove it from the grill and place it on a clean cutting board. Tent it loosely with aluminum foil. Let the tri-tip rest for at least 10-15 minutes. During this resting period, the juices redistribute throughout the meat, resulting in a more succulent and flavorful final product. If you slice it too soon, the juices will run out, leaving you with dry meat. Do not skip this step!
-
Slicing Against the Grain:
After resting, it’s time to slice your beautifully cooked tri-tip. Tri-tip is unique because its grain changes direction in the middle of the roast. To ensure maximum tenderness, you must slice against the grain. Look closely at the meat; you’ll see the muscle fibers running in one direction, then changing about halfway through. Identify these grain patterns. Start by cutting the roast in half where the grain changes. Then, slice each half across the grain into thin pieces, about 1/4 to 1/2 inch thick. This technique shortens the muscle fibers, making each bite incredibly tender and easy to chew.
Assembling and Serving:
-
Preparing the Fresh Salsa (Pico de Gallo):
While the tri-tip is grilling and resting, you can quickly whip up a fresh pico de gallo. In a medium bowl, combine the diced Roma tomatoes, finely diced red onion, minced jalapeños (adjusting to your preferred spice level), and chopped fresh cilantro. Squeeze in the lime juice and season with salt and black pepper. Stir gently to combine all the ingredients. Taste and adjust the seasoning as needed. The bright, fresh flavors of the salsa provide a wonderful counterpoint to the rich tri-tip and hearty Santa Maria Pinquito Beans.
-
Serving the Santa Maria Feast:
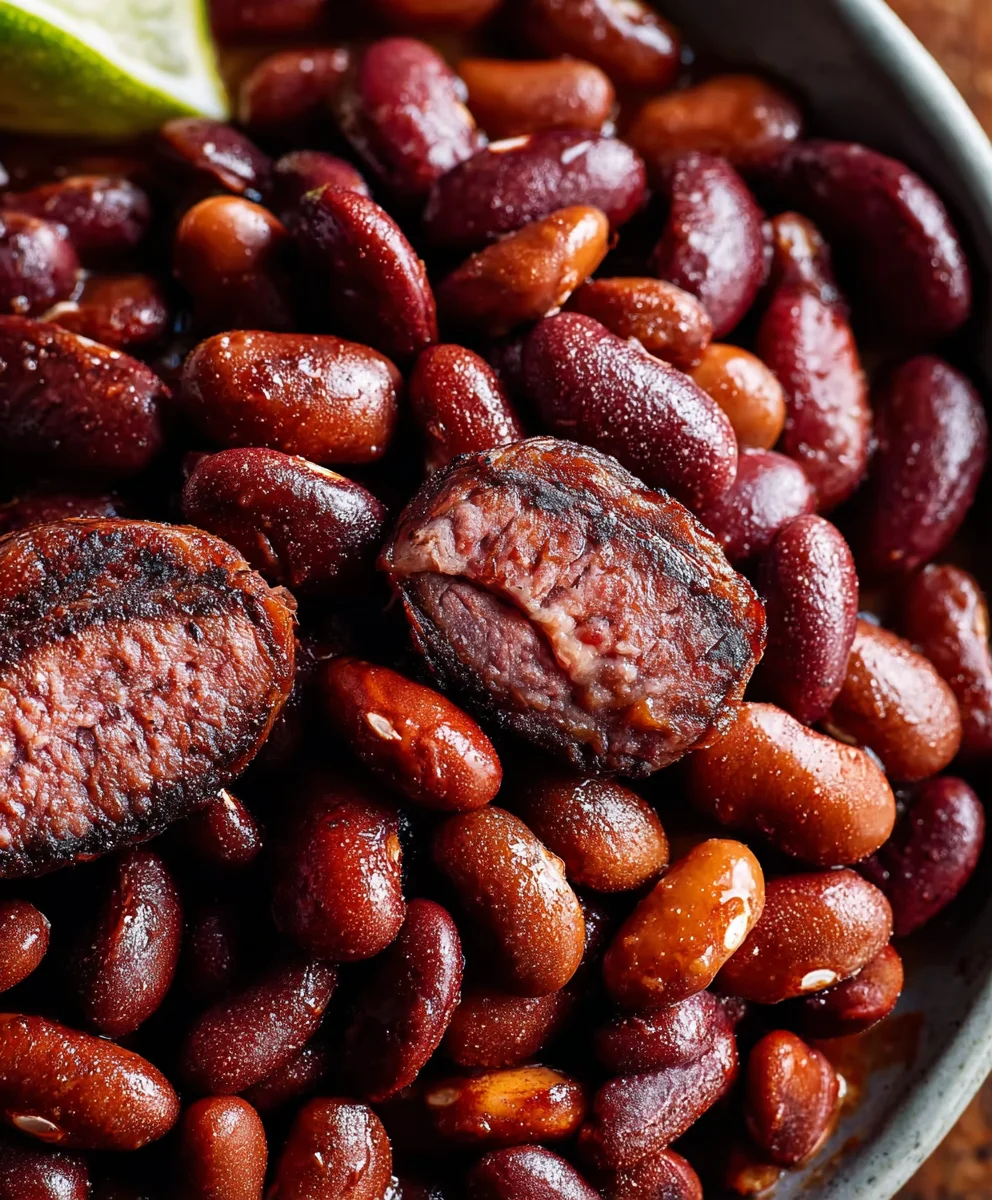
To serve your authentic Santa Maria style meal, arrange generous portions of the sliced tri-tip on plates. Spoon a hearty serving of the warm, tender, and incredibly flavorful Santa Maria Pinquito Beans alongside the meat. Garnish the tri-tip with a spoonful of the fresh pico de gallo. Traditionally, this meal is often served with grilled garlic bread or a simple green salad. The combination of the smoky, peppery tri-tip, the sweet and savory depth of the Santa Maria Pinquito Beans, and the vibrant freshness of the salsa creates a truly unforgettable dining experience that embodies the spirit of California’s Central Coast barbecue. Encourage everyone to dig in and enjoy the fruits of your labor!
Conclusion:
And there you have it, my friends! We’ve reached the delicious culmination of our culinary journey. I genuinely hope you’ve enjoyed exploring this recipe as much as I’ve enjoyed sharing it with you. This isn’t just another side dish; it’s an experience, a taste of tradition, and a hearty embrace in every spoonful. I truly believe this recipe is a must-try for anyone who appreciates rich, comforting flavors and the authentic essence of American cuisine. What makes it so utterly irresistible, you ask? It’s the perfect symphony of savory, smoky, and slightly sweet notes, all working in harmony to create a depth of flavor that is simply unparalleled. The tender, creamy texture of the beans, slow-cooked to perfection, absorbs every nuance of the seasonings, making each bite an absolute delight. It’s a dish that evokes warmth, a sense of gathering, and the simple pleasure of good food made with love. This isn’t merely about satisfying hunger; it’s about creating a memory, a moment of culinary bliss that you’ll want to revisit again and again.
The beauty of this particular recipe lies in its versatility and its undeniable ability to transform any meal into something truly special. While it shines brightly as a standalone comfort food, I’ve found it to be an incredibly adaptable companion to a myriad of main courses. For a classic pairing, you absolutely cannot go wrong serving a generous scoop alongside a perfectly grilled steak, especially a well-seasoned tri-tip, echoing the traditional Santa Maria barbecue style. Imagine the smoky flavors of the meat mingling with the savory goodness of the beans—it’s a match made in culinary heaven. A plate of juicy pulled pork or some tender, fall-off-the-bone ribs would also be elevated by this delightful side. But don’t stop there! For those brisk evenings, a big bowl of these beans, perhaps topped with a dollop of sour cream or a sprinkle of fresh cilantro, alongside a thick slice of warm, buttery cornbread, makes for an incredibly satisfying and wholesome meal all on its own. It’s the kind of dish that warms you from the inside out, making you feel cozy and content.
Elevate Your Dining Experience with Creative Twists!
Beyond the traditional, I encourage you to get creative with your serving ideas. For a hearty lunch, try stuffing them into a baked potato, loaded with cheese and green onions, for a rustic, satisfying meal. They also make an incredible base for a vegetarian main course; add some roasted vegetables like bell peppers and zucchini, and perhaps a fried egg on top, for a vibrant and protein-packed dish. For a lighter, fresher take, consider chilling them slightly and tossing them into a robust salad with some crisp greens, cherry tomatoes, and a tangy vinaigrette—a surprisingly refreshing option for warmer weather. You could even blend a portion of them into a thick, smoky dip for tortilla chips or crudités, making them a fantastic appetizer for your next gathering. Don’t hesitate to play with the flavor profile a bit too! If you like a little extra kick, a dash of your favorite hot sauce or a pinch of red pepper flakes stirred in at the end can add an exciting zing. A sprinkle of fresh parsley or chives just before serving can brighten the flavors and add a lovely pop of color, making your dish even more appealing. For those who enjoy a deeper, richer, and more authentic flavor, the unique qualities of Santa Maria Pinquito Beans are truly what set this recipe apart, bringing a specific regional taste that is hard to replicate with other bean varieties. They are the secret ingredient that gives this dish its soul, making it distinctly memorable.
Your Culinary Adventure Awaits!
Now that you’re armed with this fantastic recipe and a plethora of serving suggestions, my sincerest hope is that you’ll roll up your sleeves and give it a try in your own kitchen. There’s an immense joy in creating something so delicious from scratch, and I promise you, the effort is truly minimal for the incredible reward you’ll receive. I envision you gathering your loved ones around the table, sharing stories, and savoring every delightful mouthful of these incredible beans. And once you do, please, please don’t keep your culinary triumph a secret! I am so eager to hear about your experience. Did you serve them with a classic barbecue? Did you try one of the creative variations? What was your favorite part? Share your photos, tell me about your family’s reactions, or simply drop a comment below to let me know how it went. Your feedback and stories inspire me and help our community of food lovers grow. So, go forth, cook with passion, and prepare to fall in love with a dish that is destined to become a staple in your home. Happy cooking, everyone!
Classic Santa Maria Pinquito Beans
Discover the heart and soul of Santa Maria-style barbecue with these authentic Pinquito Beans. Indigenous to California’s Santa Maria Valley, these unique beans offer a creamy texture, distinct shape, and earthy flavor, making them the ultimate versatile companion to any hearty meal, especially grilled tri-tip. This recipe shares a cherished tradition steeped in Californian history.
Ingredients
-
1 lb (2 cups) dry Santa Maria Pinquito Beans
-
1 tbsp olive oil or beef fat
-
1 large yellow onion, diced
-
4 cloves garlic, minced
-
1 green bell pepper, diced
-
1 (14.5 oz) can diced tomatoes
-
4 cups chicken or vegetable broth (plus more if needed)
-
1/2 cup tomato sauce
-
1/4 cup packed brown sugar
-
2 tbsp apple cider vinegar
-
1 tbsp Worcestershire sauce
-
1 tsp smoked paprika
-
1 tsp dried oregano
-
1/2 tsp black pepper
-
1 tsp salt (to taste)
-
Optional: 1/2 tsp red pepper flakes
-
Optional: 1/4 cup fresh cilantro or parsley, chopped
Instructions
-
Step 1
Inspect beans, remove debris, rinse. Cover with 3x volume cold water. Soak overnight (8-12 hours) or quick soak: boil for 5 mins, cover, let stand 1 hour. Drain soaked beans. -
Step 2
Heat oil/fat in a large pot over medium heat. Add diced onion; sauté 5-7 mins until translucent. Add minced garlic and diced bell pepper; cook 3-4 mins until softened and fragrant. -
Step 3
Add drained beans to pot. Pour in broth, diced tomatoes, tomato sauce, brown sugar, vinegar, Worcestershire, paprika, oregano, black pepper, salt, and optional red pepper flakes. Stir. Bring to a boil, then reduce heat to low, cover, and simmer. -
Step 4
Simmer for 1.5-2 hours (or longer), stirring every 20-30 mins. Add more broth/water if liquid gets low. Beans should be creamy but hold shape. Taste and adjust seasoning (salt, pepper, vinegar, brown sugar). If sauce is too thin, uncover and simmer 15-20 mins to reduce. Garnish with fresh cilantro/parsley before serving.
Important Information
Nutrition Facts (Per Serving)
It is important to consider this information as approximate and not to use it as definitive health advice.
Allergy Information
Please check ingredients for potential allergens and consult a health professional if in doubt.


Leave a Comment