
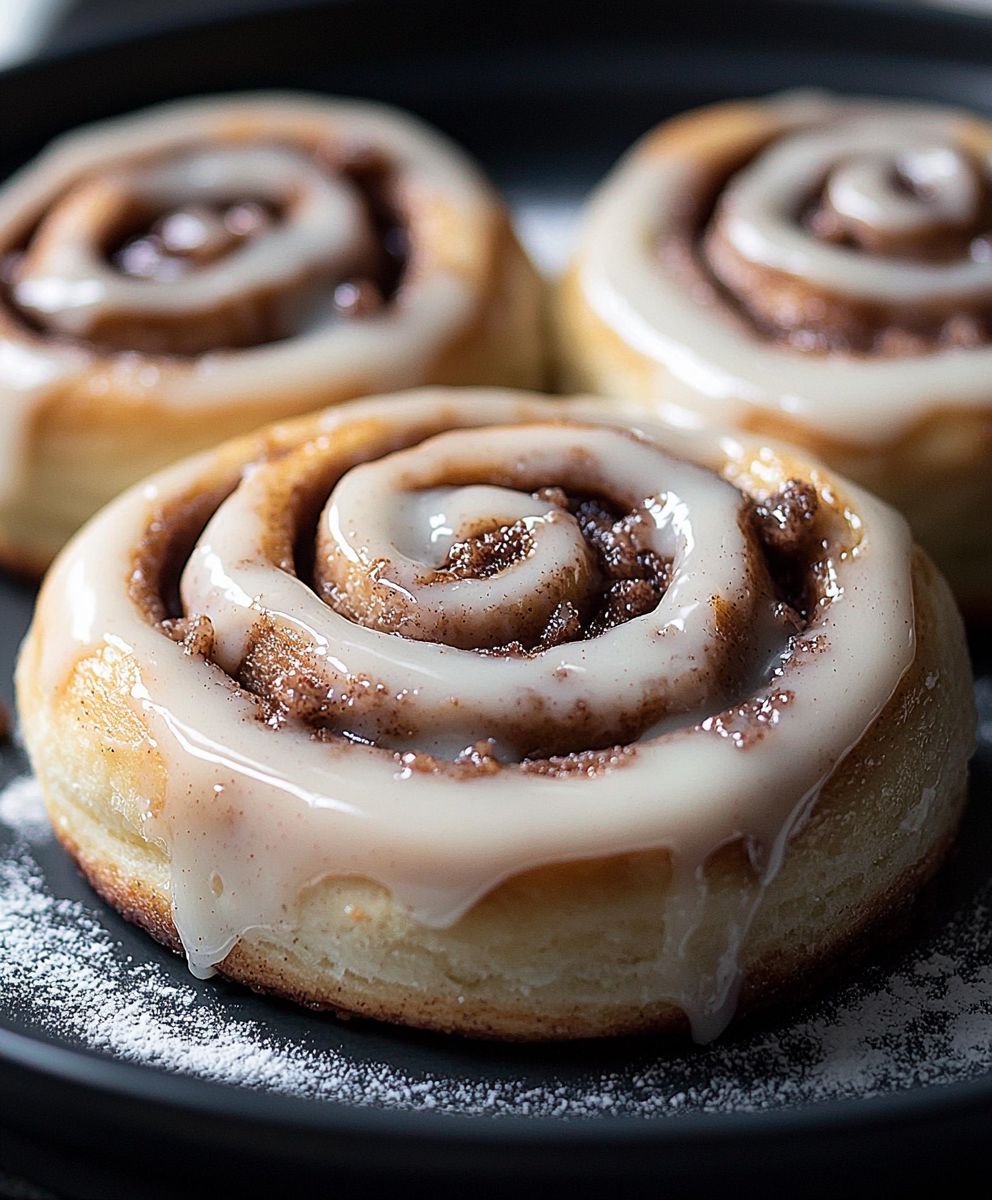
Cinnamon roll lovers, prepare to be utterly captivated! Imagine biting into a warm, gooey swirl of dough, infused with the comforting aroma of cinnamon and topped with a luscious, creamy frosting. Is your mouth watering yet? Because mine certainly is! Today, we’re diving headfirst into the delightful world of homemade cinnamon rolls, and I’m going to share my foolproof recipe for creating the most irresistible treats you’ve ever tasted.
The history of the cinnamon roll is as rich and comforting as the pastry itself. While variations exist across different cultures, the modern cinnamon roll we know and love is often attributed to Sweden, where it’s known as “kanelbulle.” These sweet buns have become a beloved staple in bakeries and homes worldwide, transcending borders with their universal appeal.
But what is it about these swirls of sugary goodness that makes them so incredibly popular? For me, it’s the perfect combination of textures the soft, pillowy dough, the slightly caramelized edges, and the smooth, decadent frosting. The warm, spicy cinnamon filling is simply divine, creating a symphony of flavors that dance on your palate. Plus, let’s be honest, there’s something incredibly comforting about baking (and eating!) a batch of homemade cinnamon rolls. They’re perfect for a cozy weekend breakfast, a special occasion brunch, or simply a sweet treat to brighten your day. So, grab your apron, and let’s get baking!

Ingredients:
- For the Dough:
- 3 ½ cups (420g) all-purpose flour, plus more for dusting
- ¼ cup (50g) granulated sugar
- 1 teaspoon salt
- 1 packet (2 ¼ teaspoons) active dry yeast
- 1 cup (240ml) milk, warmed to 110-115°F (43-46°C)
- ¼ cup (57g) unsalted butter, melted
- 2 large eggs, lightly beaten
- For the Filling:
- ½ cup (113g) unsalted butter, softened
- ¾ cup (150g) packed light brown sugar
- 2 tablespoons ground cinnamon
- For the Cream Cheese Frosting:
- 4 ounces (113g) cream cheese, softened
- ¼ cup (57g) unsalted butter, softened
- 1 ½ cups (180g) powdered sugar, sifted
- 1 teaspoon vanilla extract
- 2-4 tablespoons milk, or more as needed for desired consistency
Making the Dough
- Combine Dry Ingredients: In a large bowl, whisk together the flour, sugar, and salt.
- Activate the Yeast: In a separate bowl, dissolve the yeast in the warm milk. Let it stand for 5-10 minutes, or until foamy. This indicates that the yeast is active and ready to use. If it doesn’t foam, your yeast might be old or your milk too hot/cold, and you’ll need to start again.
- Combine Wet and Dry Ingredients: Add the melted butter and beaten eggs to the yeast mixture. Whisk to combine.
- Form the Dough: Pour the wet ingredients into the dry ingredients and stir with a wooden spoon until a shaggy dough forms.
- Knead the Dough: Turn the dough out onto a lightly floured surface and knead for 6-8 minutes, or until it becomes smooth and elastic. You can also use a stand mixer with a dough hook attachment for this step. If using a mixer, knead on medium speed for about 5 minutes. The dough should be slightly tacky but not sticky. If it’s too sticky, add a tablespoon of flour at a time until it reaches the right consistency.
- First Rise: Place the dough in a lightly greased bowl, turning to coat all sides. Cover the bowl with plastic wrap or a clean kitchen towel and let it rise in a warm place for 1-1.5 hours, or until doubled in size. This is a crucial step, so be patient! A warm environment helps the yeast do its job.
Preparing the Filling and Rolling the Dough
- Prepare the Filling: While the dough is rising, prepare the filling. In a medium bowl, combine the softened butter, brown sugar, and cinnamon. Mix well until it forms a smooth paste. Make sure your butter is truly softened; otherwise, it will be difficult to mix.
- Punch Down the Dough: Once the dough has doubled in size, gently punch it down to release the air.
- Roll Out the Dough: Turn the dough out onto a lightly floured surface and roll it into a large rectangle, about 12×18 inches. Try to keep the rectangle as even as possible for uniform rolls.
- Spread the Filling: Spread the cinnamon-sugar filling evenly over the entire surface of the dough, leaving a small border along one of the long edges. This border will help seal the roll.
- Roll Up the Dough: Starting from the long edge opposite the border, tightly roll the dough into a log. Be sure to roll it tightly to prevent gaps in the rolls.
- Seal the Seam: Pinch the seam to seal it tightly.
Cutting and Baking the Cinnamon Rolls
- Cut the Rolls: Using a sharp serrated knife or unflavored dental floss, cut the log into 12 equal slices. For even rolls, you can mark the log in the middle, then cut each half in half, and so on. Dental floss is a great option because it cuts cleanly without squishing the rolls.
- Arrange in Baking Dish: Grease a 9×13 inch baking dish. Arrange the cinnamon rolls in the prepared dish, leaving a little space between each roll.
- Second Rise: Cover the baking dish with plastic wrap or a clean kitchen towel and let the rolls rise in a warm place for another 30-45 minutes, or until they have puffed up and are almost touching each other. This second rise is important for achieving soft and fluffy rolls.
- Preheat Oven: Preheat your oven to 350°F (175°C).
- Bake the Rolls: Bake the cinnamon rolls for 20-25 minutes, or until they are golden brown and cooked through. Keep an eye on them, as baking times may vary depending on your oven. If the tops are browning too quickly, you can loosely tent them with foil.
- Cool Slightly: Remove the cinnamon rolls from the oven and let them cool in the baking dish for about 10-15 minutes before frosting.
Making the Cream Cheese Frosting
- Cream Butter and Cream Cheese: While the rolls are cooling, prepare the frosting. In a large bowl, beat the softened cream cheese and butter together with an electric mixer until smooth and creamy. It’s crucial that both the cream cheese and butter are softened to avoid lumps in the frosting.
- Add Powdered Sugar: Gradually add the sifted powdered sugar, beating on low speed until combined. Sifting the powdered sugar helps prevent lumps.
- Add Vanilla Extract: Stir in the vanilla extract.
- Adjust Consistency: Add milk, one tablespoon at a time, until the frosting reaches your desired consistency. You may need more or less milk depending on the humidity and the consistency of your cream cheese and butter.
Frosting and Serving
- Frost the Rolls: Generously spread the cream cheese frosting over the warm cinnamon rolls. The warmth of the rolls will help the frosting melt slightly and create a delicious glaze.
- Serve Immediately: Serve the cinnamon rolls warm and enjoy! They are best enjoyed fresh, but can be stored in an airtight container at room temperature for up to 2 days. You can also reheat them briefly in the microwave before serving.
Conclusion:
So, there you have it! This isn’t just another recipe; it’s your ticket to cinnamon roll nirvana. I truly believe this recipe is a must-try because it delivers that perfect balance of soft, fluffy dough, a gooey, spiced filling, and a decadent cream cheese frosting that will have everyone begging for more. Forget those store-bought rolls that are often dry and disappointing. This homemade version is bursting with flavor and made with love, and you can taste the difference in every single bite.
Why is this a must-try? Because its more than just a sweet treat; it’s an experience. It’s the aroma that fills your kitchen, the warmth that spreads through your hands as you knead the dough, and the joy of sharing something delicious with the people you care about. It’s about creating memories, one perfectly swirled cinnamon roll at a time. Plus, let’s be honest, who can resist a warm, gooey cinnamon roll fresh from the oven?
But the fun doesn’t stop there! This recipe is incredibly versatile. Looking for serving suggestions? These cinnamon rolls are fantastic on their own, of course, but they’re also amazing served warm with a scoop of vanilla ice cream or a dollop of whipped cream. For a brunch spread, pair them with fresh fruit, scrambled eggs, and a side of crispy bacon. Or, for a truly indulgent treat, drizzle them with a homemade caramel sauce.
And speaking of variations, the possibilities are endless! Want to add a little extra something special? Try incorporating chopped pecans or walnuts into the filling for a nutty crunch. Or, for a citrusy twist, add a tablespoon of orange zest to the dough. If you’re a fan of apples, you can even add diced apples to the filling for an apple cinnamon roll that’s perfect for fall. For a chocolatey indulgence, add cocoa powder to the filling and top with chocolate shavings. Get creative and experiment with different flavors to create your own signature cinnamon roll masterpiece!
Serving and Storage Tips
These cinnamon rolls are best enjoyed warm, fresh from the oven. However, they can also be stored in an airtight container at room temperature for up to two days. To reheat, simply microwave them for a few seconds or warm them in a low oven. You can also freeze them for longer storage. To freeze, wrap them individually in plastic wrap and then place them in a freezer-safe bag. When you’re ready to enjoy them, thaw them overnight in the refrigerator and then reheat as directed.
Don’t Be Afraid to Experiment!
Remember, baking is all about having fun and experimenting. Don’t be afraid to try new things and put your own spin on this recipe. Whether you add different spices, nuts, or fruits, the most important thing is to enjoy the process and create something that you love.
So, what are you waiting for? Gather your ingredients, preheat your oven, and get ready to embark on a cinnamon roll adventure! I promise you won’t be disappointed. And when you do, please, please, please share your experience with me! I’d love to hear how they turned out, what variations you tried, and what your family and friends thought. Tag me in your photos on social media, leave a comment below, or send me an email. I can’t wait to see your creations! Happy baking, and enjoy your delicious homemade cinnamon roll!
Cinnamon Roll: The Ultimate Guide to Baking Delicious Rolls
Soft, fluffy homemade cinnamon rolls with a rich cinnamon-sugar filling and a tangy cream cheese frosting. Perfect for breakfast, brunch, or a sweet treat!
Ingredients
- 3 ½ cups (420g) all-purpose flour, plus more for dusting
- ¼ cup (50g) granulated sugar
- 1 teaspoon salt
- 1 packet (2 ¼ teaspoons) active dry yeast
- 1 cup (240ml) milk, warmed to 110-115°F (43-46°C)
- ¼ cup (57g) unsalted butter, melted
- 2 large eggs, lightly beaten
- ½ cup (113g) unsalted butter, softened
- ¾ cup (150g) packed light brown sugar
- 2 tablespoons ground cinnamon
- 4 ounces (113g) cream cheese, softened
- ¼ cup (57g) unsalted butter, softened
- 1 ½ cups (180g) powdered sugar, sifted
- 1 teaspoon vanilla extract
- 2-4 tablespoons milk, or more as needed for desired consistency
Instructions
- Make the Dough: In a large bowl, whisk together the flour, sugar, and salt.
- In a separate bowl, dissolve the yeast in the warm milk. Let it stand for 5-10 minutes, or until foamy.
- Add the melted butter and beaten eggs to the yeast mixture. Whisk to combine.
- Pour the wet ingredients into the dry ingredients and stir with a wooden spoon until a shaggy dough forms.
- Turn the dough out onto a lightly floured surface and knead for 6-8 minutes, or until it becomes smooth and elastic. Alternatively, use a stand mixer with a dough hook on medium speed for about 5 minutes. Add flour if too sticky.
- Place the dough in a lightly greased bowl, turning to coat. Cover and let rise in a warm place for 1-1.5 hours, or until doubled.
- Prepare the Filling: While the dough is rising, combine the softened butter, brown sugar, and cinnamon in a medium bowl. Mix well until smooth.
- Assemble the Rolls: Punch down the risen dough.
- Roll the dough out on a lightly floured surface into a 12×18 inch rectangle.
- Spread the cinnamon-sugar filling evenly over the dough, leaving a small border on one long edge.
- Roll the dough tightly into a log, starting from the long edge opposite the border. Pinch the seam to seal.
- Cut the log into 12 equal slices using a serrated knife or unflavored dental floss.
- Grease a 9×13 inch baking dish. Arrange the cinnamon rolls in the dish, leaving a little space between each roll.
- Cover and let rise in a warm place for another 30-45 minutes, or until puffed up.
- Bake the Rolls: Preheat oven to 350°F (175°C).
- Bake the cinnamon rolls for 20-25 minutes, or until golden brown and cooked through. Tent with foil if browning too quickly.
- Cool slightly in the baking dish for 10-15 minutes.
- Make the Frosting: While the rolls are cooling, beat the softened cream cheese and butter together with an electric mixer until smooth and creamy.
- Gradually add the sifted powdered sugar, beating on low speed until combined.
- Stir in the vanilla extract.
- Add milk, one tablespoon at a time, until the frosting reaches your desired consistency.
- Frost and Serve: Generously spread the cream cheese frosting over the warm cinnamon rolls.
- Serve immediately and enjoy!
Notes
- Make sure your milk is the correct temperature (110-115°F) to activate the yeast. If the yeast doesn’t foam, it may be old or the milk was too hot/cold.
- Knead the dough until it’s smooth and elastic. It should be slightly tacky but not sticky.
- A warm environment is crucial for the dough to rise properly.
- Ensure the butter for the filling and frosting is softened for easy mixing.
- Use dental floss to cut the rolls cleanly without squishing them.
- Don’t overbake the rolls. They should be golden brown and cooked through.
- Sifting the powdered sugar helps prevent lumps in the frosting.
- Adjust the milk in the frosting to achieve your desired consistency.
- Cinnamon rolls are best enjoyed fresh, but can be stored in an airtight container at room temperature for up to 2 days. Reheat briefly in the microwave before serving.


Leave a Comment