
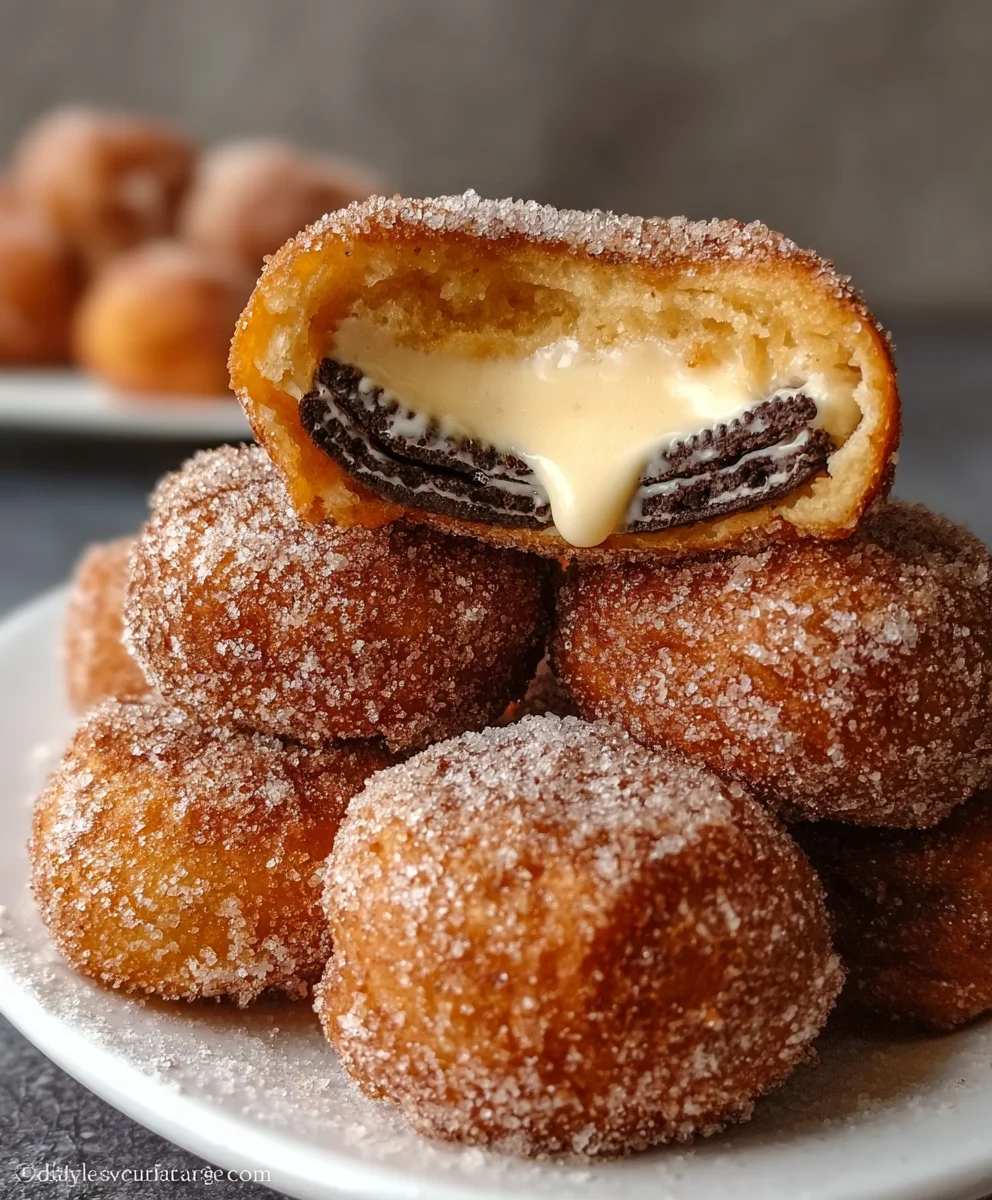
Churro Cheesecake Deep Fried Oreos – just reading those words conjures up an image of dessert paradise, doesn’t it? As an avid lover of all things sweet, I can confidently say that this creation is not merely a dessert; it’s an experience, a carnival of flavors and textures all wrapped into one incredible treat. Imagine the crispy, cinnamon-sugar delight of a freshly made churro, the rich, creamy tang of a classic cheesecake, and the undeniably satisfying crunch of a deep-fried Oreo – now picture them harmoniously united.
This ingenious fusion takes beloved elements from Spanish street food, American diners, and classic baking, elevating them into something truly spectacular. While individual components like churros, with their rich Spanish heritage, and deep-fried Oreos, a staple of American fairs, have their own storied histories as popular indulgences, bringing them together in this innovative way represents the pinnacle of modern dessert creativity. People adore this dish for its audacious combination of sweet, savory, and tangy notes, offering an explosion of crispy, soft, and creamy textures in every single bite. If you’re ready to embark on an unforgettable culinary journey, preparing these Churro Cheesecake Deep Fried Oreos is an absolute must.

Ingredients:
- 1 (8-ounce) package cream cheese, softened to room temperature
- ½ cup powdered sugar
- 1 teaspoon vanilla extract
- ½ teaspoon ground cinnamon, plus extra for churro coating
- 1 (15.3-ounce) package OREO cookies (approximately 36 cookies)
- 2 cups all-purpose flour
- 2 tablespoons granulated sugar (for batter)
- 2 teaspoons baking powder
- ½ teaspoon salt
- 1½ cups milk (whole milk preferred for richness)
- 2 large eggs
- ¼ cup unsalted butter, melted
- 6-8 cups vegetable oil, canola oil, or peanut oil, for deep frying
- For the Churro Coating:
- 1 cup granulated sugar
- 2 tablespoons ground cinnamon
- Optional Garnishes:
- Caramel sauce
- Chocolate sauce
- Whipped cream
- A dusting of extra powdered sugar
Preparing the Cheesecake Oreo Filling
First things first, let’s get that amazing cheesecake element ready for our “Churro Cheesecake Deep Fried Oreos.” This step is crucial for infusing that creamy, tangy flavor into the classic OREO cookie.
-
Soften the Cream Cheese: Before you even think about mixing, make sure your cream cheese is wonderfully soft. I usually take it out of the refrigerator at least an hour before I plan to start cooking. If you’re short on time, you can carefully soften it in the microwave in 15-second increments, but be very gentle – we don’t want melted cream cheese, just pliable.
-
Create the Cheesecake Mixture: In a medium-sized mixing bowl, combine the softened cream cheese, ½ cup of powdered sugar, 1 teaspoon of vanilla extract, and ½ teaspoon of ground cinnamon. Using an electric hand mixer or a stand mixer with a paddle attachment, beat these ingredients together on medium speed until the mixture is incredibly smooth, light, and fluffy. Make sure there are no lumps of cream cheese remaining. Scrape down the sides of the bowl as needed to ensure everything is thoroughly incorporated. This beautiful, sweet, and subtly spiced cream cheese will be the heart of our cheesecake experience.
-
Prepare the OREO Cookies: Now for the fun part! Gently twist open each OREO cookie, separating the two chocolate wafers. You’ll want to have the cream filling exposed on one side, and a plain chocolate wafer on the other. Don’t worry if some cream stays on both sides; the goal is just to open them up.
-
Fill with Cheesecake Goodness: Take a small spoon or a butter knife and carefully spread about a teaspoon of our prepared cheesecake mixture onto the plain side of one of the chocolate wafers. It’s like building a new, improved OREO! Don’t overfill, as we still need to press them back together. Aim for a nice, even layer that reaches almost to the edges.
-
Reassemble and Chill: Once you’ve applied the cheesecake mixture to one wafer, gently place the other wafer (the one with the original OREO cream filling) back on top, pressing down lightly to seal it. You’ve just created a triple-decker delight! Arrange these newly filled OREOs on a baking sheet lined with parchment paper. This parchment will prevent sticking and make cleanup easier. Once all your OREOs are reassembled, transfer the baking sheet to the refrigerator and let them chill for at least 30 minutes. This chilling time is super important because it helps the cream cheese firm up, preventing it from oozing out during the frying process. Don’t skip this step! A well-chilled OREO is a happy, fry-able OREO.
Making the Churro Batter
While our cheesecake-stuffed OREOs are chilling happily, let’s turn our attention to the star of the show – the churro batter! This will give our “Churro Cheesecake Deep Fried Oreos” that unmistakable crispy, golden exterior and cinnamon-sugar crunch.
-
Combine Dry Ingredients: In a large mixing bowl, whisk together the all-purpose flour, 2 tablespoons of granulated sugar (this is for the batter itself, separate from our coating sugar), 2 teaspoons of baking powder, and ½ teaspoon of salt. I like to give these a good whisk for about 30 seconds to a minute to ensure that the baking powder and salt are evenly distributed throughout the flour. This helps prevent clumps and ensures a consistent rise when frying.
-
Prepare Wet Ingredients: In a separate, smaller bowl, whisk together the milk, 2 large eggs, and the ¼ cup of melted unsalted butter. Make sure the butter isn’t piping hot, just nicely melted, so it doesn’t scramble the eggs when combined. A good gentle whisk until just combined is all you need here.
-
Combine Wet and Dry: Now, create a well in the center of your dry ingredients. Pour the wet ingredients into this well. Using a whisk, slowly incorporate the dry ingredients into the wet, starting from the center and working your way outwards. Mix until just combined. It’s okay if there are a few small lumps; overmixing can develop the gluten in the flour too much, leading to a tough batter, which we definitely don’t want for our light and airy churro coating.
-
Achieve the Right Consistency: The batter should be thick enough to coat the back of a spoon, similar to a good pancake or waffle batter. If it seems too thick, you can add a tablespoon or two more of milk; if it’s too thin, a tablespoon of flour. Trust your instincts here. We want a batter that will cling beautifully to our OREOs.
-
Rest the Batter: Cover the bowl with plastic wrap and let the batter rest on the counter for about 10-15 minutes. This resting period allows the gluten to relax and gives the baking powder a chance to start working its magic, resulting in a lighter and crispier coating. It also allows the flour to fully hydrate, which improves the texture of the fried churro.
Assembling the Churro Cheesecake Oreos
With our cheesecake OREOs chilled and our churro batter rested, it’s time to bring these components together before their grand finale in the fryer! This stage is all about getting a perfect, even coating for our “Churro Cheesecake Deep Fried Oreos.”
-
Set Up Your Dipping Station: Grab your chilled cheesecake-stuffed OREOs from the refrigerator. You’ll also need your bowl of churro batter and a pair of tongs or a fork for dipping. I find it helpful to have a clean plate or another parchment-lined baking sheet nearby for the coated OREOs, just before they head into the hot oil.
-
Coat the OREOs in Batter: Take one chilled OREO at a time and carefully submerge it completely into the churro batter. Use your tongs or fork to gently turn the OREO, ensuring every surface is thoroughly coated with the batter. Lift the OREO out of the batter, allowing any excess to drip back into the bowl for a few seconds. We want a nice, even layer, not a thick gloppy one. This creates the perfect base for our churro exterior.
-
Prepare for Frying: Place the batter-coated OREO onto your clean plate or parchment-lined baking sheet. Repeat this process for about 4-6 OREOs, depending on the size of your frying vessel. It’s best to fry in small batches to avoid overcrowding the pot, which can lower the oil temperature too quickly and result in greasy or unevenly cooked treats. Keep the remaining OREOs in the refrigerator until you’re ready to coat and fry them.
-
Prepare the Churro Coating Mixture: In a shallow dish or a wide, flat bowl, combine the 1 cup of granulated sugar and 2 tablespoons of ground cinnamon. Whisk these together until they are thoroughly mixed. This is the magical cinnamon-sugar blend that will give our “Churro Cheesecake Deep Fried Oreos” their iconic churro flavor and texture. Set this dish aside, ready for action as soon as the OREOs come out of the fryer.
Deep Frying the Oreos
This is where the magic truly happens and our “Churro Cheesecake Deep Fried Oreos” come to life! Deep frying requires careful attention, so please prioritize safety. You’ll be rewarded with an incredibly crispy, golden-brown exterior.
-
Choose Your Frying Vessel and Oil: Select a heavy-bottomed pot or Dutch oven that is deep enough to safely hold at least 3-4 inches of oil, leaving plenty of headspace for bubbling. Pour your vegetable, canola, or peanut oil into the pot. I usually aim for about 6-8 cups, depending on the size of my pot. You want enough oil to fully submerge the OREOs without them touching the bottom. Peanut oil is fantastic for frying due to its high smoke point and neutral flavor, but vegetable or canola work perfectly too.
-
Heat the Oil: Place the pot over medium-high heat. Attach a deep-fry thermometer to the side of the pot, making sure the tip is submerged in the oil but not touching the bottom. We are aiming for a temperature of 350°F (175°C). This temperature is critical for achieving a crispy exterior without burning and ensuring the inside gets warmed through. Heating the oil can take some time, so be patient. If the oil gets too hot, carefully remove the pot from the heat for a minute or two to let it cool down slightly, then return it to lower heat. If it’s not hot enough, your OREOs will absorb too much oil and become greasy.
-
Begin Frying in Batches: Once the oil reaches 350°F (175°C), carefully lower 2-3 batter-coated OREOs into the hot oil using tongs. Do not overcrowd the pot! Frying too many at once will drastically lower the oil temperature, leading to soggy OREOs. Giving them space also allows them to cook evenly and turn that beautiful golden-brown color.
-
Frying Time and Technique: Fry the OREOs for about 2-3 minutes per side, or until they are a gorgeous deep golden brown and appear puffed up. Use your tongs to gently flip them halfway through to ensure even cooking. The batter will turn golden and develop a satisfyingly crispy texture, reminiscent of a classic churro. Keep a close eye on them; they can go from perfectly golden to overcooked quite quickly!
-
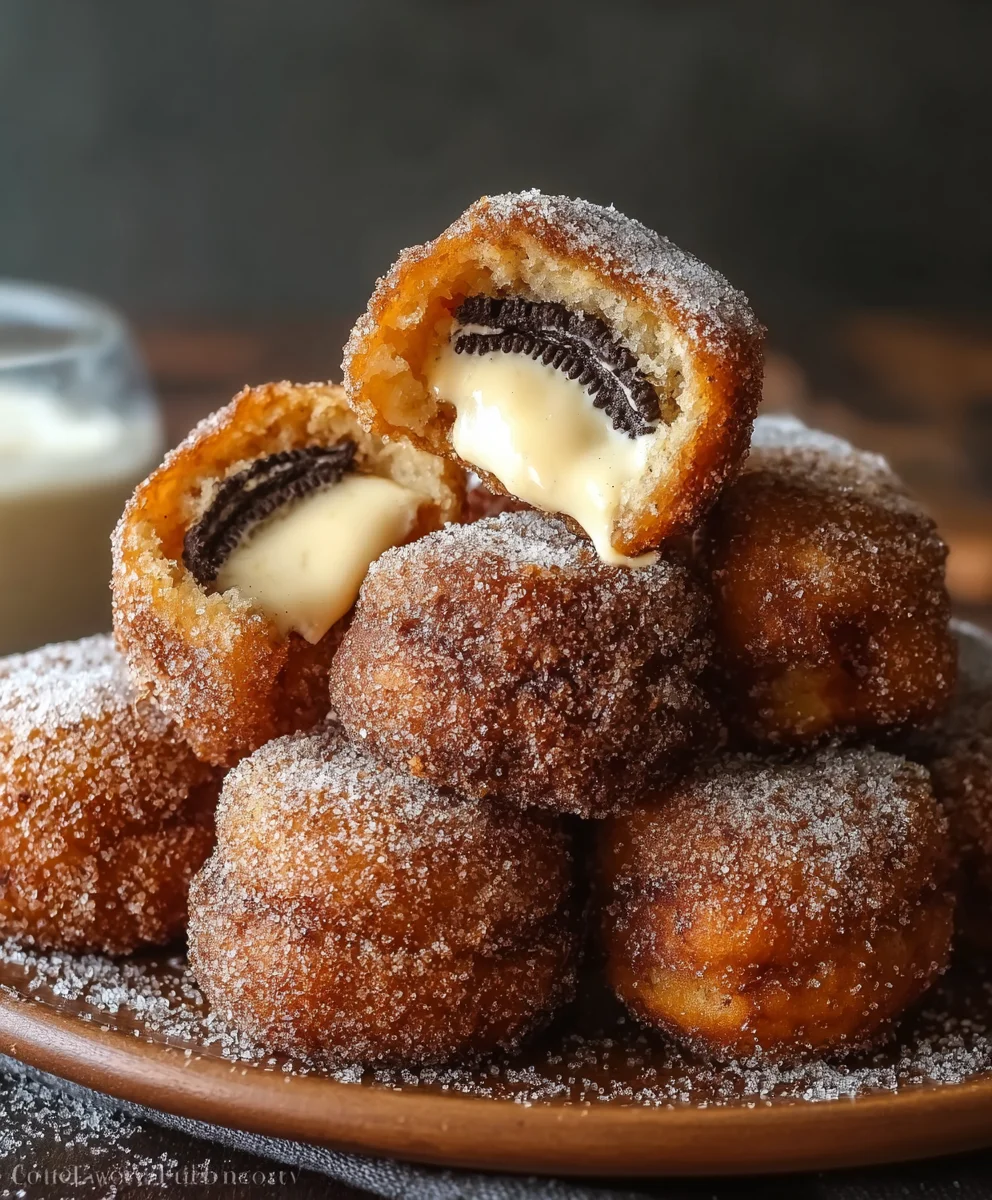
Drain and Coat Immediately: Once the OREOs are beautifully golden, carefully remove them from the hot oil using tongs. Hold them over the pot for a few seconds to allow excess oil to drip off. Immediately transfer the hot, fried OREOs to the shallow dish with our cinnamon-sugar mixture. Roll them around gently but thoroughly, ensuring every surface is generously coated with the sweet, spiced sugar. The heat of the OREO helps the sugar mixture adhere wonderfully. This step is what truly transforms them into “Churro Cheesecake Deep Fried Oreos.”
-
Cooling: Transfer the coated OREOs to a wire rack set over a baking sheet or paper towels. This allows any remaining excess oil to drain and prevents the bottoms from becoming soggy. The wire rack also allows air to circulate, helping them stay crispy. Repeat the frying and coating process with the remaining OREOs, making sure the oil returns to 350°F (175°C) between batches.
-
Safety Note for Frying:
- Never leave hot oil unattended.
- Keep a fire extinguisher nearby.
- If oil catches fire, turn off the heat and cover the pot with a metal lid; do NOT use water.
- Carefully lower items into oil to avoid splashing.
- Use proper tongs or a slotted spoon designed for frying.
Finishing and Serving
Congratulations! You’ve successfully created a batch of truly decadent “Churro Cheesecake Deep Fried Oreos.” Now comes the best part – enjoying your handiwork!
-
Serve Warm: These delightful treats are absolutely best served warm, just a few minutes after they’ve been fried and coated in that wonderful cinnamon sugar. The exterior will be incredibly crispy, the cheesecake filling soft and luscious, and the OREO center warm and gooey. There’s truly nothing quite like a freshly made deep-fried OREO, especially one infused with that cheesecake twist and churro goodness.
-
Optional Garnishes and Dips: To elevate the experience even further, consider offering a few optional garnishes. A drizzle of warm caramel sauce or rich chocolate sauce can add another layer of indulgence. A dollop of whipped cream is always a welcome addition, providing a cool contrast to the warm fried treat. You could even dust them with a little extra powdered sugar just before serving for that extra visual appeal and touch of sweetness.
-
Enjoy the Flavors: Each bite of a “Churro Cheesecake Deep Fried Oreo” is a symphony of textures and flavors: the sugary, crispy crunch of the churro batter, the creamy, tangy cheesecake, and the familiar chocolatey goodness of the OREO, all perfectly melded together. It’s a dessert that’s sure to impress and satisfy even the most discerning sweet tooth.
-
Storage (if any leftovers): While these are truly at their peak when fresh, if you happen to have any leftovers (a rare occurrence, I’m sure!), you can store them in an airtight container at room temperature for up to a day, or in the refrigerator for up to two days. Reheat them gently in a toaster oven or air fryer for a few minutes to crisp them back up before serving. Microwaving tends to make them soft, which isn’t ideal for that churro texture we worked so hard to achieve.
-
Share the Joy: Don’t keep these incredible “Churro Cheesecake Deep Fried Oreos” all to yourself! They are fantastic for parties, gatherings, or as a special weekend treat. Prepare to receive rave reviews and requests for the recipe. Happy indulging!
Conclusion:
And so, we arrive at the sweet culmination of our culinary journey! I genuinely hope you’ve enjoyed exploring the delicious possibilities that this unique dessert offers. It’s more than just a recipe; it’s an invitation to experience joy, to surprise your taste buds, and to create truly memorable moments in your kitchen and at your table. This isn’t just another treat; it’s an adventure in indulgence that promises to deliver on every single level of expectation, and then some. I truly believe that once you try this, you’ll understand why it’s quickly becoming a celebrated favorite among those who love innovative, comforting, and utterly delightful sweets.
Why This Recipe is an Absolute Must-Try
What makes this particular recipe stand out in a sea of delicious desserts? It’s the audacious yet utterly harmonious combination of textures and flavors that will truly captivate your senses. Imagine the satisfying crunch of a perfectly deep-fried exterior, dusted generously with aromatic cinnamon sugar, giving way to the rich, creamy, and subtly tangy cheesecake layer, and finally revealing the familiar, beloved chocolatey crunch of an Oreo cookie. It’s a symphony of sensations in every single bite, a culinary paradox that works so brilliantly you’ll wonder why it wasn’t invented sooner. This is precisely why our Churro Cheesecake Deep Fried Oreos are more than just a dessert; they’re an event. They offer that incredible “wow” factor, the kind that makes people stop, take notice, and immediately ask for the recipe. It’s a testament to creative fusion, blending classic comfort with an exciting, unexpected twist. Forget everything you thought you knew about dessert; this creation redefines indulgence, offering something truly novel and deeply satisfying. It’s comforting, exciting, and utterly irresistible all at once.
Elevate Your Indulgence: Serving Suggestions & Creative Twists
While these decadent delights are phenomenal straight out of the fryer, perhaps after a brief moment to cool slightly (if you can wait!), there are so many ways to personalize and elevate your serving experience. For a simple yet elegant touch, a light dusting of extra powdered sugar or a delicate drizzle of melted chocolate or warm caramel sauce can go a long way. But why stop there? Imagine serving them alongside a scoop of premium vanilla bean ice cream, allowing its cool creaminess to contrast beautifully with the warm, crispy exterior. A dollop of freshly whipped cream, perhaps infused with a hint of vanilla or almond extract, would also be a fantastic addition. For those who love a bit more spice, consider adding a pinch of nutmeg or cardamom to your cinnamon sugar mix for an even more complex aroma. And for a truly adult twist, a shot of espresso or a glass of a rich, dark stout could be the perfect beverage pairing to cut through the sweetness. Think seasonally, too! In the fall, a tiny dash of pumpkin pie spice in the sugar could be magical, or in the summer, a side of fresh berries or a light berry compote could add a delightful tart counterpoint. Don’t be afraid to experiment; your kitchen is your canvas, and these deep-fried treasures are the perfect subject for your culinary artistry.
Your Turn to Create & Share the Sweetness!
Now that you have all the insights and inspiration, it’s truly your turn to bring this incredible recipe to life! I promise you, the process is incredibly rewarding, and the end result will speak for itself. Don’t feel intimidated; the steps are straightforward, and the joy you’ll get from sharing these with friends and family (or simply savoring them yourself!) is immeasurable. I truly believe this recipe will become a new favorite in your repertoire, a go-to for special occasions or whenever you just need a serious dose of happiness. So, gather your ingredients, put on your apron, and prepare to create something truly spectacular. I wholeheartedly encourage you to dive in and experience the magic firsthand. Once you’ve made them, please, please, please share your experience! Tag me in your photos, tell me about your creative serving suggestions, or simply drop a comment below letting me know how much you loved them. Your success stories and culinary adventures inspire me, and I can’t wait to see the amazing Churro Cheesecake Deep Fried Oreos you create in your own kitchen!
Churro Cheesecake Deep Fried Oreos
A truly decadent fusion of crispy, cinnamon-sugar churros, creamy cheesecake, and deep-fried Oreos. This ultimate sweet treat brings together Spanish street food, American fair indulgence, and classic baking into one unforgettable dessert experience, offering an explosion of crispy, soft, and creamy textures in every bite.
Ingredients
-
1 (8-ounce) package cream cheese, softened
-
½ cup powdered sugar (for filling)
-
1 teaspoon vanilla extract
-
½ teaspoon ground cinnamon (for filling)
-
1 (15.3-ounce) package OREO cookies (approx. 36)
-
2 cups all-purpose flour
-
2 tablespoons granulated sugar (for batter)
-
2 teaspoons baking powder
-
½ teaspoon salt
-
1½ cups milk (whole milk preferred)
-
2 large eggs
-
¼ cup unsalted butter, melted
-
6-8 cups vegetable oil, canola oil, or peanut oil, for deep frying
-
For Churro Coating:
-
1 cup granulated sugar
-
2 tablespoons ground cinnamon
Instructions
-
Step 1
Combine softened cream cheese, ½ cup powdered sugar, 1 tsp vanilla, and ½ tsp cinnamon; beat until smooth and fluffy. Gently twist open each OREO cookie. Spread about 1 teaspoon of cheesecake mixture onto the plain side of one chocolate wafer, then reassemble with the original cream wafer. Arrange on a parchment-lined baking sheet and chill for at least 30 minutes to firm up. -
Step 2
In a large bowl, whisk together flour, 2 tbsp granulated sugar, baking powder, and ½ tsp salt. In a separate small bowl, whisk milk, eggs, and melted butter. Pour wet ingredients into the dry; mix until just combined (do not overmix, lumps are okay). Cover and let batter rest for 10-15 minutes. -
Step 3
In a shallow dish, combine 1 cup granulated sugar and 2 tbsp ground cinnamon for the churro coating; whisk well. Heat 6-8 cups of vegetable, canola, or peanut oil in a deep, heavy-bottomed pot to 350°F (175°C), using a deep-fry thermometer. -
Step 4
{‘@type’: ‘HowToStep’, ‘name’: ‘Deep Fry and Coat Oreos’, ‘text’: ‘Dip one chilled OREO at a time into the churro batter, ensuring it’s fully coated. Carefully lower 2-3 batter-coated OREOs into the hot oil (do not overcrowd). Fry for 2-3 minutes per side, or until deep golden brown and puffed. Remove from oil, letting excess drip off, then immediately roll in the cinnamon-sugar mixture, coating generously. Transfer to a wire rack set over paper towels to cool. Repeat with remaining OREOs, ensuring oil temperature returns to 350°F between batches.’, ‘supply’: [{‘@type’: ‘HowToSupply’, ‘name’: ‘Deep-fry thermometer’}, {‘@type’: ‘HowToSupply’, ‘name’: ‘Tongs’}, {‘@type’: ‘HowToSupply’, ‘name’: ‘Wire rack’}]} -
Step 5
Serve Churro Cheesecake Deep Fried Oreos warm for the best taste and texture. Optionally garnish with caramel sauce, chocolate sauce, whipped cream, or extra powdered sugar. Store any leftovers in an airtight container at room temperature for up to one day, or in the refrigerator for up to two days. Reheat gently in a toaster oven or air fryer to re-crisp.
Important Information
Nutrition Facts (Per Serving)
It is important to consider this information as approximate and not to use it as definitive health advice.
Allergy Information
Please check ingredients for potential allergens and consult a health professional if in doubt.


Leave a Comment