
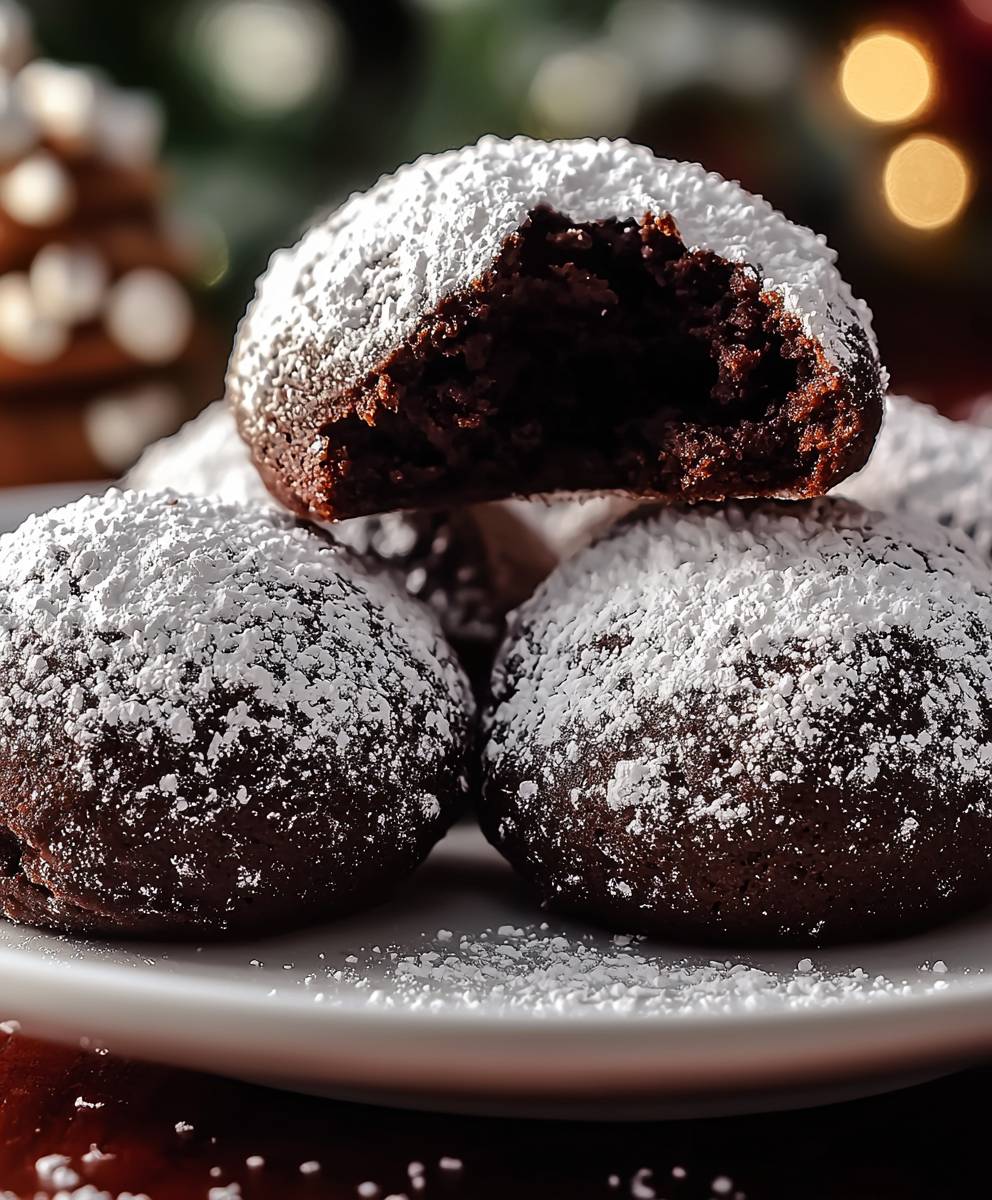
Chocolate snowball cookies, those delightful orbs of fudgy goodness cloaked in a blizzard of powdered sugar, are more than just a treat; they’re a miniature winter wonderland on a plate! Have you ever bitten into one and felt instantly transported to a cozy fireside scene, snow gently falling outside? That’s the magic of these cookies.
While the exact origins of snowball cookies are debated, many believe they evolved from traditional European Christmas cookies, adapted with the rich flavor of chocolate. Some trace their lineage back to Russian Tea Cakes or Mexican Wedding Cookies, highlighting the global appeal of this simple yet elegant confection. Regardless of their precise history, chocolate snowball cookies have become a beloved holiday staple in countless homes.
What makes these cookies so irresistible? It’s the perfect combination of textures and tastes. The tender, almost melt-in-your-mouth crumb gives way to a deep, satisfying chocolate flavor, all balanced by the delicate sweetness of the powdered sugar coating. They’re also incredibly easy to make, requiring minimal ingredients and effort, making them perfect for baking with family and friends. Plus, their charming appearance makes them a delightful addition to any holiday cookie platter or a thoughtful homemade gift. So, let’s get baking and create some edible snowballs that will bring joy to everyone who tastes them!

Ingredients:
- 1 cup (2 sticks) unsalted butter, softened
- 1/2 cup powdered sugar, plus more for coating
- 1 teaspoon vanilla extract
- 1/4 teaspoon salt
- 2 1/4 cups all-purpose flour
- 1/2 cup unsweetened cocoa powder
- 1 cup finely chopped walnuts or pecans (optional, but highly recommended!)
Preparing the Dough:
Okay, let’s get started! First things first, we need to cream together the butter and powdered sugar. This is a crucial step, so take your time and do it right. You want the mixture to be light and fluffy, which will give our snowball cookies that melt-in-your-mouth texture.
- In a large bowl (or the bowl of your stand mixer), combine the softened butter and 1/2 cup of powdered sugar. Beat on medium speed for about 3-5 minutes, or until the mixture is pale and fluffy. Don’t rush this! The air you incorporate now will make a big difference later. I usually scrape down the sides of the bowl a couple of times to make sure everything is evenly mixed.
- Add the vanilla extract and salt to the butter mixture. Beat until just combined. We don’t want to overmix at this point, just enough to incorporate the vanilla and salt evenly.
- In a separate bowl, whisk together the all-purpose flour and cocoa powder. This ensures that the cocoa powder is evenly distributed throughout the flour, preventing any pockets of intense cocoa flavor. Nobody wants a surprise bitter bite!
- Gradually add the flour mixture to the butter mixture, beating on low speed until just combined. Be careful not to overmix! Overmixing will develop the gluten in the flour, resulting in tough cookies. We want these to be tender and delicate. I usually add the flour in three additions, mixing until just combined after each addition.
- If you’re using nuts (and I highly recommend you do!), gently fold them into the dough. I love the added texture and flavor that nuts bring to these cookies. Walnuts and pecans are both excellent choices. Make sure the nuts are finely chopped so they don’t interfere with the cookie’s delicate structure.
- Divide the dough in half, wrap each half in plastic wrap, and flatten into a disc. This helps the dough chill more evenly. Refrigerate for at least 30 minutes, or up to 2 hours. Chilling the dough is essential! It prevents the cookies from spreading too much in the oven and helps them hold their shape.
Shaping and Baking the Cookies:
Now for the fun part shaping the cookies! I like to make mine about 1-inch in diameter, but you can adjust the size to your liking. Just remember that smaller cookies will bake faster, so keep a close eye on them.
- Preheat your oven to 350°F (175°C). Line a baking sheet with parchment paper. Parchment paper is your best friend when baking these cookies! It prevents them from sticking and makes cleanup a breeze.
- Remove one disc of dough from the refrigerator. On a lightly floured surface, roll the dough into 1-inch balls. Place the balls on the prepared baking sheet, leaving about 1 inch between each cookie.
- Repeat with the remaining dough. If the dough becomes too soft to handle, return it to the refrigerator for a few minutes to firm up.
- Bake for 10-12 minutes, or until the cookies are set but not browned. The cookies should still be slightly soft to the touch. Don’t overbake them! Overbaked cookies will be dry and crumbly.
- Let the cookies cool on the baking sheet for a few minutes before transferring them to a wire rack to cool completely.
Coating with Powdered Sugar:
This is what gives our snowball cookies their signature look and extra sweetness! The key is to coat them while they’re still slightly warm, so the powdered sugar adheres properly.
- While the cookies are still slightly warm, roll them in powdered sugar until they are completely coated. I like to use a shallow bowl filled with powdered sugar for this step.
- Place the coated cookies back on the wire rack to cool completely.
- Once the cookies are completely cool, roll them in powdered sugar again. This double coating ensures that they are completely covered in a thick layer of sweetness.
Tips and Tricks for Perfect Snowball Cookies:
Here are a few extra tips to help you achieve snowball cookie perfection:
- Use high-quality ingredients: The better the ingredients, the better the cookies will taste. Use good quality butter, vanilla extract, and cocoa powder.
- Don’t overmix the dough: Overmixing will develop the gluten in the flour, resulting in tough cookies. Mix until just combined.
- Chill the dough: Chilling the dough is essential for preventing the cookies from spreading too much in the oven.
- Don’t overbake the cookies: Overbaked cookies will be dry and crumbly. Bake until they are set but still slightly soft to the touch.
- Coat the cookies while they’re still warm: This helps the powdered sugar adhere properly.
- Double coat the cookies: This ensures that they are completely covered in a thick layer of sweetness.
- Store the cookies in an airtight container: This will help them stay fresh for longer.
- Experiment with flavors: Try adding different extracts, spices, or nuts to customize the cookies to your liking. A little almond extract or a pinch of cinnamon can add a lovely touch.
- Make them ahead of time: The dough can be made ahead of time and stored in the refrigerator for up to 2 days. Just bring it to room temperature slightly before rolling.
- Freeze them: Baked cookies can be frozen for up to 2 months. Thaw completely before serving. You may want to give them a fresh dusting of powdered sugar after thawing.
Troubleshooting:
Sometimes things don’t go exactly as planned. Here are a few common problems and how to fix them:
- Cookies are spreading too much: This is usually caused by the dough being too warm. Make sure to chill the dough thoroughly before baking. You can also try adding a tablespoon or two of flour to the dough.
- Cookies are dry and crumbly: This is usually caused by overbaking. Make sure to bake the cookies until they are just set but still slightly soft to the touch.
- Powdered sugar isn’t sticking: Make sure to coat the cookies while they are still slightly warm. You can also try adding a teaspoon of cornstarch to the powdered sugar.
- Cookies are too hard: This could be due to overmixing the dough. Be gentle when mixing and stop as soon as the ingredients are combined.
Variations:
Want to mix things up a bit? Here are some fun variations you can try:
- Mexican Chocolate Snowballs: Add 1/2 teaspoon of ground cinnamon and 1/4 teaspoon of cayenne pepper to the dough for a spicy kick.
- Espresso Snowballs: Add 1 tablespoon of instant espresso powder to the dough for a coffee flavor.
- Peppermint Snowballs: Add 1/4 teaspoon of peppermint extract to the dough and crush some peppermint candies to sprinkle on top after coating with powdered sugar.
- Orange Snowballs: Add the zest of one orange to the dough for a citrusy flavor.
Enjoy your delicious chocolate snowball cookies! They’re perfect for holiday baking, gift-giving, or just a sweet treat any time of year.
Conclusion:
And there you have it! These chocolate snowball cookies are more than just a treat; they’re a delightful experience, a nostalgic trip, and a guaranteed crowd-pleaser all rolled into one perfectly powdered package. I truly believe this recipe is a must-try, and here’s why: the rich, decadent chocolate flavor combined with the delicate, melt-in-your-mouth texture is simply irresistible. They’re surprisingly easy to make, requiring minimal ingredients and effort, making them perfect for both seasoned bakers and kitchen novices alike. Plus, the festive appearance makes them ideal for holiday gatherings, potlucks, or simply a cozy night in.
But the best part? They’re incredibly versatile! While I’ve shared my classic recipe, feel free to get creative and experiment with different variations. For a nutty twist, try adding chopped pecans or walnuts to the dough. If you’re a fan of spice, a pinch of cinnamon or cayenne pepper will add a warm, subtle kick. You could even incorporate mini chocolate chips for an extra dose of chocolatey goodness.
Serving suggestions are endless! These cookies are fantastic on their own, enjoyed with a warm cup of coffee or tea. They also pair beautifully with a scoop of vanilla ice cream for a decadent dessert. For a festive touch, arrange them on a platter with other holiday treats like gingerbread men and sugar cookies. They also make wonderful gifts! Package them in a decorative tin or cellophane bag and share the joy with friends and family.
Don’t be intimidated by the “snowball” name; these cookies are surprisingly forgiving. The key is to not overbake them you want them to be soft and tender, not crispy. And remember, the double coating of powdered sugar is what gives them their signature snowy appearance, so don’t skimp on that step!
I’ve poured my heart into perfecting this recipe, and I’m confident that you’ll love it as much as I do. It’s a recipe that’s been passed down through my family for generations, and it always brings back fond memories of holidays past. I hope it creates similar memories for you and your loved ones.
So, what are you waiting for? Gather your ingredients, preheat your oven, and get ready to bake up a batch of these irresistible chocolate snowball cookies. I promise you won’t regret it!
And now, for the most important part: I want to hear about your experience! Did you try the recipe? Did you make any variations? What did your family and friends think? Please, share your thoughts and photos in the comments below. I’m always eager to see your creations and hear your feedback. Your comments not only help me improve my recipes but also inspire other bakers to give them a try. Let’s create a community of cookie lovers and spread the joy of baking! Happy baking, and I can’t wait to see your snowy creations!
Chocolate Snowball Cookies: A Delicious Holiday Recipe
Delicate chocolate snowball cookies that melt in your mouth, generously coated in powdered sugar. Perfect for holidays or any celebration!
Ingredients
- 1 cup (2 sticks) unsalted butter, softened
- 1/2 cup powdered sugar, plus more for coating
- 1 teaspoon vanilla extract
- 1/4 teaspoon salt
- 2 1/4 cups all-purpose flour
- 1/2 cup unsweetened cocoa powder
- 1 cup finely chopped walnuts or pecans (optional, but highly recommended!)
Instructions
- Cream Butter and Sugar: In a large bowl (or stand mixer), cream together the softened butter and 1/2 cup of powdered sugar on medium speed for 3-5 minutes, until pale and fluffy. Scrape down the sides of the bowl as needed.
- Add Vanilla and Salt: Add the vanilla extract and salt to the butter mixture. Beat until just combined.
- Whisk Dry Ingredients: In a separate bowl, whisk together the all-purpose flour and cocoa powder.
- Combine Wet and Dry: Gradually add the flour mixture to the butter mixture, beating on low speed until just combined. Be careful not to overmix.
- Add Nuts (Optional): Gently fold in the finely chopped walnuts or pecans, if using.
- Chill Dough: Divide the dough in half, wrap each half in plastic wrap, and flatten into a disc. Refrigerate for at least 30 minutes, or up to 2 hours.
- Preheat Oven: Preheat your oven to 350°F (175°C). Line a baking sheet with parchment paper.
- Shape Cookies: Remove one disc of dough from the refrigerator. On a lightly floured surface, roll the dough into 1-inch balls. Place the balls on the prepared baking sheet, leaving about 1 inch between each cookie. Repeat with the remaining dough.
- Bake: Bake for 10-12 minutes, or until the cookies are set but not browned. The cookies should still be slightly soft to the touch.
- Cool: Let the cookies cool on the baking sheet for a few minutes before transferring them to a wire rack to cool completely.
- First Coating: While the cookies are still slightly warm, roll them in powdered sugar until they are completely coated.
- Cool Again: Place the coated cookies back on the wire rack to cool completely.
- Second Coating: Once the cookies are completely cool, roll them in powdered sugar again.
Notes
- Use high-quality ingredients for the best flavor.
- Don’t overmix the dough to avoid tough cookies.
- Chilling the dough is essential to prevent spreading.
- Don’t overbake the cookies; they should be slightly soft.
- Coat the cookies while warm for better powdered sugar adhesion.
- Double coating ensures a thick layer of sweetness.
- Store in an airtight container to maintain freshness.
- Experiment with flavors like almond extract, cinnamon, or other spices.
- Dough can be made ahead and refrigerated for up to 2 days.
- Baked cookies can be frozen for up to 2 months.


Leave a Comment