
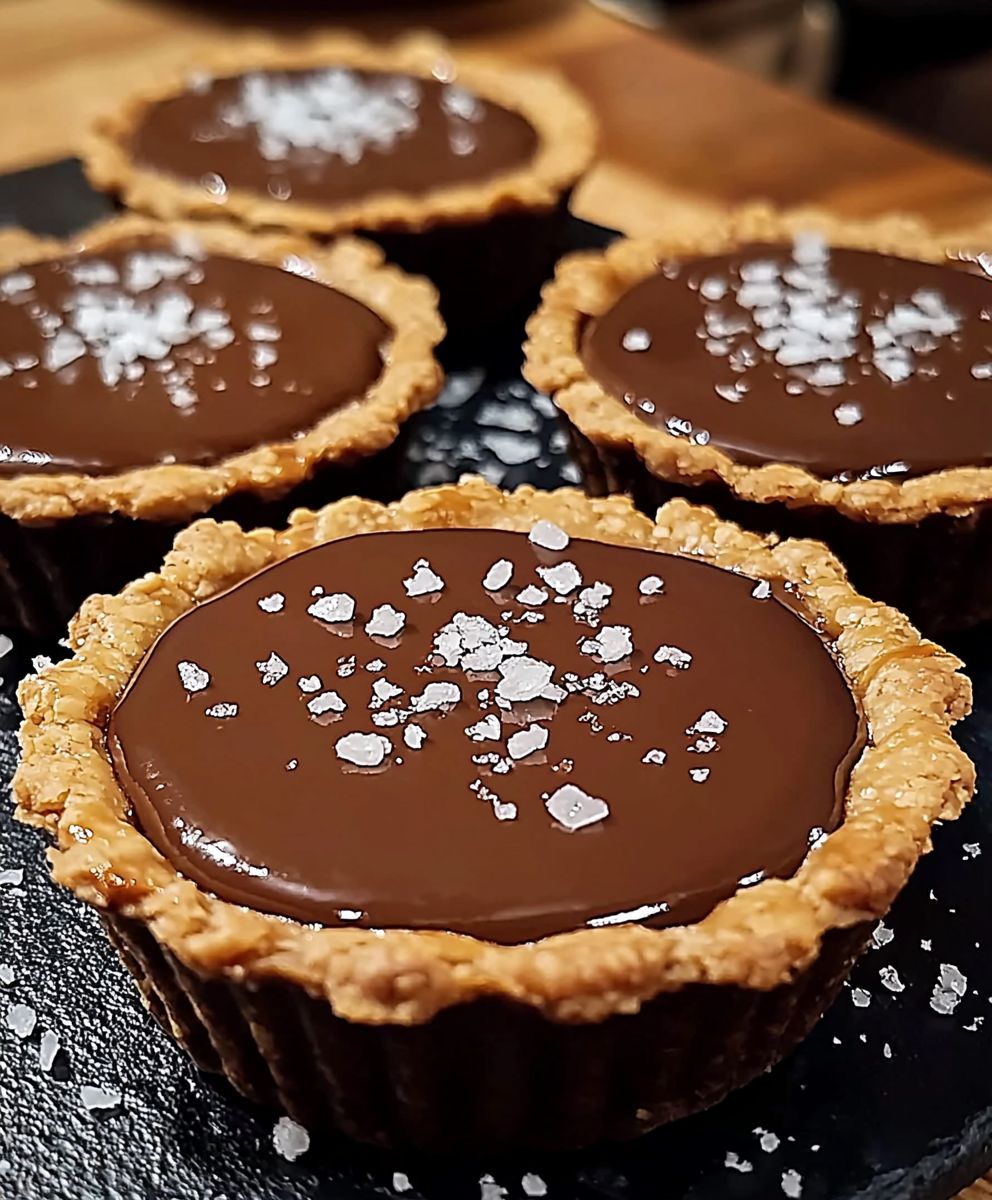
Chocolate Salted Caramel Tarts, need I say more? These decadent little treats are the answer to every chocolate and caramel craving you’ve ever had. Imagine sinking your teeth into a buttery, crisp chocolate crust, followed by a rush of gooey, homemade salted caramel, and topped with a rich, dark chocolate ganache. It’s a symphony of flavors and textures that will leave you utterly speechless.
While the exact origins of salted caramel are debated, its modern resurgence can be traced back to French pastry chef Henri Le Roux in the late 1970s. He dared to combine salted butter caramel with crushed nuts, creating a flavor profile that was both familiar and surprisingly sophisticated. This innovative combination quickly gained popularity, paving the way for the salted caramel craze we know and love today. And what better way to showcase this beloved flavor than in a perfectly portioned tart?
People adore Chocolate Salted Caramel Tarts for their irresistible combination of sweet and salty, rich and decadent. The contrasting flavors create a delightful dance on your palate, while the smooth caramel and creamy ganache provide a luxurious mouthfeel. Plus, these tarts are surprisingly easy to make at home, allowing you to impress your friends and family with a gourmet dessert without spending hours in the kitchen. So, are you ready to embark on a baking adventure that will tantalize your taste buds? Let’s get started!

Ingredients:
- For the Chocolate Tart Crust:
- 1 1/2 cups (192g) all-purpose flour
- 1/2 cup (50g) unsweetened cocoa powder
- 1/2 cup (100g) granulated sugar
- 1/4 teaspoon salt
- 1/2 cup (1 stick, 113g) cold unsalted butter, cut into cubes
- 1 large egg yolk
- 3-5 tablespoons ice water
- For the Salted Caramel Filling:
- 1 cup (200g) granulated sugar
- 1/4 cup (60ml) water
- 1/2 cup (120ml) heavy cream, warmed
- 4 tablespoons (1/2 stick, 57g) unsalted butter, cut into cubes
- 1 teaspoon vanilla extract
- 1/2 – 1 teaspoon sea salt, or to taste (I prefer Maldon sea salt flakes)
- For the Chocolate Ganache Topping:
- 8 ounces (227g) semi-sweet chocolate, finely chopped
- 1 cup (240ml) heavy cream
- 2 tablespoons (28g) unsalted butter, softened
- Optional Garnish:
- Sea salt flakes
- Cocoa powder
- Chocolate shavings
Preparing the Chocolate Tart Crust:
- Combine Dry Ingredients: In a large bowl, whisk together the flour, cocoa powder, sugar, and salt. This ensures that the cocoa powder is evenly distributed throughout the flour, preventing any bitter clumps in your crust.
- Cut in the Butter: Add the cold, cubed butter to the dry ingredients. Using a pastry blender or your fingertips, cut the butter into the flour mixture until it resembles coarse crumbs. The key here is to work quickly so the butter stays cold. Cold butter is essential for creating a flaky crust. If you don’t have a pastry blender, you can use two knives to cut the butter in.
- Add the Egg Yolk: In a small bowl, whisk the egg yolk with 3 tablespoons of ice water. Pour this mixture into the flour mixture. The egg yolk adds richness and helps bind the dough together.
- Mix the Dough: Gently mix the ingredients together until the dough just comes together. If the dough seems too dry, add the remaining ice water, one tablespoon at a time, until it forms a cohesive ball. Be careful not to overmix, as this will develop the gluten in the flour and result in a tough crust.
- Form into a Disc and Chill: Flatten the dough into a disc, wrap it tightly in plastic wrap, and refrigerate for at least 30 minutes, or up to 2 hours. This chilling period allows the gluten to relax, making the dough easier to roll out and preventing it from shrinking during baking.
- Roll Out the Dough: On a lightly floured surface, roll out the chilled dough to about 1/8 inch thickness. Make sure to rotate the dough as you roll to prevent it from sticking to the surface. If the dough becomes too warm and sticky, return it to the refrigerator for a few minutes to chill.
- Transfer to Tart Pans: Gently transfer the rolled-out dough to your tart pans (I use individual 4-inch tart pans with removable bottoms). Press the dough firmly into the bottom and up the sides of the pans. Trim any excess dough from the edges. You can use a rolling pin to roll over the top of the tart pan to get a clean edge.
- Dock the Crust: Use a fork to prick the bottom of the tart crusts all over. This prevents the crust from puffing up during baking.
- Chill Again: Place the tart pans in the freezer for 15 minutes. This helps the crust hold its shape during baking and prevents it from shrinking.
- Bake the Crust: Preheat your oven to 375°F (190°C). Line the tart crusts with parchment paper and fill with pie weights or dried beans. This will prevent the crust from puffing up. Bake for 15 minutes.
- Remove Weights and Bake Further: Remove the parchment paper and pie weights and bake for another 5-10 minutes, or until the crusts are golden brown. Watch them carefully to prevent burning.
- Cool Completely: Let the tart crusts cool completely in the pans before filling.
Making the Salted Caramel Filling:
- Combine Sugar and Water: In a medium saucepan, combine the sugar and water. Stir to moisten the sugar.
- Cook the Caramel: Cook over medium heat, without stirring, until the sugar dissolves and turns into a deep amber color. This process requires patience and careful attention. Do not stir the mixture, as this can cause the sugar to crystallize. You can gently swirl the pan if needed to ensure even cooking.
- Add the Cream: Once the caramel is a deep amber color, carefully pour in the warm heavy cream. Be careful, as the mixture will bubble vigorously. Whisk constantly to combine the cream and caramel.
- Add the Butter: Remove the saucepan from the heat and whisk in the butter until it is melted and smooth.
- Add Vanilla and Salt: Stir in the vanilla extract and sea salt. Adjust the amount of salt to your liking. I prefer a generous amount of sea salt to balance the sweetness of the caramel.
- Cool Slightly: Let the caramel cool slightly before pouring it into the prepared tart crusts. This will prevent the crust from becoming soggy.
- Pour into Crusts: Pour the salted caramel filling into the cooled tart crusts, filling them almost to the top.
- Chill: Refrigerate the tarts for at least 1 hour, or until the caramel is set. This allows the caramel to firm up and makes the tarts easier to handle.
Preparing the Chocolate Ganache Topping:
- Chop the Chocolate: Finely chop the semi-sweet chocolate and place it in a heatproof bowl. The finer the chocolate is chopped, the smoother the ganache will be.
- Heat the Cream: In a small saucepan, heat the heavy cream over medium heat until it just comes to a simmer. Do not boil the cream.
- Pour Over Chocolate: Pour the hot cream over the chopped chocolate. Let it sit for 1 minute to allow the heat to melt the chocolate.
- Whisk Until Smooth: Whisk the mixture gently until the chocolate is completely melted and the ganache is smooth and glossy.
- Add Butter: Stir in the softened butter until it is fully incorporated. The butter adds richness and shine to the ganache.
- Cool Slightly: Let the ganache cool slightly before pouring it over the caramel-filled tarts. This will prevent the caramel from melting.
- Pour Over Tarts: Pour the chocolate ganache over the chilled caramel-filled tarts, spreading it evenly to cover the caramel.
- Chill Again: Refrigerate the tarts for another 30 minutes, or until the ganache is set. This allows the ganache to firm up and creates a clean, smooth finish.
Assembling and Garnishing:
- Remove from Pans: Carefully remove the tarts from the tart pans. The removable bottoms make this process much easier.
- Garnish (Optional): Garnish the tarts with sea salt flakes, cocoa powder, or chocolate shavings, if desired. A sprinkle of sea salt flakes adds a nice visual appeal and enhances the salted caramel flavor.
- Serve: Serve the chocolate salted caramel tarts chilled or at room temperature. They are best enjoyed within a few days of making them.
Conclusion:
And there you have it! These Chocolate Salted Caramel Tarts are truly a decadent treat that will impress anyone lucky enough to try them. From the rich, buttery crust to the smooth, intensely chocolatey ganache and that irresistible salty-sweet caramel, every element works in perfect harmony. I know, I know, they might seem a little intimidating at first glance, but trust me, the process is incredibly rewarding, and the end result is absolutely worth the effort. Why is this recipe a must-try? Because it’s more than just a dessert; it’s an experience. It’s the perfect balance of flavors and textures that will tantalize your taste buds and leave you wanting more. It’s the kind of treat that elevates any occasion, from a simple weeknight indulgence to a sophisticated dinner party. Plus, who can resist the allure of chocolate and salted caramel? It’s a classic combination for a reason! But the best part? You can easily customize these tarts to suit your own preferences. Feeling adventurous? Try adding a pinch of cayenne pepper to the caramel for a subtle kick. Or, sprinkle some chopped pecans or walnuts on top of the ganache for added crunch. For a more festive touch, consider using different types of chocolate for the ganache, like dark chocolate with orange zest or milk chocolate with a hint of cinnamon. You could even experiment with different types of salt for the caramel, such as flaky sea salt or smoked salt, to add a unique depth of flavor. Serving suggestions? These tarts are delicious on their own, but they’re even better when paired with a scoop of vanilla ice cream or a dollop of whipped cream. A drizzle of extra caramel sauce never hurts either! For a truly decadent experience, serve them with a glass of dessert wine or a cup of strong coffee. They also make a wonderful gift for friends and family, especially during the holidays. Imagine the joy on their faces when they receive a box of these homemade Chocolate Salted Caramel Tarts! I truly believe that everyone should have this recipe in their repertoire. It’s a showstopper that’s guaranteed to impress, and it’s surprisingly easy to make once you get the hang of it. So, what are you waiting for? Gather your ingredients, preheat your oven, and get ready to embark on a delicious baking adventure. I’m so excited for you to try this recipe! And I can’t wait to hear about your experience. Did you make any variations? Did you encounter any challenges? What did your friends and family think? Please, please, please share your thoughts and photos in the comments below. Your feedback is invaluable, and it helps me to improve my recipes and create even more delicious treats for you to enjoy. Happy baking! I am confident that you will love this recipe for Chocolate Salted Caramel Tarts as much as I do. Print
Chocolate Salted Caramel Tarts: A Decadent Dessert Recipe
- Total Time: 165 minutes
- Yield: 6 individual tarts (4-inch) 1x
Description
Decadent chocolate tarts with a rich salted caramel filling and a smooth chocolate ganache topping. A perfect balance of sweet and salty!
Ingredients
- 1 1/2 cups (192g) all-purpose flour
- 1/2 cup (50g) unsweetened cocoa powder
- 1/2 cup (100g) granulated sugar
- 1/4 teaspoon salt
- 1/2 cup (1 stick, 113g) cold unsalted butter, cut into cubes
- 1 large egg yolk
- 3–5 tablespoons ice water
- 1 cup (200g) granulated sugar
- 1/4 cup (60ml) water
- 1/2 cup (120ml) heavy cream, warmed
- 4 tablespoons (1/2 stick, 57g) unsalted butter, cut into cubes
- 1 teaspoon vanilla extract
- 1/2 – 1 teaspoon sea salt, or to taste (I prefer Maldon sea salt flakes)
- 8 ounces (227g) semi-sweet chocolate, finely chopped
- 1 cup (240ml) heavy cream
- 2 tablespoons (28g) unsalted butter, softened
- Sea salt flakes
- Cocoa powder
- Chocolate shavings
Instructions
- Combine Dry Ingredients: In a large bowl, whisk together the flour, cocoa powder, sugar, and salt.
- Cut in the Butter: Add the cold, cubed butter to the dry ingredients. Using a pastry blender or your fingertips, cut the butter into the flour mixture until it resembles coarse crumbs.
- Add the Egg Yolk: In a small bowl, whisk the egg yolk with 3 tablespoons of ice water. Pour this mixture into the flour mixture.
- Mix the Dough: Gently mix the ingredients together until the dough just comes together. If the dough seems too dry, add the remaining ice water, one tablespoon at a time, until it forms a cohesive ball.
- Form into a Disc and Chill: Flatten the dough into a disc, wrap it tightly in plastic wrap, and refrigerate for at least 30 minutes, or up to 2 hours.
- Roll Out the Dough: On a lightly floured surface, roll out the chilled dough to about 1/8 inch thickness.
- Transfer to Tart Pans: Gently transfer the rolled-out dough to your tart pans (I use individual 4-inch tart pans with removable bottoms). Press the dough firmly into the bottom and up the sides of the pans. Trim any excess dough from the edges.
- Dock the Crust: Use a fork to prick the bottom of the tart crusts all over.
- Chill Again: Place the tart pans in the freezer for 15 minutes.
- Bake the Crust: Preheat your oven to 375°F (190°C). Line the tart crusts with parchment paper and fill with pie weights or dried beans. Bake for 15 minutes.
- Remove Weights and Bake Further: Remove the parchment paper and pie weights and bake for another 5-10 minutes, or until the crusts are golden brown.
- Cool Completely: Let the tart crusts cool completely in the pans before filling.
- Combine Sugar and Water: In a medium saucepan, combine the sugar and water. Stir to moisten the sugar.
- Cook the Caramel: Cook over medium heat, without stirring, until the sugar dissolves and turns into a deep amber color.
- Add the Cream: Once the caramel is a deep amber color, carefully pour in the warm heavy cream. Be careful, as the mixture will bubble vigorously. Whisk constantly to combine the cream and caramel.
- Add the Butter: Remove the saucepan from the heat and whisk in the butter until it is melted and smooth.
- Add Vanilla and Salt: Stir in the vanilla extract and sea salt. Adjust the amount of salt to your liking.
- Cool Slightly: Let the caramel cool slightly before pouring it into the prepared tart crusts.
- Pour into Crusts: Pour the salted caramel filling into the cooled tart crusts, filling them almost to the top.
- Chill: Refrigerate the tarts for at least 1 hour, or until the caramel is set.
- Chop the Chocolate: Finely chop the semi-sweet chocolate and place it in a heatproof bowl.
- Heat the Cream: In a small saucepan, heat the heavy cream over medium heat until it just comes to a simmer. Do not boil the cream.
- Pour Over Chocolate: Pour the hot cream over the chopped chocolate. Let it sit for 1 minute to allow the heat to melt the chocolate.
- Whisk Until Smooth: Whisk the mixture gently until the chocolate is completely melted and the ganache is smooth and glossy.
- Add Butter: Stir in the softened butter until it is fully incorporated.
- Cool Slightly: Let the ganache cool slightly before pouring it over the caramel-filled tarts.
- Pour Over Tarts: Pour the chocolate ganache over the chilled caramel-filled tarts, spreading it evenly to cover the caramel.
- Chill Again: Refrigerate the tarts for another 30 minutes, or until the ganache is set.
- Remove from Pans: Carefully remove the tarts from the tart pans.
- Garnish (Optional): Garnish the tarts with sea salt flakes, cocoa powder, or chocolate shavings, if desired.
- Serve: Serve the chocolate salted caramel tarts chilled or at room temperature. They are best enjoyed within a few days of making them.
Notes
- Cold butter is essential for a flaky tart crust. Work quickly to keep the butter cold.
- Do not overmix the tart dough, as this will result in a tough crust.
- Chilling the dough before rolling and baking helps prevent shrinking.
- When making the caramel, do not stir the sugar and water mixture, as this can cause crystallization. You can gently swirl the pan if needed.
- Warm the heavy cream before adding it to the caramel to prevent it from seizing up.
- Adjust the amount of sea salt in the caramel to your liking.
- Finely chop the chocolate for the ganache to ensure a smooth texture.
- Let the ganache cool slightly before pouring it over the tarts to prevent the caramel from melting.
- Prep Time: 45 minutes
- Cook Time: 25 minutes


Leave a Comment