
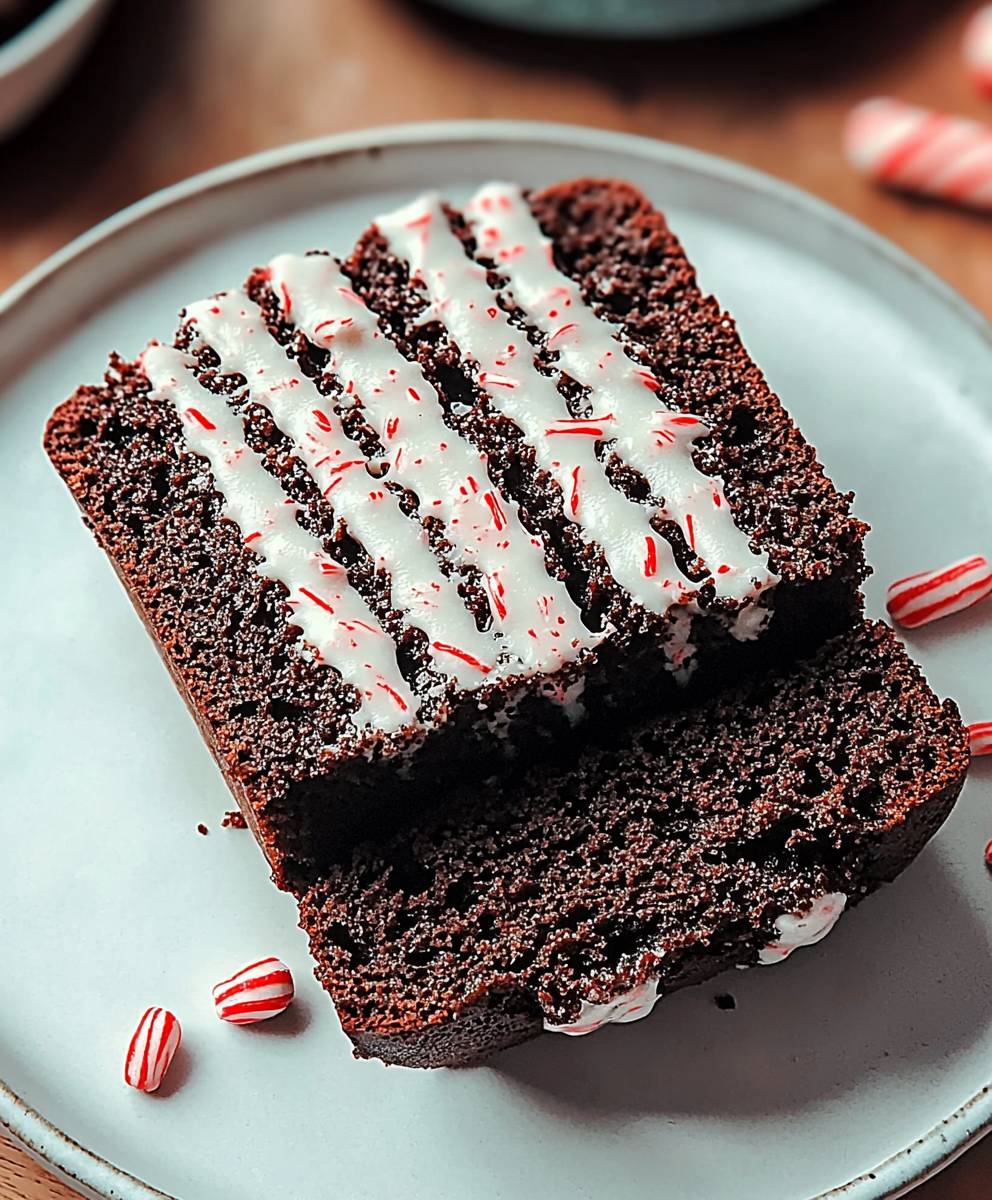
Chocolate Peppermint Bread: Just the name conjures up images of cozy winter evenings, doesn’t it? Imagine slicing into a moist, decadent loaf, the rich chocolate aroma mingling with the invigorating scent of peppermint. This isn’t just bread; it’s a festive experience in every bite!
While the exact origins of combining chocolate and peppermint are somewhat debated, this flavor pairing has become synonymous with the holiday season, particularly in North America and Europe. Some believe the combination gained popularity in the early 20th century with the rise of commercially produced peppermint candies and chocolate bars, leading innovative bakers to incorporate these flavors into their creations. Regardless of its precise history, the marriage of these two distinct tastes has proven to be a culinary match made in heaven.
So, why do people adore Chocolate Peppermint Bread so much? It’s a symphony of sensations! The deep, comforting flavor of chocolate is perfectly balanced by the cool, refreshing zing of peppermint. The texture is equally delightful a tender crumb that melts in your mouth. Beyond the taste and texture, this bread is incredibly versatile. Enjoy it warm with a pat of butter, toasted for breakfast, or even as a delightful dessert with a scoop of vanilla ice cream. Plus, it’s surprisingly easy to make, making it a perfect treat to bake and share with loved ones during the holidays (or any time you need a little festive cheer!).

Ingredients:
- 2 1/4 cups all-purpose flour, plus more for dusting
- 1 teaspoon baking soda
- 1 teaspoon salt
- 1 cup (2 sticks) unsalted butter, softened
- 1 3/4 cups granulated sugar
- 2 large eggs
- 1 teaspoon vanilla extract
- 1 cup sour cream
- 1/2 cup unsweetened cocoa powder
- 1 cup boiling water
- 1/2 teaspoon peppermint extract
- 1 cup semi-sweet chocolate chips
- 1/2 cup crushed peppermint candies, plus more for topping
Preparing the Chocolate Peppermint Bread
Step 1: Preheat and Prep
Okay, let’s get started! First things first, preheat your oven to 350°F (175°C). While the oven is heating up, grease and flour a 9×5 inch loaf pan. Make sure you get into all the corners so the bread doesn’t stick. I like to use a cooking spray that has flour in it for extra insurance, but good old butter and flour work just fine too.
Step 2: Dry Ingredients Unite!
In a medium bowl, whisk together the flour, baking soda, and salt. Whisking is important here because it helps to evenly distribute the baking soda and salt throughout the flour, which will give your bread a nice, even rise. Set this bowl aside for now.
Step 3: Creaming the Butter and Sugar
Now, in a large bowl (or the bowl of your stand mixer), cream together the softened butter and granulated sugar until light and fluffy. This usually takes about 3-5 minutes. You really want to get the butter and sugar nice and airy, as this is what gives the bread its tender crumb. If you’re using a stand mixer, use the paddle attachment. If you’re using a hand mixer, just make sure you scrape down the sides of the bowl occasionally to ensure everything is evenly mixed.
Step 4: Egg-cellent Additions
Beat in the eggs one at a time, then stir in the vanilla extract. Make sure each egg is fully incorporated before adding the next. You don’t want any streaks of egg yolk in your batter! The vanilla extract adds a lovely warmth to the bread, complementing the chocolate and peppermint flavors.
Step 5: Sour Cream Magic
Stir in the sour cream. The sour cream adds moisture and tang to the bread, making it incredibly moist and delicious. Don’t skip this ingredient! It really makes a difference.
Step 6: Blooming the Cocoa
In a separate small bowl, whisk together the cocoa powder and boiling water until smooth. This process is called “blooming” the cocoa, and it helps to intensify the chocolate flavor. The hot water releases the flavor compounds in the cocoa powder, resulting in a richer, more chocolatey bread. Let this mixture cool slightly before adding it to the batter.
Step 7: Combining Wet and Dry
Gradually add the cocoa mixture to the butter mixture, alternating with the dry ingredients, beginning and ending with the dry ingredients. So, you’ll add about a third of the dry ingredients, then half of the cocoa mixture, then another third of the dry ingredients, then the remaining cocoa mixture, and finally the remaining dry ingredients. This helps to prevent the gluten in the flour from developing too much, which can result in a tough bread. Mix until just combined. Be careful not to overmix!
Step 8: Peppermint Power
Stir in the peppermint extract, chocolate chips, and crushed peppermint candies. The peppermint extract adds that signature peppermint flavor, while the chocolate chips and crushed peppermint candies add bursts of sweetness and texture. I like to use semi-sweet chocolate chips because they balance the sweetness of the bread perfectly, but you can use milk chocolate chips if you prefer a sweeter bread.
Baking the Chocolate Peppermint Bread
Step 9: Pan Prep and Pour
Pour the batter into the prepared loaf pan and spread it evenly. You want to make sure the batter is evenly distributed in the pan so that the bread bakes evenly.
Step 10: Topping Time
Sprinkle the top of the bread with additional crushed peppermint candies, if desired. This adds a festive touch and extra peppermint flavor.
Step 11: Bake to Perfection
Bake for 50-60 minutes, or until a wooden skewer inserted into the center comes out clean. The baking time may vary depending on your oven, so start checking the bread after 50 minutes. If the top of the bread is browning too quickly, you can tent it with foil to prevent it from burning.
Step 12: Cool Down
Let the bread cool in the pan for 10 minutes before transferring it to a wire rack to cool completely. This prevents the bread from sticking to the pan and allows it to cool evenly. If you try to remove the bread from the pan while it’s still hot, it may crumble.
Serving and Storing
Step 13: Slice and Enjoy!
Once the bread is completely cool, slice it and enjoy! This Chocolate Peppermint Bread is delicious on its own, but it’s also great with a cup of coffee or tea. You can also toast it and spread it with butter or cream cheese.
Step 14: Storage Secrets
Store the bread in an airtight container at room temperature for up to 3 days, or in the refrigerator for up to a week. You can also freeze the bread for up to 2 months. To freeze, wrap the bread tightly in plastic wrap and then in foil. Thaw the bread overnight in the refrigerator before serving.
Tips and Variations
- For a richer chocolate flavor: Use dark chocolate cocoa powder instead of unsweetened cocoa powder.
- For a more intense peppermint flavor: Add a few drops of peppermint oil to the batter. Be careful not to add too much, as peppermint oil is very potent.
- For a festive touch: Drizzle the cooled bread with melted white chocolate and sprinkle with crushed peppermint candies.
- Add nuts: Stir in 1/2 cup of chopped walnuts or pecans to the batter for added texture and flavor.
- Make it gluten-free: Use a gluten-free all-purpose flour blend in place of the regular all-purpose flour. You may need to add a little extra liquid to the batter to achieve the desired consistency.
- Mini Loaves: Bake in mini loaf pans for individual servings. Reduce baking time accordingly.
I hope you enjoy this Chocolate Peppermint Bread as much as I do! It’s the perfect treat for the holidays or any time you’re craving something sweet and festive. Happy baking!
Conclusion:
This Chocolate Peppermint Bread isn’t just another holiday recipe; it’s a guaranteed crowd-pleaser that will fill your kitchen with the most delightful aromas and your taste buds with pure joy. From the rich, decadent chocolate base to the invigorating burst of peppermint, every bite is a celebration of flavors. I truly believe this recipe is a must-try, not just during the festive season, but any time you crave a little bit of comfort and indulgence.
Why is it a must-try? Because it’s surprisingly simple to make, even for novice bakers! The ingredients are readily available, and the steps are straightforward. But more importantly, the end result is something truly special a moist, flavorful bread that’s perfect for sharing (or keeping all to yourself, I won’t judge!). The combination of chocolate and peppermint is a classic for a reason, and this bread perfectly captures that magic. It’s the kind of treat that evokes memories of cozy evenings by the fire, holiday gatherings, and the simple pleasures of life.
But the best part? It’s incredibly versatile! While I’ve shared my go-to recipe, feel free to get creative and experiment with variations. For a richer, more intense chocolate flavor, try using dark chocolate cocoa powder or adding chocolate chips to the batter. If you’re not a fan of peppermint extract, you can substitute it with a different extract, such as vanilla or almond. You could even add a swirl of cream cheese filling for an extra layer of decadence.
Serving suggestions are endless! A warm slice of this Chocolate Peppermint Bread is delicious on its own, but it’s also fantastic toasted with a smear of butter or cream cheese. It pairs perfectly with a cup of hot cocoa or coffee, making it the ideal breakfast or afternoon treat. For a truly decadent dessert, try serving it with a scoop of vanilla ice cream and a drizzle of chocolate sauce. You can even cube it up and use it as the base for a bread pudding!
And don’t forget about gifting! This bread makes a wonderful homemade gift for friends, family, and neighbors. Wrap it in cellophane, tie it with a festive ribbon, and you’ve got a thoughtful and delicious present that’s sure to be appreciated.
I’m so excited for you to try this recipe and experience the magic of Chocolate Peppermint Bread for yourself. I’ve poured my heart into creating a recipe that’s both delicious and easy to follow, and I truly believe you’ll love it.
So, what are you waiting for? Gather your ingredients, preheat your oven, and get ready to bake up a batch of this irresistible treat. And most importantly, don’t forget to share your experience! I’d love to hear how your bread turns out, what variations you tried, and what your family and friends thought. Share your photos and stories on social media using [Your Hashtag Here], or leave a comment below. I can’t wait to see your creations! Happy baking!
Chocolate Peppermint Bread: A Festive Holiday Recipe
Moist and delicious Chocolate Peppermint Bread, perfect for the holidays! This festive loaf combines rich chocolate flavor with a refreshing peppermint kick.
Ingredients
- 2 1/4 cups all-purpose flour, plus more for dusting
- 1 teaspoon baking soda
- 1 teaspoon salt
- 1 cup (2 sticks) unsalted butter, softened
- 1 3/4 cups granulated sugar
- 2 large eggs
- 1 teaspoon vanilla extract
- 1 cup sour cream
- 1/2 cup unsweetened cocoa powder
- 1 cup boiling water
- 1/2 teaspoon peppermint extract
- 1 cup semi-sweet chocolate chips
- 1/2 cup crushed peppermint candies, plus more for topping
Instructions
- Preheat oven to 350°F (175°C). Grease and flour a 9×5 inch loaf pan.
- In a medium bowl, whisk together the flour, baking soda, and salt. Set aside.
- In a large bowl, cream together the softened butter and granulated sugar until light and fluffy (3-5 minutes).
- Beat in the eggs one at a time, then stir in the vanilla extract.
- Stir in the sour cream.
- In a separate small bowl, whisk together the cocoa powder and boiling water until smooth. Let cool slightly.
- Gradually add the cocoa mixture to the butter mixture, alternating with the dry ingredients, beginning and ending with the dry ingredients. Mix until just combined. Be careful not to overmix!
- Stir in the peppermint extract, chocolate chips, and crushed peppermint candies.
- Pour the batter into the prepared loaf pan and spread it evenly.
- Sprinkle the top of the bread with additional crushed peppermint candies, if desired.
- Bake for 50-60 minutes, or until a wooden skewer inserted into the center comes out clean.
- Let the bread cool in the pan for 10 minutes before transferring it to a wire rack to cool completely.
- Once the bread is completely cool, slice it and enjoy!
- Store the bread in an airtight container at room temperature for up to 3 days, or in the refrigerator for up to a week. You can also freeze the bread for up to 2 months. To freeze, wrap the bread tightly in plastic wrap and then in foil. Thaw the bread overnight in the refrigerator before serving.
Notes
- For a richer chocolate flavor: Use dark chocolate cocoa powder instead of unsweetened cocoa powder.
- For a more intense peppermint flavor: Add a few drops of peppermint oil to the batter. Be careful not to add too much, as peppermint oil is very potent.
- For a festive touch: Drizzle the cooled bread with melted white chocolate and sprinkle with crushed peppermint candies.
- Add nuts: Stir in 1/2 cup of chopped walnuts or pecans to the batter for added texture and flavor.
- Make it gluten-free: Use a gluten-free all-purpose flour blend in place of the regular all-purpose flour. You may need to add a little extra liquid to the batter to achieve the desired consistency.
- Mini Loaves: Bake in mini loaf pans for individual servings. Reduce baking time accordingly.


Leave a Comment