
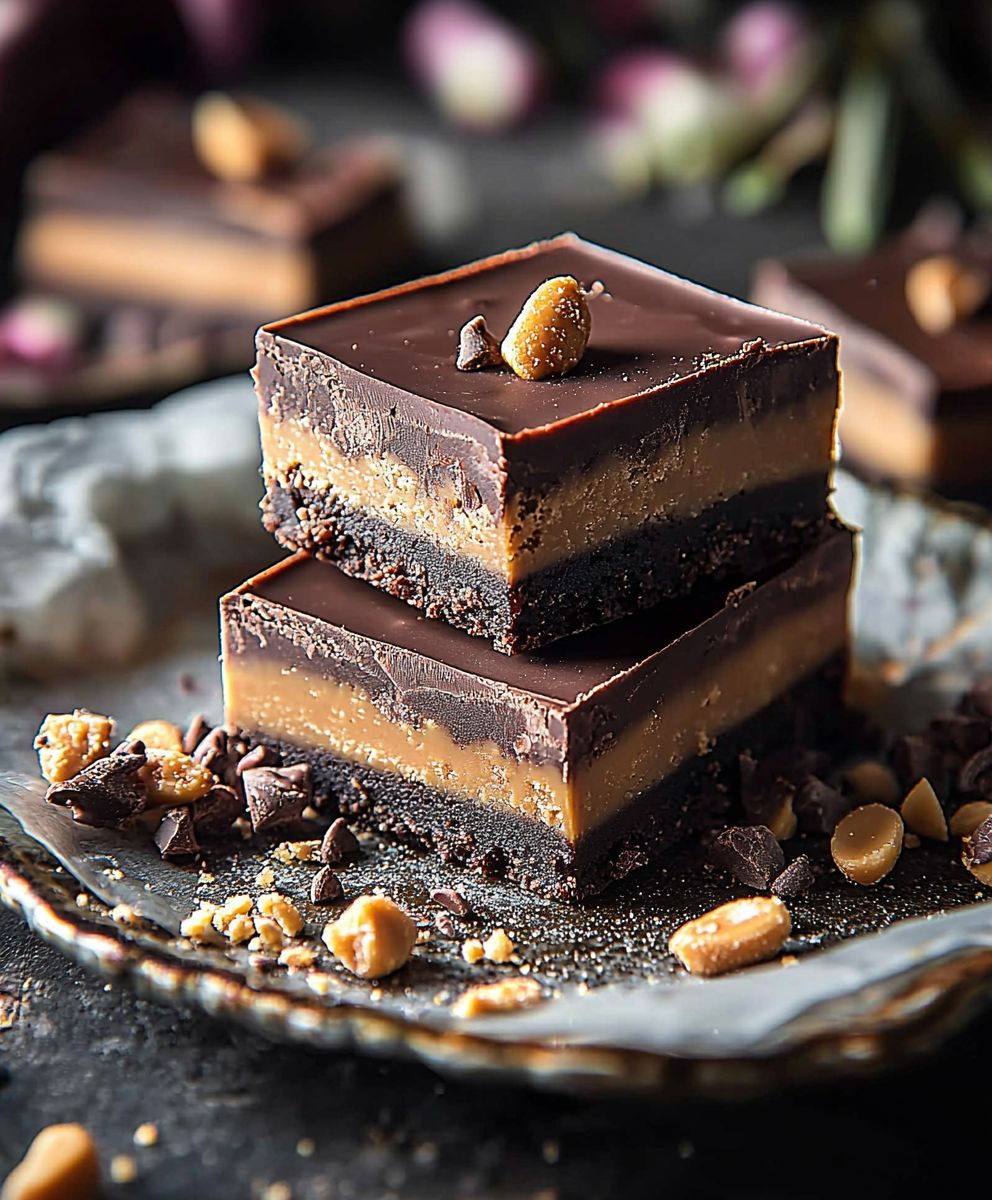
Chocolate peanut butter fudge, a symphony of sweet and salty, rich and creamy, is a dessert that needs no introduction. But let me tell you, this isn’t just any fudge recipe; it’s a ticket to instant happiness! Imagine sinking your teeth into a velvety smooth square, the intense chocolate melting on your tongue, followed by the satisfyingly nutty burst of peanut butter. It’s an experience that’s both decadent and comforting, a true indulgence that’s surprisingly easy to create in your own kitchen.
While the exact origins of fudge are debated, it’s widely believed to have emerged in America during the late 19th century, a happy accident born from a batch of caramels gone wrong. But there’s nothing accidental about the enduring appeal of chocolate peanut butter fudge. Its popularity stems from the perfect marriage of two beloved flavors. The creamy texture is also a huge draw, offering a melt-in-your-mouth sensation that’s simply irresistible. Plus, let’s be honest, who can resist a dessert that requires minimal effort but delivers maximum flavor? Whether you’re looking for a quick treat to satisfy your sweet tooth, a homemade gift for a loved one, or a show-stopping addition to your holiday dessert table, this recipe is guaranteed to be a crowd-pleaser.

Ingredients:
- 1 (14 ounce) can sweetened condensed milk
- 3 cups semi-sweet chocolate chips
- 1 cup creamy peanut butter
- 1 teaspoon vanilla extract
- Pinch of salt
- Optional: 1/2 cup chopped peanuts, for topping
Preparing the Fudge Base
Okay, let’s get started! This chocolate peanut butter fudge is seriously addictive, so be warned! The first step is all about creating that smooth, rich base that will make this fudge unforgettable.
- Prepare Your Pan: Before we even think about melting chocolate, let’s line an 8×8 inch square baking pan with parchment paper. Make sure the parchment paper overhangs the sides of the pan. This is crucial! The overhangs will act like handles, making it super easy to lift the fudge out of the pan once it’s set. Trust me, you’ll thank me later. If you don’t have parchment paper, you can use aluminum foil, but make sure to grease it well with butter or cooking spray to prevent sticking.
- Combine Ingredients: In a large, microwave-safe bowl, combine the sweetened condensed milk, chocolate chips, and peanut butter. It’s important to use a bowl that’s large enough to accommodate all the ingredients comfortably, as the mixture will expand slightly when heated. I prefer using semi-sweet chocolate chips because they provide a good balance of sweetness and chocolate flavor, but you can experiment with dark chocolate chips for a richer, less sweet fudge.
- Microwave in Intervals: Now, for the melting process! Microwave the mixture in 30-second intervals, stirring well after each interval. This is where patience comes in handy. Microwaving in short bursts prevents the chocolate from burning or seizing up. Burning the chocolate will ruin the entire batch, so be diligent with the intervals.
- Stir Until Smooth: Continue microwaving and stirring until the chocolate chips are completely melted and the mixture is smooth and creamy. The mixture should be glossy and easily pourable. If you notice any lumps, keep stirring! Sometimes, a little extra stirring is all it takes to get everything to melt together perfectly. If you are still having trouble, microwave for another 10 seconds and stir again.
- Add Vanilla and Salt: Once the mixture is perfectly smooth, stir in the vanilla extract and a pinch of salt. The vanilla extract enhances the flavor of the chocolate and peanut butter, while the salt helps to balance the sweetness and bring out the other flavors. Don’t skip the salt! It makes a big difference.
Assembling and Setting the Fudge
Now that we have our delicious fudge base, it’s time to assemble everything and let it set. This is the easiest part, but it’s still important to follow the steps carefully to ensure a perfect final product.
- Pour into Prepared Pan: Pour the melted fudge mixture into the prepared baking pan. Use a spatula to spread the mixture evenly across the bottom of the pan. You want to make sure the fudge is the same thickness throughout, so take your time and be precise.
- Add Toppings (Optional): If you’re using chopped peanuts, sprinkle them evenly over the top of the fudge. Gently press the peanuts into the fudge so they adhere properly. You can also use other toppings, such as sprinkles, mini chocolate chips, or even a drizzle of melted peanut butter. Get creative!
- Chill in the Refrigerator: Cover the pan with plastic wrap and refrigerate for at least 2 hours, or preferably overnight. This allows the fudge to set completely and become firm enough to cut into squares. Don’t be tempted to cut into it too soon! Patience is key.
Cutting and Serving the Fudge
The final step! After all that waiting, it’s time to enjoy your homemade chocolate peanut butter fudge. Here’s how to cut and serve it for the best results.
- Lift from Pan: Once the fudge is completely set, use the parchment paper overhangs to lift it out of the pan. Place the fudge on a cutting board.
- Cut into Squares: Use a sharp knife to cut the fudge into squares. The size of the squares is up to you, but I usually cut them into 1-inch squares. For clean cuts, run the knife under hot water and wipe it dry between each cut. This helps to prevent the fudge from sticking to the knife.
- Serve and Enjoy: Serve the fudge immediately, or store it in an airtight container in the refrigerator for up to a week. The fudge will soften slightly at room temperature, so it’s best to keep it chilled until you’re ready to eat it.
Tips and Tricks for Perfect Fudge
Here are a few extra tips and tricks to help you make the best chocolate peanut butter fudge ever:
- Use High-Quality Ingredients: The quality of your ingredients will directly impact the taste of your fudge. Use good-quality chocolate chips and creamy peanut butter for the best results.
- Don’t Overcook the Chocolate: Overcooking the chocolate can cause it to seize up and become grainy. Microwave in short intervals and stir frequently to prevent this from happening.
- Adjust the Sweetness: If you prefer a less sweet fudge, use dark chocolate chips instead of semi-sweet chocolate chips. You can also reduce the amount of sweetened condensed milk slightly.
- Add Variations: Get creative with your toppings! Try adding chopped nuts, sprinkles, mini chocolate chips, or even a drizzle of melted caramel.
- Storage: Store the fudge in an airtight container in the refrigerator for up to a week. You can also freeze the fudge for longer storage. Wrap it tightly in plastic wrap and then place it in a freezer-safe bag.
Troubleshooting
Sometimes, things don’t go exactly as planned. Here are a few common problems and how to fix them:
- Fudge is Too Soft: If your fudge is too soft, it may not have been chilled long enough. Place it back in the refrigerator for a few more hours to allow it to set completely.
- Fudge is Grainy: Grainy fudge is usually caused by overcooking the chocolate. Be sure to microwave in short intervals and stir frequently to prevent this from happening.
- Fudge is Too Hard: If your fudge is too hard, it may have been overcooked or chilled for too long. Let it sit at room temperature for a few minutes before cutting it.
- Fudge is Sticking to the Pan: Make sure to line your pan with parchment paper or aluminum foil and grease it well to prevent sticking.
Peanut Butter Variations
While creamy peanut butter is the classic choice, feel free to experiment with different types of peanut butter to customize your fudge:
- Crunchy Peanut Butter: For added texture, use crunchy peanut butter instead of creamy. The little bits of peanuts will add a delightful crunch to each bite.
- Natural Peanut Butter: If you prefer a more natural flavor, use natural peanut butter. Just be sure to stir it well before using it, as the oil tends to separate.
- Flavored Peanut Butter: Get adventurous with flavored peanut butters! Chocolate peanut butter, honey roasted peanut butter, or even white chocolate peanut butter can add a unique twist to your fudge.
Chocolate Variations
Don’t limit yourself to semi-sweet chocolate chips! Here are some other chocolate options to try:
- Dark Chocolate: For a richer, more intense chocolate flavor, use dark chocolate chips or chopped dark chocolate.
- Milk Chocolate: If you prefer a sweeter fudge, use milk chocolate chips.
- White Chocolate: For a completely different flavor profile, try using white chocolate chips. You can even swirl in some melted dark chocolate for a marbled effect.
- Chocolate Chunks: Instead of chocolate chips, use chopped chocolate chunks for a more rustic look and a more intense chocolate experience.
Adding a Swirl
Want to make your fudge even more visually appealing? Try adding a swirl of melted peanut butter or chocolate:
- Melt the Swirl: Melt about 1/4 cup of peanut butter or chocolate in a separate bowl.
- Drizzle Over Fudge: Once you’ve poured the fudge mixture into the pan, drizzle the melted peanut butter or chocolate over the top.
- Create Swirls: Use a toothpick or knife to swirl the melted peanut butter or chocolate into the fudge. Be careful not to overmix, or you’ll lose the swirl effect.
Making it Vegan
Yes, you can even make this
Conclusion:
And there you have it! This chocolate peanut butter fudge recipe is truly a must-try for anyone who loves the classic combination of rich chocolate and creamy peanut butter. Its incredibly easy to make, requires minimal ingredients, and delivers a decadent, melt-in-your-mouth experience that will have everyone begging for more. Seriously, prepare to be amazed at how simple it is to create such a luxurious treat. Why is this fudge so special? Well, beyond the irresistible flavor profile, it’s the perfect balance of textures. The smooth, velvety chocolate complements the slightly salty and nutty peanut butter beautifully. It’s not overly sweet, allowing the individual flavors to really shine through. Plus, it’s a fantastic make-ahead dessert, perfect for parties, holidays, or just a little self-indulgence. Looking for serving suggestions? This fudge is divine on its own, enjoyed with a cup of coffee or tea. But if you want to elevate it even further, try crumbling it over vanilla ice cream for an extra special sundae. You could also cut it into small squares and add it to a dessert charcuterie board alongside other sweet treats like cookies, brownies, and fresh fruit. For a truly decadent experience, pair it with a glass of chilled dessert wine or a creamy liqueur. Now, let’s talk variations! The possibilities are endless. Want to add a little crunch? Stir in some chopped peanuts or pretzels before the fudge sets. Craving a hint of saltiness? Sprinkle a pinch of sea salt on top after pouring the fudge into the pan. For a more intense chocolate flavor, use dark chocolate instead of semi-sweet. If you’re feeling adventurous, swirl in some marshmallow fluff or Nutella for an extra layer of deliciousness. You could even add a layer of peanut butter cups in the middle for a surprise inside! Another fun variation is to make a layered fudge. Pour half of the chocolate mixture into the pan, let it set slightly, then spread a layer of peanut butter filling (simply mix peanut butter with a little powdered sugar and milk until smooth) on top, and finally pour the remaining chocolate mixture over the peanut butter layer. The result is a stunning and delicious layered fudge that’s sure to impress. I truly believe that this chocolate peanut butter fudge will become a staple in your recipe collection. It’s a crowd-pleaser, a guaranteed hit, and a surefire way to satisfy your sweet tooth. It’s also a wonderful gift to give to friends and family. Imagine the joy on their faces when they receive a box of homemade fudge! So, what are you waiting for? Gather your ingredients, follow the simple steps, and prepare to be amazed. I’m confident that you’ll love this recipe as much as I do. And most importantly, don’t be afraid to experiment and make it your own! I’m so excited for you to try this recipe! Once you’ve made it, please come back and share your experience in the comments below. I’d love to hear what you think, what variations you tried, and how much everyone enjoyed it. Did you add any special ingredients? Did you serve it in a unique way? Your feedback is invaluable and helps other readers discover new and exciting ways to enjoy this delicious chocolate peanut butter fudge. Happy baking! Print
Chocolate Peanut Butter Fudge: The Ultimate Easy Recipe
- Total Time: 130 minutes
- Yield: Approximately 64 (1-inch) squares 1x
Description
Easy and decadent chocolate peanut butter fudge made with sweetened condensed milk, perfect for a quick treat!
Ingredients
- 1 (14 ounce) can sweetened condensed milk
- 3 cups semi-sweet chocolate chips
- 1 cup creamy peanut butter
- 1 teaspoon vanilla extract
- Pinch of salt
- Optional: 1/2 cup chopped peanuts, for topping
Instructions
- Prepare Your Pan: Line an 8×8 inch square baking pan with parchment paper, ensuring the paper overhangs the sides.
- Combine Ingredients: In a large, microwave-safe bowl, combine the sweetened condensed milk, chocolate chips, and peanut butter.
- Microwave in Intervals: Microwave the mixture in 30-second intervals, stirring well after each interval, until the chocolate chips are completely melted and the mixture is smooth and creamy.
- Add Vanilla and Salt: Stir in the vanilla extract and a pinch of salt.
- Pour into Prepared Pan: Pour the melted fudge mixture into the prepared baking pan and spread evenly.
- Add Toppings (Optional): Sprinkle chopped peanuts (or other toppings) evenly over the top of the fudge and gently press them in.
- Chill in the Refrigerator: Cover the pan with plastic wrap and refrigerate for at least 2 hours, or preferably overnight, until the fudge is firm.
- Lift from Pan: Use the parchment paper overhangs to lift the fudge out of the pan.
- Cut into Squares: Cut the fudge into squares using a sharp knife. For clean cuts, run the knife under hot water and wipe it dry between each cut.
- Serve and Enjoy: Serve the fudge immediately, or store it in an airtight container in the refrigerator for up to a week.
Notes
- Use high-quality ingredients for the best flavor.
- Microwave in short intervals to prevent the chocolate from burning.
- Adjust the sweetness by using dark chocolate chips instead of semi-sweet.
- Get creative with toppings!
- Store the fudge in an airtight container in the refrigerator for up to a week, or freeze for longer storage.
- If the fudge is too soft, chill it longer. If it’s grainy, be careful not to overcook the chocolate. If it’s too hard, let it sit at room temperature for a few minutes before cutting.
- Experiment with different types of peanut butter (crunchy, natural, flavored) and chocolate (dark, milk, white).
- Add a swirl of melted peanut butter or chocolate for a visually appealing effect.
- Prep Time: 5 minutes
- Cook Time: 5 minutes


Leave a Comment