
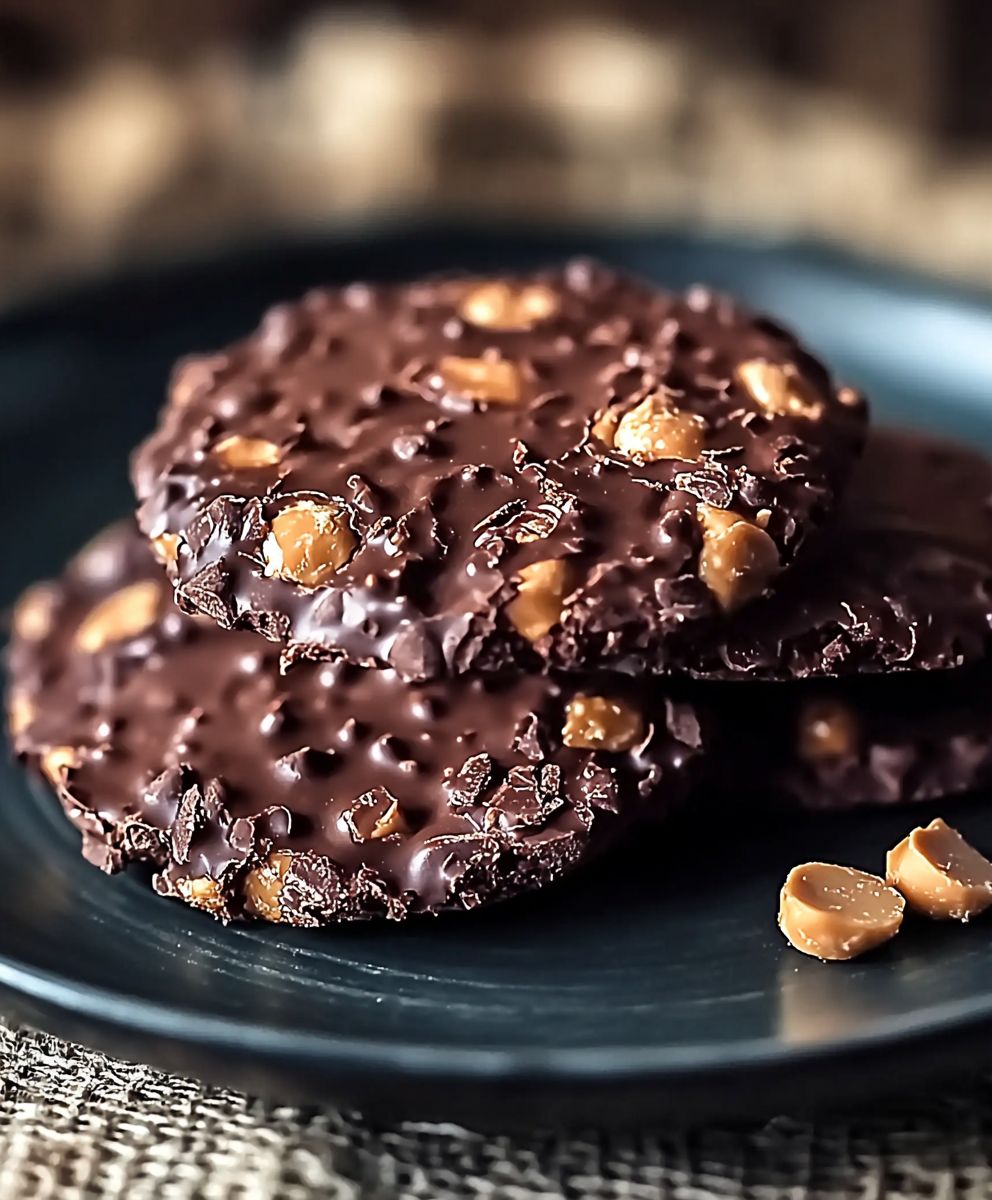
Chocolate Peanut Butter Cookies: Prepare to enter a world of irresistible indulgence! Imagine sinking your teeth into a soft, chewy cookie, where the rich, decadent flavor of chocolate dances harmoniously with the salty, nutty goodness of peanut butter. It’s a flavor combination that’s not just delicious; it’s practically iconic.
While the exact origins of pairing chocolate and peanut butter are debated, its popularity exploded in the early 20th century, particularly in America. Some credit a happy accident, others strategic marketing, but whatever the reason, this dynamic duo has captured hearts (and taste buds) for generations. It’s a classic combination that evokes feelings of nostalgia and pure comfort.
What makes chocolate peanut butter cookies so universally loved? It’s the perfect balance of sweet and savory, the satisfyingly soft texture, and the sheer convenience of whipping up a batch at home. They’re ideal for a quick dessert, a lunchbox treat, or simply a moment of self-indulgence. These cookies are more than just a recipe; they’re a celebration of flavor, simplicity, and the joy of baking. So, let’s get started and create some cookie magic!

Ingredients:
- 1 cup (2 sticks) unsalted butter, softened
- 1 cup granulated sugar
- 1 cup packed brown sugar
- 2 large eggs
- 1 teaspoon vanilla extract
- 1 cup creamy peanut butter
- 2 1/2 cups all-purpose flour
- 1 teaspoon baking soda
- 1 teaspoon baking powder
- 1/2 teaspoon salt
- 1 cup semi-sweet chocolate chips
- 1/2 cup peanut butter chips (optional, but highly recommended!)
Preparing the Dough:
Alright, let’s get started! These Chocolate Peanut Butter Cookies are seriously addictive, so be warned! First things first, make sure your butter is nice and soft. Not melted, just soft enough that you can easily cream it with the sugars.
- Cream the Butter and Sugars: In a large bowl (or the bowl of your stand mixer), cream together the softened butter, granulated sugar, and brown sugar until light and fluffy. This usually takes about 3-5 minutes. Don’t rush this step! Getting the butter and sugars properly creamed is key to a tender cookie. You want it to be almost like a whipped cream consistency. Scrape down the sides of the bowl occasionally to make sure everything is evenly mixed.
- Add the Eggs and Vanilla: Beat in the eggs one at a time, making sure each egg is fully incorporated before adding the next. Then, stir in the vanilla extract. The mixture should be smooth and creamy at this point.
- Incorporate the Peanut Butter: Add the creamy peanut butter and mix until well combined. Make sure there are no streaks of peanut butter remaining. The dough will start to look a little thicker now.
- Combine Dry Ingredients: In a separate medium bowl, whisk together the all-purpose flour, baking soda, baking powder, and salt. Whisking ensures that the baking soda and baking powder are evenly distributed throughout the flour, which is important for proper leavening.
- Gradually Add Dry Ingredients to Wet Ingredients: Gradually add the dry ingredients to the wet ingredients, mixing on low speed until just combined. Be careful not to overmix! Overmixing can develop the gluten in the flour, resulting in tough cookies. Mix until the flour is almost completely incorporated, but a few streaks of flour are still visible.
- Fold in the Chocolate and Peanut Butter Chips: Gently fold in the chocolate chips and peanut butter chips (if using). Distribute them evenly throughout the dough. I like to use a rubber spatula for this step to avoid overmixing.
- Chill the Dough (Important!): Cover the bowl with plastic wrap and chill the dough in the refrigerator for at least 30 minutes. This is a crucial step! Chilling the dough prevents the cookies from spreading too much during baking and also allows the flavors to meld together. You can chill the dough for longer, even overnight, if you prefer. If chilling overnight, let the dough sit at room temperature for about 15-20 minutes before scooping to make it easier to handle.
Baking the Cookies:
Now for the fun part baking! Preheat your oven and get ready to fill your kitchen with the amazing aroma of chocolate and peanut butter.
- Preheat Oven: Preheat your oven to 375°F (190°C). Line baking sheets with parchment paper or silicone baking mats. Parchment paper or silicone mats prevent the cookies from sticking to the baking sheet and make cleanup a breeze.
- Scoop the Dough: Use a cookie scoop (about 1.5 tablespoons) to scoop the dough onto the prepared baking sheets, leaving about 2 inches between each cookie. If you don’t have a cookie scoop, you can use a spoon to measure out the dough.
- Optional: Flatten Slightly: Gently flatten the tops of the cookies with the palm of your hand or the bottom of a glass. This will help them bake more evenly. You can also sprinkle a little extra sea salt on top for a salty-sweet flavor.
- Bake: Bake for 9-11 minutes, or until the edges are golden brown and the centers are still slightly soft. The baking time may vary depending on your oven, so keep a close eye on them.
- Cool: Remove the baking sheets from the oven and let the cookies cool on the baking sheets for a few minutes before transferring them to a wire rack to cool completely. This allows the cookies to firm up a bit and prevents them from breaking when you move them.
Tips and Variations:
Want to customize your cookies? Here are a few ideas:
- Add Nuts: Chopped peanuts, walnuts, or pecans would be delicious additions to these cookies. Fold them in along with the chocolate and peanut butter chips.
- Use Different Chocolate: Experiment with different types of chocolate chips, such as dark chocolate, milk chocolate, or white chocolate.
- Make Peanut Butter Blossoms: Roll the dough balls in granulated sugar before baking, and then press a Hershey’s Kiss into the center of each cookie immediately after they come out of the oven.
- Add Oats: For a chewier cookie, add 1/2 cup of rolled oats to the dry ingredients.
- Make it Gluten-Free: Substitute the all-purpose flour with a gluten-free all-purpose flour blend. Make sure the blend contains xanthan gum for binding.
- Peanut Butter Swirl: Before baking, swirl a small amount of melted peanut butter on top of each cookie for a beautiful and delicious effect.
Storing the Cookies:
These cookies are best enjoyed fresh, but they can be stored in an airtight container at room temperature for up to 3 days. They can also be frozen for longer storage. To freeze, place the cooled cookies in a single layer on a baking sheet and freeze for about 30 minutes, or until solid. Then, transfer them to a freezer-safe bag or container. Frozen cookies will keep for up to 2 months. Thaw them at room temperature before serving.
Troubleshooting:
Sometimes things don’t go exactly as planned in the kitchen. Here are a few common problems and how to fix them:
- Cookies are too flat: This could be due to several factors, such as using butter that is too soft, not chilling the dough long enough, or overmixing the dough. Make sure your butter is softened but not melted, chill the dough for at least 30 minutes, and avoid overmixing.
- Cookies are too dry: This could be due to using too much flour. Make sure you measure the flour accurately. Spoon the flour into the measuring cup and level it off with a knife, rather than scooping it directly from the bag.
- Cookies are too hard: This could be due to overbaking. Keep a close eye on the cookies while they are baking and remove them from the oven when the edges are golden brown and the centers are still slightly soft.
- Cookies are not spreading enough: This could be due to using too little butter or sugar, or using cold butter. Make sure your butter is softened to room temperature and that you are using the correct amount of butter and sugar.
Enjoy your delicious homemade Chocolate Peanut Butter Cookies! I hope you love them as much as I do!
Conclusion:
Okay, friends, let’s be honest you’ve scrolled this far because something about these Chocolate Peanut Butter Cookies whispered your name, right? And trust me, that whisper was spot on. This isn’t just another cookie recipe; it’s a guaranteed crowd-pleaser, a comforting hug in baked form, and a surefire way to elevate any day (or late-night craving!). The rich, decadent chocolate perfectly complements the nutty, salty peanut butter, creating a symphony of flavors that will have you reaching for seconds (and thirds!).
But why is this recipe a must-try? Beyond the incredible taste, it’s the simplicity. We’re talking minimal ingredients, straightforward instructions, and a baking time that won’t keep you chained to the oven for hours. Even if you’re a baking novice, I promise you can nail these cookies. They’re forgiving, adaptable, and practically foolproof. Plus, the aroma that fills your kitchen while they bake is pure bliss a little aromatherapy session while you create something delicious!
And the best part? The possibilities are endless! While these cookies are divine as is, feel free to get creative. Want to amp up the chocolate? Add some chocolate chips to the dough. Craving a little crunch? Throw in some chopped peanuts. Feeling adventurous? Swirl in some marshmallow fluff before baking for an extra gooey treat.
Here are a few of my favorite serving suggestions:
Serving Suggestions:
* Classic Combo: Enjoy them warm with a tall glass of cold milk. It’s a timeless pairing for a reason!
* Ice Cream Sandwich: Let the cookies cool completely, then sandwich a scoop of your favorite ice cream (vanilla, chocolate, or even peanut butter cup!) between two cookies.
* Cookie Crumbles: Crumble the cookies over yogurt, oatmeal, or even ice cream for a delightful textural contrast.
* Gift Giving: Package them in a cute tin or box for a thoughtful and delicious homemade gift.
* Elevated Dessert: Serve them with a dollop of whipped cream and a drizzle of chocolate sauce for a more elegant presentation.
Don’t be afraid to experiment and make these cookies your own. That’s the beauty of baking it’s all about creating something that you love and sharing it with others.
I truly believe that these Chocolate Peanut Butter Cookies will become a staple in your baking repertoire. They’re perfect for any occasion, from casual weeknight desserts to special celebrations. They’re also a fantastic way to impress your friends and family with your baking skills (even if you secretly know how easy they are to make!).
So, what are you waiting for? Preheat that oven, gather your ingredients, and get ready to experience cookie perfection. I’m confident that you’ll love these cookies as much as I do.
And please, please, please once you’ve tried this recipe, come back and share your experience! I’d love to hear your thoughts, your variations, and any tips or tricks you discovered along the way. Did you add chocolate chips? Did you try the marshmallow fluff swirl? Let me know! Your feedback is invaluable, and it helps me create even better recipes for you in the future. Happy baking! I can’t wait to hear all about your Chocolate Peanut Butter Cookies success!
Chocolate Peanut Butter Cookies: The Ultimate Recipe
Soft, chewy cookies bursting with chocolate and peanut butter. Easy to make and utterly irresistible!
Ingredients
- 1 cup (2 sticks) unsalted butter, softened
- 1 cup granulated sugar
- 1 cup packed brown sugar
- 2 large eggs
- 1 teaspoon vanilla extract
- 1 cup creamy peanut butter
- 2 1/2 cups all-purpose flour
- 1 teaspoon baking soda
- 1 teaspoon baking powder
- 1/2 teaspoon salt
- 1 cup semi-sweet chocolate chips
- 1/2 cup peanut butter chips (optional)
Instructions
- Cream the Butter and Sugars: In a large bowl, cream together the softened butter, granulated sugar, and brown sugar until light and fluffy (3-5 minutes). Scrape down the sides of the bowl.
- Add the Eggs and Vanilla: Beat in the eggs one at a time, then stir in the vanilla extract.
- Incorporate the Peanut Butter: Add the creamy peanut butter and mix until well combined.
- Combine Dry Ingredients: In a separate bowl, whisk together the flour, baking soda, baking powder, and salt.
- Gradually Add Dry Ingredients to Wet Ingredients: Gradually add the dry ingredients to the wet ingredients, mixing on low speed until just combined. Be careful not to overmix.
- Fold in the Chocolate and Peanut Butter Chips: Gently fold in the chocolate chips and peanut butter chips (if using).
- Chill the Dough: Cover and chill the dough in the refrigerator for at least 30 minutes (or longer, even overnight). If chilling overnight, let the dough sit at room temperature for about 15-20 minutes before scooping.
- Preheat Oven: Preheat your oven to 375°F (190°C). Line baking sheets with parchment paper or silicone baking mats.
- Scoop the Dough: Use a cookie scoop (about 1.5 tablespoons) to scoop the dough onto the prepared baking sheets, leaving about 2 inches between each cookie.
- Optional: Flatten Slightly: Gently flatten the tops of the cookies.
- Bake: Bake for 9-11 minutes, or until the edges are golden brown and the centers are still slightly soft.
- Cool: Remove from oven and let cool on the baking sheets for a few minutes before transferring to a wire rack to cool completely.
Notes
- Chilling is Key: Don’t skip chilling the dough! It prevents excessive spreading.
- Don’t Overmix: Overmixing leads to tough cookies.
- Variations: Add chopped nuts, use different chocolate chips, make peanut butter blossoms (press a Hershey’s Kiss into the center after baking), add oats (1/2 cup), use gluten-free flour blend, or swirl melted peanut butter on top before baking.
- Storage: Store in an airtight container at room temperature for up to 3 days, or freeze for up to 2 months.

Leave a Comment