
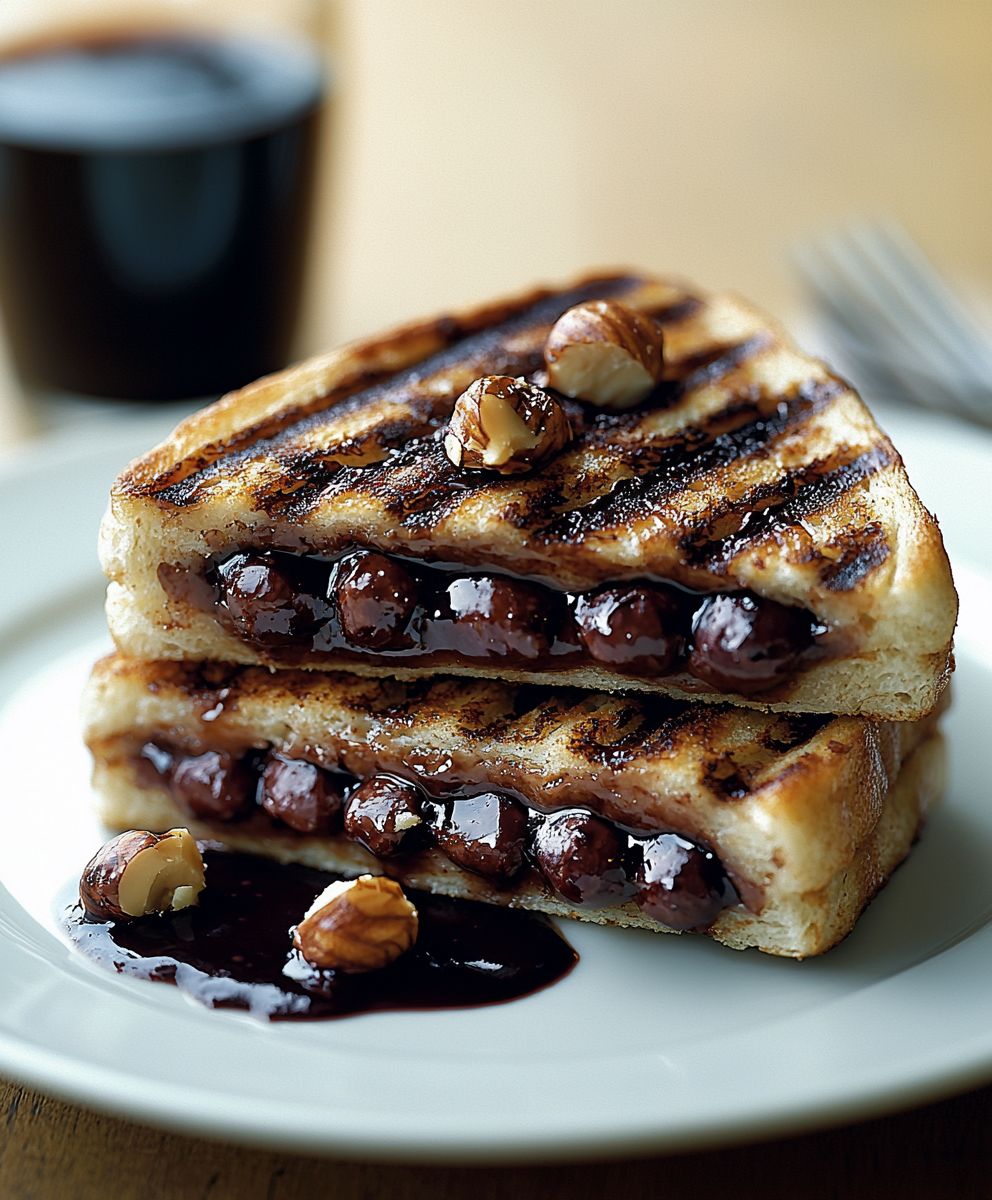
Chocolate Hazelnut Panini: Prepare to indulge in a symphony of flavors and textures with this incredibly decadent, yet surprisingly simple treat! Imagine biting into warm, toasted bread, giving way to a molten river of rich chocolate hazelnut spread. It’s a dessert that elevates the humble sandwich to a gourmet experience, perfect for a cozy afternoon or an impressive after-dinner delight.
While the panini itself boasts Italian origins, the marriage of chocolate and hazelnut has a long and storied history, particularly in Italy. Think of the iconic Gianduja, a creamy blend of chocolate and hazelnut paste that originated in Turin during the Napoleonic era. This delicious combination has captivated palates for centuries, and our Chocolate Hazelnut Panini pays homage to that legacy.
What makes this panini so irresistible? It’s the perfect balance of textures the crisp, golden-brown bread contrasting beautifully with the smooth, velvety filling. The warmth enhances the nutty aroma of the hazelnuts and intensifies the chocolate’s richness. Plus, it’s incredibly convenient! With just a few ingredients and a panini press (or even a skillet!), you can whip up this delightful dessert in minutes. Whether you’re a seasoned chef or a kitchen novice, the Chocolate Hazelnut Panini is guaranteed to become a new favorite.

Ingredients:
- 4 slices of your favorite bread (I prefer brioche or challah for this!)
- 4 tablespoons Nutella (or your favorite hazelnut spread)
- 2 tablespoons unsalted butter, softened
- 1/4 cup chopped hazelnuts, toasted (trust me, toasting them makes a HUGE difference!)
- Optional: 1/4 cup dark chocolate chips or chopped dark chocolate
- Optional: A dusting of powdered sugar for serving
Preparing the Chocolate Hazelnut Panini
- Toast the Hazelnuts (if using whole hazelnuts): If you’re starting with raw hazelnuts, preheat your oven to 350°F (175°C). Spread the hazelnuts in a single layer on a baking sheet. Toast them for 8-10 minutes, or until they are fragrant and the skins start to crack. Keep a close eye on them, as they can burn easily. Once toasted, let them cool slightly, then rub them in a clean kitchen towel to remove as much of the skins as possible. Roughly chop the toasted hazelnuts. You can also buy pre-toasted and chopped hazelnuts to save time.
- Prepare the Bread: Lay out your bread slices on a clean work surface. I like to use a cutting board.
- Spread the Nutella: Generously spread about 2 tablespoons of Nutella on one side of each slice of bread. Make sure to spread it evenly, right to the edges. This will ensure every bite is filled with chocolatey goodness!
- Add the Hazelnuts and Chocolate Chips (Optional): Sprinkle half of the chopped toasted hazelnuts over the Nutella on two of the bread slices. If you’re using chocolate chips or chopped dark chocolate, sprinkle those on as well. The combination of the creamy Nutella, crunchy hazelnuts, and rich dark chocolate is simply divine!
- Assemble the Panini: Top the hazelnut and chocolate-covered slices of bread with the remaining slices of bread, Nutella-side down. Gently press down on each panini to help the filling adhere.
Cooking the Panini
- Preheat Your Panini Press (or Skillet): If you have a panini press, preheat it according to the manufacturer’s instructions. If you don’t have a panini press, don’t worry! You can easily make these in a skillet. Place a large skillet (cast iron works great) over medium heat.
- Butter the Outside of the Panini: Spread about 1/2 tablespoon of softened butter on the outside of each panini. This will help them get golden brown and crispy.
- Grill the Panini:
- Using a Panini Press: Place the buttered panini in the preheated panini press and close the lid. Grill for 3-5 minutes, or until the bread is golden brown and the Nutella is melted and gooey. The exact cooking time will depend on your panini press, so keep an eye on it.
- Using a Skillet: Place the buttered panini in the preheated skillet. Place a heavy skillet or pot on top of the panini to press it down. This will help it cook evenly and get those beautiful grill marks. Cook for 3-4 minutes per side, or until the bread is golden brown and the Nutella is melted. If the bread is browning too quickly, reduce the heat slightly.
- Check for Doneness: Carefully remove the panini from the panini press or skillet. The bread should be golden brown and crispy, and the Nutella should be melted and gooey. If the Nutella isn’t fully melted, you can return the panini to the press or skillet for another minute or two.
Serving and Enjoying Your Chocolate Hazelnut Panini
- Let it Cool Slightly: Allow the panini to cool for a minute or two before cutting into it. This will prevent the Nutella from oozing out too much and burning your mouth.
- Cut and Serve: Using a sharp knife, cut the panini in half diagonally. This makes it easier to handle and eat.
- Optional: Dust with Powdered Sugar: For an extra touch of elegance, dust the panini with powdered sugar before serving.
- Enjoy Immediately: These Chocolate Hazelnut Panini are best enjoyed warm, when the Nutella is melted and gooey and the bread is crispy. Serve them with a glass of milk, a cup of coffee, or a scoop of vanilla ice cream for a truly decadent treat!
Tips and Variations:
- Use Different Types of Bread: While I love brioche or challah, you can use any type of bread you like. Sourdough, ciabatta, or even whole wheat bread would work well.
- Add Other Fillings: Get creative with your fillings! Try adding sliced bananas, strawberries, or raspberries. A sprinkle of sea salt can also enhance the flavor.
- Make it Vegan: Use vegan bread and a vegan hazelnut spread to make this recipe vegan-friendly.
- Experiment with Different Nuts: If you’re not a fan of hazelnuts, you can use other nuts like almonds, pecans, or walnuts.
- Make it Ahead: You can assemble the panini ahead of time and store them in the refrigerator until you’re ready to cook them. Just be sure to add the butter right before grilling.
- Use a Waffle Iron: For a fun twist, try cooking the panini in a waffle iron! This will give them a unique texture and shape.
Storage Instructions:
While these panini are best enjoyed fresh, you can store leftovers in an airtight container in the refrigerator for up to 2 days. Reheat them in a panini press, skillet, or microwave before serving. Keep in mind that the bread may not be as crispy after being refrigerated.
Nutritional Information (approximate, per panini):
Please note that the nutritional information is an estimate and may vary depending on the specific ingredients you use.
- Calories: 400-500
- Fat: 25-35g
- Saturated Fat: 10-15g
- Cholesterol: 30-50mg
- Sodium: 200-300mg
- Carbohydrates: 40-50g
- Sugar: 20-30g
- Protein: 5-10g
Why This Recipe Works:
This Chocolate Hazelnut Panini recipe is a winner because it’s incredibly easy to make, requires minimal ingredients, and delivers maximum flavor. The combination of the creamy Nutella, crunchy hazelnuts, and crispy bread is simply irresistible. It’s the perfect treat for a quick breakfast, a satisfying snack, or a decadent dessert. Plus, it’s customizable, so you can easily adapt it to your own preferences and dietary needs. The toasting of the hazelnuts is a key step that elevates the flavor profile, adding a depth and richness that you won’t get with raw hazelnuts. The use of softened butter on the outside of the bread ensures a perfectly golden brown and crispy crust. And the option to add dark chocolate chips takes it to the next level of indulgence. This recipe is a guaranteed crowd-pleaser that will leave everyone wanting more!
Conclusion:
This Chocolate Hazelnut Panini isn’t just a sandwich; it’s an experience. It’s the perfect blend of warm, comforting bread, the rich, decadent chocolate, and the satisfying crunch of hazelnuts, all melted together into a gooey, irresistible treat. I truly believe this recipe is a must-try because it’s incredibly simple to make, requires minimal ingredients, and delivers maximum flavor. It’s the kind of dessert (or snack, let’s be honest!) that will impress your friends and family, and leave them begging for more.
But the best part? It’s incredibly versatile! While I’ve presented the classic Chocolate Hazelnut Panini, feel free to get creative and experiment with different variations. For a truly indulgent experience, try adding a thin layer of mascarpone cheese or ricotta to the bread before adding the chocolate hazelnut spread. The creamy cheese adds a delightful tang that complements the sweetness perfectly. Or, if you’re a fan of fruit, consider adding sliced strawberries, bananas, or raspberries for a burst of freshness. A sprinkle of sea salt on top after grilling elevates the flavors even further, creating a sweet and salty masterpiece.
For serving suggestions, this panini is fantastic on its own as a quick and satisfying dessert. However, it also pairs beautifully with a scoop of vanilla ice cream or a dollop of whipped cream. Imagine sinking your teeth into the warm, gooey panini, followed by the cool, creamy ice cream pure bliss! You could also serve it alongside a cup of hot coffee or tea for a cozy afternoon treat. If you’re feeling adventurous, try dipping it in a chocolate sauce or a caramel sauce for an extra layer of decadence.
Don’t be afraid to experiment with different types of bread too! While I personally love using a crusty Italian bread for that perfect panini texture, you could also try using brioche bread for a softer, sweeter sandwich. Or, for a healthier option, use whole wheat bread. The possibilities are endless!
I’m so excited for you to try this recipe and discover just how easy and delicious it is to make your own Chocolate Hazelnut Panini. It’s the perfect treat for any occasion, whether you’re looking for a quick and easy dessert, a satisfying snack, or a crowd-pleasing party food.
I truly believe that this recipe will become a staple in your kitchen. It’s a guaranteed crowd-pleaser, and it’s so simple to make that even the most novice cook can master it. So, what are you waiting for? Gather your ingredients, fire up your panini press (or skillet!), and get ready to experience the magic of the Chocolate Hazelnut Panini.
And most importantly, I want to hear about your experience! Did you try any variations? Did you add any special ingredients? What did your friends and family think? Please share your photos and comments below. I can’t wait to see your creations and hear your feedback. Happy cooking (and eating)! Let me know if you have any questions, and I’ll do my best to answer them. I hope you enjoy this recipe as much as I do!
Chocolate Hazelnut Panini: A Decadent & Easy Recipe
Warm, gooey Chocolate Hazelnut Panini with crispy bread, creamy Nutella, and crunchy toasted hazelnuts. A quick and decadent treat!
Ingredients
- 4 slices of your favorite bread (brioche or challah recommended)
- 4 tablespoons Nutella (or your favorite hazelnut spread)
- 2 tablespoons unsalted butter, softened
- 1/4 cup chopped hazelnuts, toasted
- Optional: 1/4 cup dark chocolate chips or chopped dark chocolate
- Optional: A dusting of powdered sugar for serving
Instructions
- Toast Hazelnuts (if using whole): Preheat oven to 350°F (175°C). Spread hazelnuts on a baking sheet and toast for 8-10 minutes, until fragrant and skins crack. Cool slightly, rub in a towel to remove skins, and roughly chop.
- Prepare Bread: Lay out bread slices on a clean work surface.
- Spread Nutella: Generously spread 2 tablespoons of Nutella on one side of each bread slice, evenly to the edges.
- Add Hazelnuts and Chocolate (Optional): Sprinkle half of the chopped toasted hazelnuts (and chocolate chips, if using) over the Nutella on two bread slices.
- Assemble Panini: Top the hazelnut/chocolate-covered slices with the remaining bread slices, Nutella-side down. Gently press down on each panini.
- Preheat Panini Press (or Skillet): Preheat panini press according to instructions. If using a skillet, place a large skillet over medium heat.
- Butter the Outside: Spread 1/2 tablespoon of softened butter on the outside of each panini.
- Grill the Panini:
- Panini Press: Place buttered panini in the preheated press and close the lid. Grill for 3-5 minutes, or until golden brown and Nutella is melted.
- Skillet: Place buttered panini in the preheated skillet. Place a heavy skillet or pot on top to press it down. Cook for 3-4 minutes per side, or until golden brown and Nutella is melted. Reduce heat if browning too quickly.
- Check for Doneness: Remove panini from press or skillet. Bread should be golden brown and crispy, and Nutella melted. Return to press/skillet if needed.
- Let it Cool Slightly: Allow the panini to cool for a minute or two before cutting into it.
- Cut and Serve: Cut the panini in half diagonally.
- Optional: Dust with Powdered Sugar: For an extra touch of elegance, dust the panini with powdered sugar before serving.
- Enjoy Immediately: Serve warm with milk, coffee, or ice cream.
Notes
- Bread Choice: Brioche or challah are recommended, but sourdough, ciabatta, or whole wheat bread also work.
- Filling Variations: Add sliced bananas, strawberries, raspberries, or a sprinkle of sea salt.
- Vegan Option: Use vegan bread and hazelnut spread.
- Nut Alternatives: Use almonds, pecans, or walnuts instead of hazelnuts.
- Make Ahead: Assemble panini ahead of time and refrigerate. Butter just before grilling.
- Waffle Iron: Cook panini in a waffle iron for a unique texture.
- Storage: Store leftovers in an airtight container in the refrigerator for up to 2 days. Reheat in a panini press, skillet, or microwave.


Leave a Comment