
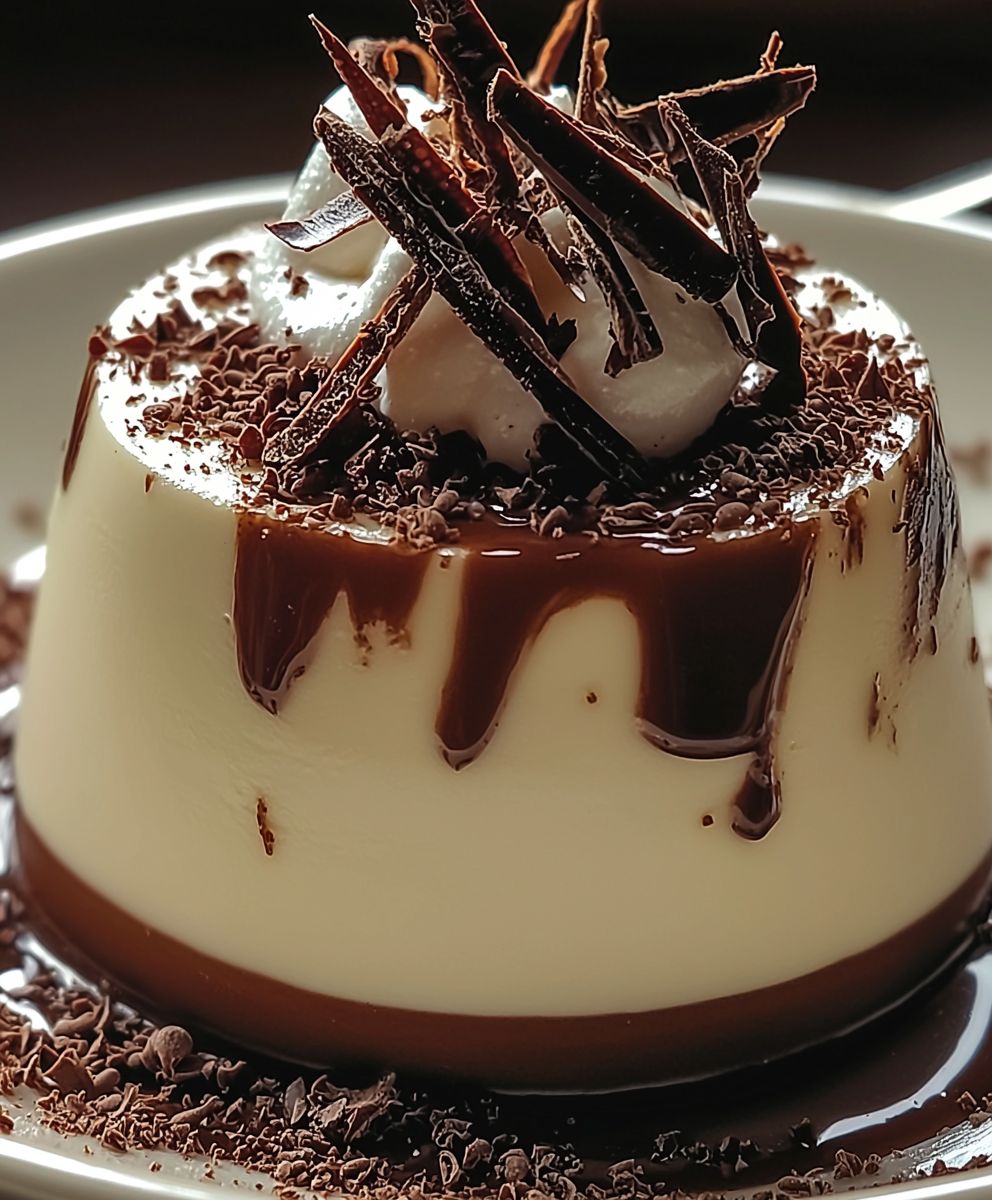
Chocolate Cream Dessert, oh, where do I even begin? Imagine sinking your spoon into a cloud of decadent, intensely chocolatey bliss. This isn’t just any dessert; it’s a symphony of textures and flavors that will have you craving more after every single bite. I’m thrilled to share my foolproof recipe with you!
While the exact origins of Chocolate Cream Dessert are debated, the concept of combining chocolate with cream has been around for centuries, evolving from simple chocolate custards enjoyed by European royalty to the more modern, layered creations we know and love today. This particular recipe draws inspiration from classic French pastry techniques, emphasizing a smooth, rich chocolate flavor balanced by the lightness of whipped cream.
What makes this dessert so irresistible? It’s the perfect combination of textures the velvety smoothness of the chocolate cream, the airy lightness of the whipped topping, and the satisfying crunch of any optional garnishes like chocolate shavings or crushed cookies. Plus, it’s surprisingly easy to make! Whether you’re looking for a show-stopping dessert for a special occasion or a simple treat to satisfy your chocolate cravings, this recipe is guaranteed to impress. Get ready to experience chocolate heaven!

Ingredients:
- 1 ½ cups heavy cream, cold
- 4 ounces bittersweet chocolate, finely chopped
- 2 tablespoons unsalted butter
- ¼ cup granulated sugar
- 1 teaspoon vanilla extract
- Pinch of salt
- 1 package (14.3 ounces) chocolate sandwich cookies (like Oreos), finely crushed
- 4 tablespoons unsalted butter, melted
- Optional: Fresh berries (strawberries, raspberries, blueberries) for garnish
- Optional: Chocolate shavings for garnish
Preparing the Chocolate Cream
Okay, let’s get started with the heart of this dessert the luscious chocolate cream! This is where the magic happens, and trust me, it’s easier than you think. The key is to be patient and let the chocolate melt slowly and evenly.
- Melt the Chocolate and Butter: In a heatproof bowl set over a saucepan of simmering water (make sure the bottom of the bowl doesn’t touch the water!), combine the finely chopped bittersweet chocolate and the 2 tablespoons of unsalted butter. Stir occasionally until the chocolate and butter are completely melted and smooth. This is called a double boiler method, and it’s perfect for melting chocolate without burning it. If you’re feeling brave, you can microwave it in 30-second intervals, stirring in between, but be extra careful not to overheat it!
- Cool Slightly: Remove the bowl from the heat and let the melted chocolate mixture cool slightly for about 5-10 minutes. This is important because you don’t want to add the hot chocolate to the cold cream, or it will seize up.
- Whip the Cream: While the chocolate is cooling, in a separate large bowl, pour in the cold heavy cream. Using an electric mixer (either a stand mixer or a hand mixer), beat the cream on medium speed until soft peaks form. Soft peaks mean that when you lift the beaters, the peaks of the cream will droop slightly.
- Add Sugar and Vanilla: Gradually add the granulated sugar and vanilla extract to the whipped cream. Continue beating until stiff peaks form. Stiff peaks mean that when you lift the beaters, the peaks of the cream will stand up straight. Be careful not to overwhip, or you’ll end up with butter!
- Temper the Chocolate: This is a crucial step to prevent the chocolate from seizing when it’s mixed with the cold cream. Take a spoonful of the whipped cream and gently fold it into the slightly cooled melted chocolate. Mix until well combined. Repeat this process with another spoonful of whipped cream. This helps to gradually raise the temperature of the chocolate so it doesn’t shock the cold cream.
- Combine the Mixtures: Now, gently fold the tempered chocolate mixture into the remaining whipped cream. Use a rubber spatula and fold carefully, being sure not to deflate the cream. Fold until just combined; you don’t want to overmix. Overmixing will cause the cream to lose its volume.
- Add a Pinch of Salt: Stir in a pinch of salt to enhance the chocolate flavor.
- Chill: Cover the bowl with plastic wrap and refrigerate the chocolate cream for at least 2 hours, or preferably overnight. This allows the flavors to meld together and the cream to firm up.
Preparing the Cookie Crust
Next up, we’re making the cookie crust. This adds a delightful crunch and a contrasting texture to the smooth chocolate cream. It’s super simple and adds a lot of flavor!
- Crush the Cookies: Place the chocolate sandwich cookies (like Oreos) in a food processor and pulse until they are finely crushed. Alternatively, you can place the cookies in a large zip-top bag and crush them with a rolling pin. Make sure there are no large chunks of cookie remaining.
- Melt the Butter: Melt the 4 tablespoons of unsalted butter in a microwave-safe bowl or in a saucepan over low heat.
- Combine: In a medium bowl, combine the crushed cookies and the melted butter. Mix well until the crumbs are evenly moistened. The mixture should resemble wet sand.
Assembling the Dessert
Now for the fun part putting it all together! This is where you can get creative with how you layer the dessert. I like to use individual glasses or a trifle bowl, but you can use whatever you have on hand.
- Choose Your Vessel: Select your serving dishes. Individual glasses, small bowls, or a large trifle bowl all work well.
- Layer the Crust: Spoon a layer of the cookie crumb mixture into the bottom of each serving dish. Gently press the crumbs down to form a compact base. If you’re using a trifle bowl, spread the crumbs evenly across the bottom.
- Layer the Chocolate Cream: Spoon a layer of the chilled chocolate cream over the cookie crust. Spread it evenly.
- Repeat Layers (Optional): If desired, repeat the layers of cookie crust and chocolate cream. You can create as many layers as you like, depending on the size of your serving dishes. I usually do two layers of each.
- Chill Again: Cover the serving dishes with plastic wrap and refrigerate for at least 30 minutes to allow the layers to set. This will make it easier to serve and prevent the layers from sliding around.
Garnishing and Serving
Finally, it’s time to garnish and serve this decadent dessert! This is where you can really make it your own and add a personal touch.
- Garnish (Optional): Before serving, garnish the dessert with fresh berries (strawberries, raspberries, blueberries), chocolate shavings, or a dusting of cocoa powder. You can also add a dollop of whipped cream or a sprinkle of chopped nuts.
- Serve: Serve the chocolate cream dessert chilled. Enjoy!
Tips and Variations:
- Use Different Cookies: Feel free to experiment with different types of cookies for the crust. Vanilla wafers, graham crackers, or even shortbread cookies would all be delicious.
- Add Coffee Flavor: For a mocha twist, add a teaspoon of instant espresso powder to the melted chocolate mixture.
- Make it Vegan: Use vegan chocolate, vegan butter, and coconut cream instead of heavy cream to make this dessert vegan-friendly.
- Add Liqueur: A splash of coffee liqueur or chocolate liqueur to the chocolate cream will add a sophisticated touch.
- Individual Parfaits: Layer the cookie crumbs and chocolate cream in tall parfait glasses for an elegant presentation.
- Make Ahead: This dessert can be made a day or two in advance. Just keep it refrigerated until ready to serve.
- Freezing: While this dessert is best served chilled, you can freeze it for up to a month. Thaw it in the refrigerator overnight before serving. The texture of the cream may change slightly after freezing.
Troubleshooting:
- Chocolate Seizing: If your chocolate seizes (becomes grainy and hard) while melting, try adding a tablespoon of vegetable oil or shortening to the chocolate and stirring until smooth.
- Whipped Cream Not Stiffening: Make sure your heavy cream is very cold. You can also chill your mixing bowl and beaters in the freezer for 15 minutes before whipping the cream.
- Cookie Crust Too Dry: If the cookie crust is too dry, add a little more melted butter until it reaches the desired consistency.
- Dessert Too Sweet: If you find the dessert too sweet, reduce the amount of sugar in the whipped cream or use a darker chocolate with a higher cocoa percentage.
Enjoy Your Homemade Chocolate Cream Dessert!
I hope you enjoy making and eating this delicious chocolate cream dessert as much as I do! It’s a perfect treat for any occasion, and it’s sure to impress your friends and family. Don’t be afraid to get creative and customize it to your own taste. Happy baking!
Conclusion:
This Chocolate Cream Dessert isn’t just another recipe; it’s an invitation to pure, unadulterated bliss. From the rich, decadent chocolate flavor to the light and airy texture, every spoonful is a celebration of simple pleasures. I truly believe this dessert is a must-try for anyone who appreciates a good chocolate fix, and I’m confident it will become a new favorite in your household, just as it has in mine. What makes this recipe so special? It’s the perfect balance of indulgence and ease. You don’t need to be a master baker to whip up this masterpiece. The ingredients are readily available, the instructions are straightforward, and the results are consistently impressive. Whether you’re looking for a show-stopping dessert for a special occasion or a comforting treat to enjoy on a quiet evening, this Chocolate Cream Dessert delivers every time. But the best part? It’s incredibly versatile! Feel free to get creative and customize it to your liking. For a truly decadent experience, try layering it with crushed Oreo cookies or chocolate shavings. If you’re looking for a lighter option, you can use a sugar-free chocolate pudding mix and top it with fresh berries. And for a festive twist, consider adding a splash of peppermint extract during the pudding preparation, especially around the holidays. Here are a few serving suggestions to get you started:- Serve chilled in individual parfait glasses for an elegant presentation.
- Layer it in a trifle bowl with ladyfingers and whipped cream for a show-stopping centerpiece.
- Top it with a dollop of whipped cream and a sprinkle of cocoa powder for a classic touch.
- Add a scoop of vanilla ice cream for an extra layer of indulgence.
- Garnish with fresh raspberries or strawberries for a burst of freshness and color.

Chocolate Cream Dessert: The Ultimate Guide to Delicious Recipes
- Total Time: 155 minutes
- Yield: 6–8 servings 1x
Description
Decadent layered chocolate cream dessert with a crunchy Oreo cookie crust. Easy to make and perfect for any occasion!
Ingredients
- 1 ½ cups heavy cream, cold
- 4 ounces bittersweet chocolate, finely chopped
- 2 tablespoons unsalted butter
- ¼ cup granulated sugar
- 1 teaspoon vanilla extract
- Pinch of salt
- 1 package (14.3 ounces) chocolate sandwich cookies (like Oreos), finely crushed
- 4 tablespoons unsalted butter, melted
- Optional: Fresh berries (strawberries, raspberries, blueberries) for garnish
- Optional: Chocolate shavings for garnish
Instructions
- In a heatproof bowl set over a saucepan of simmering water (double boiler), combine chocolate and 2 tablespoons butter. Stir until melted and smooth. Alternatively, microwave in 30-second intervals, stirring in between.
- Remove from heat and let cool for 5-10 minutes.
- In a large bowl, beat cold heavy cream with an electric mixer on medium speed until soft peaks form.
- Gradually add sugar and vanilla extract. Continue beating until stiff peaks form. Be careful not to overwhip.
- Take a spoonful of whipped cream and gently fold it into the cooled melted chocolate. Mix until well combined. Repeat with another spoonful of whipped cream.
- Gently fold the tempered chocolate mixture into the remaining whipped cream. Fold until just combined.
- Stir in a pinch of salt.
- Cover and refrigerate for at least 2 hours, or preferably overnight.
- Place cookies in a food processor and pulse until finely crushed. Alternatively, crush in a zip-top bag with a rolling pin.
- Melt 4 tablespoons butter in the microwave or in a saucepan over low heat.
- In a medium bowl, combine crushed cookies and melted butter. Mix well until evenly moistened.
- Select serving dishes (individual glasses, bowls, or a trifle bowl).
- Spoon a layer of cookie crumbs into the bottom of each dish. Gently press down.
- Spoon a layer of chilled chocolate cream over the cookie crust. Spread evenly.
- Repeat layers of cookie crust and chocolate cream as desired.
- Cover and refrigerate for at least 30 minutes to allow the layers to set.
- Before serving, garnish with fresh berries, chocolate shavings, cocoa powder, whipped cream, or chopped nuts.
- Serve chilled.
Notes
- Cookie Variations: Use vanilla wafers, graham crackers, or shortbread cookies for the crust.
- Coffee Flavor: Add 1 teaspoon instant espresso powder to the melted chocolate.
- Vegan Option: Use vegan chocolate, vegan butter, and coconut cream.
- Liqueur: Add a splash of coffee liqueur or chocolate liqueur to the chocolate cream.
- Individual Parfaits: Layer in tall parfait glasses.
- Make Ahead: Can be made 1-2 days in advance.
- Freezing: Can be frozen for up to a month. Thaw in the refrigerator overnight.
- Prep Time: 25 minutes
- Cook Time: 10 minutes

Leave a Comment