
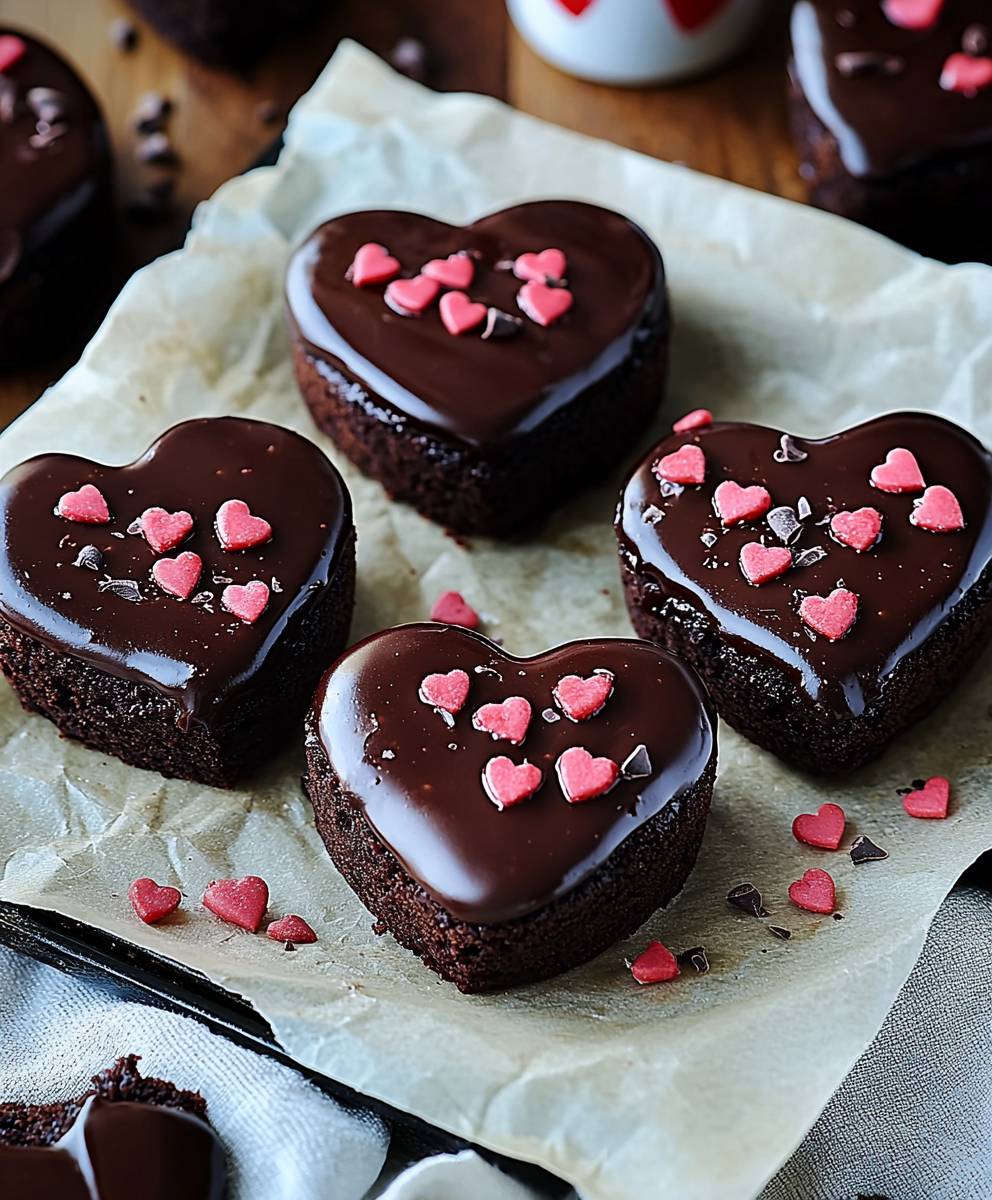
Chocolate brownie hearts, the ultimate expression of love in dessert form! Imagine sinking your teeth into a fudgy, intensely chocolatey brownie, perfectly shaped like a heart. It’s not just a treat; it’s a delicious declaration. But these aren’t your average brownies; they’re a step above, designed to impress and satisfy even the most discerning chocolate lover.
While the exact origins of the brownie are debated, its popularity soared in the early 20th century in the United States. It quickly became a staple, evolving from simple squares to the decadent, customized creations we enjoy today. Transforming the classic brownie into heart shapes adds a touch of romance and makes them perfect for Valentine’s Day, anniversaries, or simply showing someone you care.
What makes chocolate brownie hearts so irresistible? It’s the perfect combination of textures: a slightly crisp top, a chewy edge, and a gooey, melt-in-your-mouth center. The rich, deep chocolate flavor is undeniably comforting, and the heart shape elevates it from an everyday dessert to something special. Plus, they’re surprisingly easy to make! Whether you’re a seasoned baker or a kitchen novice, you can whip up a batch of these delightful treats and spread some love, one bite at a time.

Ingredients:
- 1 cup (2 sticks) unsalted butter, melted
- 2 cups granulated sugar
- 4 large eggs
- 1 teaspoon vanilla extract
- 1 cup all-purpose flour
- ¾ cup unsweetened cocoa powder
- ¼ teaspoon baking powder
- ¼ teaspoon salt
- 1 cup semi-sweet chocolate chips
- Red food coloring gel (optional, for a deeper red hue)
- Powdered sugar, for dusting (optional)
Preparing the Brownie Batter:
- Melt the butter: In a large, microwave-safe bowl, melt the butter. You can do this in 30-second intervals, stirring in between, until completely melted. Be careful not to overheat it! Alternatively, you can melt the butter in a saucepan over low heat.
- Combine butter and sugar: Add the granulated sugar to the melted butter and whisk vigorously until well combined. The mixture should be smooth and slightly glossy. This step is crucial for achieving that signature crackly brownie top.
- Incorporate the eggs: Add the eggs one at a time, whisking well after each addition. Make sure each egg is fully incorporated before adding the next. This helps create a smooth and emulsified batter.
- Add vanilla extract: Stir in the vanilla extract. This enhances the chocolate flavor and adds a touch of warmth to the brownies.
- Dry ingredients: In a separate bowl, whisk together the all-purpose flour, unsweetened cocoa powder, baking powder, and salt. Whisking ensures that the dry ingredients are evenly distributed, preventing clumps and ensuring a consistent texture.
- Combine wet and dry ingredients: Gradually add the dry ingredients to the wet ingredients, mixing until just combined. Be careful not to overmix the batter, as this can lead to tough brownies. A few streaks of flour are okay at this stage.
- Add chocolate chips: Fold in the semi-sweet chocolate chips. I like to use a rubber spatula for this, gently folding them in until they are evenly distributed throughout the batter.
- Optional: Add red food coloring: If you want to enhance the red color of your brownie hearts, add a few drops of red food coloring gel to the batter and stir until evenly distributed. Start with a small amount and add more until you achieve your desired color. Remember, a little goes a long way!
Baking the Brownie Hearts:
- Preheat the oven: Preheat your oven to 350°F (175°C). This is a crucial step for ensuring that the brownies bake evenly.
- Prepare the baking pan: Grease and flour a 9×13 inch baking pan. Alternatively, you can line the pan with parchment paper, leaving an overhang on the sides for easy removal. This prevents the brownies from sticking to the pan and makes cleanup a breeze.
- Pour the batter: Pour the brownie batter into the prepared baking pan and spread it evenly.
- Bake: Bake for 25-30 minutes, or until a toothpick inserted into the center comes out with moist crumbs attached. Be careful not to overbake the brownies, as this will make them dry and crumbly. The baking time may vary depending on your oven, so keep a close eye on them.
- Cool completely: Remove the brownies from the oven and let them cool completely in the pan before cutting. This is important because the brownies will continue to set as they cool. Trying to cut them while they are still warm will result in a messy and gooey disaster.
Cutting Out the Hearts:
- Prepare your workspace: Once the brownies are completely cool, gently lift them out of the pan using the parchment paper overhang (if you used it). Place them on a cutting board.
- Choose your heart cutter: Select a heart-shaped cookie cutter of your desired size. I recommend using a medium-sized cutter for best results.
- Cut out the hearts: Press the cookie cutter firmly into the brownies and cut out as many hearts as possible. Try to arrange the hearts close together to minimize waste.
- Re-roll the scraps (optional): If you want to maximize your yield, you can gently knead the brownie scraps together and re-roll them to cut out more hearts. However, be aware that the texture of these re-rolled brownies may be slightly different from the original ones.
Serving and Decoration:
- Dust with powdered sugar (optional): If desired, dust the brownie hearts with powdered sugar for a festive touch. This adds a touch of sweetness and visual appeal.
- Serve: Arrange the brownie hearts on a platter or serving dish. They are delicious on their own or served with a scoop of vanilla ice cream or a dollop of whipped cream.
- Storage: Store the brownie hearts in an airtight container at room temperature for up to 3 days. They can also be frozen for longer storage.
Tips for Perfect Brownie Hearts:
- Use high-quality ingredients: The quality of your ingredients will directly impact the flavor and texture of your brownies. Use good-quality butter, chocolate, and cocoa powder for the best results.
- Don’t overmix the batter: Overmixing the batter can develop the gluten in the flour, resulting in tough brownies. Mix until just combined.
- Don’t overbake the brownies: Overbaking the brownies will make them dry and crumbly. Bake until a toothpick inserted into the center comes out with moist crumbs attached.
- Let the brownies cool completely before cutting: This is important for achieving clean cuts and preventing the brownies from crumbling.
- Experiment with different flavors: Feel free to add other ingredients to your brownie batter, such as nuts, dried fruit, or different types of chocolate chips.
- Make them extra special: Drizzle melted chocolate over the hearts or add sprinkles for a fun and festive touch.
Variations:
- Peanut Butter Brownie Hearts: Swirl peanut butter into the brownie batter before baking for a delicious peanut butter twist.
- Mint Chocolate Brownie Hearts: Add a few drops of peppermint extract to the batter and use mint chocolate chips for a refreshing mint chocolate flavor.
- Salted Caramel Brownie Hearts: Drizzle salted caramel sauce over the baked brownies before cutting out the hearts.
- Espresso Brownie Hearts: Add a teaspoon of instant espresso powder to the dry ingredients for a rich and intense chocolate flavor.
Conclusion:
And there you have it! These chocolate brownie hearts are more than just a dessert; they’re a little bundle of joy, perfect for sharing (or not I won’t judge!). From the rich, fudgy texture to the adorable heart shape, every bite is a celebration. I truly believe this recipe is a must-try for anyone who loves chocolate, baking, or simply spreading a little happiness. But why is it a must-try, you ask? Well, beyond the obvious deliciousness, these brownies are surprisingly easy to make. The ingredient list is short and sweet (pun intended!), and the steps are straightforward, making it a fantastic recipe for both beginner bakers and seasoned pros. Plus, the heart shape adds a touch of whimsy that elevates these brownies from ordinary to extraordinary. Imagine presenting a plate of these to your loved ones on Valentine’s Day, an anniversary, or just because! The smiles will be worth every second spent in the kitchen. And the best part? These chocolate brownie hearts are incredibly versatile. While they’re amazing on their own, warm and gooey, straight from the oven, there are so many ways to customize them to your liking. For a truly decadent experience, try serving them with a scoop of vanilla ice cream and a drizzle of chocolate sauce. Or, if you’re feeling adventurous, add a dollop of whipped cream and a sprinkle of fresh berries. Looking for variations? Go wild! Mix in some chopped nuts, like walnuts or pecans, for added crunch. Add a swirl of peanut butter for a classic combination. Or, for a hint of spice, try adding a pinch of chili powder to the batter. You could even experiment with different types of chocolate, like dark chocolate for a more intense flavor or white chocolate for a sweeter treat. The possibilities are endless! These brownies also make fantastic gifts. Package them in a cute box or tin, tie it with a ribbon, and you have a thoughtful and homemade present that anyone would appreciate. They’re perfect for birthdays, holidays, or just to show someone you care. I’m so confident that you’ll love this recipe, and I can’t wait to hear about your baking adventures! So, grab your ingredients, preheat your oven, and get ready to create some magic in the kitchen. Don’t be afraid to experiment and put your own spin on it. After all, baking is all about having fun and creating something delicious. Once you’ve made these delightful chocolate brownie hearts, please, please, please share your experience with me! I’d love to see your photos, hear about your variations, and read your reviews. You can leave a comment below, tag me on social media (I’m always lurking!), or even send me an email. Your feedback is invaluable, and it helps me to create even better recipes for you in the future. So, what are you waiting for? Go bake some love! I promise you won’t regret it. Happy baking! Print
Chocolate Brownie Hearts: A Decadent Valentine’s Day Treat
- Total Time: 90 minutes
- Yield: 20–24 brownie hearts 1x
Description
Decadent and fudgy brownie hearts, perfect for Valentine’s Day or any special occasion! These rich chocolate treats are easy to make and can be customized with your favorite flavors.
Ingredients
- 1 cup (2 sticks) unsalted butter, melted
- 2 cups granulated sugar
- 4 large eggs
- 1 teaspoon vanilla extract
- 1 cup all-purpose flour
- ¾ cup unsweetened cocoa powder
- ¼ teaspoon baking powder
- ¼ teaspoon salt
- 1 cup semi-sweet chocolate chips
- Red food coloring gel (optional, for a deeper red hue)
- Powdered sugar, for dusting (optional)
Instructions
- Melt the butter: In a large, microwave-safe bowl, melt the butter in 30-second intervals, stirring in between, until completely melted. Alternatively, melt in a saucepan over low heat.
- Combine butter and sugar: Add the granulated sugar to the melted butter and whisk vigorously until well combined. The mixture should be smooth and slightly glossy.
- Incorporate the eggs: Add the eggs one at a time, whisking well after each addition. Make sure each egg is fully incorporated before adding the next.
- Add vanilla extract: Stir in the vanilla extract.
- Dry ingredients: In a separate bowl, whisk together the all-purpose flour, unsweetened cocoa powder, baking powder, and salt.
- Combine wet and dry ingredients: Gradually add the dry ingredients to the wet ingredients, mixing until just combined. Be careful not to overmix the batter. A few streaks of flour are okay.
- Add chocolate chips: Fold in the semi-sweet chocolate chips.
- (Optional) Add red food coloring: If desired, add a few drops of red food coloring gel to the batter and stir until evenly distributed.
- Preheat the oven: Preheat your oven to 350°F (175°C).
- Prepare the baking pan: Grease and flour a 9×13 inch baking pan. Alternatively, line the pan with parchment paper, leaving an overhang on the sides for easy removal.
- Pour the batter: Pour the brownie batter into the prepared baking pan and spread it evenly.
- Bake: Bake for 25-30 minutes, or until a toothpick inserted into the center comes out with moist crumbs attached.
- Cool completely: Remove the brownies from the oven and let them cool completely in the pan before cutting.
- Prepare your workspace: Once the brownies are completely cool, gently lift them out of the pan using the parchment paper overhang (if you used it). Place them on a cutting board.
- Choose your heart cutter: Select a heart-shaped cookie cutter of your desired size.
- Cut out the hearts: Press the cookie cutter firmly into the brownies and cut out as many hearts as possible. Try to arrange the hearts close together to minimize waste.
- Re-roll the scraps (optional): If you want to maximize your yield, you can gently knead the brownie scraps together and re-roll them to cut out more hearts. However, be aware that the texture of these re-rolled brownies may be slightly different from the original ones.
- Dust with powdered sugar (optional): If desired, dust the brownie hearts with powdered sugar for a festive touch.
- Serve: Arrange the brownie hearts on a platter or serving dish. They are delicious on their own or served with a scoop of vanilla ice cream or a dollop of whipped cream.
- Storage: Store the brownie hearts in an airtight container at room temperature for up to 3 days. They can also be frozen for longer storage.
Notes
- Use high-quality ingredients for the best flavor.
- Don’t overmix the batter to avoid tough brownies.
- Don’t overbake the brownies; they should be fudgy.
- Cool completely before cutting for clean edges.
- Experiment with different flavors like peanut butter, mint, salted caramel, or espresso.
- Drizzle with melted chocolate or add sprinkles for extra flair.
- Prep Time: 15 minutes
- Cook Time: 25 minutes

Leave a Comment