
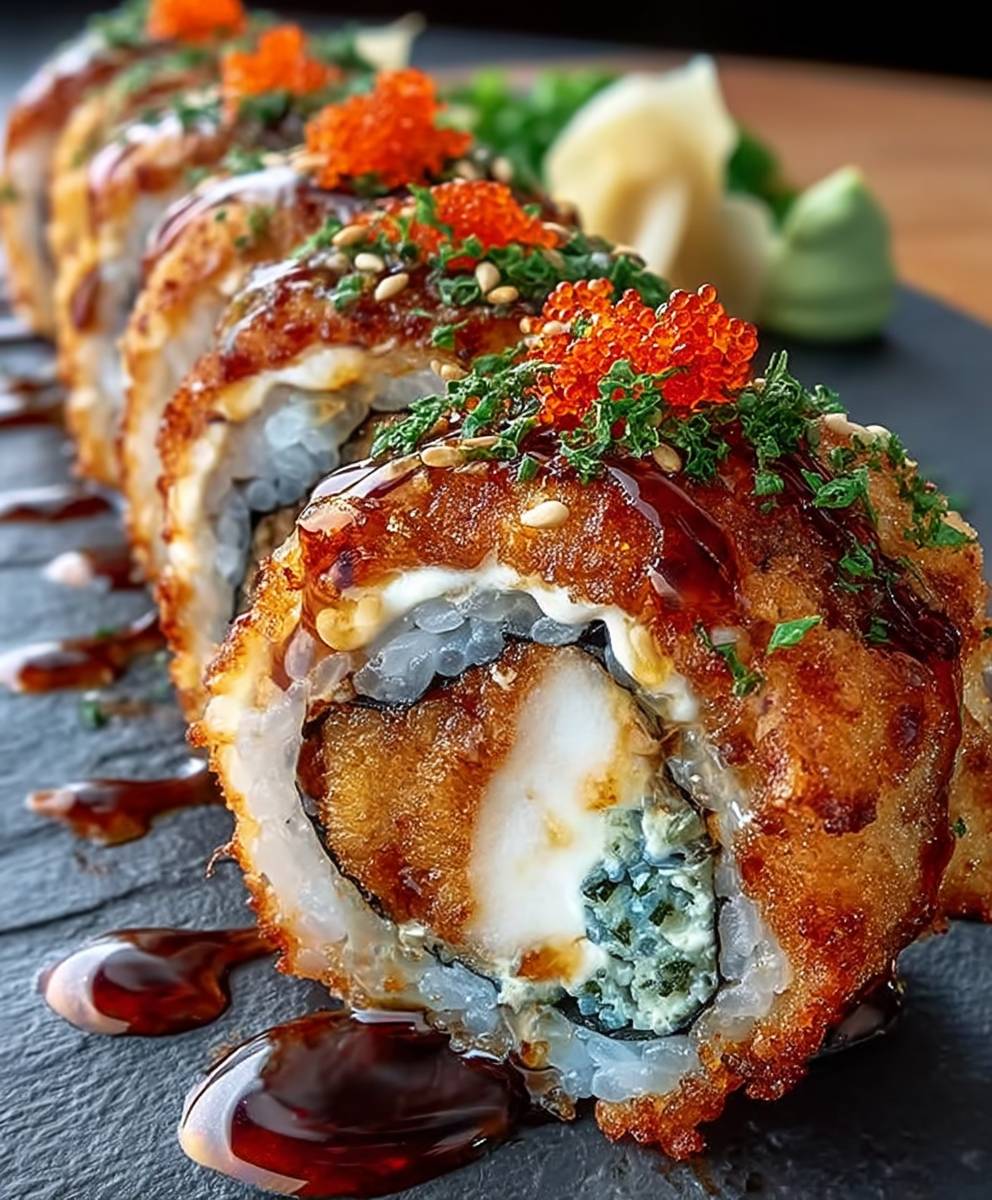
Chicken Tempura Roll: Prepare to embark on a culinary adventure that marries the crispy delight of Japanese tempura with the satisfying simplicity of sushi! Have you ever craved the best of both worlds the crunch of perfectly fried chicken and the cool, refreshing taste of a sushi roll? Well, look no further because this recipe is about to become your new favorite indulgence.
The concept of incorporating tempura into sushi is a relatively modern innovation, a testament to the ever-evolving nature of Japanese cuisine. While traditional sushi focuses on fresh, raw ingredients, the Chicken Tempura Roll offers a playful twist, adding a textural contrast that’s simply irresistible. Its a fusion dish that celebrates both tradition and innovation.
People adore this dish for its incredible combination of flavors and textures. The crispy, savory chicken tempura pairs beautifully with the vinegared rice, creamy avocado, and often a drizzle of sweet and savory sauces. It’s a delightful experience for your taste buds! Plus, making your own Chicken Tempura Roll at home is surprisingly easy and a fun way to impress your friends and family. Get ready to roll!

Ingredients:
- For the Tempura Chicken:
- 1 lb boneless, skinless chicken breasts, cut into strips about ½ inch thick
- 1 cup all-purpose flour
- ½ cup cornstarch
- 1 teaspoon baking powder
- ½ teaspoon salt
- ¼ teaspoon black pepper
- 1 cup ice-cold water
- Vegetable oil, for frying (about 4 cups)
- For the Sushi Rice:
- 2 cups sushi rice
- 2 ¼ cups water
- ¼ cup rice vinegar
- 2 tablespoons sugar
- 1 teaspoon salt
- For the Roll:
- 4 sheets nori seaweed
- ½ avocado, thinly sliced
- ½ cucumber, julienned
- Spicy mayonnaise (store-bought or homemade recipe below)
- Sesame seeds, for garnish (optional)
- For the Spicy Mayonnaise (Optional):
- ½ cup mayonnaise
- 1-2 tablespoons sriracha (adjust to taste)
- 1 teaspoon rice vinegar
- ½ teaspoon sesame oil
- Serving:
- Soy sauce, for dipping
- Wasabi, for serving (optional)
- Pickled ginger, for serving (optional)
Preparing the Sushi Rice:
- Rinse the Rice: Place the sushi rice in a fine-mesh sieve and rinse under cold running water until the water runs clear. This usually takes about 3-5 minutes. Rinsing removes excess starch, which helps the rice achieve the perfect sticky texture.
- Cook the Rice: Combine the rinsed rice and 2 ¼ cups of water in a medium saucepan. Bring to a boil over high heat. Once boiling, reduce the heat to low, cover tightly, and simmer for 18 minutes. It’s crucial to keep the lid on during this time to allow the rice to steam properly.
- Steam the Rice: After 18 minutes, remove the saucepan from the heat and let it stand, covered, for 10 minutes. This allows the rice to fully absorb the remaining moisture and become perfectly fluffy.
- Prepare the Sushi Vinegar: While the rice is steaming, prepare the sushi vinegar. In a small saucepan, combine the rice vinegar, sugar, and salt. Heat over low heat, stirring constantly, until the sugar and salt are dissolved. Do not boil. Let it cool slightly.
- Season the Rice: Transfer the cooked rice to a large, non-metallic bowl (a wooden sushi oke is ideal, but any large bowl will work). Gently drizzle the sushi vinegar mixture over the rice. Using a rice paddle or a wooden spoon, carefully cut and fold the vinegar into the rice, being careful not to mash the grains. Fan the rice with a fan or a piece of cardboard while mixing to help it cool down quickly and evenly. This process is important for achieving the right texture and flavor. The rice should be slightly sticky but not mushy.
- Cool the Rice: Continue to fan and mix the rice until it reaches room temperature. Cover the rice with a damp cloth to prevent it from drying out while you prepare the other ingredients.
Preparing the Tempura Chicken:
- Prepare the Chicken: Cut the chicken breasts into strips that are about ½ inch thick and 3-4 inches long. Pat the chicken strips dry with paper towels. This helps the batter adhere better.
- Prepare the Tempura Batter: In a medium bowl, whisk together the all-purpose flour, cornstarch, baking powder, salt, and pepper.
- Add the Cold Water: Gradually add the ice-cold water to the dry ingredients, whisking until just combined. The batter should be thin and slightly lumpy. Do not overmix! Overmixing will develop the gluten in the flour, resulting in a tough tempura. The key to light and crispy tempura is a cold, lightly mixed batter.
- Heat the Oil: Pour about 4 cups of vegetable oil into a deep pot or Dutch oven. Heat the oil over medium-high heat until it reaches a temperature of 350-375°F (175-190°C). Use a deep-fry thermometer to monitor the temperature. If you don’t have a thermometer, you can test the oil by dropping a small amount of batter into it. If the batter sizzles and turns golden brown in about 30 seconds, the oil is ready.
- Fry the Chicken: Dip each chicken strip into the tempura batter, making sure it’s fully coated. Carefully lower the battered chicken into the hot oil, a few pieces at a time, being careful not to overcrowd the pot. Overcrowding will lower the oil temperature and result in soggy tempura.
- Cook the Chicken: Fry the chicken for 2-3 minutes per side, or until golden brown and cooked through. The internal temperature of the chicken should reach 165°F (74°C).
- Drain the Chicken: Remove the fried chicken from the oil with a slotted spoon and place it on a wire rack lined with paper towels to drain excess oil.
Assembling the Chicken Tempura Roll:
- Prepare the Nori: Place a sheet of nori seaweed on a bamboo sushi rolling mat (makisu). If you don’t have a bamboo mat, you can use a clean kitchen towel.
- Spread the Rice: Wet your hands with water to prevent the rice from sticking. Take a handful of sushi rice and spread it evenly over the nori sheet, leaving about ½ inch of space at the top edge of the nori. This space will help seal the roll.
- Add the Fillings: Arrange a few strips of tempura chicken horizontally across the center of the rice. Add a few slices of avocado and julienned cucumber next to the chicken. Drizzle some spicy mayonnaise over the fillings.
- Roll the Sushi: Using the bamboo mat, lift the edge of the nori closest to you and begin to roll the sushi tightly. Keep the fillings tucked in as you roll. Once you’ve rolled about halfway, gently press down on the roll to tighten it. Continue rolling until the entire roll is complete.
- Seal the Roll: Moisten the top edge of the nori with a little water to help seal the roll. Press firmly to secure the seal.
- Cut the Roll: Using a sharp, wet knife, cut the sushi roll in half. Then, cut each half into 3-4 equal pieces. Wetting the knife prevents the rice from sticking and ensures clean cuts.
- Garnish and Serve: Arrange the sushi rolls on a plate. Sprinkle with sesame seeds, if desired. Serve immediately with soy sauce, wasabi, and pickled ginger.
- Repeat: Repeat steps 1-7 with the remaining nori sheets and ingredients.
Making Spicy Mayonnaise (Optional):
- Combine Ingredients: In a small bowl, combine the mayonnaise, sriracha, rice vinegar, and sesame oil.
- Mix Well: Stir until all ingredients are thoroughly combined and the mixture is smooth and creamy.
- Adjust to Taste: Taste the spicy mayonnaise and adjust the amount of sriracha to your liking. If you prefer a milder flavor, use less sriracha. If you like it spicier, add more.
- Store: Store the spicy mayonnaise in an airtight container in the refrigerator for up to 3 days.
Tips for Success:
- Use High-Quality Ingredients: The quality of your ingredients will directly impact the taste of your sushi roll. Use fresh, high-quality sushi rice, nori seaweed, and chicken.
- Keep Everything Cold: Keeping the water and batter cold for the tempura is crucial for achieving a light and crispy texture.
- Don’t Overcrowd the Pot: When frying the chicken, avoid overcrowding the pot. Fry in batches to maintain the oil temperature and ensure even cooking.
- Use a Sharp Knife: A sharp knife is essential for cutting the sushi roll cleanly. Wet the knife before each cut to prevent the rice from sticking.
- Practice Makes Perfect: Making sushi rolls can be a bit tricky at first, but with practice, you’ll get the hang of it. Don’t be discouraged if your first few rolls aren’t perfect.
Variations:
- Vegetarian Option: Substitute the chicken with tofu or sweet
Conclusion:
So, there you have it! This Chicken Tempura Roll recipe is more than just a meal; it’s an experience. It’s a delightful dance of textures and flavors that will transport your taste buds straight to sushi heaven. The crispy, golden-brown chicken tempura, the creamy avocado, the perfectly seasoned rice, and that satisfying crunch of the nori seaweed it all comes together in perfect harmony. I truly believe this is a must-try recipe for any sushi lover, and even for those who are a little hesitant about trying homemade sushi, this is a fantastic starting point. It’s surprisingly easy to make, and the results are incredibly rewarding.
Why is this a must-try? Because it’s not just about following a recipe; it’s about creating something special. It’s about the satisfaction of knowing you made something delicious from scratch, something that rivals your favorite restaurant’s offering. It’s about the joy of sharing that creation with friends and family and seeing their faces light up with delight. Plus, let’s be honest, who can resist perfectly fried chicken tempura nestled inside a delicious sushi roll?
Now, let’s talk about serving suggestions and variations. While I love this roll as is, there’s always room for a little personalization! For a spicier kick, try adding a drizzle of sriracha mayo on top or mixing a little wasabi into your soy sauce. If you’re feeling adventurous, you could even add some thinly sliced jalapeños to the roll itself. For a vegetarian option, you could easily substitute the chicken tempura with crispy fried tofu or even some tempura-battered vegetables like sweet potato or zucchini.
As for serving, these rolls are fantastic on their own as a light lunch or dinner. But they also pair perfectly with a side of edamame, a seaweed salad, or a bowl of miso soup. For a truly authentic experience, serve with pickled ginger and wasabi. And don’t forget the soy sauce for dipping!
I’ve poured my heart and soul into perfecting this Chicken Tempura Roll recipe, and I’m so excited for you to try it. I truly believe you’ll be amazed at how easy and delicious it is. Don’t be intimidated by the thought of making sushi at home. With a little patience and practice, you’ll be rolling like a pro in no time.
I really encourage you to give this recipe a try. Gather your ingredients, put on some music, and have fun with it! And most importantly, don’t be afraid to experiment and make it your own. Cooking should be a joyful experience, so relax, enjoy the process, and savor the delicious results.
Once you’ve made your own batch of these amazing Chicken Tempura Rolls, I would absolutely love to hear about your experience! Did you make any variations? What did you think of the flavor? Did your friends and family love them as much as I do? Please share your thoughts and photos in the comments below. Your feedback is invaluable, and it helps me to continue creating and sharing recipes that you’ll love. Happy rolling! I can’t wait to hear from you!
Chicken Tempura Roll: Recipe, Tips, and Delicious Variations
Crispy tempura chicken meets classic sushi in this delicious Chicken Tempura Roll. A fun and flavorful twist on traditional sushi, perfect for a satisfying meal.
Ingredients
- 1 lb boneless, skinless chicken breasts, cut into strips about ½ inch thick
- 1 cup all-purpose flour
- ½ cup cornstarch
- 1 teaspoon baking powder
- ½ teaspoon salt
- ¼ teaspoon black pepper
- 1 cup ice-cold water
- Vegetable oil, for frying (about 4 cups)
- 2 cups sushi rice
- 2 ¼ cups water
- ¼ cup rice vinegar
- 2 tablespoons sugar
- 1 teaspoon salt
- 4 sheets nori seaweed
- ½ avocado, thinly sliced
- ½ cucumber, julienned
- Spicy mayonnaise (store-bought or homemade recipe below)
- Sesame seeds, for garnish (optional)
- ½ cup mayonnaise
- 1-2 tablespoons sriracha (adjust to taste)
- 1 teaspoon rice vinegar
- ½ teaspoon sesame oil
- Soy sauce, for dipping
- Wasabi, for serving (optional)
- Pickled ginger, for serving (optional)
Instructions
- Rinse the Rice: Place the sushi rice in a fine-mesh sieve and rinse under cold running water until the water runs clear. This usually takes about 3-5 minutes.
- Cook the Rice: Combine the rinsed rice and 2 ¼ cups of water in a medium saucepan. Bring to a boil over high heat. Once boiling, reduce the heat to low, cover tightly, and simmer for 18 minutes.
- Steam the Rice: After 18 minutes, remove the saucepan from the heat and let it stand, covered, for 10 minutes.
- Prepare the Sushi Vinegar: While the rice is steaming, prepare the sushi vinegar. In a small saucepan, combine the rice vinegar, sugar, and salt. Heat over low heat, stirring constantly, until the sugar and salt are dissolved. Do not boil. Let it cool slightly.
- Season the Rice: Transfer the cooked rice to a large, non-metallic bowl. Gently drizzle the sushi vinegar mixture over the rice. Using a rice paddle or a wooden spoon, carefully cut and fold the vinegar into the rice, being careful not to mash the grains. Fan the rice with a fan or a piece of cardboard while mixing to help it cool down quickly and evenly.
- Cool the Rice: Continue to fan and mix the rice until it reaches room temperature. Cover the rice with a damp cloth to prevent it from drying out while you prepare the other ingredients.
- Prepare the Chicken: Cut the chicken breasts into strips that are about ½ inch thick and 3-4 inches long. Pat the chicken strips dry with paper towels.
- Prepare the Tempura Batter: In a medium bowl, whisk together the all-purpose flour, cornstarch, baking powder, salt, and pepper.
- Add the Cold Water: Gradually add the ice-cold water to the dry ingredients, whisking until just combined. The batter should be thin and slightly lumpy. Do not overmix!
- Heat the Oil: Pour about 4 cups of vegetable oil into a deep pot or Dutch oven. Heat the oil over medium-high heat until it reaches a temperature of 350-375°F (175-190°C).
- Fry the Chicken: Dip each chicken strip into the tempura batter, making sure it’s fully coated. Carefully lower the battered chicken into the hot oil, a few pieces at a time, being careful not to overcrowd the pot.
- Cook the Chicken: Fry the chicken for 2-3 minutes per side, or until golden brown and cooked through. The internal temperature of the chicken should reach 165°F (74°C).
- Drain the Chicken: Remove the fried chicken from the oil with a slotted spoon and place it on a wire rack lined with paper towels to drain excess oil.
- Prepare the Nori: Place a sheet of nori seaweed on a bamboo sushi rolling mat (makisu).
- Spread the Rice: Wet your hands with water to prevent the rice from sticking. Take a handful of sushi rice and spread it evenly over the nori sheet, leaving about ½ inch of space at the top edge of the nori.
- Add the Fillings: Arrange a few strips of tempura chicken horizontally across the center of the rice. Add a few slices of avocado and julienned cucumber next to the chicken. Drizzle some spicy mayonnaise over the fillings.
- Roll the Sushi: Using the bamboo mat, lift the edge of the nori closest to you and begin to roll the sushi tightly. Keep the fillings tucked in as you roll. Once you’ve rolled about halfway, gently press down on the roll to tighten it. Continue rolling until the entire roll is complete.
- Seal the Roll: Moisten the top edge of the nori with a little water to help seal the roll. Press firmly to secure the seal.
- Cut the Roll: Using a sharp, wet knife, cut the sushi roll in half. Then, cut each half into 3-4 equal pieces.
- Garnish and Serve: Arrange the sushi rolls on a plate. Sprinkle with sesame seeds, if desired. Serve immediately with soy sauce, wasabi, and pickled ginger.
- Repeat: Repeat steps 1-7 with the remaining nori sheets and ingredients.
- Combine Ingredients: In a small bowl, combine the mayonnaise, sriracha, rice vinegar, and sesame oil.
- Mix Well: Stir until all ingredients are thoroughly combined and the mixture is smooth and creamy.
- Adjust to Taste: Taste the spicy mayonnaise and adjust the amount of sriracha to your liking.
- Store: Store the spicy mayonnaise in an airtight container in the refrigerator for up to 3 days.
Notes
- Use High-Quality Ingredients: The quality of your ingredients will directly impact the taste of your sushi roll. Use fresh, high-quality sushi rice, nori seaweed, and chicken.
- Keep Everything Cold: Keeping the water and batter cold for the tempura is crucial for achieving a light and crispy texture.
- Don’t Overcrowd the Pot: When frying the chicken, avoid overcrowding the pot. Fry in batches to maintain the oil temperature and ensure even cooking.
- Use a Sharp Knife: A sharp knife is essential for cutting the sushi roll cleanly. Wet the knife before each cut to prevent the rice from sticking.
- Practice Makes Perfect: Making sushi rolls can be a bit tricky at first, but with practice, you’ll get the hang of it. Don’t be discouraged if your first few rolls aren’t perfect.


Leave a Comment