
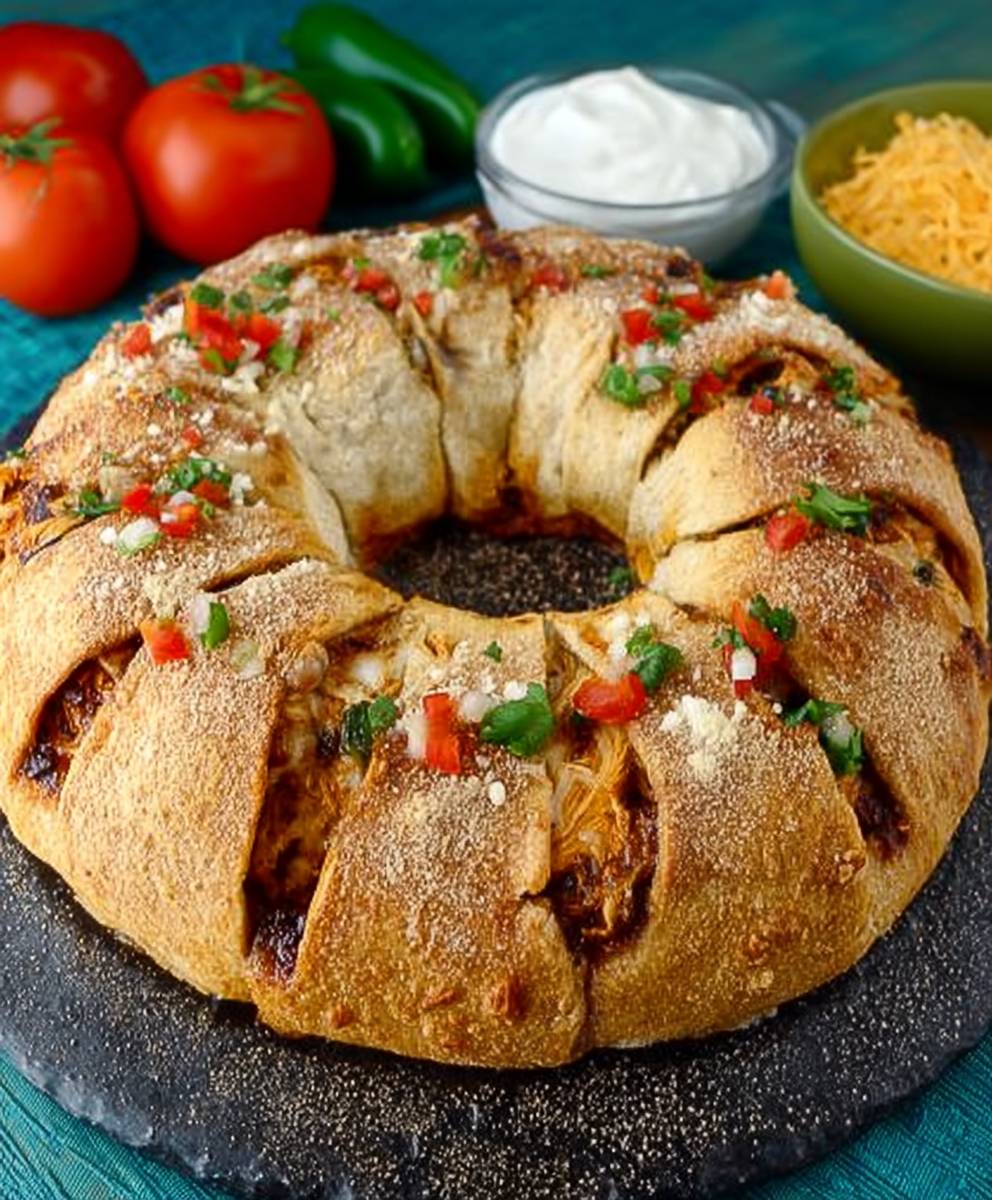
Chicken enchilada ring: just the name conjures up images of a vibrant, cheesy, and utterly delicious centerpiece gracing your table, doesn’t it? Forget the same old casserole; this is a showstopper that’s surprisingly simple to create! I’m thrilled to share this recipe with you, a twist on the classic enchilada that’s perfect for potlucks, family gatherings, or even a fun weeknight dinner.
Enchiladas, of course, have deep roots in Mexican cuisine, dating back to the Mayan civilization. The word “enchilada” itself comes from the Nahuatl word “ch?llap?tzalli,” meaning “chili-seasoned flute.” Over centuries, this humble dish has evolved, incorporating various fillings and sauces, becoming a beloved staple across Mexico and beyond. This chicken enchilada ring takes that tradition and gives it a modern, crowd-pleasing presentation.
Why do people adore enchiladas? It’s the perfect combination of savory filling, soft tortillas, and that irresistible, melty cheese topping. The beauty of this ring version is that it offers all that familiar comfort in a visually appealing format. Plus, it’s incredibly versatile! You can customize the filling to your liking, using different cheeses, vegetables, or even adding a little spice. Get ready to impress your friends and family with this easy-to-make and utterly satisfying dish!

Ingredients:
- 1 tablespoon olive oil
- 1 medium onion, chopped
- 2 cloves garlic, minced
- 1 pound boneless, skinless chicken breasts, cooked and shredded
- 1 (10 ounce) can diced tomatoes and green chilies, undrained
- 1 (15 ounce) can black beans, rinsed and drained
- 1 (15 ounce) can corn, drained
- 1 teaspoon chili powder
- 1/2 teaspoon cumin
- 1/4 teaspoon garlic powder
- 1/4 teaspoon onion powder
- Salt and pepper to taste
- 1 (10 ounce) can enchilada sauce
- 10-12 flour tortillas (6-inch size)
- 2 cups shredded cheddar cheese
- Optional toppings: sour cream, guacamole, salsa, chopped cilantro
Preparing the Chicken Filling:
- First, let’s get our chicken cooked and shredded. You can use leftover cooked chicken, rotisserie chicken, or cook your own. If you’re cooking your own, I like to poach the chicken breasts in simmering water until they’re cooked through (about 15-20 minutes). Once cooked, let them cool slightly before shredding with two forks.
- Now, heat the olive oil in a large skillet over medium heat. Add the chopped onion and cook until softened, about 5 minutes. We want those onions to be nice and translucent.
- Add the minced garlic to the skillet and cook for another minute, until fragrant. Be careful not to burn the garlic! Burnt garlic is no fun.
- Stir in the shredded chicken, diced tomatoes and green chilies (undrained), black beans, and corn. Make sure everything is nicely combined.
- Add the chili powder, cumin, garlic powder, and onion powder. Season with salt and pepper to taste. I always recommend starting with a little salt and pepper and then adjusting to your preference.
- Simmer the mixture for about 10-15 minutes, stirring occasionally, to allow the flavors to meld together. This step is important because it really brings out the best in all the spices and ingredients. The mixture should be heated through and slightly thickened.
- Taste the filling and adjust seasonings as needed. Maybe you want a little more chili powder for a spicier kick, or a pinch more salt to balance the flavors. This is your chance to make it perfect!
- Remove the skillet from the heat and set aside. We’ll need this filling later for assembling our enchilada ring.
Assembling the Enchilada Ring:
- Preheat your oven to 350°F (175°C). This is a crucial step, so don’t forget it!
- Lightly grease a 9-inch springform pan. This will prevent the enchilada ring from sticking and make it easier to remove after baking. If you don’t have a springform pan, you can use a regular cake pan, but be extra careful when removing the enchilada ring.
- Spread a thin layer of enchilada sauce on the bottom of the prepared pan. This will help keep the tortillas from drying out and add extra flavor.
- Now, let’s start assembling the enchilada ring. Take one tortilla and spread about 1/4 cup of the chicken filling evenly over it. Don’t overfill the tortillas, or they’ll be difficult to roll.
- Roll up the tortilla tightly and place it seam-side down in the prepared pan, starting from the center and working your way outwards. We’re creating a spiral effect here.
- Repeat steps 4 and 5 with the remaining tortillas and filling, arranging them in a circle around the center tortilla. The tortillas should fit snugly together in the pan.
- Once all the tortillas are arranged in the pan, pour the remaining enchilada sauce evenly over the top of the enchilada ring. Make sure all the tortillas are covered in sauce.
- Sprinkle the shredded cheddar cheese evenly over the enchilada ring. Don’t be shy with the cheese!
Baking the Enchilada Ring:
- Bake in the preheated oven for 25-30 minutes, or until the cheese is melted and bubbly and the enchilada ring is heated through. The tortillas should be slightly golden brown around the edges.
- Remove the enchilada ring from the oven and let it cool in the pan for about 5-10 minutes before releasing the springform pan. This will help the enchilada ring hold its shape.
- Carefully release the springform pan and transfer the enchilada ring to a serving platter. If you used a regular cake pan, carefully invert the enchilada ring onto a serving platter.
Serving and Enjoying:
- Cut the enchilada ring into wedges and serve immediately.
- Garnish with your favorite toppings, such as sour cream, guacamole, salsa, and chopped cilantro. I personally love a dollop of sour cream and a sprinkle of fresh cilantro.
- Enjoy your delicious and impressive chicken enchilada ring! This is perfect for a weeknight dinner or a potluck gathering.
Tips and Variations:
- Spice it up: Add a pinch of cayenne pepper or a dash of hot sauce to the chicken filling for a spicier kick.
- Use different cheese: Try using Monterey Jack, pepper jack, or a Mexican cheese blend instead of cheddar cheese.
- Add vegetables: Include other vegetables in the filling, such as bell peppers, zucchini, or mushrooms.
- Make it vegetarian: Substitute the chicken with cooked lentils or crumbled tofu for a vegetarian option.
- Use corn tortillas: For a gluten-free option, use corn tortillas instead of flour tortillas. Keep in mind that corn tortillas are more prone to cracking, so be gentle when rolling them.
- Prepare ahead: You can assemble the enchilada ring ahead of time and store it in the refrigerator until ready to bake. Just add a few extra minutes to the baking time.
- Freezing: You can freeze the assembled enchilada ring before baking. Wrap it tightly in plastic wrap and then in foil. Thaw it overnight in the refrigerator before baking.
Serving Suggestions:
- Serve with a side of Mexican rice and refried beans for a complete meal.
- Offer a variety of toppings, such as sour cream, guacamole, salsa, chopped cilantro, and sliced jalapenos.
- Pair with a refreshing margarita or a cold Mexican beer.
Nutritional Information (approximate per serving):
- Calories: 400-500
- Protein: 25-30g
- Fat: 20-25g
- Carbohydrates: 30-40g
Note: Nutritional information may vary depending on the specific ingredients used.
Why This Recipe Works:
This recipe is a crowd-pleaser because it’s easy to make, customizable, and visually appealing. The combination of savory chicken filling, flavorful enchilada sauce, and melted cheese is simply irresistible. The ring shape makes it a fun and festive dish that’s perfect for sharing. Plus, it’s a great way to use up leftover cooked chicken. The step-by-step instructions ensure that even novice cooks can successfully create this delicious dish. The ability to customize the filling and toppings allows you to tailor the recipe to your own preferences and dietary needs. The enchilada ring is also a great make-ahead dish, making it perfect for busy weeknights or potluck gatherings. The use of readily available ingredients makes it accessible to everyone. The balance of flavors and textures, from the tender chicken to the creamy cheese and the slightly crispy tortillas, creates a satisfying and enjoyable eating experience. The recipe is also relatively healthy, providing a good source of protein and fiber. The option to use corn tortillas makes it gluten-free friendly. The visual appeal of the enchilada ring makes it a show-stopping dish that’s sure to impress your guests. The recipe is also versatile, allowing you to adapt it to different occasions and preferences. The clear and concise instructions make it easy to follow, even for beginner cooks. The tips and variations provide helpful suggestions for customizing the recipe and troubleshooting any potential issues. The nutritional information provides a general idea of the calorie and macronutrient content of the dish. The serving suggestions offer ideas for creating a complete and balanced meal. Overall, this recipe is a winner because it’s delicious, easy to make, customizable, and visually appealing.
Conclusion:
This Chicken Enchilada Ring isn’t just another recipe; it’s a guaranteed crowd-pleaser that brings a fiesta of flavor right to your table. From the flaky, golden-brown crescent roll crust to the savory, cheesy chicken filling, every bite is an explosion of deliciousness. It’s quick, it’s easy, and it’s infinitely adaptable, making it the perfect dish for busy weeknights or festive weekend gatherings. I truly believe this will become a staple in your recipe repertoire!
But what makes this Chicken Enchilada Ring a must-try? It’s the perfect balance of textures and tastes. The creamy, cheesy filling, bursting with tender chicken and zesty enchilada sauce, is beautifully complemented by the light and airy crescent roll crust. It’s a symphony of flavors that will have everyone reaching for seconds (and maybe even thirds!). Plus, the ring presentation is just so visually appealing! It’s a dish that looks as good as it tastes, making it ideal for potlucks, parties, or any occasion where you want to impress.
Looking for serving suggestions? This enchilada ring is fantastic on its own, but it also pairs beautifully with a variety of sides. A simple green salad with a light vinaigrette provides a refreshing contrast to the richness of the ring. You could also serve it with a side of Mexican rice and refried beans for a complete and satisfying meal. For a spicier kick, add a dollop of sour cream or guacamole and a sprinkle of fresh cilantro.
And the best part? This recipe is incredibly versatile! Feel free to experiment with different fillings to suit your taste. Ground beef or shredded pork would be delicious alternatives to chicken. You could also add vegetables like corn, black beans, or bell peppers to the filling for extra flavor and nutrition. For a vegetarian option, simply replace the chicken with sautéed mushrooms or tofu. Don’t be afraid to get creative and make it your own! You can also adjust the spice level by using mild, medium, or hot enchilada sauce. If you’re feeling adventurous, try making your own homemade enchilada sauce!
I’m so confident that you’ll love this recipe. It’s a winner every time! The ease of preparation, the delicious flavor, and the stunning presentation make it a true standout. It’s the kind of dish that everyone will ask you to make again and again.
So, what are you waiting for? Gather your ingredients, preheat your oven, and get ready to create a culinary masterpiece. I promise you won’t be disappointed. This Chicken Enchilada Ring is more than just a recipe; it’s an experience.
Once you’ve tried it, I’d love to hear about your experience! Did you make any variations? What did your family and friends think? Share your photos and comments on social media using [Your Hashtag Here] so I can see your creations. I can’t wait to see what you come up with! Happy cooking!
Chicken Enchilada Ring: A Delicious and Easy Recipe
A fun and festive Chicken Enchilada Ring, perfect for weeknight dinners or potlucks! Filled with savory chicken, beans, corn, and cheese, baked in a ring shape for easy serving and impressive presentation.
Ingredients
- 1 tablespoon olive oil
- 1 medium onion, chopped
- 2 cloves garlic, minced
- 1 pound boneless, skinless chicken breasts, cooked and shredded
- 1 (10 ounce) can diced tomatoes and green chilies, undrained
- 1 (15 ounce) can black beans, rinsed and drained
- 1 (15 ounce) can corn, drained
- 1 teaspoon chili powder
- 1/2 teaspoon cumin
- 1/4 teaspoon garlic powder
- 1/4 teaspoon onion powder
- Salt and pepper to taste
- 1 (10 ounce) can enchilada sauce
- 10-12 flour tortillas (6-inch size)
- 2 cups shredded cheddar cheese
- Optional toppings: sour cream, guacamole, salsa, chopped cilantro
Instructions
- Cook and shred chicken breasts. You can use leftover cooked chicken, rotisserie chicken, or poach chicken breasts in simmering water until cooked through (about 15-20 minutes). Let cool slightly before shredding with two forks.
- Heat olive oil in a large skillet over medium heat. Add chopped onion and cook until softened, about 5 minutes.
- Add minced garlic to the skillet and cook for another minute, until fragrant.
- Stir in shredded chicken, diced tomatoes and green chilies (undrained), black beans, and corn.
- Add chili powder, cumin, garlic powder, and onion powder. Season with salt and pepper to taste.
- Simmer the mixture for about 10-15 minutes, stirring occasionally, to allow the flavors to meld together. The mixture should be heated through and slightly thickened.
- Taste the filling and adjust seasonings as needed.
- Remove the skillet from the heat and set aside.
- Preheat your oven to 350°F (175°C).
- Lightly grease a 9-inch springform pan.
- Spread a thin layer of enchilada sauce on the bottom of the prepared pan.
- Take one tortilla and spread about 1/4 cup of the chicken filling evenly over it.
- Roll up the tortilla tightly and place it seam-side down in the prepared pan, starting from the center and working your way outwards.
- Repeat steps 4 and 5 with the remaining tortillas and filling, arranging them in a circle around the center tortilla. The tortillas should fit snugly together in the pan.
- Once all the tortillas are arranged in the pan, pour the remaining enchilada sauce evenly over the top of the enchilada ring.
- Sprinkle the shredded cheddar cheese evenly over the enchilada ring.
- Bake in the preheated oven for 25-30 minutes, or until the cheese is melted and bubbly and the enchilada ring is heated through.
- Remove the enchilada ring from the oven and let it cool in the pan for about 5-10 minutes before releasing the springform pan.
- Carefully release the springform pan and transfer the enchilada ring to a serving platter. If you used a regular cake pan, carefully invert the enchilada ring onto a serving platter.
- Cut the enchilada ring into wedges and serve immediately.
- Garnish with your favorite toppings, such as sour cream, guacamole, salsa, and chopped cilantro.
- Enjoy!
Notes
- Spice it up: Add a pinch of cayenne pepper or a dash of hot sauce to the chicken filling for a spicier kick.
- Use different cheese: Try using Monterey Jack, pepper jack, or a Mexican cheese blend instead of cheddar cheese.
- Add vegetables: Include other vegetables in the filling, such as bell peppers, zucchini, or mushrooms.
- Make it vegetarian: Substitute the chicken with cooked lentils or crumbled tofu for a vegetarian option.
- Use corn tortillas: For a gluten-free option, use corn tortillas instead of flour tortillas. Keep in mind that corn tortillas are more prone to cracking, so be gentle when rolling them.
- Prepare ahead: You can assemble the enchilada ring ahead of time and store it in the refrigerator until ready to bake. Just add a few extra minutes to the baking time.
- Freezing: You can freeze the assembled enchilada ring before baking. Wrap it tightly in plastic wrap and then in foil. Thaw it overnight in the refrigerator before baking.
- Serve with a side of Mexican rice and refried beans for a complete meal.
- Offer a variety of toppings, such as sour cream, guacamole, salsa, chopped cilantro, and sliced jalapenos.
- Pair with a refreshing margarita or a cold Mexican beer.
Leave a Comment