
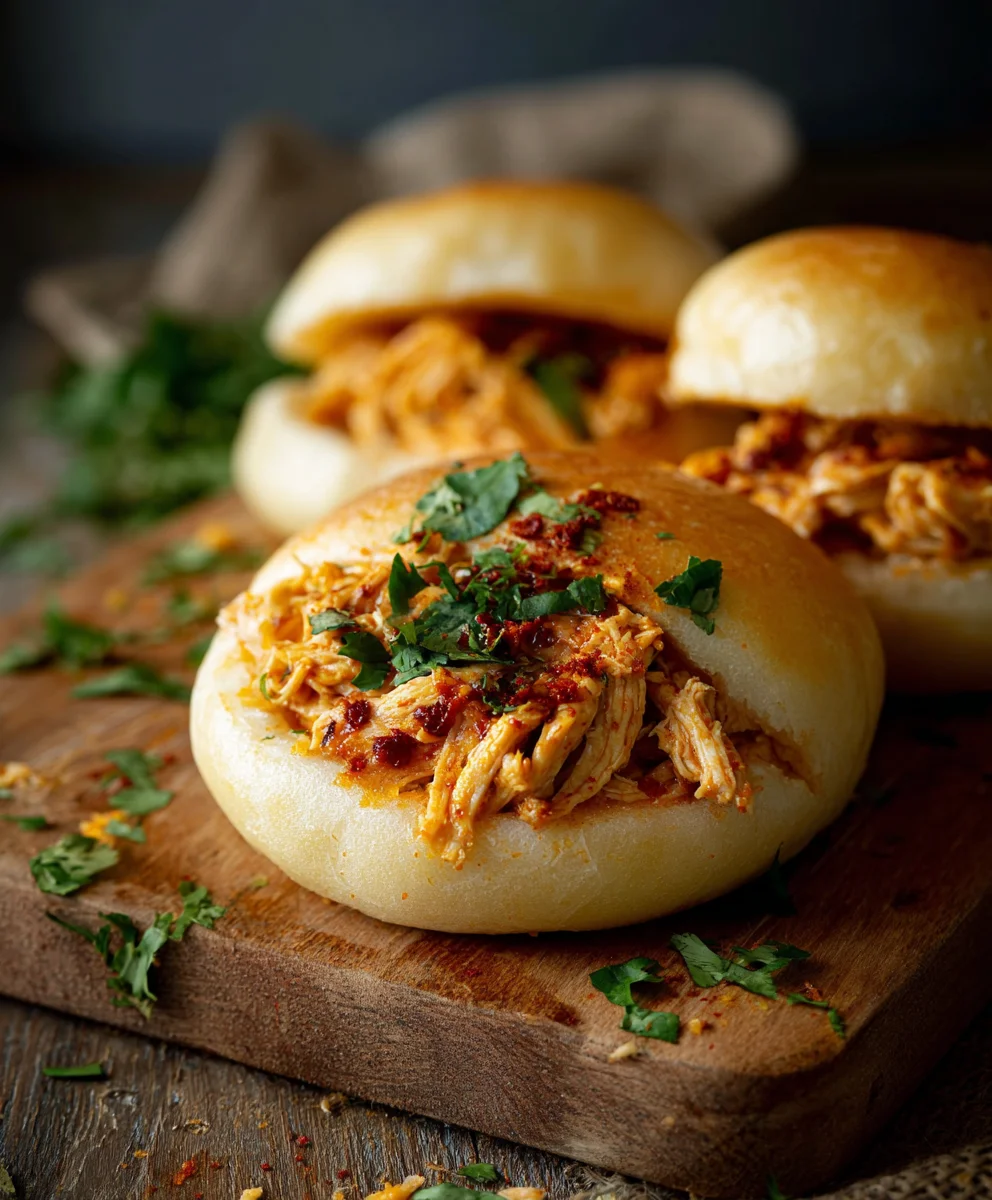
Cheesy Dynamite Chicken Buns are more than just a recipe; they are an invitation to an explosion of flavor and texture that will undoubtedly become a new favorite in your kitchen. Imagine sinking your teeth into a perfectly golden, soft bun, only to discover an exhilarating core of tender, spicy chicken generously blanketed in a molten, gooey cheese. It’s a culinary adventure that promises both comfort and an exciting kick, making every bite an unforgettable experience.
A Modern Classic in the Making
While not a dish steeped in ancient history, this creation brilliantly encapsulates the modern culinary spirit—a delightful fusion that marries the universal appeal of warm, fluffy bread with the vibrant, bold flavors often found in contemporary Asian-inspired chicken preparations. The addition of cheese transforms it into an utterly irresistible experience, creating a dish that feels both familiar and thrillingly new. I’ve always been fascinated by how simple ingredients, when combined creatively, can yield such spectacular results, and this recipe is a prime example of culinary ingenuity.
People absolutely adore this dish for countless reasons. The initial crunch of the bun giving way to its pillowy interior, followed by the savory, subtly spicy chicken, and finally, the luxurious embrace of the melted cheese—it’s a symphony for the senses. This Cheesy Dynamite Chicken Buns recipe offers a perfect balance: the tender chicken provides substance, the spice adds an exciting edge, and the cheese brings a creamy richness that harmonizes everything beautifully. Whether you’re looking for an impressive appetizer, a memorable party snack, or a unique dinner option, these buns are guaranteed to be a sensational hit that leaves everyone craving more.

Ingredients:
-
For the Enriched Dough:
- 3 ½ cups (about 420g) all-purpose flour, plus more for dusting – I always use unbleached for a better texture.
- 1 (¼-ounce or 7g) packet active dry yeast – make sure it’s fresh for a good rise!
- ¼ cup (50g) granulated sugar – for that touch of sweetness and to feed the yeast.
- 1 teaspoon salt – essential for balancing flavors.
- 1 cup (240ml) warm milk (about 105-115°F / 40-46°C) – just warm enough to activate the yeast without killing it.
- ½ cup (113g) unsalted butter, softened and cut into pieces – for richness and tenderness.
- 1 large egg, at room temperature – for structure and a beautiful golden crust.
-
For the Irresistible Dynamite Chicken Filling:
- 1 ½ pounds boneless, skinless chicken breast or thighs, diced into ½-inch pieces – I find thighs offer more flavor, but breast works perfectly too.
- 1 tablespoon olive oil – for sautéing.
- ½ cup finely diced red onion – adds a subtle sweetness and bite.
- 2 cloves garlic, minced – because garlic makes everything better!
- ½ cup finely diced red bell pepper – for color and a fresh crunch.
- ½ cup finely diced green bell pepper – balancing out the colors and flavors.
- ½ cup mayonnaise – the creamy base for our “dynamite” sauce.
- ¼ cup Sriracha sauce (or more, to taste!) – this is where the “dynamite” comes in, adjust for your heat preference!
- 1 tablespoon sweet chili sauce (optional, but I love the extra layer of flavor it adds) – enhances the sweet-spicy dynamic.
- 1 tablespoon lime juice – a little zest brightens everything up.
- 1 teaspoon smoked paprika – for a lovely depth of flavor.
- ½ teaspoon onion powder – another layer of aromatic goodness.
- Salt and freshly ground black pepper, to taste – season generously!
- 1 cup shredded cheddar cheese – for that classic cheesy goodness.
- ½ cup shredded mozzarella cheese – for extra melty stretch.
- ¼ cup chopped fresh cilantro – for freshness and a vibrant flavor.
- 2 tablespoons chopped green onions – for garnish and a mild oniony kick.
-
For Assembling and Topping:
- 1 large egg, whisked with 1 tablespoon water (for egg wash) – for that golden sheen.
- 1 tablespoon sesame seeds – for a classic bun topping.
- ¼ cup shredded cheddar or mozzarella cheese – for a final cheesy flourish on top of your Cheesy Dynamite Chicken Buns.
Preparing the Enriched Dough for Your Cheesy Dynamite Chicken Buns
- Activate the Yeast: In a small bowl or a liquid measuring cup, combine the warm milk and a pinch of your granulated sugar. Sprinkle the active dry yeast over the top. Give it a gentle stir and then let it sit undisturbed for about 5-10 minutes. You’re looking for a foamy, bubbly mixture, which is a sure sign that your yeast is alive and ready to bring your Cheesy Dynamite Chicken Buns to life! If it doesn’t foam, your yeast might be old, or your milk might have been too hot or too cold, and it’s best to start this step over. This is a crucial step for a light and airy bun.
- Combine Dry Ingredients: In the large bowl of a stand mixer fitted with the dough hook attachment (or a very large mixing bowl if you’re kneading by hand), whisk together the remaining granulated sugar, all-purpose flour, and salt. Make sure these are well combined so the salt is evenly distributed, otherwise, you might end up with pockets of overly salty dough.
- Add Wet Ingredients to Dry: Once your yeast mixture is foamy, pour it into the dry ingredients. Add the softened butter pieces and the room temperature egg. Mixing butter directly into flour before liquid can sometimes inhibit gluten development, so adding it with the wet ingredients here helps achieve a smoother dough.
-
Knead the Dough:
- Using a Stand Mixer: Start the mixer on low speed, gradually increasing to medium, and knead for about 8-10 minutes. The dough will start off sticky but will eventually come together, pulling away from the sides of the bowl. It should be smooth, elastic, and slightly tacky to the touch. I love using my mixer for this; it saves so much arm work!
- Kneading by Hand: Turn the dough out onto a lightly floured surface. Knead vigorously for 12-15 minutes. This is a bit of a workout, but it’s incredibly satisfying! Push the dough away from you with the heels of your hands, then fold it back towards you, rotating it slightly. Continue until the dough is smooth, elastic, and passes the “windowpane test” (where you can stretch a small piece thin enough to see light through it without tearing).
Proper kneading is key to developing the gluten, which gives your Cheesy Dynamite Chicken Buns their characteristic chewiness and helps them hold their shape.
- First Proofing: Lightly grease a clean large bowl with a little olive oil. Transfer the kneaded dough to the bowl, turning it once to coat the entire surface with oil. Cover the bowl tightly with plastic wrap or a clean kitchen towel. Place it in a warm, draft-free spot – I often use my oven with just the light on, or a sunny spot on my counter. Let the dough rise for 1 to 1.5 hours, or until it has doubled in size. This first rise allows the flavors to develop beautifully and creates a wonderfully light texture.
Crafting the Irresistible Dynamite Chicken Filling
- Cook the Chicken: While your dough is on its first rise, let’s get started on the star of our Cheesy Dynamite Chicken Buns: the filling! Heat 1 tablespoon of olive oil in a large skillet or frying pan over medium-high heat. Add the diced chicken pieces, season generously with salt, pepper, smoked paprika, and onion powder. Cook, stirring occasionally, until the chicken is golden brown and cooked through, about 5-7 minutes. Once cooked, remove the chicken from the pan and set it aside in a large mixing bowl.
- Sauté Aromatics and Veggies: In the same skillet, if there’s any oil remaining, add a tiny bit more if needed. Reduce the heat to medium. Add the finely diced red onion and cook for about 3-4 minutes until softened and translucent. Next, add the minced garlic and cook for another minute until fragrant, being careful not to burn it. Then, add the diced red and green bell peppers. Sauté for about 3-5 minutes, just until they start to soften slightly but still retain a little bit of their crispness. We don’t want them mushy! Transfer the cooked vegetables to the bowl with the chicken.
- Prepare the Dynamite Sauce: In a separate small bowl, whisk together the mayonnaise, Sriracha sauce (remember, you can adjust this to your heat preference!), sweet chili sauce (if using), and lime juice. Taste it and adjust the seasoning if needed. I sometimes add a tiny bit more lime or Sriracha at this point. This sauce is the heart of the “dynamite” flavor, so make it just right for you!
- Combine the Filling: Pour the prepared dynamite sauce over the cooked chicken and vegetables in the large mixing bowl. Add the shredded cheddar cheese and mozzarella cheese. Toss everything gently until all the ingredients are well coated in the creamy, spicy sauce and the cheeses are evenly distributed. Finally, fold in the chopped fresh cilantro and two tablespoons of the chopped green onions. This vibrant, flavorful filling is what will make your Cheesy Dynamite Chicken Buns truly unforgettable! Set this aside to cool slightly while your dough finishes proofing.
Assembling Your Cheesy Dynamite Chicken Buns
- Prepare Your Workspace and Dough: Once your dough has doubled in size, gently punch it down to release the air. Turn the dough out onto a lightly floured surface. Using a digital kitchen scale for accuracy (this helps ensure even baking), divide the dough into 12 equal portions, each weighing approximately 55-60 grams. Roll each portion into a smooth ball. Cover the dough balls loosely with a damp cloth or plastic wrap to prevent them from drying out while you work.
- Shape and Fill the Buns: Take one dough ball at a time. On your lightly floured surface, use a rolling pin to roll it into a circle about 4-5 inches (10-12 cm) in diameter. Try to make the edges slightly thinner than the center. Place a generous tablespoon or two of the dynamite chicken filling in the center of the dough circle. Don’t overfill, or it will be difficult to seal, but don’t be shy with the filling either!
- Seal and Shape the Buns: Gather the edges of the dough up around the filling, bringing them together at the top to completely enclose the filling. Pinch the seams tightly to seal the bun. Once sealed, gently roll the bun in your hands to create a smooth, round shape. Repeat this process for all the remaining dough balls and filling.
- Arrange for Second Proofing: Lightly grease two large baking sheets or line them with parchment paper. Arrange the shaped Cheesy Dynamite Chicken Buns on the prepared baking sheets, leaving about 2-3 inches of space between each bun to allow for their second rise.
- Second Proofing: Loosely cover the baking sheets with plastic wrap or a clean kitchen towel. Place them back in a warm, draft-free spot for another 30-45 minutes, or until the buns have visibly puffed up and increased in size by about 50%. This second rise is crucial for light, fluffy buns and prevents them from being too dense. Towards the end of this proofing time, preheat your oven.
Baking Your Perfect Cheesy Dynamite Chicken Buns
- Preheat Oven: While your Cheesy Dynamite Chicken Buns are on their second proof, preheat your oven to 375°F (190°C). Make sure to place an oven rack in the middle position.
- Egg Wash and Toppings: Once the buns have sufficiently risen, gently brush the tops of each bun with the prepared egg wash (1 whisked egg with 1 tablespoon water). This will give your Cheesy Dynamite Chicken Buns a beautiful, golden-brown shine. Immediately after the egg wash, sprinkle a little bit of sesame seeds over each bun, and then, for extra cheesiness, top with a pinch of the reserved shredded cheddar or mozzarella cheese. These toppings add both visual appeal and a lovely texture.
- Bake to Golden Perfection: Carefully transfer the baking sheets to the preheated oven. Bake for 18-22 minutes, or until the Cheesy Dynamite Chicken Buns are gloriously golden brown on top and cooked through. Baking times can vary depending on your oven, so keep an eye on them! If you notice them browning too quickly, you can loosely tent them with aluminum foil for the last few minutes.
- Cool and Enjoy: Once baked, remove the Cheesy Dynamite Chicken Buns from the oven and transfer them to a wire rack to cool slightly. While they are tempting to eat immediately, letting them cool for 5-10 minutes allows the filling to set and prevents you from burning your mouth. These are absolutely best served warm, straight from the oven, when the cheese is still gooey and the chicken filling is perfectly spiced. Get ready to enjoy the most incredibly delicious, Cheesy Dynamite Chicken Buns you’ve ever tasted! They’re perfect for a snack, an appetizer, or even a light meal.
Conclusion:
And there you have it, my friends! We’ve reached the delicious culmination of our culinary journey. I truly believe that this recipe for
Cheesy Dynamite Chicken Buns is more than just a meal; it’s an experience waiting to happen in your kitchen. From the moment you taste that perfect combination of tender, savory chicken, the creamy, molten cheese, and the subtle warmth of the “dynamite” spices, all encased in a soft, fluffy bun, you’ll understand why I’m so passionate about it. It’s a guaranteed crowd-pleaser, whether you’re serving it at a bustling family dinner, a casual get-together with friends, or simply treating yourself to a truly exceptional homemade snack. The joy of pulling apart one of these delectable buns, seeing the cheese stretch, and inhaling the aromatic spices is something I truly wish for everyone to experience.
What makes these buns an absolute must-try, in my humble opinion, is their incredible balance. They’re rich without being overly heavy, flavorful without being overwhelming, and comforting in a way that just makes you feel good from the inside out. They manage to hit all the right notes – savory, a touch spicy, and undeniably cheesy – creating a symphony of flavors that will leave everyone, myself included, reaching for just one more. I’ve found that they disappear incredibly fast, so don’t be surprised if you need to double the batch next time you make them! There’s a certain magic that happens when simple ingredients come together to create something so utterly satisfying, and this recipe absolutely encapsulates that magic.
Serving Suggestions & Creative Variations: Make It Your Own!
While these
Cheesy Dynamite Chicken Buns are absolutely phenomenal on their own, fresh out of the oven, I love exploring different ways to enjoy and customize them. For serving, consider pairing them with a simple side salad dressed in a light vinaigrette to cut through the richness, or a bowl of creamy tomato soup for a truly comforting meal. They also make fantastic appetizers for game nights or parties – just arrange them artfully on a platter, perhaps with a sprinkle of fresh chopped chives or cilantro for a pop of color. Dipping sauces are also a fantastic addition; I’ve personally tried them with a cool ranch dressing, a zesty sriracha mayo, or even a sweet and spicy chili sauce, and each option adds another layer of enjoyment.
Now, let’s talk about variations – this is where you can really let your culinary creativity shine! Firstly, spice levels are completely adjustable. If you love a serious kick, feel free to amp up the amount of chili flakes or add a dash of your favorite hot sauce to the chicken mixture. For those who prefer a milder flavor, you can reduce the spice or even omit it entirely, allowing the other flavors to take center stage. Cheese is another playground for experimentation; while cheddar and mozzarella are my go-to’s, imagine the possibilities with a smoky gouda, a sharp provolone, or even a spicy pepper jack for an extra zing! You could also incorporate finely diced vegetables like bell peppers, corn, or even a handful of spinach into the chicken mixture for added nutrients and texture. For a different bun experience, consider using mini slider buns, puff pastry, or even shaping the dough into larger calzone-style pockets for a heartier meal.
Thinking outside the bun, you could even adapt the filling for other uses – stuff it into bell peppers and bake, or use it as a hearty topping for nachos. For a vegetarian twist, consider replacing the chicken with finely chopped mushrooms sautéed with smoked paprika, or a plant-based chicken alternative. The possibilities are truly endless, and that’s what makes cooking so much fun! Each time you make these, you have the opportunity to tweak them and make them perfectly suited to your palate and what you have on hand.
Your Turn to Create and Share!
Now, it’s your turn to roll up your sleeves and bring these incredible
Cheesy Dynamite Chicken Buns to life in your own kitchen! I genuinely hope you’ll give this recipe a try. I’m confident that once you experience the sheer delight of biting into one, it will quickly become a cherished favorite in your recipe collection, just as it has in mine. Don’t be intimidated; the process is straightforward, and the reward is immeasurable. The aroma filling your home as these bake is a treat in itself, a promise of the deliciousness to come.
I would absolutely love to hear about your experience! Did you stick to the original recipe, or did you put your own unique spin on it? What kind of cheese did you use? Did you add extra spice, or maybe some unexpected ingredients? Please don’t hesitate to share your thoughts, your successes, and any creative variations you came up with. I thrive on hearing about your culinary adventures, and your feedback helps not only me but also inspires other home cooks in our community. Snap a photo of your magnificent buns and tell me all about it – I can’t wait to see your creations! Happy baking, and enjoy every single dynamite bite!
Cheesy Dynamite Chicken Buns – Spicy & Delicious!
Cheesy Dynamite Chicken Buns are more than just a recipe; they are an invitation to an explosion of flavor and texture that will undoubtedly become a new favorite in your kitchen. Imagine sinking your teeth into a perfectly golden, soft bun, only to discover an exhilarating core of tender, spicy chicken generously blanketed in a molten, gooey cheese. It’s a culinary adventure that promises both comfort and an exciting kick, making every bite an unforgettable experience.
Ingredients
-
**For the Enriched Dough:**
-
3 ½ cups (420g) all-purpose flour
-
1 (7g) packet active dry yeast
-
¼ cup (50g) granulated sugar
-
1 teaspoon salt
-
1 cup (240ml) warm milk (105-115°F / 40-46°C)
-
½ cup (113g) unsalted butter, softened, cut into pieces
-
1 large egg, at room temperature
-
**For the Irresistible Dynamite Chicken Filling:**
-
1 ½ pounds boneless, skinless chicken breast or thighs, diced into ½-inch pieces
-
1 tablespoon olive oil
-
½ cup finely diced red onion
-
2 cloves garlic, minced
-
½ cup finely diced red bell pepper
-
½ cup finely diced green bell pepper
-
½ cup mayonnaise
-
¼ cup Sriracha sauce (or more, to taste)
-
1 tablespoon sweet chili sauce (optional)
-
1 tablespoon lime juice
-
1 teaspoon smoked paprika
-
½ teaspoon onion powder
-
Salt and freshly ground black pepper, to taste
-
1 cup shredded cheddar cheese
-
½ cup shredded mozzarella cheese
-
¼ cup chopped fresh cilantro
-
2 tablespoons chopped green onions
-
**For Assembling and Topping:**
-
1 large egg, whisked with 1 tablespoon water (for egg wash)
-
1 tablespoon sesame seeds
-
¼ cup shredded cheddar or mozzarella cheese
Instructions
-
Step 1
In a small bowl, combine warm milk, a pinch of sugar, and yeast. Let sit 5-10 minutes until foamy. -
Step 2
In a stand mixer bowl, whisk remaining sugar, all-purpose flour, and salt. -
Step 3
Pour the foamy yeast mixture into the dry ingredients. Add softened butter pieces and the room temperature egg. -
Step 4
Knead with a stand mixer on low-medium speed for 8-10 minutes, or by hand on a lightly floured surface for 12-15 minutes, until the dough is smooth, elastic, and slightly tacky. -
Step 5
Lightly grease a clean bowl, transfer the kneaded dough, turning once to coat. Cover and let rise in a warm, draft-free spot for 1 to 1.5 hours, or until doubled in size. -
Step 6
Heat 1 tablespoon olive oil in a large skillet over medium-high heat. Add diced chicken, season with salt, pepper, smoked paprika, and onion powder. Cook for 5-7 minutes until golden brown and cooked through. Remove chicken and set aside in a large mixing bowl. -
Step 7
In the same skillet, add red onion and cook for 3-4 minutes until softened. Add minced garlic and cook for 1 minute until fragrant. Add diced red and green bell peppers and sauté for 3-5 minutes until slightly softened. Transfer cooked vegetables to the bowl with the chicken. -
Step 8
In a separate small bowl, whisk together mayonnaise, Sriracha sauce, sweet chili sauce (if using), and lime juice. Adjust seasoning to taste. -
Step 9
Pour the prepared dynamite sauce over the cooked chicken and vegetables. Add shredded cheddar cheese and mozzarella cheese. Toss gently until well coated. Fold in chopped fresh cilantro and 2 tablespoons of chopped green onions. Set aside to cool slightly. -
Step 10
Once dough has doubled, gently punch it down. Turn onto a lightly floured surface and divide into 12 equal portions (approx. 55-60 grams each). Roll each portion into a smooth ball and cover loosely. -
Step 11
Take one dough ball, roll it into a 4-5 inch (10-12 cm) diameter circle, making edges slightly thinner. Place a generous tablespoon or two of the dynamite chicken filling in the center. -
Step 12
Gather the edges of the dough up around the filling, bringing them together at the top to completely enclose it. Pinch seams tightly to seal, then gently roll to create a smooth, round bun. Repeat for all remaining dough and filling. -
Step 13
Lightly grease two large baking sheets or line with parchment paper. Arrange shaped buns 2-3 inches apart. Loosely cover and let rise in a warm, draft-free spot for 30-45 minutes, or until visibly puffed up by about 50%. Preheat oven to 375°F (190°C) towards the end of this proofing time. -
Step 14
Gently brush the tops of the risen buns with the prepared egg wash (1 whisked egg + 1 tbsp water). Sprinkle with sesame seeds and a pinch of reserved shredded cheddar or mozzarella cheese. -
Step 15
Carefully transfer baking sheets to the preheated oven. Bake for 18-22 minutes, or until the buns are gloriously golden brown on top and cooked through. -
Step 16
Remove from oven and transfer to a wire rack to cool slightly for 5-10 minutes. Serve warm for best results, when the cheese is still gooey and the chicken filling is perfectly spiced.
Important Information
Nutrition Facts (Per Serving)
It is important to consider this information as approximate and not to use it as definitive health advice.
Allergy Information
Please check ingredients for potential allergens and consult a health professional if in doubt.

Leave a Comment