
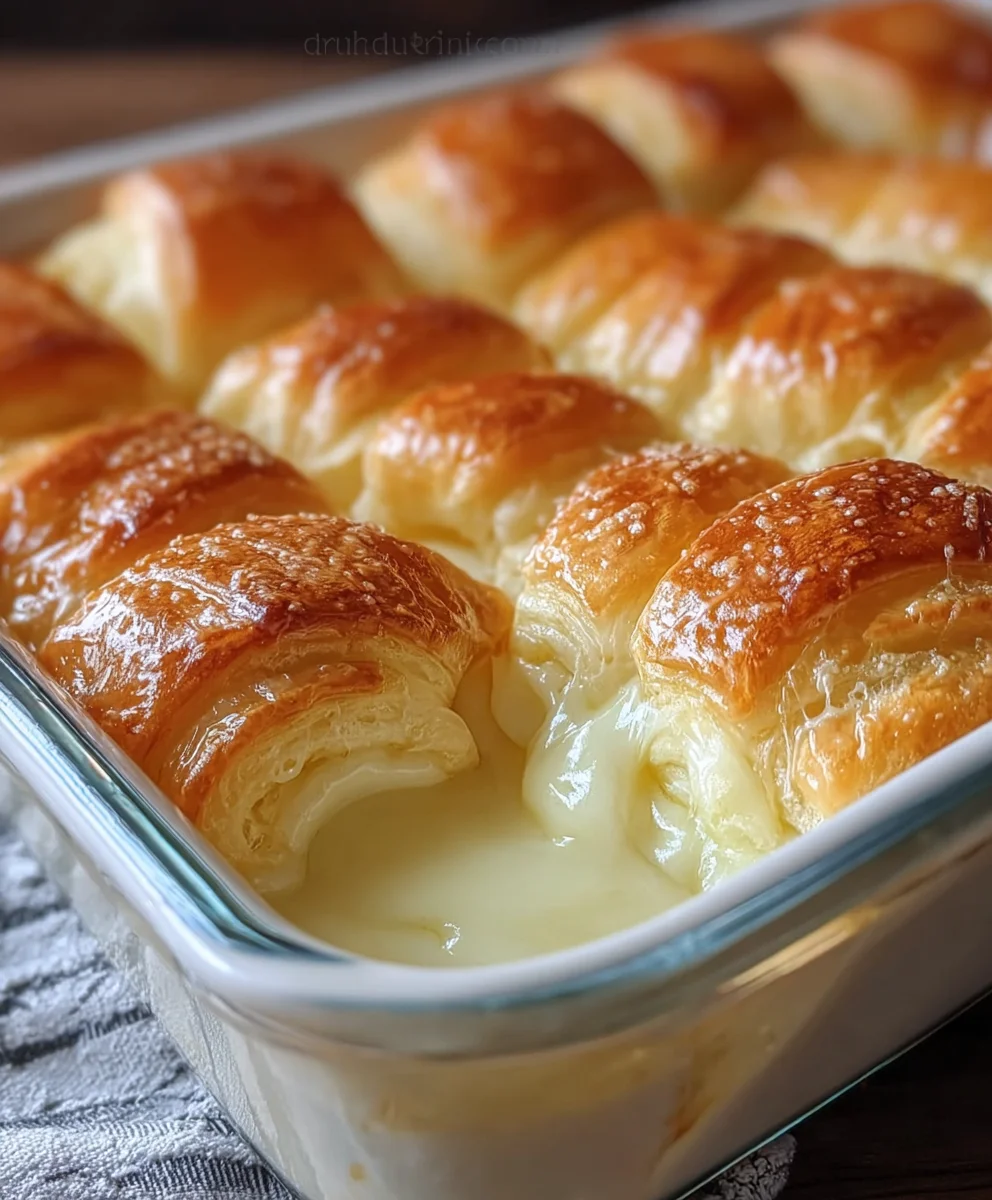
Cheesecake Crescent Rolls Casserole Recipe – just hearing those words evokes a sense of indulgent comfort, doesn’t it? Imagine a dish that perfectly marries the flaky, buttery goodness of crescent rolls with the creamy, tangy sweetness of cheesecake, all baked into a wonderfully golden casserole. It’s an irresistible combination that promises to be a showstopper at any brunch or dessert table. As your guide, I’m thrilled to share this delightful creation with you.
While this specific Cheesecake Crescent Rolls Casserole Recipe isn’t centuries old, it represents a delightful fusion of beloved culinary traditions. Crescent rolls, with their rich Austrian origins (think kipferl), have long been a staple in American baking, symbolizing warmth and home. Cheesecake, a dessert with roots stretching back to ancient Greece, has evolved into a universal symbol of decadence. This recipe brilliantly brings these two comforting worlds together, creating a modern classic that feels both familiar and excitingly new.
Why This Casserole Becomes an Instant Favorite
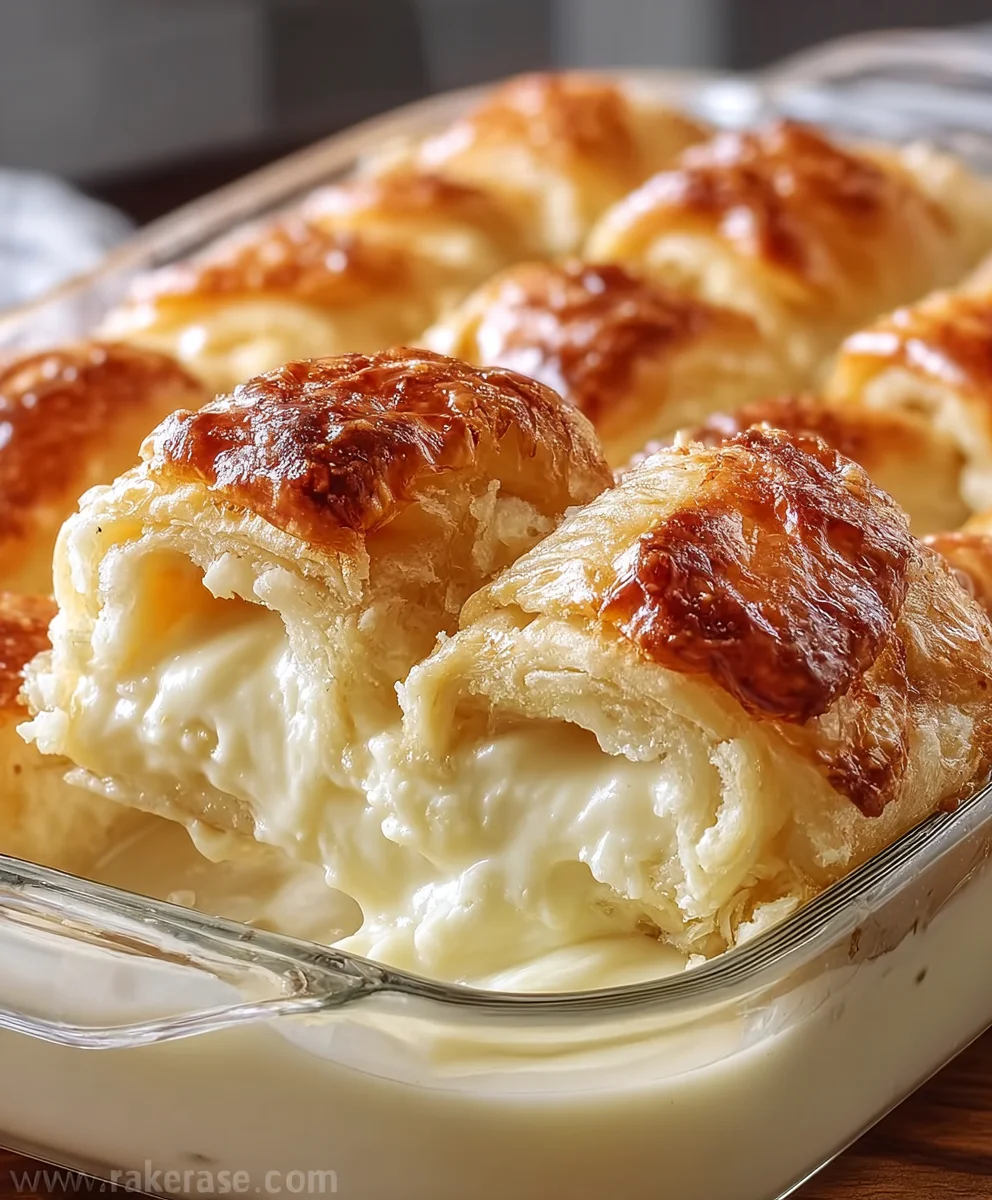
People adore this dish for countless reasons. The textural contrast is simply divine – a delicate, slightly crisp exterior giving way to a soft, fluffy crescent interior, all enveloping a smooth, rich cheesecake filling. It’s incredibly versatile, perfect for a special breakfast, a delightful dessert, or even a comforting snack. Furthermore, its relatively straightforward preparation belies its impressive appearance and taste, making it a fantastic option for busy home cooks who want to create something truly memorable without spending hours in the kitchen. The convenience of using readily available crescent dough combined with the allure of a homemade cheesecake flavor is what truly makes this particular Cheesecake Crescent Rolls Casserole Recipe a standout favorite among all who try it.

Ingredients:
- For the Cheesecake Filling:
- 2 (8-ounce) packages full-fat cream cheese, softened to room temperature. Using full-fat cream cheese is absolutely essential for that rich, creamy texture we’re aiming for in this Cheesecake Crescent Rolls Casserole Recipe. Make sure it’s properly softened to avoid any lumps in your filling – I usually leave mine out on the counter for at least an hour or two.
- 1/2 cup granulated sugar. This adds just the right amount of sweetness to complement the slight tanginess of the cream cheese, creating a balanced flavor profile that’s not overly sweet.
- 1 large egg. The egg acts as a crucial binder, helping the cheesecake filling set beautifully and giving it that classic smooth, custardy texture once baked.
- 1 teaspoon pure vanilla extract. A good quality vanilla extract really elevates the flavor profile, adding warmth, depth, and that familiar comforting aroma to our delicious casserole. Don’t skimp on this!
- 1/4 teaspoon salt. Just a tiny pinch of salt works wonders to balance the sweetness and enhance all the other flavors, making the cheesecake taste even richer and more complex.
- For the Crescent Rolls Base:
- 2 (8-ounce) cans refrigerated crescent roll dough. We’ll be using these convenient rolls to form both the flaky, golden bottom and top layers of our scrumptious Cheesecake Crescent Rolls Casserole. Opt for the classic variety for the best results, as they unroll and separate easily.
- 4 tablespoons unsalted butter, melted. This melted butter will be gently brushed over the top layer of crescent rolls, giving them a beautiful golden-brown crust and infusing them with a wonderfully rich, buttery flavor that pairs perfectly with the sweet filling.
- For the Optional Glaze/Topping:
- 1/2 cup powdered sugar (confectioners’ sugar). For a simple, sweet, and elegant drizzle that adds a lovely finishing touch and an extra layer of sweetness.
- 1-2 tablespoons milk (dairy or non-dairy). To achieve the perfect pourable consistency for our glaze – start with one tablespoon and add more incrementally until it’s just right.
- 1/2 teaspoon pure vanilla extract (optional). A little extra vanilla never hurt anyone! It enhances the overall flavor of the glaze and ties it beautifully with the casserole itself.
- Fresh berries (strawberries, blueberries, raspberries) or a dusting of powdered sugar for serving. These additions are fantastic for both presentation and adding a burst of fresh, contrasting flavor and color, completing your Cheesecake Crescent Rolls Casserole experience.
Preparation Phase: Gathering and Initial Steps
- Preheat Your Oven and Prepare Your Baking Dish: First things first, let’s get that oven ready! I always recommend preheating your oven to 350°F (175°C) well in advance. This ensures a consistent temperature throughout the baking process, which is key for even cooking. While the oven warms up, grab a 9×13-inch baking dish. You’ll want to lightly grease it with cooking spray or a pat of butter. This step is super important to prevent the crescent roll dough from sticking, making serving a breeze later on. A little non-stick effort goes a long way!
- Prepare the First Layer of Crescent Rolls: Now, let’s get those crescent rolls ready. Carefully unroll one can of the refrigerated crescent roll dough. Don’t separate the individual triangles just yet! Instead, you’re going to lay the entire sheet of dough flat into the bottom of your prepared 9×13-inch baking dish. Gently press the seams together to form a solid, continuous bottom crust. You might need to stretch it slightly to cover the whole bottom of the dish evenly. The goal here is to create a seamless base for our luscious cheesecake filling, so take your time pressing those seams. This foundational layer is crucial for the structural integrity of our wonderful Cheesecake Crescent Rolls Casserole Recipe.
Crafting the Irresistible Cheesecake Filling
- Combine Cream Cheese and Sugar: In a large mixing bowl, either with a stand mixer fitted with the paddle attachment or using an electric hand mixer, combine your softened full-fat cream cheese and the granulated sugar. Begin mixing on low speed, gradually increasing to medium speed. You want to beat this mixture until it’s wonderfully light, fluffy, and completely smooth. This usually takes about 2-3 minutes. Make sure there are absolutely no lumps of cream cheese left – a smooth start is essential for a velvety smooth filling. Scrape down the sides of the bowl often to ensure everything is incorporated evenly. This aeration also contributes to the light texture of the cheesecake.
- Incorporate the Egg and Flavorings: Once your cream cheese and sugar mixture is perfectly smooth and creamy, it’s time to add the egg, vanilla extract, and that tiny pinch of salt. Add the egg first, beating on low speed until it is just combined. Overmixing after the egg is added can sometimes lead to cracks in the finished cheesecake, so be gentle here. Then, stir in the pure vanilla extract and salt. Continue to mix on low speed, just until everything is fully incorporated and the mixture is uniform. You should now have a heavenly, velvety smooth cheesecake filling that smells absolutely divine, ready to be spread over our crescent roll base. This filling is truly the star of our “Cheesecake Crescent Rolls Casserole Recipe”!
- Spread the Filling Evenly: With your beautiful cheesecake filling ready, carefully spoon it over the crescent roll dough that you’ve already laid in your baking dish. Use an offset spatula or the back of a spoon to gently spread the filling out to the edges, ensuring an even layer across the entire surface. This even distribution is important for consistent baking and for every bite to have that perfect balance of dough and creamy filling. Make sure not to disturb the bottom crescent roll layer too much as you spread.
Assembling Your Cheesecake Crescent Rolls Casserole
- Prepare the Top Layer of Crescent Rolls: Now for the second can of crescent roll dough! Unroll this can, just as you did the first. However, this time, instead of placing it as a whole sheet, you’re going to gently separate the individual crescent triangles. Once separated, arrange these triangles over the cheesecake filling. You’ll want to overlap them slightly, creating a lattice-like pattern or simply covering the entire surface of the cheesecake filling. The goal is to fully enclose the filling, so aim for good coverage. Don’t worry if it’s not perfectly uniform; the beauty of this casserole is its rustic charm.
- Brush with Melted Butter: Once your top layer of crescent roll triangles is in place, it’s time for the melted butter. Take your 4 tablespoons of melted unsalted butter and, using a pastry brush, gently brush it evenly over the entire top surface of the crescent rolls. This step is incredibly important for several reasons: it helps the crescent rolls achieve that gorgeous golden-brown color during baking, it adds a delicious rich, buttery flavor, and it contributes to that irresistible flakiness. Don’t skip this – it truly elevates the final texture and taste of your Cheesecake Crescent Rolls Casserole.
The Baking Journey: Achieving Golden Perfection
- Bake Until Golden Brown: Carefully place your assembled baking dish into your preheated 350°F (175°C) oven. The baking time will typically be between 30 to 35 minutes. You’ll know your “Cheesecake Crescent Rolls Casserole” is perfectly baked when the top crescent roll layer turns a beautiful, inviting golden brown. The cheesecake filling beneath should also be set, though it might have a slight jiggle in the very center when gently shaken – this is normal and indicates it’s cooked through but still moist and creamy. Keep an eye on it towards the end of the baking time, as oven temperatures can vary. If you notice the top browning too quickly, you can loosely tent it with aluminum foil for the last 10-15 minutes of baking.
- Cooling is Crucial: Once your casserole emerges from the oven, looking absolutely magnificent and smelling incredible, it’s vital to let it cool properly. First, allow it to cool on a wire rack at room temperature for at least 30 minutes to an hour. During this initial cooling phase, the cheesecake filling will continue to set and solidify further. After it has cooled to room temperature, cover the baking dish loosely with plastic wrap or aluminum foil and transfer it to the refrigerator. It needs to chill for a minimum of 2-3 hours, but ideally, I recommend chilling it for at least 4 hours, or even overnight. This extended chilling time is paramount for the cheesecake filling to fully firm up, allowing for clean, neat slices and the best possible texture. Patience truly is a virtue here, and it makes all the difference for the ultimate enjoyment of this Cheesecake Crescent Rolls Casserole Recipe.
The Grand Finale: Whipped Topping and Serving Suggestions
- Prepare the Optional Glaze (If Using): If you’ve decided to add a sweet glaze – which I highly recommend for an extra touch of decadence – now is the time to prepare it. In a small bowl, whisk together the powdered sugar, 1 tablespoon of milk, and the optional 1/2 teaspoon of vanilla extract. Start with just 1 tablespoon of milk, mixing until smooth. If the glaze is too thick to drizzle, add the remaining milk a tiny bit at a time (about a teaspoon at a time) until you reach your desired consistency. You want it to be thick enough to cling to the spoon but thin enough to drizzle beautifully.
- Drizzle and Garnish: Once your Cheesecake Crescent Rolls Casserole is thoroughly chilled and firm, remove it from the refrigerator. If you made the glaze, use a spoon or a whisk to drizzle it artfully over the top of the cooled casserole. For an even fancier presentation, you could transfer the glaze to a small piping bag or a Ziploc bag with a corner snipped off for more controlled lines. Finally, for an extra burst of freshness and color, garnish with fresh berries like sliced strawberries, plump blueberries, or vibrant raspberries. A simple dusting of powdered sugar directly over the top is also a beautiful and easy finishing touch.
- Serve and Enjoy: Now for the best part – serving! Cut the chilled casserole into squares or rectangles. Because it’s been properly chilled, your slices should hold their shape wonderfully, showcasing the distinct layers of flaky crescent roll and creamy cheesecake. Serve immediately and watch how quickly this delightful “Cheesecake Crescent Rolls Casserole Recipe” disappears! This dish is perfect for breakfast, brunch, dessert, or as a delightful snack any time of day. It’s a guaranteed crowd-pleaser and truly satisfies that craving for something sweet, creamy, and wonderfully comforting. Leftovers, if there are any, can be stored in an airtight container in the refrigerator for up to 3-4 days, though I doubt they’ll last that long! Enjoy every single bite of this scrumptious creation!
<h2>Conclusion:</h2>
<p>As we reach the sweet end of our culinary journey, I truly hope you’re feeling as excited as I am about trying this incredible creation. There’s something uniquely magical about a dish that effortlessly marries comfort with decadence, and this recipe truly does just that. We’ve explored every delicious corner of this delightful bake, from its surprisingly simple assembly to the heavenly aromas that will undoubtedly fill your kitchen. <strong>It’s more than just a dessert; it’s an experience, a moment of pure bliss wrapped in flaky, golden crescent rolls and a luscious, creamy cheesecake filling.</strong> The combination of textures—the tender, buttery pastry giving way to the smooth, rich cheesecake—is simply irresistible. This isn’t just another item to add to your baking list; it’s an absolute must-try that promises to delight your taste buds and impress anyone lucky enough to share it with you.</p>
<p>What makes this particular dish stand out, you ask? It’s the ingenious fusion of two beloved classics into one cohesive, comforting casserole. Forget complicated steps or hours of slaving away in the kitchen; this recipe delivers maximum flavor with minimal effort, making it perfect for both seasoned bakers and complete novices. Imagine the joy of pulling a golden-brown casserole from the oven, its surface glistening with a hint of sweetness, the warm, sweet scent of vanilla and cream cheese perfuming the air. Whether you’re looking for a show-stopping brunch item, a comforting dessert after a family dinner, or simply a delightful treat to brighten your afternoon, this <strong>Cheesecake Crescent Rolls Casserole Recipe</strong> is your answer. It’s truly a testament to how simple ingredients can come together to create something truly extraordinary and memorable. I guarantee that once you taste it, you’ll understand exactly why I’m so passionate about sharing it with you. The balance of sweetness is spot on, ensuring it’s rich without being cloying, and utterly satisfying to the very last bite.</p>
<h4>Serving Suggestions & Creative Variations to Elevate Your Experience</h4>
<p>Now, let’s talk about how to truly make this recipe your own and present it beautifully. While absolutely sublime on its own, this casserole is also wonderfully versatile when it comes to serving. For a decadent breakfast or brunch, consider serving warm slices alongside a freshly brewed cup of coffee or a tall glass of cold milk. A side of fresh berries—strawberries, blueberries, or raspberries—adds a lovely tart contrast and a burst of vibrant color. If you’re offering it as a dessert, elevate it further with a scoop of vanilla bean ice cream, a dollop of freshly whipped cream, or a drizzle of your favorite fruit sauce. A light dusting of powdered sugar or a sprinkle of cinnamon can also add a simple yet elegant finish. <strong>Don’t underestimate the power of a warm, comforting slice paired with a simple hot beverage on a chilly evening.</strong></p>
<p>But don’t stop there! The beauty of this casserole lies in its adaptability. For a seasonal twist, try adding a tablespoon of pumpkin pie spice to the cream cheese filling in the fall, or a sprinkle of lemon zest for a brighter, spring-like flavor. You could also experiment with different fruit fillings; instead of just plain cream cheese, spread a thin layer of cherry pie filling or apple butter over the crescent dough before adding the cream cheese mixture. For an extra layer of texture, consider adding a crunchy streusel topping made from butter, flour, sugar, and cinnamon. Or, mix in some mini chocolate chips or chopped nuts (like pecans or walnuts) into the cream cheese filling for an added surprise. <strong>Each of these variations offers a unique spin on the classic, allowing you to tailor the casserole to your specific tastes or the occasion.</strong> Imagine a warm slice, adorned with a swirl of chocolate sauce and a sprinkle of toasted almonds – truly divine! The possibilities are truly endless, limited only by your imagination and what delights your palate most.</p>
<h4>Your Turn: Bake, Share, & Inspire!</h4>
<p>So, what are you waiting for? This is your invitation to step into the kitchen and create something truly special. I genuinely encourage you to give this recipe a try; I promise it’s much simpler than it looks and infinitely rewarding. There’s a unique joy that comes from baking, especially when the results are this spectacular. <strong>The aroma alone is enough to bring smiles to faces, even before the first bite!</strong> Once you’ve pulled your masterpiece from the oven and experienced its deliciousness firsthand, I would absolutely love to hear about it! Please don’t hesitate to share your experiences, your successes, and even your creative variations in the comments section below. Did you add a special topping? Serve it with a unique accompaniment? Your insights and photos inspire not just me, but our entire community of food lovers. Let’s celebrate the magic of homemade treats together. Happy baking, my friends, and may your kitchen be filled with the wonderful aroma of your very own <strong>Cheesecake Crescent Rolls Casserole Recipe</strong>!</p>
Cheesecake Crescent Rolls Casserole – Quick Dessert Idea!
Indulge in the perfect combination of flaky, buttery crescent rolls and creamy cheesecake filling with this Cheesecake Crescent Rolls Casserole! Layers of soft crescent rolls are filled with a luscious cream cheese mixture and topped with a crunchy cinnamon-sugar crust, making this casserole the ultimate treat for breakfast or dessert. Whether you’re serving it for a cozy brunch or a sweet evening snack, this casserole is sure to be a hit with family and friends. It’s incredibly easy to make and will have everyone asking for seconds!
Ingredients
-
2 (8-ounce) packages full-fat cream cheese, softened
-
1 cup granulated sugar
-
1 large egg
-
1 tsp pure vanilla extract
-
1/4 tsp salt
-
2 (8-ounce) cans refrigerated crescent roll dough
-
4 tbsp unsalted butter, melted
-
1/2 cup powdered sugar
-
1-2 tbsp milk
-
1/2 tsp pure vanilla extract (optional)
-
Fresh berries or powdered sugar, for serving (optional)
Instructions
-
Step 1
Preheat oven to 350°F (175°C). Lightly grease a 9×13-inch baking dish. -
Step 2
Unroll one can of crescent roll dough; press the entire sheet into the bottom of the prepared dish, sealing seams to form a solid crust. -
Step 3
In a large bowl, beat softened cream cheese with 1 cup granulated sugar and 1 tsp pure vanilla extract until smooth and creamy. Beat in 1 large egg and 1/4 tsp salt until just combined. -
Step 4
Evenly spread the cheesecake filling over the bottom crescent roll layer. -
Step 5
Unroll the second can of crescent roll dough and separate triangles. Arrange triangles over the cheesecake filling, overlapping to cover. -
Step 6
Brush the top layer of crescent rolls with 4 tablespoons of melted unsalted butter. -
Step 7
Bake for 30-35 minutes, or until the top is golden brown and the cheesecake filling is set. -
Step 8
Let cool on a wire rack for 30-60 minutes, then cover and refrigerate for at least 2-4 hours, or preferably overnight, until thoroughly chilled. -
Step 9
If using, prepare the glaze: In a small bowl, whisk together 1/2 cup powdered sugar, 1-2 tablespoons milk, and 1/2 tsp vanilla extract (optional) until smooth and drizzly. -
Step 10
Drizzle the glaze over the chilled casserole. Garnish with fresh berries or a dusting of powdered sugar. -
Step 11
Cut into squares and serve. Store leftovers in an airtight container in the refrigerator for up to 3-4 days.
Important Information
Nutrition Facts (Per Serving)
It is important to consider this information as approximate and not to use it as definitive health advice.
Allergy Information
Please check ingredients for potential allergens and consult a health professional if in doubt.

Leave a Comment