
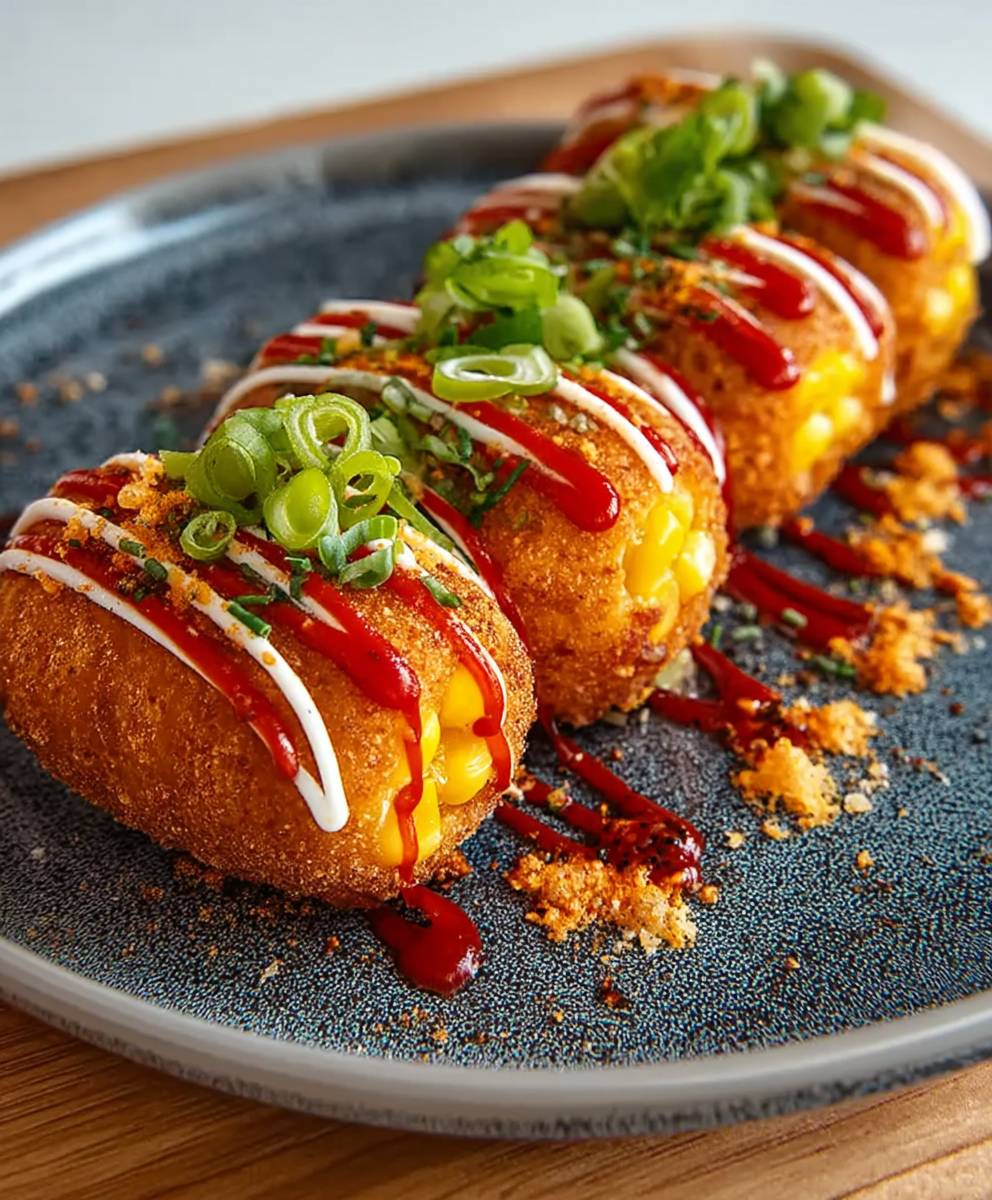
Cheese Korean Corn Dogs: Prepare to embark on a culinary adventure that will redefine your perception of the humble corn dog! Forget the ballpark version you know; we’re diving headfirst into the wildly popular Korean street food sensation that’s taking the world by storm. Imagine a crispy, golden-brown exterior giving way to a stretchy, melty cheese pull that seems to go on forever. Intrigued? You should be!
Korean corn dogs, or “gamja hot dogs” as they’re sometimes called, have their roots in South Korea’s vibrant street food culture. While the exact origins are debated, they gained immense popularity in the early 2000s and have since become a beloved staple. What sets them apart from their American counterparts is the unique batter, often incorporating rice flour for an extra crispy texture, and the exciting array of toppings. Think panko breadcrumbs, potato cubes, ramen noodles, and a generous dusting of sugar yes, sugar! It might sound unconventional, but trust me, the sweet and savory combination is absolutely addictive.
People adore Cheese Korean Corn Dogs for their playful textures and explosive flavors. The contrast between the crunchy coating, the soft, yielding cheese, and the optional savory sausage is simply irresistible. Plus, they’re incredibly customizable! Whether you’re a fan of spicy gochujang sauce, tangy mustard, or a simple drizzle of ketchup, you can tailor your corn dog to your exact preferences. And let’s be honest, who can resist that iconic cheese pull? It’s a guaranteed Instagram moment and a surefire way to brighten anyone’s day. So, are you ready to ditch the ordinary and embrace the extraordinary? Let’s get cooking!

Ingredients:
- For the Dough:
- 1 cup all-purpose flour
- 1/4 cup granulated sugar
- 1 teaspoon baking powder
- 1/2 teaspoon salt
- 1 large egg
- 3/4 cup milk
- 1 tablespoon vegetable oil
- For the Filling:
- 6 hot dogs, cut in half (or use mini hot dogs)
- 6 mozzarella cheese sticks, cut in half (or use cheese cubes)
- For the Coating:
- 1 cup panko breadcrumbs
- 1/4 cup granulated sugar
- Vegetable oil, for deep frying
- Optional Toppings:
- Ketchup
- Mustard
- Mayonnaise
- Sugar
- Potato cubes (frozen, small diced)
- Spicy mayo (mayonnaise mixed with sriracha)
- Equipment:
- Wooden skewers
- Tall glass or jar
- Deep fryer or large pot
- Thermometer (optional, but recommended)
Preparing the Dough
Okay, let’s get started with the dough! This is the foundation of our Korean corn dogs, and it’s surprisingly easy to make. I promise, you’ll be surprised how simple it is!
- Combine Dry Ingredients: In a medium-sized bowl, whisk together the flour, sugar, baking powder, and salt. Make sure everything is well combined so that the baking powder is evenly distributed. This will help your corn dogs rise nicely and have a light, airy texture.
- Add Wet Ingredients: In a separate bowl, whisk together the egg, milk, and vegetable oil. Whisk until the egg is fully incorporated and the mixture is smooth.
- Combine Wet and Dry: Pour the wet ingredients into the bowl with the dry ingredients. Gently whisk until just combined. Be careful not to overmix! Overmixing can develop the gluten in the flour, resulting in a tough corn dog. A few lumps are okay. The batter should be smooth but slightly thick, similar to pancake batter.
- Rest the Batter: Cover the bowl with plastic wrap and let the batter rest for at least 15 minutes at room temperature. This allows the gluten to relax, resulting in a more tender corn dog. While the batter rests, you can prepare the hot dogs and cheese.
- Prepare the Glass: Pour the batter into a tall glass or jar. This will make it easier to dip the hot dogs and cheese evenly. The glass should be tall enough to fully submerge the hot dog and cheese. If you don’t have a tall glass, you can use a wide-mouthed jar or even a measuring cup.
Preparing the Hot Dogs and Cheese
Now, let’s get our fillings ready! This is where you can get creative. I’m using hot dogs and mozzarella cheese, but feel free to experiment with other types of cheese or even sausages.
- Cut the Hot Dogs and Cheese: If you’re using full-sized hot dogs and mozzarella sticks, cut them in half. This will make them easier to handle and cook evenly. If you’re using mini hot dogs or cheese cubes, you can skip this step.
- Skewer the Hot Dogs and Cheese: Thread a hot dog piece and a cheese piece onto each wooden skewer. You can alternate the hot dog and cheese, or you can put them side by side. Make sure the skewer goes through the center of the hot dog and cheese to prevent them from falling off during cooking. Leave enough skewer exposed at the bottom to hold onto while dipping and frying.
- Optional: Pat Dry: Gently pat the hot dogs and cheese with a paper towel to remove any excess moisture. This will help the batter adhere better.
Coating and Frying
Alright, the moment we’ve been waiting for! This is where the magic happens. We’re going to coat our hot dogs and cheese in batter and then fry them to golden perfection.
- Prepare the Coating: In a shallow dish, combine the panko breadcrumbs and sugar. Mix well. The sugar adds a touch of sweetness and helps the breadcrumbs caramelize nicely.
- Heat the Oil: Pour enough vegetable oil into a deep fryer or large pot to reach a depth of about 3-4 inches. Heat the oil to 350°F (175°C). Use a thermometer to monitor the temperature. If you don’t have a thermometer, you can test the oil by dropping a small piece of breadcrumb into it. If the breadcrumb sizzles and turns golden brown in about 15-20 seconds, the oil is ready. Be careful not to overheat the oil, as it can catch fire.
- Dip in Batter: Take one skewered hot dog and cheese and dip it into the glass of batter. Rotate the skewer to ensure the entire hot dog and cheese are evenly coated. Let any excess batter drip off.
- Coat in Breadcrumbs: Immediately after dipping in the batter, roll the battered hot dog and cheese in the panko breadcrumb mixture. Press gently to ensure the breadcrumbs adhere well. Make sure the entire surface is covered in breadcrumbs.
- Fry the Corn Dogs: Carefully lower the coated corn dog into the hot oil. Fry for 2-3 minutes, or until golden brown and crispy. Turn the corn dog occasionally to ensure even cooking. Do not overcrowd the fryer, as this will lower the oil temperature and result in soggy corn dogs. Fry in batches of 2-3 at a time.
- Remove and Drain: Once the corn dog is golden brown, remove it from the oil with a slotted spoon or tongs. Place it on a wire rack lined with paper towels to drain any excess oil.
- Repeat: Repeat the dipping, coating, and frying process with the remaining hot dogs and cheese.
Adding Potato Cubes (Optional)
This step is optional, but it adds a fantastic textural element to your Korean corn dogs! The crispy potato cubes are a delightful contrast to the soft dough and melty cheese.
- Par-fry the Corn Dog: Follow steps 1-5 from the “Coating and Frying” section, but only fry the corn dog for about 1 minute, just enough to set the batter slightly. Remove from the oil and let it cool for a moment.
- Adhere the Potatoes: While the batter is still slightly tacky, roll the corn dog in the frozen, small diced potato cubes. Press gently to ensure they stick to the batter. You can even use your hands to press the potatoes onto any bare spots.
- Final Fry: Return the potato-coated corn dog to the hot oil and fry for another 2-3 minutes, or until the potatoes are golden brown and crispy and the corn dog is cooked through.
- Remove and Drain: Remove the corn dog from the oil and place it on a wire rack lined with paper towels to drain.
Serving and Enjoying
Finally, the best part! It’s time to serve and enjoy your homemade Korean corn dogs. Get creative with your toppings and have fun!
- Add Toppings: Drizzle your corn dogs with your favorite toppings, such as ketchup, mustard, mayonnaise, sugar, or spicy mayo. You can also sprinkle them with sesame seeds or chopped green onions.
- Serve Immediately: Korean corn dogs are best served hot and fresh. The cheese will be melty and the dough will be crispy.
- Enjoy!: Take a bite and savor the delicious combination of flavors and textures. The sweet and savory dough, the melty cheese, and the crispy breadcrumbs are a match made in heaven.
Tips for Success:
- Oil Temperature: Maintaining the correct oil temperature is crucial for achieving crispy, golden brown corn dogs. Use a thermometer to monitor the temperature and adjust the heat as needed.
- Don’t Overcrowd: Avoid overcrowding the fryer, as this will lower the oil temperature and result in soggy corn dogs. Fry in batches of 2-3 at a time.
- Rest the Batter: Resting the batter allows the gluten to relax, resulting in a more tender corn dog. Don’t skip this step!
- Get Creative with Fillings: Feel free to experiment with different types of cheese, sausages, or even vegetables.
- Have Fun!:
Conclusion:
And there you have it! These Cheese Korean Corn Dogs are more than just a snack; they’re an experience. I truly believe this recipe is a must-try for anyone looking to add a little fun and a whole lot of flavor to their culinary repertoire. The combination of the crispy, slightly sweet batter, the melty, stretchy cheese, and that satisfying crunch from the panko breadcrumbs is simply irresistible. It’s a guaranteed crowd-pleaser, whether you’re hosting a casual get-together, looking for a fun family activity, or just craving something deliciously different.
But what truly sets these apart is the versatility. While I’ve outlined my favorite way to make them, don’t be afraid to experiment and make them your own!
Serving Suggestions and Variations
Think beyond just ketchup and mustard (though those are classics for a reason!). For a Korean-inspired twist, try drizzling them with gochujang mayo or a sprinkle of sesame seeds and a dash of furikake. Honey mustard is another fantastic option that complements the sweetness of the batter beautifully.
Want to kick up the heat? Add a pinch of cayenne pepper to the batter or use a spicy cheese like pepper jack. For a vegetarian version, you can easily substitute the mozzarella with plant-based cheese alternatives. Just be sure to choose one that melts well for that signature cheese pull!
And don’t forget about the toppings! While panko breadcrumbs are the traditional choice, you can also use crushed ramen noodles for an extra layer of texture and flavor. Or, for a sweeter treat, try rolling them in sugar after frying. The possibilities are endless!
These Cheese Korean Corn Dogs are also incredibly adaptable to different dietary needs. You can easily make them gluten-free by using a gluten-free flour blend for the batter and gluten-free panko breadcrumbs. Just be sure to check the labels of all your ingredients to ensure they are gluten-free.
I also find that these are best served immediately after frying, when the cheese is at its melty peak and the batter is at its crispiest. However, if you do have leftovers, you can store them in an airtight container in the refrigerator for up to two days. To reheat, I recommend baking them in a preheated oven at 350°F (175°C) for about 10-15 minutes, or until heated through. You can also reheat them in an air fryer for a similar result. Avoid microwaving them, as this can make the batter soggy.
Time to Get Cooking!
I’m so excited for you to try this recipe and experience the joy of making your own Cheese Korean Corn Dogs. It’s a fun and rewarding process, and I guarantee you’ll be amazed at how delicious they turn out.
So, gather your ingredients, put on your apron, and get ready to create some culinary magic! And most importantly, don’t forget to have fun! Cooking should be an enjoyable experience, so relax, experiment, and let your creativity shine.
Once you’ve made your own batch of these amazing Cheese Korean Corn Dogs, I would absolutely love to hear about your experience! Share your photos, your variations, and your thoughts in the comments below. Did you try a different cheese? Did you add a unique topping? I’m always looking for new and exciting ways to elevate this recipe, and your feedback is invaluable. Happy cooking!
Cheese Korean Corn Dogs: The Ultimate Guide to Making Them at Home
Crispy, sweet, and savory Korean corn dogs! Hot dogs and mozzarella cheese are skewered, dipped in a sweet batter, coated in panko breadcrumbs (or potato cubes!), and deep-fried to golden perfection.
Ingredients
- 1 cup all-purpose flour
- 1/4 cup granulated sugar
- 1 teaspoon baking powder
- 1/2 teaspoon salt
- 1 large egg
- 3/4 cup milk
- 1 tablespoon vegetable oil
- 6 hot dogs, cut in half (or use mini hot dogs)
- 6 mozzarella cheese sticks, cut in half (or use cheese cubes)
- 1 cup panko breadcrumbs
- 1/4 cup granulated sugar
- Vegetable oil, for deep frying
- Ketchup
- Mustard
- Mayonnaise
- Sugar
- Potato cubes (frozen, small diced)
- Spicy mayo (mayonnaise mixed with sriracha)
Instructions
- In a medium-sized bowl, whisk together the flour, sugar, baking powder, and salt.
- In a separate bowl, whisk together the egg, milk, and vegetable oil.
- Pour the wet ingredients into the bowl with the dry ingredients. Gently whisk until just combined. Be careful not to overmix! A few lumps are okay. The batter should be smooth but slightly thick, similar to pancake batter.
- Cover the bowl with plastic wrap and let the batter rest for at least 15 minutes at room temperature.
- Pour the batter into a tall glass or jar.
- If you’re using full-sized hot dogs and mozzarella sticks, cut them in half. If you’re using mini hot dogs or cheese cubes, you can skip this step.
- Thread a hot dog piece and a cheese piece onto each wooden skewer.
- Gently pat the hot dogs and cheese with a paper towel to remove any excess moisture.
- In a shallow dish, combine the panko breadcrumbs and sugar. Mix well.
- Pour enough vegetable oil into a deep fryer or large pot to reach a depth of about 3-4 inches. Heat the oil to 350°F (175°C).
- Take one skewered hot dog and cheese and dip it into the glass of batter. Rotate the skewer to ensure the entire hot dog and cheese are evenly coated. Let any excess batter drip off.
- Immediately after dipping in the batter, roll the battered hot dog and cheese in the panko breadcrumb mixture. Press gently to ensure the breadcrumbs adhere well.
- Carefully lower the coated corn dog into the hot oil. Fry for 2-3 minutes, or until golden brown and crispy. Turn the corn dog occasionally to ensure even cooking. Do not overcrowd the fryer.
- Once the corn dog is golden brown, remove it from the oil with a slotted spoon or tongs. Place it on a wire rack lined with paper towels to drain any excess oil.
- Repeat the dipping, coating, and frying process with the remaining hot dogs and cheese.
- Follow steps 1-5 from the “Coating and Frying” section, but only fry the corn dog for about 1 minute, just enough to set the batter slightly. Remove from the oil and let it cool for a moment.
- While the batter is still slightly tacky, roll the corn dog in the frozen, small diced potato cubes. Press gently to ensure they stick to the batter. You can even use your hands to press the potatoes onto any bare spots.
- Return the potato-coated corn dog to the hot oil and fry for another 2-3 minutes, or until the potatoes are golden brown and crispy and the corn dog is cooked through.
- Remove the corn dog from the oil and place it on a wire rack lined with paper towels to drain.
- Drizzle your corn dogs with your favorite toppings, such as ketchup, mustard, mayonnaise, sugar, or spicy mayo. You can also sprinkle them with sesame seeds or chopped green onions.
- Korean corn dogs are best served hot and fresh.
- Enjoy!
Notes
- Maintaining the correct oil temperature is crucial for achieving crispy, golden brown corn dogs. Use a thermometer to monitor the temperature and adjust the heat as needed.
- Avoid overcrowding the fryer, as this will lower the oil temperature and result in soggy corn dogs. Fry in batches of 2-3 at a time.
- Resting the batter allows the gluten to relax, resulting in a more tender corn dog. Don’t skip this step!
- Get creative with fillings! Feel free to experiment with different types of cheese, sausages, or even vegetables.
- Be careful not to overheat the oil, as it can catch fire.


Leave a Comment