
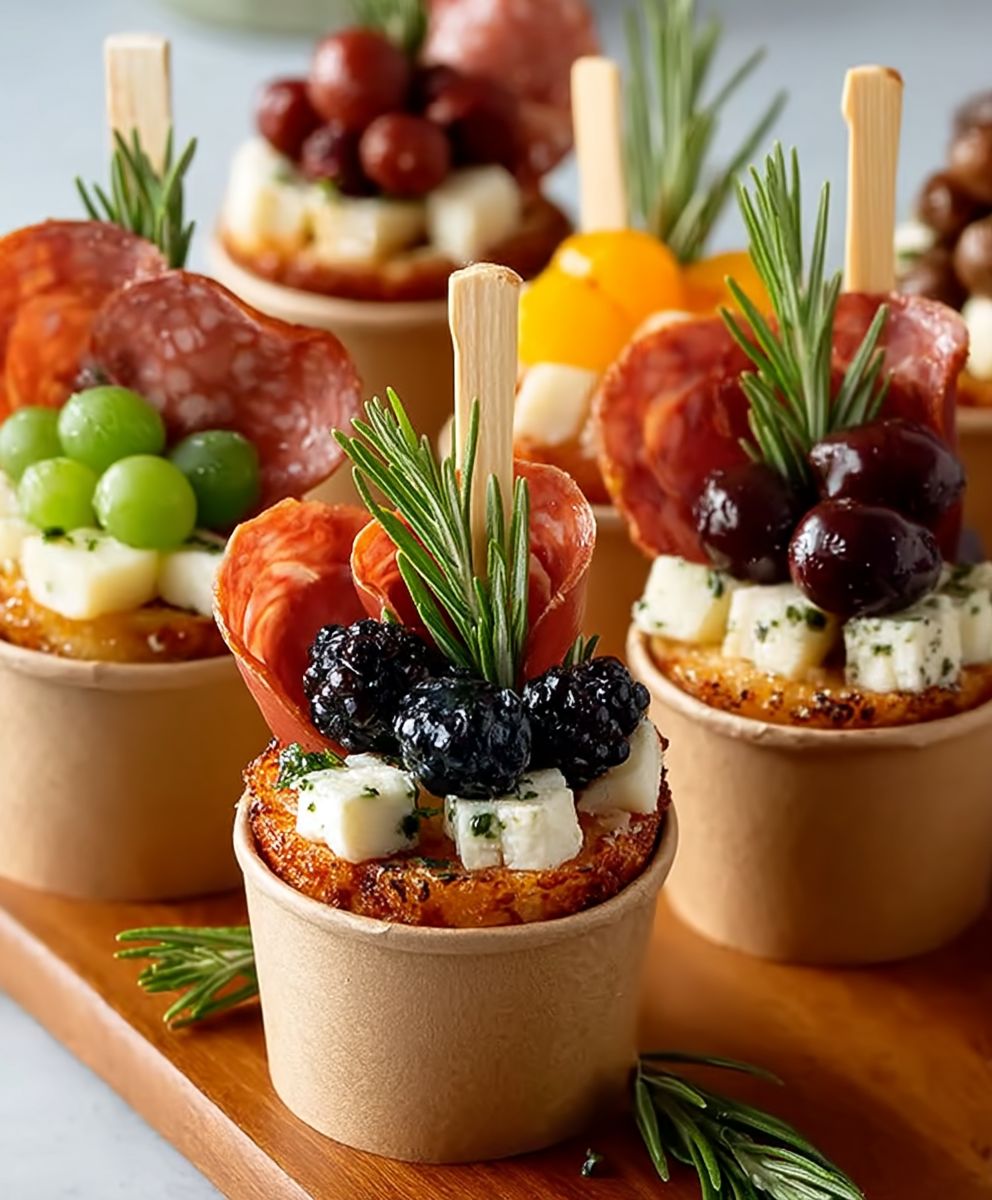
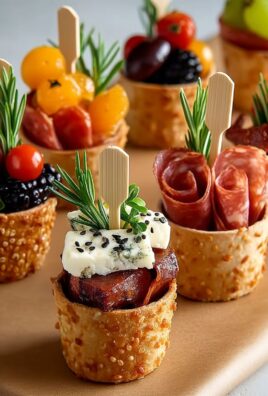
Charcuterie Cups: the single-serving sensation that’s taking parties by storm! Forget struggling with crowded boards and double-dipping dilemmas. These delightful little vessels offer a personalized, elegant, and utterly delicious way to enjoy all the flavors of a classic charcuterie board, but with a modern, hygienic twist.
While the concept of a charcuterie board dates back to 15th-century France, where it was a way to showcase preserved meats, the idea of individual servings is a decidedly contemporary innovation. Think of it as a deconstructed, portable picnic basket, perfect for everything from sophisticated cocktail parties to casual backyard barbecues. The beauty of charcuterie cups lies in their versatility. You can tailor each cup to individual preferences, ensuring everyone gets exactly what they crave.
Why are these miniature masterpieces so popular? It’s simple: they’re visually appealing, incredibly convenient, and offer a delightful explosion of flavors and textures. The combination of savory meats, creamy cheeses, crunchy crackers, and sweet fruits creates a symphony for the taste buds. Plus, the individual presentation makes them feel extra special. Get ready to impress your guests with this easy-to-assemble and endlessly customizable appetizer that’s guaranteed to be a crowd-pleaser!

Ingredients:
- Cured Meats:
- 4 oz Salami, thinly sliced
- 4 oz Prosciutto, thinly sliced
- 4 oz Pepperoni, sliced
- 4 oz Chorizo, sliced (optional)
- Cheeses:
- 4 oz Cheddar Cheese, cubed
- 4 oz Mozzarella Cheese, small balls (bocconcini)
- 4 oz Gouda Cheese, cubed
- 4 oz Brie Cheese, cut into small wedges (optional)
- Fruits:
- 1 cup Red Grapes, halved
- 1 cup Green Grapes, halved
- 1 cup Strawberries, halved or quartered depending on size
- 1/2 cup Blueberries
- 1/2 cup Blackberries
- 1 Orange, peeled and segmented (optional)
- Crackers & Breadsticks:
- 1 box Crackers (variety pack recommended)
- 1 package Breadsticks, thin
- Olives & Pickles:
- 1/2 cup Green Olives, pitted
- 1/2 cup Black Olives, pitted
- 1/2 cup Cornichons (small pickles)
- Nuts:
- 1/2 cup Almonds
- 1/2 cup Walnuts
- 1/2 cup Pistachios, shelled (optional)
- Other:
- Honey or Jam (small jars or containers)
- Rosemary sprigs (for garnish)
- Small wooden skewers or toothpicks
- Clear plastic cups (9-12 oz size)
Preparation:
- Prepare the Meats: Gently fold or roll the salami, prosciutto, pepperoni, and chorizo slices. This will add visual appeal and make them easier to arrange in the cups. I like to fold the prosciutto into ribbons and roll the salami into small cones.
- Prepare the Cheeses: If you’re using larger blocks of cheese, cut them into bite-sized cubes or wedges. The mozzarella balls (bocconcini) can be used as is. Make sure all the cheeses are easy to pick up with a skewer or toothpick.
- Prepare the Fruits: Wash and dry all the fruits thoroughly. Halve the grapes and strawberries. If the strawberries are large, quarter them. Blueberries and blackberries can be used whole. If using oranges, peel them carefully and segment them.
- Prepare the Olives and Pickles: Drain the olives and cornichons. If the olives are very large, you can halve them.
- Prepare the Nuts: If using pistachios, make sure they are shelled. You can leave the almonds and walnuts whole or roughly chop them if you prefer.
Assembling the Charcuterie Cups:
- Layering the Base: Start by placing a few crackers or breadsticks at the bottom of each cup. This will create a base for the other ingredients and add some height. I find that crisscrossing the breadsticks works well.
- Adding the Meats: Add a few pieces of each type of cured meat to each cup. Distribute them evenly among the cups. I like to arrange them so that the folded or rolled edges are visible.
- Adding the Cheeses: Add a few cubes or wedges of each type of cheese to each cup. Try to vary the colors and textures. The mozzarella balls add a nice round shape.
- Adding the Fruits: Add a mix of grapes, strawberries, blueberries, and blackberries to each cup. The fruits add a pop of color and sweetness that complements the savory meats and cheeses.
- Adding the Olives and Pickles: Add a few green olives, black olives, and cornichons to each cup. These add a salty and tangy element to the charcuterie cups.
- Adding the Nuts: Sprinkle a few almonds, walnuts, and pistachios (if using) on top of the other ingredients. The nuts add a crunchy texture and a nutty flavor.
- Adding the Honey/Jam (Optional): If you’re including honey or jam, place a small container of it in each cup or drizzle a small amount over the other ingredients. This adds a touch of sweetness and can be a nice complement to the cheeses.
- Garnishing: Garnish each cup with a small sprig of rosemary. This adds a touch of freshness and visual appeal.
- Securing Ingredients (Optional): If you’re transporting the charcuterie cups, you can use small wooden skewers or toothpicks to secure some of the ingredients in place. This will help prevent them from shifting around during transport.
Tips and Variations:
- Customize to Your Taste: Feel free to customize the ingredients to your liking. You can substitute any of the meats, cheeses, fruits, olives, or nuts with your favorites.
- Dietary Restrictions: If you have any dietary restrictions, you can easily adapt the recipe. For example, you can use gluten-free crackers for those who are gluten-free, or vegan cheese alternatives for those who are vegan.
- Presentation Matters: The presentation of the charcuterie cups is important. Try to arrange the ingredients in an appealing way, varying the colors, textures, and shapes.
- Make Ahead: You can prepare the charcuterie cups a few hours in advance. Just store them in the refrigerator until you’re ready to serve them. However, I recommend adding the crackers and breadsticks just before serving to prevent them from getting soggy.
- Theme It Up: Consider creating themed charcuterie cups for special occasions. For example, you could make a Valentine’s Day-themed cup with heart-shaped cheeses and red fruits, or a Christmas-themed cup with green and red ingredients.
- Add Dips: Consider adding small containers of dips like hummus, spinach artichoke dip, or French onion dip to the cups for an extra layer of flavor.
- Spice it Up: Add a little kick by including spicy salami, pepper jack cheese, or a small container of hot pepper jelly.
- Vegetarian Option: Create vegetarian charcuterie cups by omitting the meats and adding more cheeses, fruits, vegetables, and nuts. Consider adding marinated artichoke hearts, roasted red peppers, and cucumber slices.
- Kid-Friendly: Make kid-friendly charcuterie cups by using ingredients that kids will love, such as mini sausages, cheese cubes, grapes, berries, and goldfish crackers.
- Consider the Season: Use seasonal fruits and vegetables for the freshest and most flavorful charcuterie cups. In the fall, consider adding apple slices, pear slices, and cranberries. In the summer, consider adding watermelon cubes, cantaloupe cubes, and peaches.
- Don’t Overfill: While you want the cups to look full and appealing, avoid overfilling them. Overfilled cups can be difficult to eat from and the ingredients may spill out.
- Use a Variety of Textures: Incorporate a variety of textures into your charcuterie cups, such as crunchy crackers, creamy cheeses, juicy fruits, and chewy meats.
- Consider the Colors: Pay attention to the colors of the ingredients you’re using. A mix of colors will make the charcuterie cups more visually appealing.
- Use High-Quality Ingredients: The quality of the ingredients will affect the taste of the charcuterie cups. Use the best quality meats, cheeses, fruits, and nuts that you can afford.
- Experiment: Don’t be afraid to experiment with different ingredients and combinations. The possibilities are endless!
Serving Suggestions:
- Individual Appetizers: Charcuterie cups are perfect as individual appetizers for parties, gatherings, or even a fancy picnic. They are easy to grab and go, and they eliminate the need for plates and utensils.
- Party Favors: Consider giving charcuterie cups as party favors. They are a unique and delicious way to thank your guests for coming.
- Lunchbox Treat: Pack a charcuterie cup in your lunchbox for a fun and satisfying midday snack.
- Gourmet Snack: Enjoy a charcuterie cup as a gourmet snack any time of day.
- Pair with Wine: Charcuterie cups pair well with a variety of wines. Consider serving them with a crisp white wine, a light-bodied red wine, or a sparkling wine.
- Serve with Dips: Offer a selection of dips alongside the charcuterie cups, such as
Conclusion:
So there you have it! These adorable and delicious Charcuterie Cups are truly a must-try for your next gathering, big or small. They’re not only incredibly easy to assemble, saving you precious time and effort, but they also offer a personalized and visually stunning alternative to a traditional charcuterie board. Think about it: no more double-dipping dilemmas or awkward reaching across the table! Each guest gets their own perfectly curated cup of savory goodness.
But the best part? The possibilities are endless! Feel free to get creative and tailor the ingredients to your own preferences and dietary needs. Are you catering to vegetarians? Load up on marinated artichoke hearts, olives, roasted red peppers, and a variety of cheeses. Got a sweet tooth? Add some dried apricots, candied pecans, or even a drizzle of honey. For a spicier kick, incorporate some chorizo, pepper jack cheese, or a sprinkle of red pepper flakes. The only limit is your imagination!
Beyond the ingredients themselves, consider the presentation. Use different sized cups for a more dynamic look. Add a sprig of rosemary or thyme for a touch of elegance. Tie a ribbon around each cup with a personalized tag for a special touch. These little details can really elevate the overall experience and make your Charcuterie Cups even more memorable.
Serving suggestions are just as versatile. These cups are perfect as appetizers before a meal, as a snack during a party, or even as a light lunch. Pair them with a crisp white wine, a refreshing sparkling cider, or your favorite craft beer. They also make a fantastic addition to a picnic basket or a potluck gathering.
And don’t forget about variations! For a more substantial meal, consider adding some cooked shrimp, grilled chicken skewers, or even small quiches to your cups. You could also create themed cups, such as an Italian-inspired cup with prosciutto, mozzarella, and pesto, or a Mediterranean-inspired cup with feta cheese, olives, and hummus.
I truly believe that these Charcuterie Cups are a game-changer when it comes to entertaining. They’re fun, festive, and incredibly customizable. They’re also a great way to impress your guests without spending hours in the kitchen.
So, what are you waiting for? Gather your ingredients, grab some cups, and get creative! I’m confident that you’ll love the results. And more importantly, your guests will love them too!
I’m so excited for you to try this recipe and experience the joy of creating your own personalized Charcuterie Cups. Once you’ve given it a go, please come back and share your experience in the comments below. I’d love to hear about your favorite ingredient combinations, any variations you tried, and how your guests reacted. Your feedback is invaluable and helps inspire others to try this recipe as well. Let’s create a community of charcuterie cup enthusiasts! Happy snacking!
Charcuterie Cups: The Ultimate Guide to Individual Charcuterie
Individual charcuterie cups are a fun and elegant way to serve appetizers! Filled with cured meats, cheeses, fruits, crackers, and nuts, these cups are perfect for parties, picnics, or a gourmet snack.
Ingredients
- 4 oz Salami, thinly sliced
- 4 oz Prosciutto, thinly sliced
- 4 oz Pepperoni, sliced
- 4 oz Chorizo, sliced (optional)
- 4 oz Cheddar Cheese, cubed
- 4 oz Mozzarella Cheese, small balls (bocconcini)
- 4 oz Gouda Cheese, cubed
- 4 oz Brie Cheese, cut into small wedges (optional)
- 1 cup Red Grapes, halved
- 1 cup Green Grapes, halved
- 1 cup Strawberries, halved or quartered depending on size
- 1/2 cup Blueberries
- 1/2 cup Blackberries
- 1 Orange, peeled and segmented (optional)
- 1 box Crackers (variety pack recommended)
- 1 package Breadsticks, thin
- 1/2 cup Green Olives, pitted
- 1/2 cup Black Olives, pitted
- 1/2 cup Cornichons (small pickles)
- 1/2 cup Almonds
- 1/2 cup Walnuts
- 1/2 cup Pistachios, shelled (optional)
- Honey or Jam (small jars or containers)
- Rosemary sprigs (for garnish)
- Small wooden skewers or toothpicks (optional)
- Clear plastic cups (9-12 oz size)
Instructions
- Prepare the Meats: Gently fold or roll the salami, prosciutto, pepperoni, and chorizo slices. This will add visual appeal and make them easier to arrange in the cups. Fold the prosciutto into ribbons and roll the salami into small cones.
- Prepare the Cheeses: If you’re using larger blocks of cheese, cut them into bite-sized cubes or wedges. The mozzarella balls (bocconcini) can be used as is. Make sure all the cheeses are easy to pick up with a skewer or toothpick.
- Prepare the Fruits: Wash and dry all the fruits thoroughly. Halve the grapes and strawberries. If the strawberries are large, quarter them. Blueberries and blackberries can be used whole. If using oranges, peel them carefully and segment them.
- Prepare the Olives and Pickles: Drain the olives and cornichons. If the olives are very large, you can halve them.
- Prepare the Nuts: If using pistachios, make sure they are shelled. You can leave the almonds and walnuts whole or roughly chop them if you prefer.
- Layering the Base: Start by placing a few crackers or breadsticks at the bottom of each cup. This will create a base for the other ingredients and add some height. Crisscrossing the breadsticks works well.
- Adding the Meats: Add a few pieces of each type of cured meat to each cup. Distribute them evenly among the cups. Arrange them so that the folded or rolled edges are visible.
- Adding the Cheeses: Add a few cubes or wedges of each type of cheese to each cup. Try to vary the colors and textures. The mozzarella balls add a nice round shape.
- Adding the Fruits: Add a mix of grapes, strawberries, blueberries, and blackberries to each cup. The fruits add a pop of color and sweetness that complements the savory meats and cheeses.
- Adding the Olives and Pickles: Add a few green olives, black olives, and cornichons to each cup. These add a salty and tangy element to the charcuterie cups.
- Adding the Nuts: Sprinkle a few almonds, walnuts, and pistachios (if using) on top of the other ingredients. The nuts add a crunchy texture and a nutty flavor.
- Adding the Honey/Jam (Optional): If you’re including honey or jam, place a small container of it in each cup or drizzle a small amount over the other ingredients. This adds a touch of sweetness and can be a nice complement to the cheeses.
- Garnishing: Garnish each cup with a small sprig of rosemary. This adds a touch of freshness and visual appeal.
- Securing Ingredients (Optional): If you’re transporting the charcuterie cups, you can use small wooden skewers or toothpicks to secure some of the ingredients in place. This will help prevent them from shifting around during transport.
Notes
- Customize the ingredients to your liking. You can substitute any of the meats, cheeses, fruits, olives, or nuts with your favorites.
- If you have any dietary restrictions, you can easily adapt the recipe. For example, you can use gluten-free crackers for those who are gluten-free, or vegan cheese alternatives for those who are vegan.
- The presentation of the charcuterie cups is important. Try to arrange the ingredients in an appealing way, varying the colors, textures, and shapes.
- You can prepare the charcuterie cups a few hours in advance. Just store them in the refrigerator until you’re ready to serve them. However, I recommend adding the crackers and breadsticks just before serving to prevent them from getting soggy.
- Consider creating themed charcuterie cups for special occasions. For example, you could make a Valentine’s Day-themed cup with heart-shaped cheeses and red fruits, or a Christmas-themed cup with green and red ingredients.
- Consider adding small containers of dips like hummus, spinach artichoke dip, or French onion dip to the cups for an extra layer of flavor.
- Add a little kick by including spicy salami, pepper jack cheese, or a small container of hot pepper jelly.
- Create vegetarian charcuterie cups by omitting the meats and adding more cheeses, fruits, vegetables, and nuts. Consider adding marinated artichoke hearts, roasted red peppers, and cucumber slices.
- Make kid-friendly charcuterie cups by using ingredients that kids will love, such as mini sausages, cheese cubes, grapes, berries, and goldfish crackers.
- Use seasonal fruits and vegetables for the freshest and most flavorful charcuterie cups. In the fall, consider adding apple slices, pear slices, and cranberries. In the summer, consider adding watermelon cubes, cantaloupe cubes, and peaches.
- While you want the cups to look full and appealing, avoid overfilling them. Overfilled cups can be difficult to eat from and the ingredients may spill out.
- Incorporate a variety of textures into your charcuterie cups, such as crunchy crackers, creamy cheeses, juicy fruits, and chewy meats.
- Pay attention to the colors of the ingredients you’re using. A mix of colors will make the charcuterie cups more visually appealing.
- The quality of the ingredients will affect the taste of the charcuterie cups. Use the best quality meats, cheeses, fruits, and nuts that you can afford.
- Don’t be afraid to experiment with different ingredients and combinations. The possibilities are endless!
Leave a Comment