
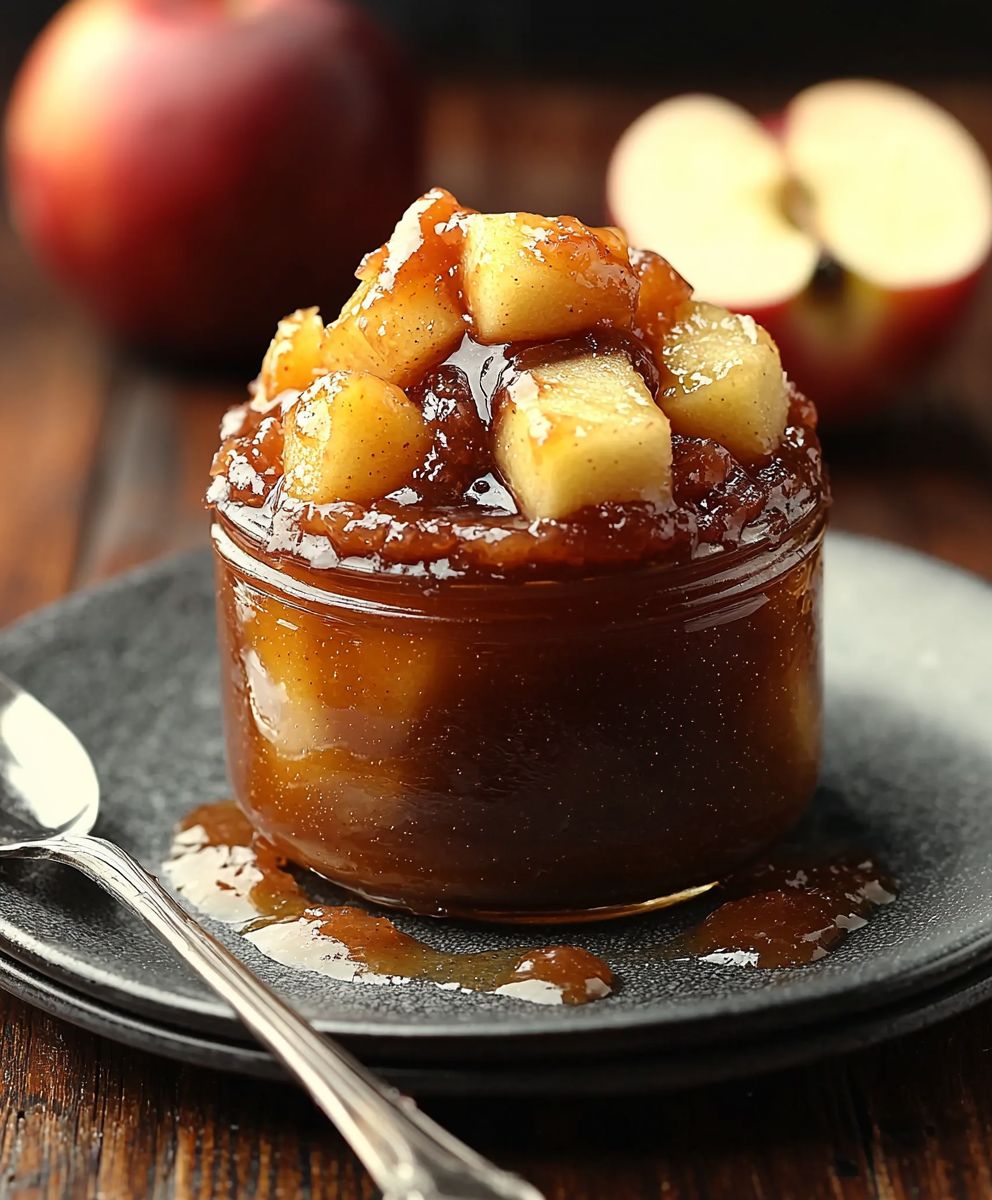
Caramel Apple Jam: the sweet, decadent spread you never knew you needed, but won’t be able to live without! Imagine the comforting flavors of warm apple pie and creamy caramel swirled together into a luscious jam, perfect for slathering on toast, dolloping onto scones, or even swirling into your morning yogurt. Are you ready to elevate your breakfast game and impress your friends with a homemade treat that tastes like pure autumn bliss?
While the exact origins of combining caramel and apples are debated, the pairing has become a beloved tradition, particularly in American culture. Think of caramel apples at fall festivals, a symbol of seasonal joy and simple pleasures. This Caramel Apple Jam takes that classic combination and transforms it into a versatile condiment that can be enjoyed year-round. It’s a delightful way to capture the essence of fall in a jar!
People adore this jam for its irresistible combination of flavors and textures. The tartness of the apples perfectly balances the rich sweetness of the caramel, creating a symphony of taste that dances on your palate. The smooth, spreadable texture makes it incredibly versatile, and the fact that it’s homemade adds a touch of love and care that store-bought jams simply can’t replicate. Plus, it’s surprisingly easy to make, making it a perfect project for both beginner and experienced cooks alike. Get ready to experience the magic of homemade Caramel Apple Jam!

Ingredients:
- 6 pounds (approximately 12 medium) firm, tart apples, such as Granny Smith, Honeycrisp, or Fuji, peeled, cored, and finely chopped
- 6 cups granulated sugar
- 1 cup packed light brown sugar
- 1 cup apple cider vinegar
- 1 cup water
- 1/2 cup unsalted butter, cut into pieces
- 2 teaspoons ground cinnamon
- 1 teaspoon ground nutmeg
- 1/2 teaspoon ground allspice
- 1/4 teaspoon ground cloves
- 1/4 teaspoon salt
- 1 teaspoon vanilla extract
- 1/4 cup lemon juice, freshly squeezed
Preparing the Apples:
Okay, let’s get started! The first and most important step is prepping our apples. This is where a little elbow grease comes in, but trust me, it’s worth it. We want to make sure the apples are finely chopped so they break down nicely during the cooking process and create that lovely jam consistency.
- Peel the Apples: Using a vegetable peeler, carefully peel all 6 pounds of apples. Make sure to remove all the skin, as it can make the jam a bit tough.
- Core the Apples: Cut the peeled apples in half and then remove the core from each half. You can use a small knife or an apple corer for this. Ensure you remove all the seeds and the tough core area.
- Finely Chop the Apples: This is where the real work begins! You can use a knife and cutting board to finely chop the apples into small pieces, about 1/4-inch in size. Alternatively, if you have a food processor, you can use it to pulse the apples until they are finely chopped. Be careful not to over-process them into a puree. We want small pieces, not mush!
- Measure the Chopped Apples: After chopping, measure the apples to ensure you have approximately 6 pounds. This is important for maintaining the correct ratio of apples to other ingredients.
Combining and Cooking the Jam:
Now for the fun part bringing all those delicious flavors together! We’re going to create a beautiful caramel base and then let the apples simmer until they transform into a luscious jam.
- Combine Ingredients in a Large Pot: In a large, heavy-bottomed pot or Dutch oven, combine the chopped apples, granulated sugar, brown sugar, apple cider vinegar, and water. The heavy bottom will help prevent scorching.
- Add Butter and Spices: Add the butter, cinnamon, nutmeg, allspice, cloves, and salt to the pot. The butter adds richness and helps create a smooth texture, while the spices provide that warm, comforting caramel apple flavor.
- Bring to a Boil: Place the pot over medium-high heat and bring the mixture to a rolling boil, stirring frequently to prevent sticking. A rolling boil means the mixture continues to boil even when you stir it.
- Reduce Heat and Simmer: Once the mixture is at a rolling boil, reduce the heat to medium-low and let it simmer gently, stirring occasionally at first, then more frequently as the jam thickens. This simmering process is crucial for developing the caramel flavor and breaking down the apples.
- Cook Until Thickened: Continue to simmer the jam for approximately 1 to 1.5 hours, or until it has thickened to your desired consistency. The jam is ready when a spoonful placed on a chilled plate wrinkles when you push it with your finger. Be patient; this takes time! The color will also deepen as the sugars caramelize.
- Stir Frequently: As the jam cooks and thickens, it’s important to stir it more frequently, especially towards the end of the cooking time. This will prevent the jam from sticking to the bottom of the pot and burning.
- Check for Doneness: To check if the jam is ready, place a small spoonful of the hot jam onto a chilled plate (you can put a plate in the freezer for a few minutes). Let it cool for a minute or two, then gently push the jam with your finger. If it wrinkles and doesn’t run back together, it’s ready. If it’s still too runny, continue to cook it for a few more minutes and test again.
Adding the Finishing Touches:
Almost there! A couple of final ingredients will really elevate our Caramel Apple Jam and give it that perfect balance of sweetness and tang.
- Stir in Vanilla Extract and Lemon Juice: Once the jam has reached the desired consistency, remove it from the heat and stir in the vanilla extract and lemon juice. The vanilla adds a touch of warmth and complexity, while the lemon juice brightens the flavors and helps to balance the sweetness.
- Taste and Adjust: Give the jam a taste and adjust the seasonings as needed. If you prefer a sweeter jam, you can add a little more sugar. If you want a bit more tang, add a squeeze more lemon juice.
Canning the Jam (Optional):
If you want to preserve your Caramel Apple Jam for longer storage, you can can it using proper canning techniques. This will allow you to enjoy your homemade jam for months to come. If you don’t want to can it, you can simply store it in the refrigerator for up to 2 weeks.
- Prepare Canning Jars: Wash your canning jars, lids, and bands in hot, soapy water. Rinse them well and then sterilize the jars by boiling them in a large pot of water for 10 minutes. Keep the jars hot until you are ready to fill them. You can also sterilize them in a dishwasher with a sterilize setting.
- Heat the Lids: Place the lids in a small saucepan and cover them with water. Bring the water to a simmer (do not boil) and keep the lids hot until you are ready to use them.
- Fill the Jars: Ladle the hot jam into the hot sterilized jars, leaving 1/4-inch headspace at the top. Headspace is the space between the top of the jam and the lid.
- Remove Air Bubbles: Use a non-metallic spatula or bubble remover to gently press down on the jam to release any trapped air bubbles.
- Wipe the Jar Rims: Wipe the rims of the jars with a clean, damp cloth to remove any spills or drips. This is important for ensuring a good seal.
- Place Lids and Bands: Place the lids on the jars and then screw on the bands until they are fingertip tight. Fingertip tight means the bands are snug but not overly tight.
- Process in a Water Bath Canner: Place the filled jars in a water bath canner. Make sure the jars are completely covered with water by at least 1 inch. Bring the water to a rolling boil and process the jars for 10 minutes. Adjust processing time for altitude.
- Cool the Jars: After processing, turn off the heat and let the jars sit in the canner for 5 minutes before removing them. This helps to prevent siphoning. Carefully remove the jars from the canner and place them on a towel-lined surface to cool completely.
- Check the Seals: As the jars cool, you should hear a popping sound as the lids seal. After the jars have cooled completely (about 12-24 hours), check the seals by pressing down on the center of each lid. If the lid doesn’t flex or pop back up, it’s sealed properly. If the lid flexes, it’s not sealed and should be refrigerated and used within a few weeks.
- Label and Store: Label the jars with the date and contents and store them in a cool, dark place for up to 1 year.
Serving Suggestions:
Now that you have a beautiful batch of Caramel Apple Jam, it’s time to enjoy it! Here are a few of my favorite ways to serve it:
- On Toast or Biscuits: Spread it on warm toast, biscuits, or scones for a delicious breakfast or snack.
- With Cheese and Crackers: Serve it alongside a cheese board with crackers for a sophisticated appetizer. The sweetness of the jam pairs perfectly with the savory cheese.
- As a Topping for Ice Cream: Drizzle it over vanilla ice cream for a decadent dessert.
- In Oatmeal or Yogurt: Stir it into oatmeal or yogurt for a flavorful and comforting breakfast.
- As a Filling for Pastries: Use it as a filling for pies, tarts, or pastries.
- As a Glaze for Meats: Brush it on roasted pork or chicken during the last few minutes of cooking for a sweet and savory glaze.
Enjoy your homemade Caramel Apple Jam! I hope you love it as much as I do.
Conclusion:
So, there you have it! This Caramel Apple Jam recipe is more than just a spread; it’s a jar full of autumn memories waiting to be unlocked. I truly believe this is a must-try for anyone who loves the comforting flavors of fall, or simply enjoys a delicious, homemade treat. The combination of tart apples, rich caramel, and warm spices creates a symphony of flavors that will dance on your taste buds. It’s the perfect balance of sweet and tangy, making it incredibly versatile and utterly irresistible.
But why is this recipe a must-try, you ask? Well, beyond the incredible flavor, it’s surprisingly easy to make. Forget spending hours slaving over a hot stove; this recipe comes together relatively quickly, and the results are absolutely worth the effort. Plus, making your own jam allows you to control the ingredients, ensuring a preservative-free and wholesome product. You know exactly what’s going into each jar, and that peace of mind is priceless.
Now, let’s talk about serving suggestions! While this Caramel Apple Jam is divine simply spread on toast or a warm biscuit, its versatility extends far beyond the breakfast table. Imagine swirling it into your morning oatmeal or yogurt for a burst of autumnal flavor. Use it as a filling for thumbprint cookies or mini tarts for a delightful dessert. Spread it on a grilled cheese sandwich with sharp cheddar for a sweet and savory treat. Or, get really creative and use it as a glaze for roasted pork or chicken. The possibilities are truly endless!
And if you’re feeling adventurous, why not try some variations? Add a pinch of sea salt to enhance the caramel flavor. Incorporate a splash of bourbon or apple brandy for a boozy twist. Or, throw in some chopped pecans or walnuts for added texture and nutty goodness. You can even experiment with different types of apples to create your own unique flavor profile. Granny Smith apples will provide a tart and tangy jam, while Honeycrisp apples will offer a sweeter and more mellow flavor. Don’t be afraid to get creative and make this recipe your own!
I’m so excited for you to try this recipe and experience the magic of homemade Caramel Apple Jam for yourself. I truly believe it will become a staple in your kitchen, a go-to recipe for gifting, and a cherished reminder of the flavors of fall. So, gather your ingredients, put on some cozy music, and get ready to create something truly special.
Once you’ve made your batch of Caramel Apple Jam, I would absolutely love to hear about your experience! Did you try any variations? What did you serve it with? What did your family and friends think? Share your photos and stories in the comments below. Your feedback is invaluable, and it helps inspire others to try this recipe as well. Happy jamming!
I can’t wait to see what you create! Enjoy!
Print
Caramel Apple Jam: The Ultimate Guide to Making & Enjoying
- Total Time: 120 minutes
- Yield: 6–8 half-pint (8 oz) jars 1x
Description
Delicious homemade Caramel Apple Jam, bursting with warm spices and sweet caramel flavor. Perfect on toast, biscuits, or as a topping for ice cream!
Ingredients
- 6 pounds (approximately 12 medium) firm, tart apples, such as Granny Smith, Honeycrisp, or Fuji, peeled, cored, and finely chopped
- 6 cups granulated sugar
- 1 cup packed light brown sugar
- 1 cup apple cider vinegar
- 1 cup water
- 1/2 cup unsalted butter, cut into pieces
- 2 teaspoons ground cinnamon
- 1 teaspoon ground nutmeg
- 1/2 teaspoon ground allspice
- 1/4 teaspoon ground cloves
- 1/4 teaspoon salt
- 1 teaspoon vanilla extract
- 1/4 cup lemon juice, freshly squeezed
Instructions
- Prepare the Apples: Peel, core, and finely chop the apples into approximately 1/4-inch pieces. Measure to ensure you have about 6 pounds.
- Combine Ingredients: In a large, heavy-bottomed pot or Dutch oven, combine the chopped apples, granulated sugar, brown sugar, apple cider vinegar, and water.
- Add Butter and Spices: Add the butter, cinnamon, nutmeg, allspice, cloves, and salt to the pot.
- Bring to a Boil: Place the pot over medium-high heat and bring the mixture to a rolling boil, stirring frequently to prevent sticking.
- Reduce Heat and Simmer: Reduce the heat to medium-low and let it simmer gently, stirring occasionally at first, then more frequently as the jam thickens.
- Cook Until Thickened: Continue to simmer the jam for approximately 1 to 1.5 hours, or until it has thickened to your desired consistency. The jam is ready when a spoonful placed on a chilled plate wrinkles when you push it with your finger.
- Stir Frequently: As the jam cooks and thickens, it’s important to stir it more frequently, especially towards the end of the cooking time. This will prevent the jam from sticking to the bottom of the pot and burning.
- Check for Doneness: To check if the jam is ready, place a small spoonful of the hot jam onto a chilled plate (you can put a plate in the freezer for a few minutes). Let it cool for a minute or two, then gently push the jam with your finger. If it wrinkles and doesn’t run back together, it’s ready. If it’s still too runny, continue to cook it for a few more minutes and test again.
- Stir in Vanilla and Lemon Juice: Once the jam has reached the desired consistency, remove it from the heat and stir in the vanilla extract and lemon juice.
- Taste and Adjust: Give the jam a taste and adjust the seasonings as needed. If you prefer a sweeter jam, you can add a little more sugar. If you want a bit more tang, add a squeeze more lemon juice.
- Canning (Optional): If you want to preserve your Caramel Apple Jam for longer storage, you can can it using proper canning techniques. This will allow you to enjoy your homemade jam for months to come. If you don’t want to can it, you can simply store it in the refrigerator for up to 2 weeks.
- Prepare Canning Jars: Wash your canning jars, lids, and bands in hot, soapy water. Rinse them well and then sterilize the jars by boiling them in a large pot of water for 10 minutes. Keep the jars hot until you are ready to fill them. You can also sterilize them in a dishwasher with a sterilize setting.
- Heat the Lids: Place the lids in a small saucepan and cover them with water. Bring the water to a simmer (do not boil) and keep the lids hot until you are ready to use them.
- Fill the Jars: Ladle the hot jam into the hot sterilized jars, leaving 1/4-inch headspace at the top. Headspace is the space between the top of the jam and the lid.
- Remove Air Bubbles: Use a non-metallic spatula or bubble remover to gently press down on the jam to release any trapped air bubbles.
- Wipe the Jar Rims: Wipe the rims of the jars with a clean, damp cloth to remove any spills or drips. This is important for ensuring a good seal.
- Place Lids and Bands: Place the lids on the jars and then screw on the bands until they are fingertip tight. Fingertip tight means the bands are snug but not overly tight.
- Process in a Water Bath Canner: Place the filled jars in a water bath canner. Make sure the jars are completely covered with water by at least 1 inch. Bring the water to a rolling boil and process the jars for 10 minutes. Adjust processing time for altitude.
- Cool the Jars: After processing, turn off the heat and let the jars sit in the canner for 5 minutes before removing them. This helps to prevent siphoning. Carefully remove the jars from the canner and place them on a towel-lined surface to cool completely.
- Check the Seals: As the jars cool, you should hear a popping sound as the lids seal. After the jars have cooled completely (about 12-24 hours), check the seals by pressing down on the center of each lid. If the lid doesn’t flex or pop back up, it’s sealed properly. If the lid flexes, it’s not sealed and should be refrigerated and used within a few weeks.
- Label and Store: Label the jars with the date and contents and store them in a cool, dark place for up to 1 year.
Notes
- Use firm, tart apples for the best flavor and texture.
- Stir frequently, especially as the jam thickens, to prevent burning.
- The jam is ready when a spoonful placed on a chilled plate wrinkles when you push it with your finger.
- Adjust the seasonings to your liking.
- If not canning, store in the refrigerator for up to 2 weeks.
- Enjoy on toast, biscuits, ice cream, or as a glaze for meats!
- Prep Time: 30 minutes
- Cook Time: 90 minutes

Leave a Comment