
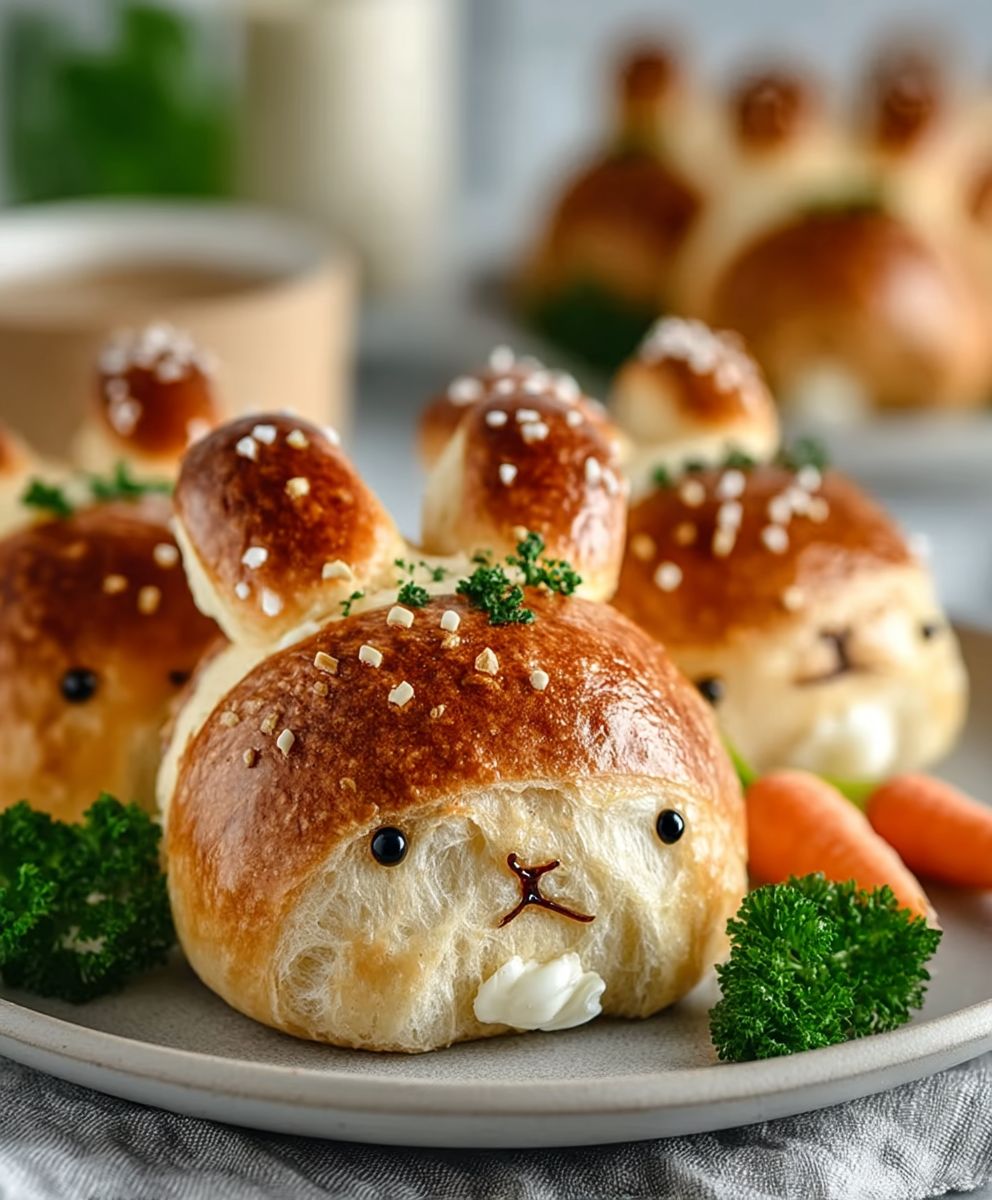
Bunny Bread Rolls: Aren’t they just the cutest addition to any Easter brunch or springtime celebration? Imagine the delighted faces of your loved ones as they reach for these adorable, fluffy, and utterly delicious treats. Forget store-bought rolls this year; I’m going to show you how to bake these charming bunny-shaped delights right in your own kitchen!
Bread, in its various forms, has been a staple food for millennia, carrying cultural significance across countless societies. While the exact origin of shaped bread is difficult to pinpoint, the tradition of baking special breads for holidays and celebrations is deeply rooted in many cultures. These Bunny Bread Rolls are a modern, whimsical take on that tradition, perfect for bringing a touch of joy and artistry to your table.
What makes these rolls so irresistible? It’s a combination of factors. First, there’s the visual appeal those floppy ears and sweet little faces are simply irresistible! But beyond the cuteness, these rolls boast a wonderfully soft and slightly sweet flavor that pairs perfectly with savory dishes like ham or quiche, or even enjoyed simply with a pat of butter. The light and airy texture is achieved through careful kneading and proofing, resulting in a melt-in-your-mouth experience. Plus, baking them yourself allows you to control the ingredients, ensuring a fresh and wholesome treat for your family and friends. Get ready to hop into the kitchen and create some magic!

Ingredients:
- For the Dough:
- 4 cups (500g) all-purpose flour, plus more for dusting
- 1/4 cup (50g) granulated sugar
- 1 teaspoon salt
- 2 1/4 teaspoons (1 packet) active dry yeast
- 1 cup (240ml) warm milk (105-115°F / 40-46°C)
- 1/4 cup (60ml) warm water (105-115°F / 40-46°C)
- 1 large egg, lightly beaten
- 1/4 cup (60ml) unsalted butter, melted
- For the Bunny Features:
- 1 large egg, beaten (for egg wash)
- Black sesame seeds, for eyes
- Pink sprinkles or small pieces of pink candy, for noses (optional)
- Small pieces of almond slivers, for ears (optional)
Preparing the Dough:
- Activate the Yeast: In a small bowl, combine the warm milk, warm water, sugar and yeast. Stir gently and let it sit for 5-10 minutes, or until foamy. This indicates that the yeast is active and ready to use. If it doesn’t foam, your yeast might be old, and you’ll need to start with a fresh packet.
- Combine Dry Ingredients: In a large mixing bowl, whisk together the flour and salt. Make a well in the center of the dry ingredients.
- Add Wet Ingredients: Pour the yeast mixture, beaten egg, and melted butter into the well in the flour mixture.
- Mix the Dough: Using a wooden spoon or a stand mixer fitted with a dough hook, mix the ingredients until a shaggy dough forms. If using a stand mixer, continue kneading on low speed for 8-10 minutes. If kneading by hand, turn the dough out onto a lightly floured surface and knead for 10-12 minutes, or until the dough is smooth and elastic. The dough should be slightly tacky but not sticky. If it’s too sticky, add a tablespoon of flour at a time until it reaches the right consistency.
- First Rise: Place the dough in a lightly oiled bowl, turning to coat all sides. Cover the bowl with plastic wrap or a clean kitchen towel. Let the dough rise in a warm place for 1-1.5 hours, or until doubled in size. This is a crucial step, so be patient! The warmer the environment, the faster the dough will rise.
Shaping the Bunny Rolls:
- Punch Down the Dough: Once the dough has doubled, gently punch it down to release the air. Turn the dough out onto a lightly floured surface.
- Divide the Dough: Divide the dough into 12 equal portions. I like to use a kitchen scale to ensure they are all the same size, which helps with even baking.
- Shape the Bodies: Roll each portion of dough into a smooth ball. Place the balls on a baking sheet lined with parchment paper, leaving some space between each one. These will be the bunny bodies.
- Shape the Heads: Take about 1/3 of each dough ball and divide it into two smaller pieces. Roll each piece into a small ball. Slightly flatten the balls and attach them to the top of the larger dough ball (the body) using a little water to help them stick. These are the bunny heads.
- Shape the Ears (Optional): Take a small piece of dough from each bunny head and roll it into a thin rope. Cut the rope into two equal pieces. Shape each piece into a small almond shape for the ears. Attach the ears to the top of the bunny head using a little water. Alternatively, you can use almond slivers after baking.
- Second Rise: Cover the shaped bunny rolls with plastic wrap or a clean kitchen towel and let them rise in a warm place for another 30-45 minutes, or until they have puffed up slightly.
Baking the Bunny Rolls:
- Preheat the Oven: Preheat your oven to 375°F (190°C).
- Prepare the Egg Wash: In a small bowl, whisk the remaining egg with a tablespoon of water to create an egg wash.
- Brush with Egg Wash: Gently brush the tops of the bunny rolls with the egg wash. This will give them a beautiful golden-brown color.
- Add the Features: Carefully place two black sesame seeds on each bunny head to create the eyes. If using pink sprinkles or candy for the noses, gently press them into the dough. If you are using almond slivers for the ears, wait until after baking to insert them.
- Bake: Bake the bunny rolls for 15-20 minutes, or until they are golden brown. Keep a close eye on them, as baking times may vary depending on your oven. If the tops are browning too quickly, you can tent them with foil.
- Cool: Remove the bunny rolls from the oven and let them cool on the baking sheet for a few minutes before transferring them to a wire rack to cool completely.
- Add Almond Ears (Optional): If you didn’t bake the ears, gently insert almond slivers into the top of each bunny head to create the ears.
Tips and Variations:
- Sweetness Level: Adjust the amount of sugar to your liking. If you prefer a less sweet roll, you can reduce the sugar to 1/8 cup (25g).
- Flour Type: While all-purpose flour works well, you can also use bread flour for a slightly chewier texture.
- Filling: For a fun twist, you can add a small piece of chocolate or a dollop of jam to the center of each dough ball before shaping them into bunnies.
- Vegan Option: To make these bunny rolls vegan, use plant-based milk (such as almond or soy milk), vegan butter, and a flax egg (1 tablespoon ground flaxseed mixed with 3 tablespoons water) in place of the egg.
- Storage: Store the cooled bunny rolls in an airtight container at room temperature for up to 2 days, or in the refrigerator for up to 5 days. You can also freeze them for up to 2 months.
- Reheating: To reheat the bunny rolls, wrap them in foil and bake them in a preheated oven at 350°F (175°C) for 5-10 minutes, or until warmed through. You can also microwave them for a few seconds, but be careful not to overheat them.
Troubleshooting:
- Dough Not Rising: If your dough isn’t rising, make sure your yeast is fresh and that the milk and water are at the correct temperature (105-115°F / 40-46°C). Also, ensure that the environment is warm enough.
- Dough Too Sticky: If your dough is too sticky, add a tablespoon of flour at a time until it reaches the right consistency.
- Bunny Rolls Too Brown: If your bunny rolls are browning too quickly, tent them with foil during the last few minutes of baking.
- Bunny Features Falling Off: Make sure to gently press the sesame seeds and sprinkles into the dough to help them adhere. You can also use a tiny dab of egg wash to help them stick.
Enjoy your adorable and delicious Bunny Bread Rolls! They’re perfect for Easter, spring celebrations, or any time you want to add a touch of whimsy to your baking.
Conclusion:
And there you have it! These Bunny Bread Rolls are more than just a cute Easter treat; they’re a delightful, crowd-pleasing addition to any spring gathering, or honestly, any day you want to add a little whimsy to your table. The soft, slightly sweet dough, shaped into adorable bunnies, is guaranteed to bring smiles to faces of all ages. But beyond the cuteness factor, these rolls are simply delicious. The texture is perfect a tender crumb with a slightly chewy crust, making them ideal for dipping in soups, slathering with butter, or enjoying all on their own.
I truly believe this recipe is a must-try, not just for its visual appeal, but for the sheer joy of baking and the satisfaction of creating something so charming and tasty. It’s a project that’s fun to do with kids, and the end result is something you can be truly proud of. Plus, the aroma that fills your kitchen while these are baking is simply heavenly!
But the fun doesn’t stop there! Feel free to get creative with your serving suggestions and variations. For a savory twist, try adding a sprinkle of everything bagel seasoning before baking. This will give your Bunny Bread Rolls a delicious, savory flavor that pairs perfectly with soups and salads. You could also incorporate some finely chopped herbs, like rosemary or thyme, into the dough for an extra layer of flavor.
If you’re looking for a sweeter option, consider brushing the baked rolls with a simple glaze made from powdered sugar and milk. Or, for a truly decadent treat, fill the bunnies with a dollop of Nutella or a spoonful of your favorite jam before baking. Imagine biting into a warm, fluffy bunny filled with gooey chocolate hazelnut spread! The possibilities are endless, so don’t be afraid to experiment and find your own favorite variations.
These Bunny Bread Rolls are also incredibly versatile when it comes to serving. They make a wonderful addition to an Easter brunch, a charming side dish for a spring dinner, or even a fun and festive snack for kids. You can serve them warm with butter, alongside a bowl of soup, or as part of a sandwich platter. They’re also perfect for packing in lunchboxes or taking on picnics.
I’ve poured my heart into perfecting this recipe, and I’m confident that you’ll love it as much as I do. The instructions are clear and easy to follow, even for beginner bakers. And the end result is so rewarding a batch of adorable, delicious bunny rolls that are sure to impress.
So, what are you waiting for? Gather your ingredients, preheat your oven, and get ready to embark on a baking adventure! I promise you, these Bunny Bread Rolls are worth the effort. They’re a delightful treat that will bring joy to your kitchen and smiles to the faces of everyone who tries them.
I’m so excited for you to try this recipe! And I would absolutely love to hear about your experience. Did you make any variations? How did your family and friends react? Please, share your photos and stories in the comments below. I can’t wait to see your adorable bunny creations! Happy baking!
Bunny Bread Rolls: The Cutest & Easiest Recipe You'll Ever Bake
Adorable homemade bunny bread rolls, perfect for Easter or spring! Soft, slightly sweet, and fun to make.
Ingredients
- 4 cups (500g) all-purpose flour, plus more for dusting
- 1/4 cup (50g) granulated sugar
- 1 teaspoon salt
- 2 1/4 teaspoons (1 packet) active dry yeast
- 1 cup (240ml) warm milk (105-115°F / 40-46°C)
- 1/4 cup (60ml) warm water (105-115°F / 40-46°C)
- 1 large egg, lightly beaten
- 1/4 cup (60ml) unsalted butter, melted
- 1 large egg, beaten (for egg wash)
- Black sesame seeds, for eyes
- Pink sprinkles or small pieces of pink candy, for noses (optional)
- Small pieces of almond slivers, for ears (optional)
Instructions
- Activate the Yeast: In a small bowl, combine the warm milk, warm water, sugar and yeast. Stir gently and let it sit for 5-10 minutes, or until foamy. This indicates that the yeast is active and ready to use. If it doesn’t foam, your yeast might be old, and you’ll need to start with a fresh packet.
- Combine Dry Ingredients: In a large mixing bowl, whisk together the flour and salt. Make a well in the center of the dry ingredients.
- Add Wet Ingredients: Pour the yeast mixture, beaten egg, and melted butter into the well in the flour mixture.
- Mix the Dough: Using a wooden spoon or a stand mixer fitted with a dough hook, mix the ingredients until a shaggy dough forms. If using a stand mixer, continue kneading on low speed for 8-10 minutes. If kneading by hand, turn the dough out onto a lightly floured surface and knead for 10-12 minutes, or until the dough is smooth and elastic. The dough should be slightly tacky but not sticky. If it’s too sticky, add a tablespoon of flour at a time until it reaches the right consistency.
- First Rise: Place the dough in a lightly oiled bowl, turning to coat all sides. Cover the bowl with plastic wrap or a clean kitchen towel. Let the dough rise in a warm place for 1-1.5 hours, or until doubled in size. This is a crucial step, so be patient! The warmer the environment, the faster the dough will rise.
- Punch Down the Dough: Once the dough has doubled, gently punch it down to release the air. Turn the dough out onto a lightly floured surface.
- Divide the Dough: Divide the dough into 12 equal portions. I like to use a kitchen scale to ensure they are all the same size, which helps with even baking.
- Shape the Bodies: Roll each portion of dough into a smooth ball. Place the balls on a baking sheet lined with parchment paper, leaving some space between each one. These will be the bunny bodies.
- Shape the Heads: Take about 1/3 of each dough ball and divide it into two smaller pieces. Roll each piece into a small ball. Slightly flatten the balls and attach them to the top of the larger dough ball (the body) using a little water to help them stick. These are the bunny heads.
- Shape the Ears (Optional): Take a small piece of dough from each bunny head and roll it into a thin rope. Cut the rope into two equal pieces. Shape each piece into a small almond shape for the ears. Attach the ears to the top of the bunny head using a little water. Alternatively, you can use almond slivers after baking.
- Second Rise: Cover the shaped bunny rolls with plastic wrap or a clean kitchen towel and let them rise in a warm place for another 30-45 minutes, or until they have puffed up slightly.
- Preheat the Oven: Preheat your oven to 375°F (190°C).
- Prepare the Egg Wash: In a small bowl, whisk the remaining egg with a tablespoon of water to create an egg wash.
- Brush with Egg Wash: Gently brush the tops of the bunny rolls with the egg wash. This will give them a beautiful golden-brown color.
- Add the Features: Carefully place two black sesame seeds on each bunny head to create the eyes. If using pink sprinkles or candy for the noses, gently press them into the dough. If you are using almond slivers for the ears, wait until after baking to insert them.
- Bake: Bake the bunny rolls for 15-20 minutes, or until they are golden brown. Keep a close eye on them, as baking times may vary depending on your oven. If the tops are browning too quickly, you can tent them with foil.
- Cool: Remove the bunny rolls from the oven and let them cool on the baking sheet for a few minutes before transferring them to a wire rack to cool completely.
- Add Almond Ears (Optional): If you didn’t bake the ears, gently insert almond slivers into the top of each bunny head to create the ears.
Notes
- Sweetness Level: Adjust the amount of sugar to your liking. If you prefer a less sweet roll, you can reduce the sugar to 1/8 cup (25g).
- Flour Type: While all-purpose flour works well, you can also use bread flour for a slightly chewier texture.
- Filling: For a fun twist, you can add a small piece of chocolate or a dollop of jam to the center of each dough ball before shaping them into bunnies.
- Vegan Option: To make these bunny rolls vegan, use plant-based milk (such as almond or soy milk), vegan butter, and a flax egg (1 tablespoon ground flaxseed mixed with 3 tablespoons water) in place of the egg.
- Storage: Store the cooled bunny rolls in an airtight container at room temperature for up to 2 days, or in the refrigerator for up to 5 days. You can also freeze them for up to 2 months.
- Reheating: To reheat the bunny rolls, wrap them in foil and bake them in a preheated oven at 350°F (175°C) for 5-10 minutes, or until warmed through. You can also microwave them for a few seconds, but be careful not to overheat them.
- Dough Not Rising: If your dough isn’t rising, make sure your yeast is fresh and that the milk and water are at the correct temperature (105-115°F / 40-46°C). Also, ensure that the environment is warm enough.
- Dough Too Sticky: If your dough is too sticky, add a tablespoon of flour at a time until it reaches the right consistency.
- Bunny Rolls Too Brown: If your bunny rolls are browning too quickly, tent them with foil during the last few minutes of baking.
- Bunny Features Falling Off: Make sure to gently press the sesame seeds and sprinkles into the dough to help them adhere. You can also use a tiny dab of egg wash to help them stick.


Leave a Comment