
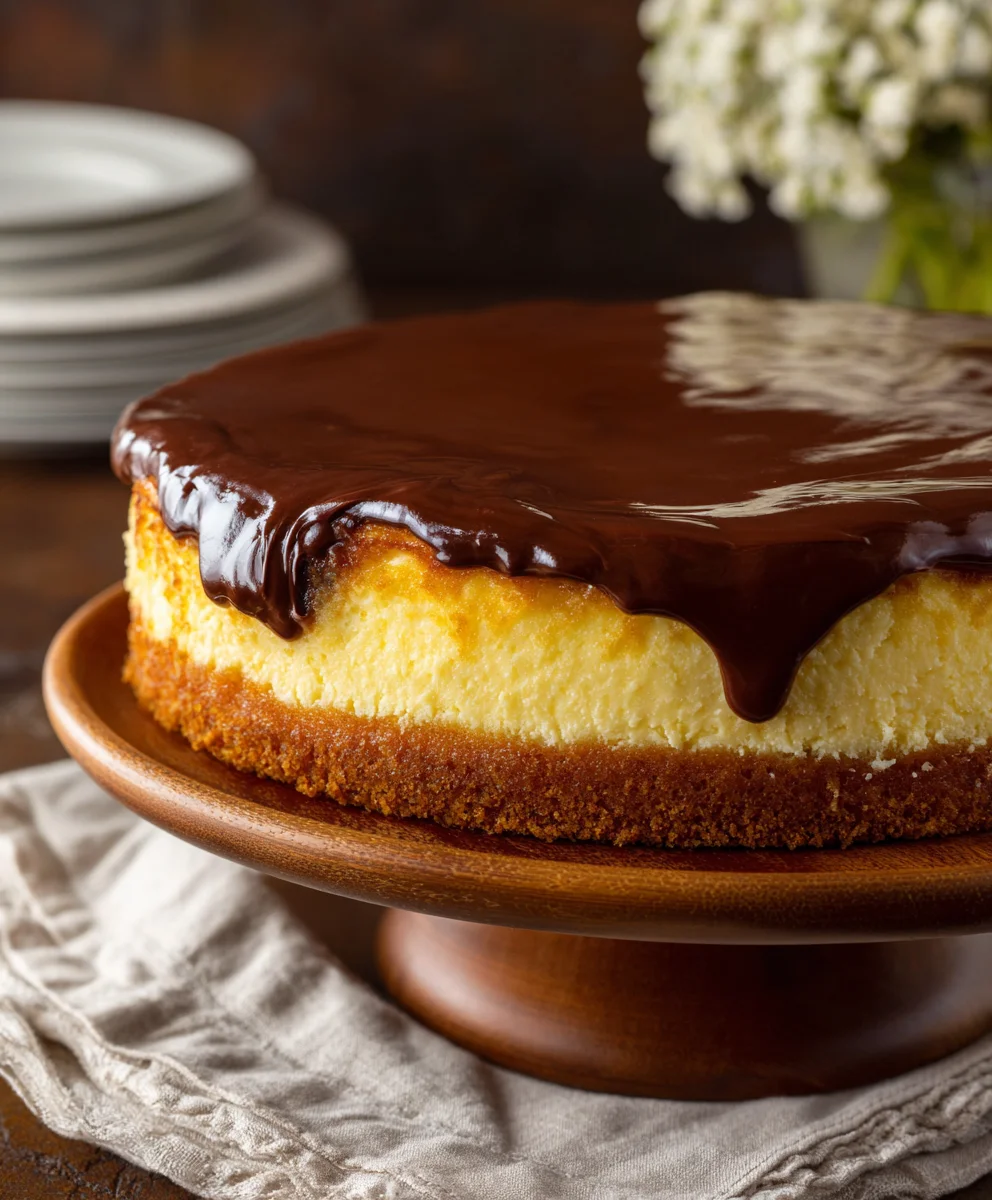
Boston Cream Pie Cheesecake—imagine the luscious, creamy perfection of your favorite cheesecake meeting the iconic, layer-upon-layer delight of a classic Boston Cream Pie. Sounds like a dream come true, doesn’t it? I’ve crafted a dessert that doesn’t just borrow elements from these two beloved confections; it masterfully blends their best qualities into a harmonious, irresistible treat.
The original Boston Cream Pie, often recognized as Massachusetts’ state dessert, has a rich history dating back to the mid-19th century, known for its fluffy vanilla sponge, velvety custard filling, and elegant chocolate ganache. Meanwhile, cheesecake, a timeless dessert enjoyed globally, is celebrated for its decadent texture and versatile flavors. What happens when these two culinary titans converge? You get something truly extraordinary!
People adore this particular Boston Cream Pie Cheesecake because it offers an exquisite balance of familiar comfort and sophisticated indulgence. Every bite delivers the tang and creaminess expected from a perfectly baked cheesecake, beautifully complemented by the distinct notes of vanilla custard and that unmistakable, glossy chocolate topping. It’s a symphony of textures and flavors that promises to impress, whether you’re serving it at a grand celebration or simply indulging in a quiet moment of dessert bliss. Prepare to fall in love with a new classic!

Ingredients:
- For the Graham Cracker Crust:
- 1 ½ cups (about 10-12 full sheets) graham cracker crumbs, finely crushed – I love a good crunchy base for my cheesecake.
- ¼ cup granulated sugar – Just a touch of sweetness to complement the crackers.
- 6 tablespoons unsalted butter, melted – This binds everything together beautifully.
- For the Boston Cream Pie Cheesecake Filling:
- 3 (8-ounce) packages full-fat cream cheese, softened to room temperature – This is absolutely crucial for a smooth, lump-free cheesecake.
- 1 cup granulated sugar – For that perfect level of sweetness in the creamy filling.
- 2 tablespoons all-purpose flour or cornstarch – A little insurance against cracks, it helps stabilize the cheesecake.
- 1 teaspoon pure vanilla extract – Classic flavor that enhances everything.
- 4 large eggs, at room temperature – Room temperature eggs incorporate much better into the cream cheese mixture.
- ½ cup full-fat sour cream, at room temperature – Adds a wonderful tang and extra creaminess to the cheesecake.
- For the Pastry Cream Filling (The “Boston Cream” Element):
- 2 cups whole milk – The base for our rich custard.
- ½ cup granulated sugar, divided – Sweetness for the custard.
- ¼ cup cornstarch – Our primary thickening agent.
- ¼ teaspoon salt – Balances the flavors.
- 4 large egg yolks – Provide richness, color, and help thicken the pastry cream.
- 2 tablespoons unsalted butter, cut into small pieces – Stirred in at the end for silkiness and flavor.
- 1 teaspoon pure vanilla extract – Essential for that classic Boston cream taste.
- For the Chocolate Ganache Topping:
- ½ cup heavy cream – The luxurious liquid component.
- 4 ounces (about 1 cup) semi-sweet chocolate chips or finely chopped semi-sweet chocolate – Good quality chocolate makes a difference here.
- 1 tablespoon unsalted butter, optional – Adds extra shine and richness, making the ganache truly decadent.
- For Garnish (Optional):
- Chocolate shavings, fresh berries, or a dollop of whipped cream – To make your Boston Cream Pie Cheesecake look even more spectacular!
Preparing the Graham Cracker Crust
- Preheat your oven to 350°F (175°C). This is a great starting point for our crust, ensuring it gets a nice, golden bake.
- Take a 9-inch springform pan and, if you like, lightly grease the bottom or line it with parchment paper for easier removal. I often do this to ensure no sticking. Wrap the outside bottom of the springform pan securely with a double layer of heavy-duty aluminum foil. This is absolutely critical if you plan on using a water bath for the cheesecake later, preventing any water from seeping into your delicious crust.
- In a medium bowl, combine the finely crushed graham cracker crumbs and the granulated sugar. Give them a good stir with a fork to ensure they are well mixed.
- Pour in the melted unsalted butter. Mix thoroughly until all the crumbs are moistened and resemble wet sand. I usually use my hands for this step to really get everything incorporated, making sure there are no dry spots.
- Press the mixture firmly and evenly into the bottom of the prepared springform pan. You can use the bottom of a flat glass or a measuring cup to achieve a really compact and even crust. A solid crust is key for a stable slice of Boston Cream Pie Cheesecake.
- Bake the crust for 8-10 minutes, or until it’s lightly golden brown and fragrant. Baking the crust briefly helps it set and become firmer, which is wonderful for supporting the heavy cheesecake filling.
- Once baked, remove the crust from the oven and set it aside to cool completely on a wire rack while you prepare the cheesecake filling. It’s important for the crust to be cool before adding the filling.
Crafting the Velvety Boston Cream Pie Cheesecake Filling
- Reduce your oven temperature to 325°F (160°C). This lower temperature is ideal for baking cheesecakes gently, preventing cracks.
- In the bowl of a stand mixer fitted with the paddle attachment, or using a large bowl with an electric hand mixer, beat the softened cream cheese on medium speed until it is completely smooth and creamy, with no lumps visible. This usually takes about 2-3 minutes. This step is paramount for a smooth cheesecake texture; ensure your cream cheese is truly at room temperature. If it’s cold, you’ll end up with lumps, and nobody wants lumpy cheesecake!
- Gradually add the granulated sugar to the cream cheese, beating on medium-low speed until just combined. Scrape down the sides of the bowl often with a rubber spatula to ensure everything is incorporated. Be careful not to overmix at this stage.
- Sprinkle in the all-purpose flour (or cornstarch) and vanilla extract. Mix on low speed until just incorporated. The flour acts as a stabilizer, helping to prevent cracks in the cheesecake as it bakes and cools.
- Add the eggs one at a time, mixing on very low speed only until each egg is just incorporated before adding the next. It’s incredibly important not to overmix the batter once the eggs are added. Overmixing incorporates too much air, which can cause the cheesecake to puff up too much during baking and then collapse and crack as it cools. Gentle mixing is the secret here.
- Finally, gently fold in the room temperature sour cream until just combined. The sour cream adds an incredible richness and a slight tang that beautifully balances the sweetness of the cheesecake. Again, avoid overmixing.
- Pour the cheesecake batter into the cooled graham cracker crust. Gently tap the pan a few times on your counter to release any large air bubbles that might be trapped in the batter.
- Prepare a water bath: Place the foil-wrapped springform pan inside a larger roasting pan. Carefully pour hot water into the roasting pan until it comes about halfway up the sides of the springform pan. The water bath creates a moist, even baking environment, which is the ultimate trick for a crack-free and creamy Boston Cream Pie Cheesecake.
- Carefully transfer the roasting pan with the cheesecake to your preheated 325°F (160°C) oven.
- Bake for 60-75 minutes, or until the edges are set but the center (about 2-3 inches in diameter) still jiggles slightly when you gently shake the pan. This slight jiggle is what you want; it indicates perfect doneness. The cheesecake will continue to set as it cools.
- Turn off the oven, prop the oven door open slightly with a wooden spoon, and let the cheesecake cool in the water bath inside the oven for 1 hour. This slow cooling process is another key step in preventing cracks.
- After 1 hour, carefully remove the springform pan from the water bath (remove the foil) and place it on a wire rack to cool completely to room temperature.
- Once at room temperature, cover the cheesecake with plastic wrap and refrigerate for at least 6-8 hours, or preferably overnight. A fully chilled cheesecake is much easier to slice and has the best texture. This waiting period is tough, but it’s worth it for the perfect Boston Cream Pie Cheesecake experience.
Whipping up the Luscious Pastry Cream
- In a medium saucepan, combine the whole milk and half of the granulated sugar (¼ cup). Heat over medium heat, stirring occasionally, until the sugar dissolves and the milk is just simmering around the edges – do not let it boil vigorously.
- While the milk is heating, in a separate medium bowl, whisk together the remaining ¼ cup granulated sugar, cornstarch, and salt. Add the egg yolks to this mixture and whisk vigorously until it’s light in color and thick, resembling a smooth paste.
- Once the milk is simmering, gradually temper the egg yolk mixture: Slowly pour about half of the hot milk mixture into the egg yolk mixture while continuously whisking. This step prevents the eggs from scrambling.
- Pour the tempered egg yolk mixture back into the saucepan with the remaining hot milk. Return the saucepan to medium heat and cook, whisking constantly, until the mixture thickens considerably and comes to a boil. Once it boils, continue to cook and whisk for another 1-2 minutes to ensure the cornstarch is fully cooked out and the pastry cream is very thick. You’ll notice it starts to “plop” and holds its shape a bit on the whisk.
- Remove the saucepan from the heat. Stir in the small pieces of unsalted butter and the vanilla extract until the butter is fully melted and incorporated, and the pastry cream is smooth and glossy.
- Pass the pastry cream through a fine-mesh sieve into a clean bowl. This removes any potential lumps or scrambled egg bits, ensuring a perfectly smooth and silky texture, just like a classic Boston cream pie filling.
- Cover the surface of the pastry cream directly with plastic wrap to prevent a skin from forming. Refrigerate for at least 2-3 hours, or until thoroughly chilled and firm. It needs to be nice and cold before you spread it on the cheesecake.
Making the Decadent Chocolate Ganache
- In a small saucepan or a microwave-safe bowl, heat the heavy cream until it’s hot and just barely simmering around the edges. If using a microwave, heat in 30-second intervals, stirring in between, until hot.
- Place the semi-sweet chocolate chips (or chopped chocolate) in a heatproof bowl. Pour the hot cream over the chocolate. Let it sit undisturbed for 5 minutes. This allows the heat from the cream to melt the chocolate gently.
- After 5 minutes, gently whisk the mixture starting from the center and working your way out, until the ganache is completely smooth and shiny. If using, stir in the optional tablespoon of unsalted butter for extra gloss and richness.
- Allow the ganache to cool slightly at room temperature, stirring occasionally, until it reaches a pourable, slightly thickened consistency. You want it to be thick enough to coat a spoon, but still runny enough to pour smoothly over the cheesecake without dripping too much over the sides. This might take 15-30 minutes, depending on your room temperature. Do not let it get too thick, or it will be difficult to spread evenly.
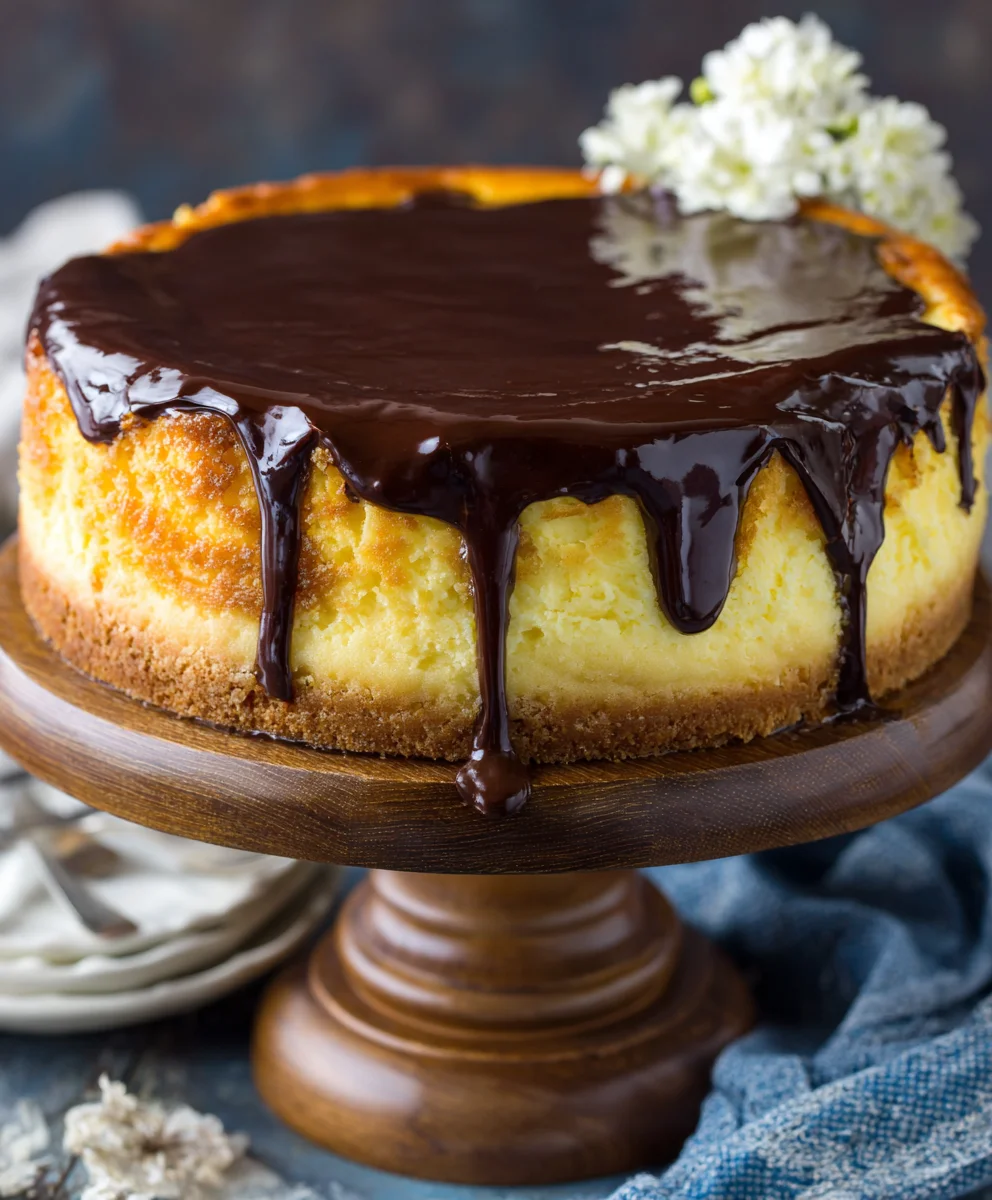
Assembling Your Magnificent Boston Cream Pie Cheesecake
- Once your cheesecake is thoroughly chilled (preferably overnight) and the pastry cream is firm, it’s time for the grand assembly! Carefully run a thin knife around the edge of the cheesecake to loosen it from the springform pan. Unclasp and remove the sides of the pan.
- Take the chilled pastry cream out of the refrigerator. Give it a quick whisk to loosen it slightly if it’s too firm, but be careful not to incorporate too much air.
- Evenly spread the pastry cream over the top of the chilled cheesecake, leaving a small border around the edge if you like, or spreading it all the way to the edge. Use an offset spatula or the back of a spoon to create a smooth, beautiful layer. This layer is the heart of the “Boston Cream Pie” in our Boston Cream Pie Cheesecake!
- Now, carefully pour the slightly cooled chocolate ganache over the pastry cream layer. Gently tilt the pan (or use the back of a spoon) to spread the ganache evenly over the entire surface, ensuring it covers all of the pastry cream. If you want some dramatic drips down the sides, you can encourage them, or keep it neatly contained on top.
- Return the assembled Boston Cream Pie Cheesecake to the refrigerator for at least 30-60 minutes to allow the chocolate ganache to set firmly. This will make slicing much cleaner and more aesthetically pleasing.
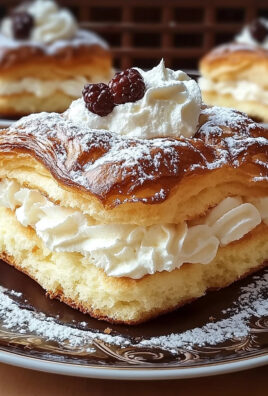
- Once the ganache is set, you can garnish your beautiful creation. I love to add some delicate chocolate shavings, a few fresh raspberries or strawberries for a pop of color, or even a small dollop of whipped cream on each slice just before serving.
- Slice and serve your homemade Boston Cream Pie Cheesecake. Each forkful will deliver layers of creamy cheesecake, luscious pastry cream, and decadent chocolate ganache, a true testament to the classic dessert it emulates. Prepare for rave reviews! This dessert is a showstopper, combining two beloved classics into one extraordinary treat. Enjoy every single rich and satisfying bite!
Conclusion:
And there you have it, my friends! We’ve journeyed through the creation of what I truly believe is one of the most magnificent desserts you’ll ever bake, a true showstopper that consistently garners rave reviews and wide smiles. This isn’t just another dessert recipe; it’s an experience, a delightful fusion of two iconic treats into one utterly irresistible masterpiece. I’ve poured my heart into perfecting this particular recipe, ensuring every layer contributes to a symphony of flavors and textures that will leave everyone craving just one more slice. It’s the kind of dessert that looks incredibly impressive, yet with a little patience and love, is completely achievable in your own kitchen. The effort you put in, I promise you, will be repaid tenfold in pure, unadulterated dessert bliss.
Why This Recipe Deserves a Spot in Your Repertoire
What makes this particular creation a must-try? It’s the brilliant marriage of the light, airy vanilla custard and rich chocolate ganache found in a classic Boston cream pie, expertly layered over a luxuriously creamy, tangy cheesecake base. You get that delightful contrast of textures – the crisp, buttery crust, the silky smooth cheesecake filling, the luscious vanilla custard, and finally, the glistening, decadent chocolate topping. It’s a dessert that manages to be both rich and surprisingly light, offering a sophisticated balance that appeals to all palates. Every single bite is a journey through familiar, comforting flavors, elevated and presented in a fresh, exciting new way. This Boston Cream Pie Cheesecake isn’t merely a hybrid; it’s an evolution, a testament to the fact that some combinations are simply meant to be. It possesses a distinct elegance that makes it perfect for special occasions, yet its comforting flavors mean it’s equally at home as the star of a casual weekend gathering. I find that it really stands out in a crowd of desserts, offering something familiar yet uniquely exciting.
Unleash Your Inner Dessert Artist: Serving Suggestions & Creative Variations
While this cheesecake is absolutely perfect as is, straight from the fridge and onto your plate, there are so many delightful ways to serve and personalize it. For a simple, elegant presentation, a light dusting of cocoa powder or a few fresh raspberries can add a beautiful splash of color and a hint of tartness to cut through the richness. I sometimes like to serve slices with a small dollop of lightly sweetened whipped cream on the side, just to add another layer of airy indulgence. For coffee lovers, a strong espresso or a creamy latte makes for an exquisite pairing, enhancing the chocolate and vanilla notes. If you’re feeling extra creative, consider adding a sprinkle of toasted almonds or finely chopped pistachios for a textural crunch. Planning for a party? This recipe can easily be adapted into individual servings! Simply bake the cheesecake batter in smaller springform pans or even in muffin tins lined with paper cups for adorable mini cheesecakes, adjusting baking times accordingly. Imagine the delight on your guests’ faces when they each receive their own personal Boston Cream Pie Cheesecake! You could also experiment with the crust – perhaps a chocolate wafer crust for an even deeper chocolate flavor, or a shortbread crust for a more buttery, delicate base. During the holiday season, a sprinkle of orange zest or a hint of peppermint extract in the chocolate ganache could add a festive twist. Don’t be afraid to make it your own; that’s part of the fun of baking!
Your Culinary Adventure Awaits!
So, what are you waiting for? I sincerely encourage you to roll up your sleeves, gather your ingredients, and embark on this delicious baking adventure. There’s something incredibly satisfying about creating something so beautiful and delectable from scratch, and I promise you, the moment you taste that first bite of this incredible cheesecake, you’ll understand exactly what I mean. It’s more than just a recipe; it’s an opportunity to create cherished memories, whether you’re baking for family, friends, or simply treating yourself to a well-deserved indulgence. I have complete faith that you’ll achieve fantastic results. Please, when you do try this recipe, don’t keep the joy to yourself! I would absolutely love to hear about your experience, see your beautiful creations, and celebrate your baking triumphs. Share your thoughts in the comments below, tell me what you loved most, and perhaps even share any creative twists you added. Your feedback is invaluable, and it truly makes my day to know that my recipes are bringing happiness to your kitchen. Happy baking, everyone!
Boston Cream Pie Cheesecake
A luxurious dessert combining the creamy texture of a classic cheesecake with the distinct vanilla custard and chocolate ganache of a Boston Cream Pie. This irresistible treat masterfully blends their best qualities into one harmonious delight.
Ingredients
-
1 ½ cups graham cracker crumbs
-
¼ cup granulated sugar (for crust)
-
6 tablespoons unsalted butter, melted (for crust)
-
3 (8-ounce) packages full-fat cream cheese, softened
-
1 cup granulated sugar (for cheesecake filling)
-
2 tablespoons all-purpose flour or cornstarch
-
1 teaspoon non-alcoholic vanilla extract (for cheesecake filling)
-
4 large eggs, room temperature
-
½ cup full-fat sour cream, room temperature
-
2 cups whole milk
-
½ cup granulated sugar, divided (for pastry cream)
-
¼ cup cornstarch (for pastry cream)
-
¼ teaspoon salt
-
4 large egg yolks
-
2 tablespoons unsalted butter, cut into small pieces (for pastry cream)
-
1 teaspoon non-alcoholic vanilla extract (for pastry cream)
-
½ cup heavy cream
-
4 ounces semi-sweet chocolate chips or chopped chocolate
-
1 tablespoon unsalted butter, optional (for ganache)
-
Chocolate shavings, fresh berries, or whipped cream (for garnish, optional)
Instructions
-
Step 1
Preheat oven to 350°F (175°C). Prepare a 9-inch springform pan by greasing the bottom and wrapping the outside with double aluminum foil. In a medium bowl, combine graham cracker crumbs and ¼ cup granulated sugar. Stir in melted unsalted butter until moistened. Press mixture firmly and evenly into the bottom of the prepared pan. Bake 8-10 minutes until lightly golden. Cool on a wire rack. -
Step 2
Reduce oven to 325°F (160°C). Beat softened cream cheese until smooth. Gradually add 1 cup granulated sugar, then all-purpose flour/cornstarch and 1 tsp non-alcoholic vanilla extract, mixing on low speed until just combined. Add eggs one at a time, mixing on very low speed until just incorporated. Gently fold in room temperature sour cream until combined. Pour batter into the cooled crust and tap pan to release air bubbles. -
Step 3
Place foil-wrapped springform pan inside a larger roasting pan. Pour hot water halfway up sides of springform. Bake 60-75 minutes until edges are set and center jiggles slightly. Turn off oven, prop door open, and cool cheesecake in water bath for 1 hour. Remove from water bath, remove foil, and cool completely on a wire rack. Cover and refrigerate for at least 6-8 hours, or preferably overnight. -
Step 4
In a saucepan, heat whole milk and ¼ cup granulated sugar until simmering. In a separate bowl, whisk remaining ¼ cup granulated sugar, cornstarch, salt, and egg yolks until light and thick. Gradually temper egg yolk mixture by slowly whisking in half of the hot milk. Pour tempered mixture back into saucepan. Cook over medium heat, whisking constantly, until thick and boiling (1-2 minutes). Remove from heat, stir in unsalted butter and 1 tsp non-alcoholic vanilla extract. Pass through a fine-mesh sieve into a clean bowl. Cover surface with plastic wrap and refrigerate 2-3 hours until thoroughly chilled and firm. -
Step 5
Heat heavy cream until hot. Place semi-sweet chocolate chips/chopped chocolate in a heatproof bowl. Pour hot cream over chocolate and let sit 5 minutes. Gently whisk from the center outwards until smooth and shiny. Stir in optional 1 tbsp unsalted butter. Cool slightly at room temperature, stirring occasionally, until pourable and slightly thickened. -
Step 6
Once cheesecake is thoroughly chilled, run a thin knife around the edge and remove springform sides. Whisk chilled pastry cream to loosen slightly. Evenly spread pastry cream over the top of the cheesecake. Pour slightly cooled chocolate ganache over the pastry cream, spreading to cover. Refrigerate assembled cheesecake for at least 30-60 minutes for ganache to set firmly. Garnish as desired (chocolate shavings, fresh berries, or whipped cream), then slice and serve.
Important Information
Nutrition Facts (Per Serving)
It is important to consider this information as approximate and not to use it as definitive health advice.
Allergy Information
Please check ingredients for potential allergens and consult a health professional if in doubt.
Leave a Comment