
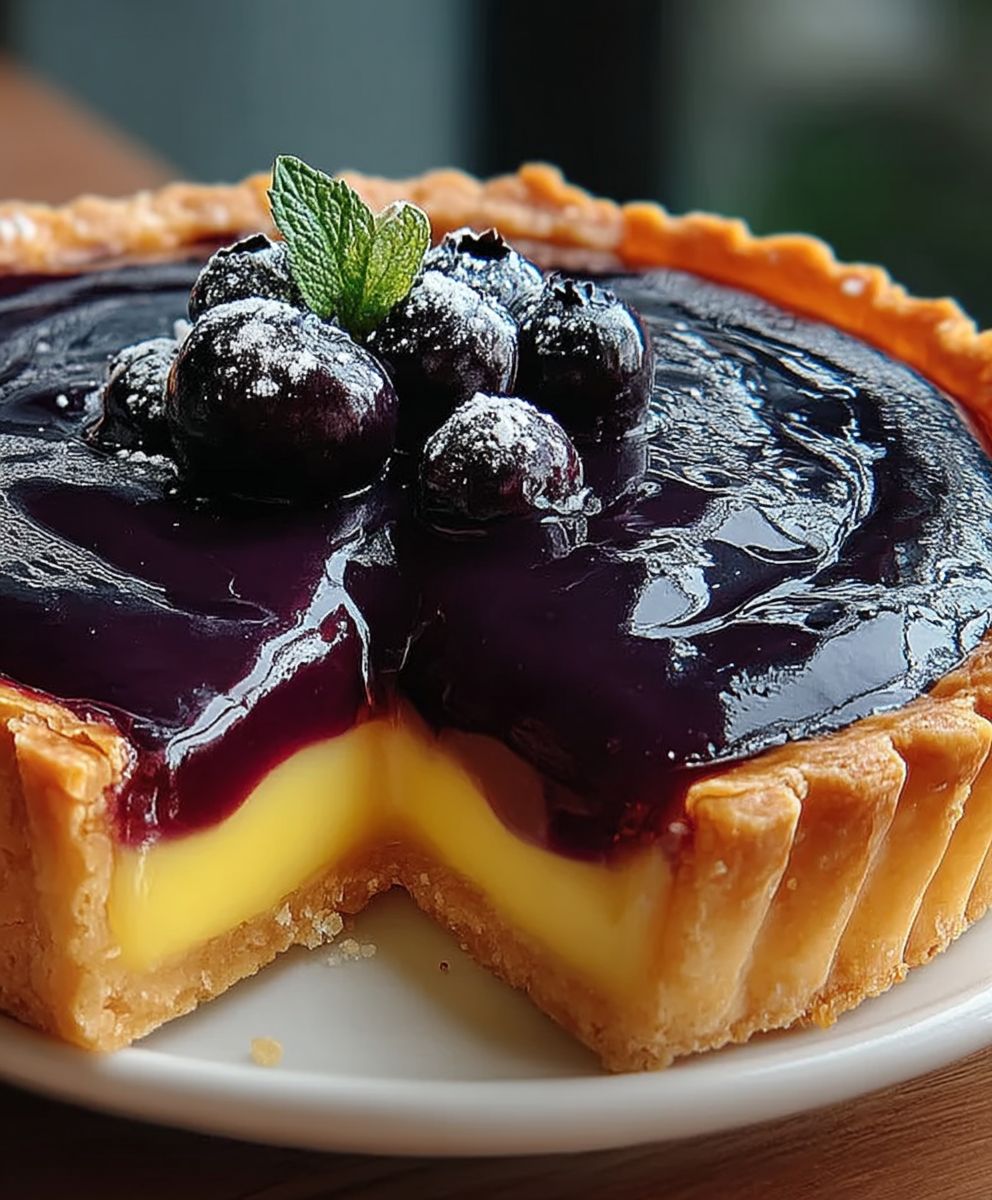
Blueberry Lemon Tart: Prepare to be transported to a sun-drenched summer afternoon with every single bite! Imagine the bright, tangy burst of lemon perfectly balanced by the sweet, juicy pop of blueberries, all nestled in a buttery, melt-in-your-mouth crust. This isn’t just a dessert; it’s an experience.
Tarts, in general, have a rich history, dating back to ancient Rome. While the exact origins of combining blueberries and lemon in a tart are harder to pinpoint, the pairing itself is a classic, celebrated for its harmonious blend of sweet and tart flavors. Blueberries, native to North America, have long been enjoyed in pies and jams, while lemons, originating in Asia, have been prized for their zesty brightness in countless culinary creations. Bringing them together in a Blueberry Lemon Tart is a testament to the power of simple, high-quality ingredients.
What makes this tart so irresistible? It’s the delightful contrast of textures the crisp, crumbly crust against the smooth, creamy filling. It’s the vibrant flavors that dance on your palate, leaving you wanting more. And, let’s be honest, it’s also the sheer beauty of it! A Blueberry Lemon Tart is a showstopper, perfect for impressing guests or simply treating yourself to a little slice of happiness. Plus, while it looks impressive, it’s surprisingly easy to make, making it a winner in my book!

Ingredients:
- For the Crust:
- 1 ½ cups all-purpose flour
- ½ cup (1 stick) unsalted butter, cold and cubed
- ¼ cup granulated sugar
- ¼ teaspoon salt
- 4-6 tablespoons ice water
- For the Lemon Filling:
- 1 cup granulated sugar
- ¼ cup cornstarch
- ¼ teaspoon salt
- 1 cup water
- ½ cup fresh lemon juice (from about 3-4 lemons)
- 2 tablespoons unsalted butter
- 2 large egg yolks, lightly beaten
- 1 teaspoon lemon zest
- ½ teaspoon vanilla extract
- For the Blueberry Topping:
- 2 cups fresh blueberries, rinsed and patted dry
- 2 tablespoons granulated sugar
- 1 tablespoon lemon juice
- 1 teaspoon lemon zest
- Optional:
- Powdered sugar, for dusting
- Fresh mint sprigs, for garnish
Preparing the Crust:
- Combine Dry Ingredients: In a large bowl, whisk together the flour, sugar, and salt. This ensures the salt and sugar are evenly distributed throughout the flour, which is crucial for a consistent crust.
- Cut in the Butter: Add the cold, cubed butter to the flour mixture. Using a pastry blender or your fingertips (work quickly to prevent the butter from melting), cut the butter into the flour until the mixture resembles coarse crumbs. You should still see small pieces of butter, about the size of peas. These butter pieces are what create flaky layers in the crust.
- Add Ice Water: Gradually add the ice water, one tablespoon at a time, mixing gently after each addition. Be careful not to overmix. The dough should just come together and form a ball. If the dough is too dry, add a little more ice water, one teaspoon at a time. If it’s too wet, add a little more flour, one tablespoon at a time. The key is to add just enough liquid to bind the ingredients without developing the gluten in the flour too much, which would result in a tough crust.
- Form the Dough: Gently form the dough into a disc, wrap it tightly in plastic wrap, and refrigerate for at least 30 minutes, or preferably an hour. This allows the gluten to relax, making the dough easier to roll out and preventing it from shrinking during baking. Chilling the butter also helps to keep it firm, which contributes to a flakier crust.
- Roll Out the Dough: On a lightly floured surface, roll out the dough into a circle about 12 inches in diameter. The dough should be thin but not so thin that it tears easily. If the dough sticks to the surface, add a little more flour underneath.
- Transfer to Tart Pan: Carefully transfer the rolled-out dough to a 9-inch tart pan with a removable bottom. Gently press the dough into the bottom and up the sides of the pan. Make sure the dough is evenly distributed and that there are no air pockets.
- Trim and Crimp the Edges: Trim any excess dough from the edges of the pan. You can use a rolling pin to roll over the top of the pan, or simply trim with a knife. Crimp the edges of the crust using a fork or your fingers to create a decorative border. This not only looks nice but also helps to prevent the crust from shrinking during baking.
- Pre-Bake the Crust (Blind Bake): Preheat your oven to 375°F (190°C). Line the crust with parchment paper and fill it with pie weights or dried beans. This prevents the crust from puffing up during baking. Bake for 15 minutes.
- Remove Weights and Bake Further: Remove the parchment paper and pie weights. Bake for another 10-15 minutes, or until the crust is lightly golden brown. Keep a close eye on it to prevent it from burning. If the edges start to brown too quickly, you can cover them with foil.
- Cool Completely: Let the crust cool completely in the tart pan before adding the filling. This prevents the filling from making the crust soggy.
Preparing the Lemon Filling:
- Combine Dry Ingredients: In a medium saucepan, whisk together the sugar, cornstarch, and salt. The cornstarch acts as a thickening agent, so it’s important to whisk it well with the sugar and salt to prevent lumps from forming.
- Add Water and Lemon Juice: Gradually whisk in the water and lemon juice until smooth. Make sure there are no lumps of cornstarch remaining.
- Cook the Mixture: Cook the mixture over medium heat, stirring constantly, until it thickens and comes to a simmer. This usually takes about 5-7 minutes. The mixture will start to look translucent as it thickens.
- Temper the Egg Yolks: In a small bowl, whisk the egg yolks lightly. Gradually whisk a small amount of the hot lemon mixture into the egg yolks to temper them. This prevents the egg yolks from scrambling when they are added to the hot mixture.
- Add Egg Yolks to the Saucepan: Pour the tempered egg yolks into the saucepan with the remaining lemon mixture. Whisk constantly and cook for another minute or two, until the filling is thick and glossy. Be careful not to overcook the filling, as this can cause it to curdle.
- Remove from Heat and Add Butter, Zest, and Vanilla: Remove the saucepan from the heat and stir in the butter, lemon zest, and vanilla extract. The butter adds richness and shine to the filling, while the lemon zest enhances the lemon flavor. The vanilla extract adds a subtle sweetness and complexity.
- Cool Slightly: Let the lemon filling cool slightly before pouring it into the pre-baked tart crust. This helps to prevent the crust from becoming soggy.
Assembling the Tart:
- Pour Filling into Crust: Pour the slightly cooled lemon filling into the cooled pre-baked tart crust. Spread the filling evenly to create a smooth surface.
- Prepare Blueberry Topping: In a medium bowl, gently toss the fresh blueberries with the sugar, lemon juice, and lemon zest. The sugar helps to draw out the natural juices of the blueberries, creating a slightly syrupy sauce. The lemon juice and zest add a bright, citrusy flavor that complements the blueberries and lemon filling.
- Arrange Blueberries on Top: Arrange the sugared blueberries evenly over the lemon filling. You can create a decorative pattern or simply scatter them randomly.
- Chill the Tart: Cover the tart with plastic wrap and refrigerate for at least 2 hours, or preferably overnight, to allow the filling to set completely. This also allows the flavors to meld together.
- Serve: Before serving, dust the tart with powdered sugar, if desired. Garnish with fresh mint sprigs for a pop of color and freshness. Slice and serve chilled.
Conclusion:
This Blueberry Lemon Tart isn’t just a dessert; it’s a burst of sunshine on a plate, a symphony of sweet and tart that will leave you craving more. I truly believe it’s a must-try recipe for anyone who appreciates a delightful balance of flavors and a visually stunning presentation. The creamy lemon curd, studded with juicy blueberries and nestled in a buttery, crumbly crust, is an experience you won’t soon forget. It’s the kind of treat that elevates any occasion, from a casual afternoon tea to a sophisticated dinner party.
But why is this particular tart so special? It’s the perfect harmony between the bright, zesty lemon and the sweet, slightly tangy blueberries. The homemade crust adds a layer of richness and texture that you simply can’t get from store-bought alternatives. And let’s be honest, the vibrant colors are incredibly appealing, making it a showstopper that will impress your friends and family. This Blueberry Lemon Tart is more than just a recipe; it’s an invitation to create a memorable moment.
Serving Suggestions and Variations:
The beauty of this recipe lies in its versatility. While it’s absolutely divine as is, there are plenty of ways to customize it to your liking.
* Serving Suggestions: Serve chilled, either on its own or with a dollop of freshly whipped cream or a scoop of vanilla ice cream. A sprinkle of powdered sugar adds a touch of elegance. For a truly decadent experience, pair it with a glass of chilled Moscato or a light dessert wine.
* Berry Variations: Feel free to experiment with other berries! Raspberries, blackberries, or even a mixed berry medley would work beautifully. Just adjust the amount of sugar slightly depending on the sweetness of the berries you choose.
* Crust Variations: If you’re feeling adventurous, try adding a touch of lemon zest or almond extract to the crust for an extra layer of flavor. You could also use a graham cracker crust for a different texture.
* Lemon Curd Variations: For a richer lemon curd, use all egg yolks instead of whole eggs. You can also add a tablespoon of limoncello for an extra kick of citrus flavor.
* Individual Tarts: Instead of making one large tart, you can easily adapt this recipe to make individual tartlets. This is a great option for parties or when you want to control portion sizes. Simply press the crust dough into individual tart pans and adjust the baking time accordingly.
Don’t Be Afraid to Experiment!
The most important thing is to have fun and make it your own. Cooking should be an enjoyable experience, so don’t be afraid to get creative and try new things.
I truly hope you’ll give this Blueberry Lemon Tart recipe a try. I’m confident that you’ll love it as much as I do. It’s a recipe that I’ve perfected over the years, and I’m excited to share it with you.
Once you’ve made it, I’d love to hear about your experience! Did you make any variations? What did your friends and family think? Share your photos and stories in the comments below. I can’t wait to see your creations! Happy baking!
Blueberry Lemon Tart: The Ultimate Recipe and Baking Guide
A bright and refreshing lemon tart with a buttery crust, tangy lemon filling, and a sweet and juicy blueberry topping. Perfect for a summer dessert!
Ingredients
- 1 ½ cups all-purpose flour
- ½ cup (1 stick) unsalted butter, cold and cubed
- ¼ cup granulated sugar
- ¼ teaspoon salt
- 4-6 tablespoons ice water
- 1 cup granulated sugar
- ¼ cup cornstarch
- ¼ teaspoon salt
- 1 cup water
- ½ cup fresh lemon juice (from about 3-4 lemons)
- 2 tablespoons unsalted butter
- 2 large egg yolks, lightly beaten
- 1 teaspoon lemon zest
- ½ teaspoon vanilla extract
- 2 cups fresh blueberries, rinsed and patted dry
- 2 tablespoons granulated sugar
- 1 tablespoon lemon juice
- 1 teaspoon lemon zest
- Powdered sugar, for dusting
- Fresh mint sprigs, for garnish
Instructions
- In a large bowl, whisk together the flour, sugar, and salt.
- Add the cold, cubed butter to the flour mixture. Using a pastry blender or your fingertips (work quickly), cut the butter into the flour until the mixture resembles coarse crumbs.
- Gradually add the ice water, one tablespoon at a time, mixing gently after each addition. The dough should just come together and form a ball.
- Gently form the dough into a disc, wrap it tightly in plastic wrap, and refrigerate for at least 30 minutes, or preferably an hour.
- On a lightly floured surface, roll out the dough into a circle about 12 inches in diameter.
- Carefully transfer the rolled-out dough to a 9-inch tart pan with a removable bottom. Gently press the dough into the bottom and up the sides of the pan.
- Trim any excess dough from the edges of the pan. Crimp the edges of the crust using a fork or your fingers to create a decorative border.
- Preheat your oven to 375°F (190°C). Line the crust with parchment paper and fill it with pie weights or dried beans. Bake for 15 minutes.
- Remove the parchment paper and pie weights. Bake for another 10-15 minutes, or until the crust is lightly golden brown.
- Let the crust cool completely in the tart pan before adding the filling.
- In a medium saucepan, whisk together the sugar, cornstarch, and salt.
- Gradually whisk in the water and lemon juice until smooth.
- Cook the mixture over medium heat, stirring constantly, until it thickens and comes to a simmer.
- In a small bowl, whisk the egg yolks lightly. Gradually whisk a small amount of the hot lemon mixture into the egg yolks to temper them.
- Pour the tempered egg yolks into the saucepan with the remaining lemon mixture. Whisk constantly and cook for another minute or two, until the filling is thick and glossy.
- Remove the saucepan from the heat and stir in the butter, lemon zest, and vanilla extract.
- Let the lemon filling cool slightly before pouring it into the pre-baked tart crust.
- Pour the slightly cooled lemon filling into the cooled pre-baked tart crust. Spread the filling evenly.
- In a medium bowl, gently toss the fresh blueberries with the sugar, lemon juice, and lemon zest.
- Arrange the sugared blueberries evenly over the lemon filling.
- Cover the tart with plastic wrap and refrigerate for at least 2 hours, or preferably overnight, to allow the filling to set completely.
- Before serving, dust the tart with powdered sugar, if desired. Garnish with fresh mint sprigs. Slice and serve chilled.
Notes
- Make sure the butter is very cold for the crust. This is key to a flaky crust.
- Don’t overmix the crust dough. Overmixing develops the gluten and makes the crust tough.
- Blind baking the crust prevents it from becoming soggy.
- When tempering the egg yolks, add the hot lemon mixture gradually to prevent them from scrambling.
- Chilling the tart completely is important for the filling to set properly.

Leave a Comment