
Pizza Rolls – just hearing those two words can conjure up a wave of delicious memories, right? For many of us, they represent the quintessential comfort food, a go-to snack that effortlessly bridges the gap between childhood nostalgia and adult cravings. They’re more than just a quick bite; they’re a symbol of casual gatherings, cozy evenings, and the simple joy of a perfectly satisfying treat.
I remember countless evenings huddled around the television, eagerly awaiting the timer to ding, signaling the arrival of those perfectly crispy, cheese-filled delights. While the frozen variety certainly holds a cherished spot in our hearts and has a significant place in American snack culture, there’s an undeniable magic that happens when you create these bite-sized wonders from scratch. It’s an experience that elevates a familiar favorite into something truly spectacular.
Why Homemade Pizza Rolls Reign Supreme
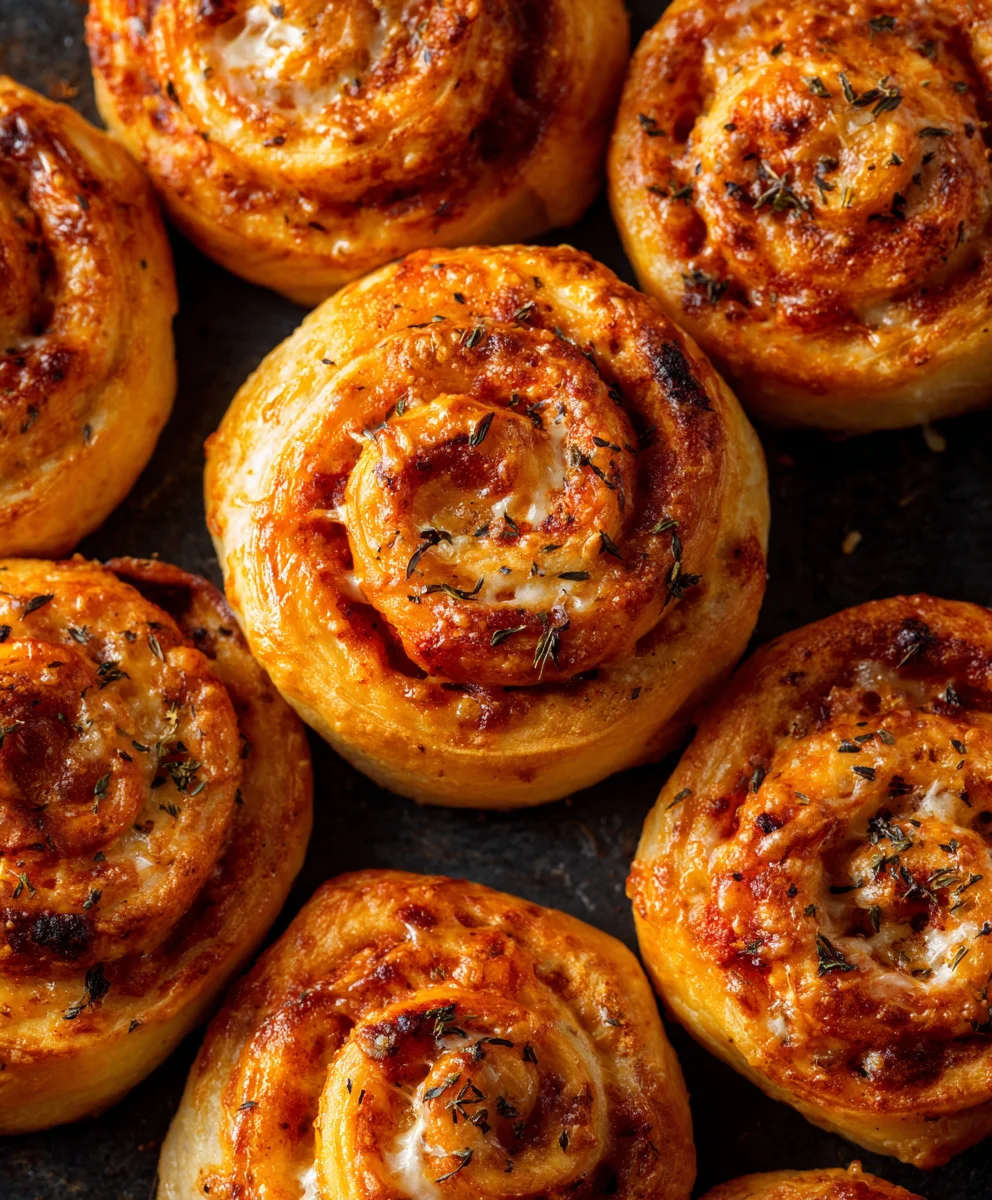
There’s a reason these miniature marvels have remained so universally adored: their perfect marriage of textures and flavors. Imagine a golden, flaky exterior yielding to an explosion of rich, savory tomato sauce and a generous, molten cascade of stretchy mozzarella cheese. This irresistible combination makes them the ultimate crowd-pleaser, whether you’re hosting a lively game night, preparing a quick after-school treat, or simply indulging in a moment of pure culinary bliss. Their convenience, coupled with their incredible taste, makes them an unbeatable option.
Homemade Pizza Rolls elevate this beloved classic, allowing for endless customization with your favorite fillings and the freshest ingredients, transforming them from a simple snack into a gourmet experience. Forget the ordinary; prepare to embark on a culinary adventure that promises to be both fun to make and absolutely divine to devour. I’m thrilled to share my recipe for crafting these iconic snacks that are guaranteed to become a new family favorite.

Ingredients:
Crafting the perfect batch of homemade Pizza Rolls begins with selecting high-quality ingredients. Each component plays a crucial role in achieving that irresistible flavor and texture that we all crave from a warm, savory bite of pizza. I find that a combination of fresh and pantry staples truly elevates these little parcels of joy.
- Puff Pastry Sheets: You’ll need two sheets, typically found in a 17.3-ounce (or similar size) package from the freezer section. Make sure to thaw them according to package directions, usually in the refrigerator overnight or at room temperature for about 30-40 minutes. I personally love puff pastry for its incredible flakiness and buttery flavor, which gives these Pizza Rolls a gourmet touch compared to traditional dough. It creates a beautiful golden crust that crunches just right.
- Marinara Sauce: Approximately ½ cup of your favorite marinara or pizza sauce. I always recommend using a good quality, thick sauce that isn’t too watery, as excess moisture can make the pastry soggy. If your sauce seems a bit thin, you can simmer it gently on the stovetop for a few minutes to reduce it slightly, concentrating its flavors. A robust, slightly sweet, and tangy sauce is key here.
- Low-Moisture Part-Skim Mozzarella Cheese: About 1½ cups, shredded. The “low-moisture part-skim” designation is important because it melts beautifully without releasing too much water, preventing your Pizza Rolls from becoming watery inside. Freshly shredded cheese is always superior to pre-shredded varieties, as the latter often contains anti-caking agents that can affect melt and texture. For the ultimate stretch and creaminess, this is my go-to.
- Mini Pepperoni: ½ cup. If you can find mini pepperoni, it’s fantastic because it distributes more evenly throughout the rolls. If not, don’t fret! Simply dice regular-sized pepperoni into small, bite-sized pieces. The savory, slightly spicy kick of pepperoni is a classic pizza topping for a reason, and it’s non-negotiable for me in Pizza Rolls.
- Cooked Italian Sausage: ½ cup, crumbled and thoroughly cooked. This is an optional but highly recommended addition for a deeper, more substantial flavor. I prefer a mild or sweet Italian sausage, but if you like a little heat, a spicy variety would be excellent too. Make sure to drain any excess grease after cooking to keep your rolls from becoming oily.
- Optional Veggies (finely diced): For those who love a bit of garden freshness, consider adding a combination of:
- ¼ cup finely diced red bell pepper: Adds a touch of sweetness and color.
- ¼ cup finely diced white onion: Provides a subtle aromatic bite.
- ¼ cup finely diced mushrooms: Offers an earthy depth.
The key here is finely diced. Large pieces will make rolling difficult and can tear the pastry. I like to sauté these briefly before adding them to the filling to soften them and deepen their flavors, as well as to remove some of their inherent moisture.
- Grated Parmesan Cheese: 2 tablespoons. A sprinkle of Parmesan adds a salty, umami kick that complements the mozzarella beautifully. I usually mix some into the filling and save a little for sprinkling on top before baking.
- Dried Italian Seasoning: 1 teaspoon. This aromatic blend of herbs like oregano, basil, thyme, and rosemary is essential for that authentic pizza flavor.
- Garlic Powder: ½ teaspoon. A hint of garlic powder enhances all the savory notes without adding moisture.
- Salt and Freshly Ground Black Pepper: To taste. A little seasoning goes a long way to elevate all the flavors.
- Large Egg: 1, for an egg wash. This is crucial for achieving that beautiful golden-brown, shiny crust on your Pizza Rolls. Whisk it with a splash of water or milk.
- Olive Oil: 1 tablespoon, or a non-stick cooking spray for your baking sheet. A good quality extra virgin olive oil can also be used for brushing the rolls if you prefer not to use an egg wash, or for sautéing your optional veggies.
- Flour (for dusting): A small amount, about 2 tablespoons, for dusting your work surface. This prevents the puff pastry from sticking and makes it much easier to handle.
Having all these ingredients prepped and ready before you start assembling is what we call “mise en place,” and it makes the entire cooking process smooth and enjoyable. Trust me, you’ll thank yourself for taking the extra few minutes!
Equipment You’ll Need:
Before we dive into the fun part of assembling these incredible Pizza Rolls, let’s make sure you have all the necessary tools at hand. Having the right equipment makes the process much more efficient and enjoyable, almost like being a chef in your own kitchen!
- Large Baking Sheets: You’ll likely need two, or one large one and a second smaller one, depending on the size of your oven. I always recommend using light-colored baking sheets as they conduct heat more evenly and prevent the bottoms of your Pizza Rolls from browning too quickly. Darker pans can sometimes lead to overbrowning.
- Parchment Paper or Silicone Baking Mats: Absolutely essential for preventing sticking and making cleanup a breeze. I swear by parchment paper for almost all my baking; it ensures your rolls lift off the sheet effortlessly. Silicone baking mats work just as well and are reusable, which is a nice eco-friendly bonus.
- Sharp Knife: A good chef’s knife or utility knife is crucial for finely dicing your vegetables and neatly cutting the puff pastry into individual rolls. A clean cut will give you aesthetically pleasing results.
- Cutting Board: A sturdy cutting board is needed for all your prep work – chopping vegetables, pepperoni, and slicing the dough.
- Rolling Pin: To gently roll out the puff pastry. While it comes pre-rolled, sometimes a light touch with a rolling pin helps to even out the thickness and gently extend it a bit, especially if you want to make sure your edges are perfectly sealed.
- Small Bowl: For whisking your egg wash.
- Pastry Brush: To apply the egg wash or olive oil to the top of your Pizza Rolls before baking. This gives them that beautiful golden sheen.
- Spatula or Bench Scraper: Useful for carefully transferring the cut rolls from your work surface to the baking sheet. A bench scraper is particularly handy for portioning and cleaning up your work surface.
- Measuring Cups and Spoons: For accurate measurement of all your ingredients, ensuring consistency in flavor.
- Small Skillet (optional): If you’re browning Italian sausage or sautéing optional vegetables, a small to medium-sized skillet will be necessary.
- Wire Cooling Rack: Once baked, allowing your Pizza Rolls to cool on a wire rack prevents the bottoms from becoming soggy and helps maintain their crispiness.
Having everything organized and within reach will make the entire process of creating your homemade Pizza Rolls a delightful experience. Now, let’s get those fillings ready!
Getting Started: Prepping Your Filling for Delicious Pizza Rolls
The heart of any good pizza, and by extension, any good Pizza Roll, lies in its filling. Taking the time to properly prepare each component ensures a burst of flavor in every bite. This is where we lay the foundation for truly spectacular results.
- Thaw the Puff Pastry: First things first, ensure your puff pastry sheets are properly thawed. I usually take them out of the freezer and let them sit in the refrigerator overnight. If you’re short on time, you can carefully unroll them and let them sit at room temperature for about 30-40 minutes until they are pliable enough to unfold without cracking. This step is critical; if the pastry is too cold, it will break when unrolled, and if it’s too warm, it can become sticky and difficult to handle. You want it to be just flexible.
-
Prepare Optional Meat Fillings: If you’re using Italian sausage, now is the time to cook it.
- Place a small skillet over medium heat. Add the Italian sausage and break it up with a spoon as it cooks.
- Cook until it’s beautifully browned and thoroughly cooked through, usually about 8-10 minutes.
- Once cooked, use a slotted spoon to transfer the crumbled sausage to a paper towel-lined plate to drain any excess grease. This is super important! You don’t want oily Pizza Rolls. Pat it dry gently if needed. Set aside to cool slightly.
I find that a well-cooked and drained sausage adds a wonderful savory depth that truly makes these Pizza Rolls stand out.
-
Chop Your Veggies (if using): If you’ve decided to include red bell pepper, onion, or mushrooms, the key is to chop them incredibly fine. We’re talking about pieces no larger than a grain of rice, if possible. This ensures they cook evenly inside the pastry and don’t create bulky spots that can tear the dough.
- For bell pepper: Halve, core, remove seeds, and finely dice.
- For onion: Peel, halve, and finely dice.
- For mushrooms: Wipe clean, remove stems (or finely dice them too), and finely dice the caps.
Pro Tip: To avoid excess moisture, I often give my finely diced veggies a quick sauté in a dry pan over medium-high heat for about 3-5 minutes, just until they start to soften and any released water has evaporated. This concentrates their flavor and prevents them from making your Pizza Rolls soggy. Let them cool completely before mixing into the filling.
- Shred Your Cheese: If you’re not using pre-shredded mozzarella, now is the time to shred your block of low-moisture part-skim mozzarella. As I mentioned, freshly shredded cheese melts much better and tastes creamier. Grate the Parmesan cheese as well.
- Prepare the Pepperoni: If you don’t have mini pepperoni, dice your regular-sized pepperoni into small, coin-like pieces. The smaller the better, for even distribution and bite.
-
Combine the Filling Ingredients: In a medium-sized bowl, gently combine all your prepared filling ingredients:
- Shredded mozzarella cheese
- Cooked and drained Italian sausage (if using)
- Mini or diced pepperoni
- Finely diced and cooled optional veggies (if using)
- Grated Parmesan cheese
- Dried Italian seasoning
- Garlic powder
- A pinch of salt and a few grinds of black pepper
Gently toss everything together until well combined. You want an even distribution of all the savory goodies. This ensures every Pizza Roll gets a little bit of everything. I sometimes even give it a quick taste at this point (assuming all meats are cooked) to adjust seasonings if needed. Remember, the sauce will add its own flavor too!
- Prepare Your Work Surface and Egg Wash: Lightly dust your clean work surface with a small amount of all-purpose flour. This will prevent the pastry from sticking. In a small bowl, whisk the large egg with about 1 tablespoon of water or milk. This creates our egg wash, which will give the Pizza Rolls their beautiful golden shine. Set your pastry brush nearby.
With all your fillings prepped and your workspace ready, you’re now perfectly set to move on to assembling your fantastic Pizza Rolls. This meticulous preparation is what sets homemade apart from store-bought, giving you truly restaurant-quality results in every bite.
Assembling Your Perfect Pizza Rolls: The Rolling Process
This is where the magic truly happens! Assembling your Pizza Rolls is a delicate yet rewarding process. Taking your time here will result in neat, evenly filled rolls that bake beautifully. I find this part to be quite meditative, almost like an art form.
- Unroll the First Puff Pastry Sheet: Carefully unroll one sheet of thawed puff pastry onto your lightly floured work surface. Most puff pastry sheets come pre-rolled into a rectangle. If it feels a little stiff, let it sit for another minute or two. You may need to gently roll it out slightly with a rolling pin, just enough to even out any creases and ensure it’s a perfect rectangle, about 10×15 inches or so, depending on the brand. The goal here is a consistent thickness, not to make it significantly larger. I always make sure the edges are nice and straight.
- Spread the Marinara Sauce: Take half of your marinara or pizza sauce (about ¼ cup) and spread it evenly over the entire surface of the puff pastry sheet, leaving about a ½-inch border clear along one of the longer edges. This border is crucial for sealing the roll later. I use the back of a spoon to spread it out smoothly, ensuring every inch gets a good coating without being overly saucy. Too much sauce can make the pastry wet and hard to roll, and can lead to sogginess.
- Distribute the Filling: Now, evenly sprinkle half of your prepared cheese and topping mixture (about 1½ cups) over the sauced puff pastry. Make sure to distribute it all the way to the edges, but again, keep that ½-inch border on the long edge clear. I usually sprinkle it layer by layer: first the cheese, then the pepperoni, then the sausage and veggies. This helps ensure a good mix in every single Pizza Roll. Don’t be shy, but also don’t overfill, as that will make rolling very difficult. A generous, even layer is what we’re aiming for.
-
Start Rolling the Puff Pastry: Beginning from the long edge opposite the one you left clear, carefully and snugly start rolling the puff pastry sheet into a tight log. This requires a gentle but firm hand.
- Lift the edge closest to you and fold it over the filling, creating the initial tight roll.
- Continue rolling slowly, keeping the log as tight as possible. A tight roll ensures your Pizza Rolls maintain their shape and don’t unravel during baking.
- As you roll, if the pastry starts to stick to your hands or the surface, a light dusting of flour on your hands can help, but avoid too much.
- Roll all the way to the clear ½-inch border.
I always take my time with this step. A well-rolled log means perfect spirals in your finished Pizza Rolls.
- Seal the Log: Once you reach the clear ½-inch border, lightly brush that border with a bit of your egg wash. This acts as a “glue.” Then, press the seam firmly against the log to seal it completely. You can also pinch the ends of the log gently to seal them as well, preventing any filling from escaping. This creates a neat, contained package for your delicious filling.
- Chill the Log (Recommended): For easier slicing and to help the Pizza Rolls hold their shape beautifully, I highly recommend chilling the rolled log in the freezer for about 15-20 minutes, or in the refrigerator for 30-40 minutes. You can place it on a small plate or cutting board. This firms up the butter in the puff pastry, making it much easier to get clean, even cuts. This step might seem extra, but it makes a noticeable difference in the final presentation of your Pizza Rolls.
-
Slice the Log into Rolls: Once chilled, transfer the log to your cutting board. Using a very sharp knife, carefully slice the log into approximately 1-inch thick rounds. I usually aim for about 12-15 rolls per log, depending on the length.
- A sawing motion with the knife, rather than pressing straight down, helps prevent squishing the rolls and keeps their round shape intact.
- If some rolls flatten slightly, you can gently reshape them back into rounds with your fingers.
You’ll see beautiful spirals of sauce, cheese, and toppings peeking out – a true visual treat before they even hit the oven!
- Repeat for the Second Sheet: Repeat steps 1 through 7 with your second sheet of puff pastry and the remaining half of your sauce and filling mixture. This will give you a generous batch of about 24-30 homemade Pizza Rolls, perfect for sharing (or not!).
Now that your adorable little Pizza Rolls are formed and ready, it’s time to get them onto the baking sheet and into the oven. The anticipation is building, isn’t it?
Baking Your Golden-Brown Pizza Rolls
The moment of truth! Baking is where our little assembled packages transform into golden, crispy, cheesy Pizza Rolls. Proper oven temperature and baking time are crucial for that perfect texture and melty interior. Get ready for your kitchen to smell absolutely divine!
- Preheat Your Oven: First, preheat your oven to 400°F (200°C). It’s important to give the oven ample time to reach and stabilize at this temperature. A hot oven ensures the puff pastry puffs up quickly and becomes beautifully flaky, which is exactly what we want for these Pizza Rolls.
- Prepare Baking Sheets: Line two large baking sheets with parchment paper or silicone baking mats. This prevents sticking and makes cleanup a breeze, allowing the bottoms of your Pizza Rolls to brown evenly without scorching. I always recommend using parchment paper for puff pastry creations because it truly helps in achieving that perfect crispy base.
- Arrange the Pizza Rolls: Carefully place the sliced Pizza Rolls onto the prepared baking sheets, making sure to leave about 1 inch of space between each roll. This allows for proper air circulation, ensuring they bake evenly and get crispy all around. If they’re too close, they might steam rather than bake, leading to a softer, less flaky texture. You don’t want them touching!
- Apply Egg Wash: Before baking, gently brush the tops and sides of each Pizza Roll with the whisked egg wash (egg mixed with water or milk). This step is what gives them that gorgeous golden-brown color and a lovely subtle sheen once baked. It also adds a tiny bit of richness to the crust. If you don’t have an egg, a brush of olive oil will also work to encourage browning, though the color might not be as deep.
- Optional Finishing Touches: For an extra layer of flavor and visual appeal, I sometimes like to sprinkle a tiny pinch of extra Italian seasoning or grated Parmesan cheese over the top of each roll after applying the egg wash. This isn’t necessary, but it certainly adds a little something extra to your homemade Pizza Rolls.
-
Bake the Pizza Rolls: Place the baking sheets into your preheated oven. Bake for 18-25 minutes, or until the puff pastry is deeply golden brown, puffed up, and the cheese is bubbly and melted.
- Rotation is Key: About halfway through the baking time (around 10-12 minutes), I usually rotate the baking sheets from front to back and, if using two sheets, swap their positions (top rack to bottom rack and vice versa). This ensures even baking, as most ovens have hot spots.
- Keep an Eye on Them: Baking times can vary depending on your oven, so watch them closely, especially towards the end. You’re looking for that unmistakable rich, golden hue and a visibly puffed, flaky texture. The aroma of baked pizza will fill your kitchen, letting you know they’re almost ready!
The cheese should be gloriously melted and possibly even a little browned in spots, creating those delicious crispy edges that everyone loves. The filling will be piping hot!
- Cooling: Once baked to perfection, carefully remove the baking sheets from the oven. Let the Pizza Rolls cool on the baking sheets for about 5 minutes before transferring them to a wire cooling rack. This brief resting period allows them to set slightly, making them easier to handle without falling apart. Cooling them on a wire rack allows air to circulate around all sides, preventing the bottoms from becoming soggy and helping to maintain their crispiness.
And there you have it! Beautifully baked, golden, and incredibly aromatic Pizza Rolls, ready for enjoyment. The flaky pastry, the gooey cheese, and the savory filling all come together in a perfect symphony of flavor. Be careful, though – they will be extremely hot fresh out of the oven, so resist the urge to bite into one immediately!
Serving Suggestions and Storage Tips for Your Homemade Pizza Rolls
Congratulations, you’ve just created a batch of glorious homemade Pizza Rolls! Now comes the best part: enjoying them and ensuring any leftovers are kept fresh for future cravings. These are truly versatile and perfect for any occasion, from a quick snack to a party appetizer.
Serving Your Delicious Pizza Rolls:
While I often find these Pizza Rolls so packed with flavor that they don’t need any accompaniment, a little something on the side can elevate the experience even further. They are incredibly satisfying straight from the oven once they’ve cooled enough not to burn your tongue.
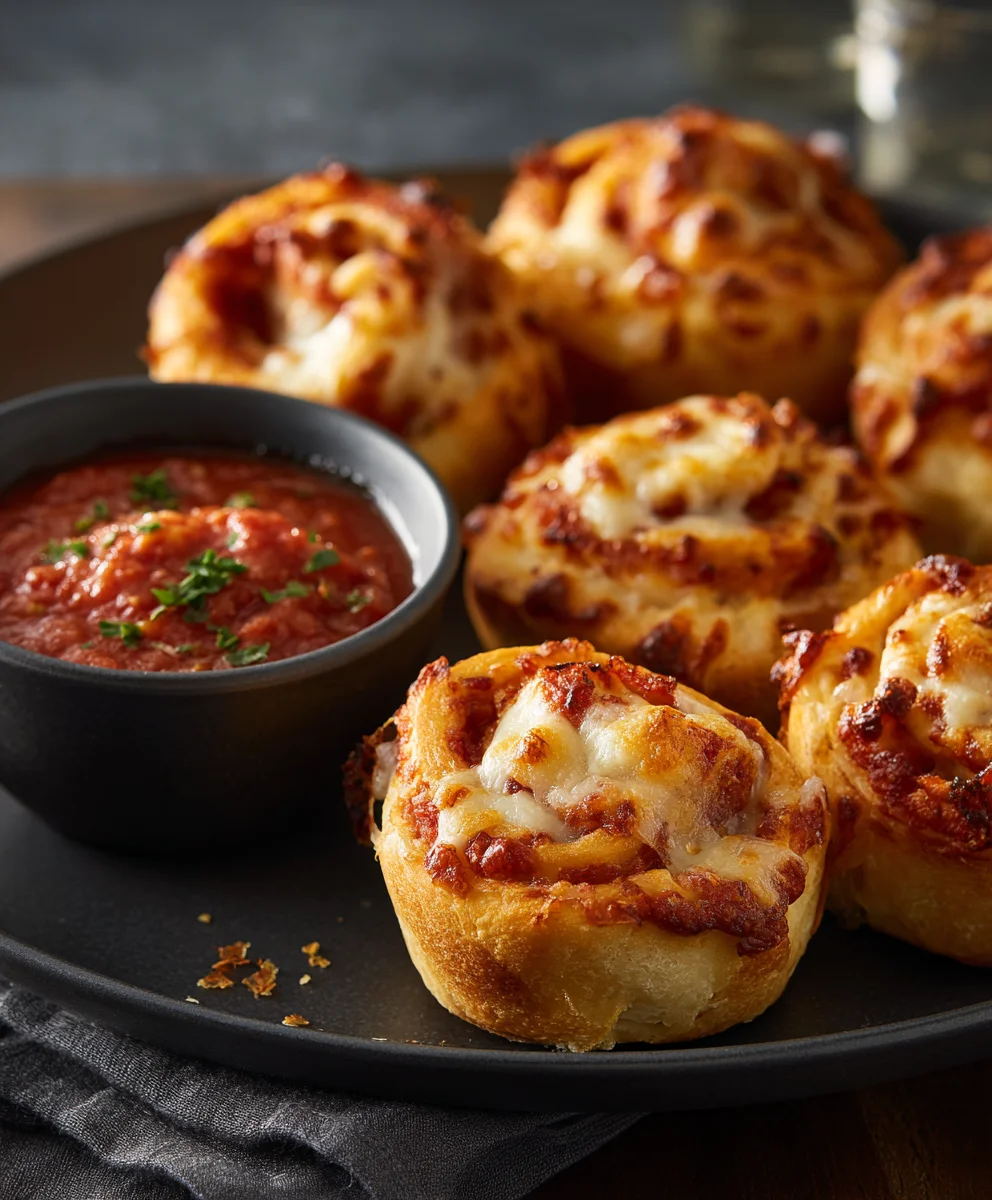
- Dipping Sauces: This is my absolute favorite way to serve them. Offer a variety of dipping sauces to cater to different tastes:
- Extra Marinara or Pizza Sauce: A classic choice, perfect for a double dose of tomato goodness. Warm it gently for the best experience.
- Ranch Dressing: A creamy, tangy ranch provides a lovely contrast to the savory pizza flavors. It’s a huge hit with kids and adults alike.
- Garlic Aioli: For a more sophisticated touch, a homemade or good quality store-bought garlic aioli adds a rich, garlicky creaminess.
- Hot Honey or Chili Oil: If you love a little sweet heat, a drizzle of hot honey or a side of chili oil can add an exciting kick to your Pizza Rolls.
- Fresh Herbs Garnish: Before serving, a sprinkle of freshly chopped parsley or basil over the top can add a touch of freshness and color. It’s a small detail that makes a big impact on presentation.
- Parmesan Dusting: A final light dusting of grated Parmesan cheese right before serving adds another layer of cheesy, salty flavor.
- As an Appetizer: Arrange them artfully on a platter for parties. They’re excellent finger foods and always a crowd-pleaser. The individual portions make them super easy to grab and enjoy.
- With a Side Salad: For a more complete meal, serve your Pizza Rolls alongside a fresh, crisp green salad with a light vinaigrette. The freshness of the salad beautifully balances the richness of the rolls.
Always remember, these are best enjoyed warm, so try to serve them soon after they’ve had a few minutes to cool down from the oven.
Storing Your Leftover Pizza Rolls:
It’s rare to have leftovers of these amazing Pizza Rolls, but if you do, don’t worry! They store and reheat beautifully, making them perfect for meal prep or a quick snack later.
- Cool Completely: Before storing, ensure your Pizza Rolls have cooled completely to room temperature on a wire rack. Storing them while they are still warm will create condensation, leading to soggy rolls. This is a crucial step for maintaining their texture.
- Airtight Container: Transfer the cooled Pizza Rolls to an airtight container. This will protect them from drying out and absorbing other odors from your refrigerator. I sometimes place a paper towel at the bottom of the container to absorb any residual moisture.
- Refrigeration: Store the container in the refrigerator for up to 3-4 days. They hold up surprisingly well, maintaining much of their flavor and a good portion of their flaky texture, especially if reheated correctly.
-
Freezing for Longer Storage: If you want to make a larger batch for future cravings, these Pizza Rolls freeze wonderfully!
- Once completely cool, arrange them in a single layer on a baking sheet and freeze for about 1-2 hours, or until solid. This “flash freezing” prevents them from sticking together.
- Transfer the frozen Pizza Rolls to a freezer-safe zip-top bag or an airtight container.
- They can be stored in the freezer for up to 1-2 months. When ready to enjoy, you can reheat them directly from frozen.
Reheating Your Pizza Rolls:
The key to good reheated Pizza Rolls is to bring back that lovely crispness without making them tough or dry. Avoid the microwave for reheating, as it will make them soft and chewy.
-
Oven or Toaster Oven: This is my preferred method for reheating.
- Preheat your oven or toaster oven to 350°F (175°C).
- Place the Pizza Rolls (from fridge or freezer) on a baking sheet lined with parchment paper.
- Bake for 10-15 minutes if refrigerated, or 15-25 minutes if frozen, until they are heated through and the pastry is crispy again. Keep an eye on them to prevent over-browning.
-
Air Fryer: An air fryer also works wonders for reheating, quickly bringing back that crispy exterior.
- Place the rolls in a single layer in the air fryer basket.
- Air fry at 350°F (175°C) for 5-8 minutes (for refrigerated) or 8-12 minutes (for frozen), shaking the basket halfway through.
No matter how you choose to enjoy them, these homemade Pizza Rolls are sure to be a hit. The effort you put in truly shines through in every flaky, cheesy, savory bite. Happy eating!
Conclusion:
And there you have it, my friends! We’ve reached the delicious conclusion of our culinary journey together. I truly hope you’ve enjoyed exploring this recipe as much as I’ve enjoyed sharing it with you. What we’ve just covered isn’t just another set of instructions; it’s an invitation to create something truly special, something that transcends the ordinary and brings genuine joy to your table. This isn’t just a meal; it’s an experience waiting to unfold in your kitchen, filling your home with incredible aromas and your loved ones with pure satisfaction.
Why This Recipe Is an Absolute Must-Try
Let me tell you why I am so incredibly passionate about this particular dish. Firstly, it’s the remarkable balance of flavors and textures. Every bite is a delightful journey – from the initial crunch or tenderness, depending on your preferred finish, to the molten, savory core that bursts with rich, aromatic goodness. It’s a comfort food elevated, designed to soothe the soul and excite the palate simultaneously. Secondly, and perhaps just as importantly, it’s the sheer accessibility and versatility of it. I’ve crafted this recipe to be straightforward enough for even a novice cook to master, yet robust enough in flavor that even the most seasoned chef will appreciate its depth. It’s proof that incredible, memorable food doesn’t have to be complicated or intimidating. Imagine the smiles when you present this to your family or friends – that’s the real magic we’re chasing here.
Elevating Your Experience: Serving Suggestions and Delicious Variations
Now that you’re armed with the knowledge to create this masterpiece, let’s talk about how to make it an even more unforgettable occasion. While these are utterly fantastic on their own, a few thoughtful additions can transform them into a full-blown feast or a delightful snack tailored to any craving.
- Dipping Delights: A classic marinara sauce is always a winner, but don’t stop there! Try a creamy garlic aioli for a touch of decadence, a vibrant pesto for an herby kick, or even a spicy arrabiata for those who love a bit of heat. A homemade ranch or blue cheese dip could also offer a delightful cool contrast.
- Perfect Pairings: For a more substantial meal, consider serving these alongside a fresh, crisp garden salad with a light vinaigrette to cut through the richness. A bowl of warm, hearty tomato soup makes for an incredibly comforting combination, especially on a chilly evening. Even a simple side of roasted vegetables – think broccoli, asparagus, or bell peppers – would beautifully complement the main event.
- Beverage Bliss: Pair this savory delight with a robust red wine, a crisp craft beer, or for a non-alcoholic option, a sparkling Italian soda or homemade lemonade. The right drink can truly enhance the entire dining experience.
Unleash Your Inner Chef: Creative Variations
One of the things I love most about cooking is the freedom to experiment, and this recipe is incredibly forgiving and open to interpretation. Don’t hesitate to make it your own!
- Spice It Up: If you’re a fan of heat, add a pinch of red pepper flakes to the filling, or even incorporate some diced jalapeños or serrano peppers. A dash of hot sauce in the mix can also provide a wonderful zing.
- Meat Lovers’ Dream: While delicious as is, feel free to fold in cooked and crumbled Italian sausage, pepperoni bits, or even tiny meatballs into the filling for an extra layer of savory indulgence. Just ensure any added meat is pre-cooked.
- Veggie Power: For a vegetarian twist or to boost your nutrient intake, sauté some finely diced mushrooms, bell peppers, onions, or spinach and mix them into the filling. Just be sure to squeeze out any excess moisture from the vegetables before adding them.
- Cheese Please: Experiment with different cheese blends! A mix of mozzarella and provolone is classic, but try adding some sharp cheddar, smoky gouda, or even a touch of creamy ricotta for varying textures and flavors.
- Herbaceous Heights: Fresh herbs like basil, oregano, and parsley can dramatically elevate the aroma and taste. Don’t be shy about chopping some fresh herbs and stirring them into your filling for an aromatic boost.
Your Culinary Adventure Awaits!
Now, it’s your turn. I wholeheartedly encourage you to roll up your sleeves, gather your ingredients, and dive into making this truly exceptional dish. The satisfaction of creating something so utterly delicious with your own hands is an unparalleled joy, and I promise you, the effort is incredibly rewarding. Whether you’re crafting a quick snack for game night or an appetizer for a lavish gathering, these homemade Pizza Rolls are guaranteed to be a hit, stealing the show and earning you rave reviews.
I am genuinely excited for you to experience the magic of this recipe. Once you’ve had the chance to whip up a batch, I would absolutely love to hear about your experience! Did you stick to the script, or did you unleash your creativity with some exciting variations? What were your favorite serving suggestions? Please, share your stories, your photos, and your triumphs in the comments below. Your feedback and personal touches inspire me and the entire community of home cooks who visit this site. Let’s build a vibrant space where we can all share our passion for delicious, homemade food. Happy cooking, and I can’t wait to hear from you!
Best Pizza Rolls Recipe: Crispy & Cheesy Bites
Homemade pizza rolls: a delightful twist on traditional pizza, crafted from flaky puff pastry and filled with savory pepperoni, mozzarella, and optional vegetables. Baked until golden and crispy, these customizable rolls are a perfect snack or party appetizer, served with dipping sauce like warm marinara. Garnish with Parmesan cheese for a finishing touch. The garlic butter topping is highly recommended for an unforgettable treat! These rolls also shine as a make-ahead option; prepare them up to the baking stage and refrigerate for up to 24 hours, adding an extra 5 minutes to baking time. You can also freeze unbaked rolls for longer storage.
Ingredients
-
2 Puff Pastry Sheets (17.3-ounce package), thawed
-
½ cup Marinara Sauce
-
1½ cups Low-Moisture Part-Skim Mozzarella Cheese, shredded
-
½ cup Mini Pepperoni (or diced regular pepperoni)
-
½ cup Cooked Beef Italian Sausage, crumbled and thoroughly drained
-
¼ cup finely diced Red Bell Pepper (optional)
-
¼ cup finely diced White Onion (optional)
-
¼ cup finely diced Mushrooms (optional)
-
2 tablespoons Grated Parmesan Cheese
-
1 teaspoon Dried Italian Seasoning
-
½ teaspoon Garlic Powder
-
Salt, to taste
-
Freshly Ground Black Pepper, to taste
-
1 Large Egg (for egg wash)
-
1 tablespoon Water or Milk (for egg wash)
-
1 tablespoon Olive Oil (for baking sheet or brushing)
-
2 tablespoons All-Purpose Flour (for dusting)
-
For Garlic Butter Topping:
-
2 tablespoons Unsalted Butter, melted
-
½ teaspoon Garlic Powder
-
1 tablespoon Fresh Parsley, chopped (optional)
Instructions
-
Step 1
Thaw puff pastry sheets (17.3-ounce package) according to package directions; ensure they are pliable but not sticky. -
Step 2
If using Beef Italian sausage, cook until browned, then drain thoroughly on a paper towel-lined plate and let cool. -
Step 3
If using optional vegetables (red bell pepper, onion, mushrooms), finely dice them. For best results and to prevent sogginess, quickly sauté them in a dry pan over medium-high heat for 3-5 minutes to soften and evaporate excess moisture. Let cool completely. -
Step 4
Shred mozzarella and Parmesan cheese if not pre-shredded. If not using mini pepperoni, dice regular pepperoni into small, coin-like pieces. -
Step 5
In a medium bowl, combine shredded mozzarella, cooked beef sausage (if using), pepperoni, cooled diced veggies (if using), Parmesan cheese, Italian seasoning, garlic powder, salt, and pepper. Gently toss until well combined. -
Step 6
Lightly dust a clean work surface with all-purpose flour. In a small bowl, whisk the large egg with 1 tablespoon of water or milk to create the egg wash. -
Step 7
Carefully unroll one puff pastry sheet (approx. 10×15 inches) onto the floured surface. Spread ¼ cup of marinara sauce evenly over the entire surface, leaving a ½-inch border clear along one of the longer edges. -
Step 8
Evenly sprinkle half of the prepared cheese and topping mixture (about 1½ cups) over the sauced puff pastry, maintaining the ½-inch clear border. -
Step 9
Starting from the long edge opposite the clear border, carefully and snugly roll the pastry sheet into a tight log. Brush the clear ½-inch border with egg wash and press firmly to seal the log. Gently pinch the ends of the log to seal them as well. -
Step 10
For easier slicing and to help maintain shape, place the rolled log in the freezer for 15-20 minutes or refrigerator for 30-40 minutes. -
Step 11
Once chilled, transfer the log to a cutting board. Using a very sharp knife, slice the log into approximately 1-inch thick rounds. Aim for 12-15 rolls per log. Gently reshape any flattened rolls into rounds with your fingers. -
Step 12
Repeat steps 7-11 with the second puff pastry sheet and the remaining half of your sauce and filling mixture. -
Step 13
Preheat your oven to 400°F (200°C). Line two large baking sheets with parchment paper or silicone baking mats. -
Step 14
Carefully arrange the sliced pizza rolls onto the prepared baking sheets, leaving about 1 inch of space between each roll for even baking. -
Step 15
Gently brush the tops and sides of each pizza roll with the whisked egg wash. Optionally, sprinkle a tiny pinch of extra Italian seasoning or Parmesan cheese over the top. -
Step 16
Bake for 18-25 minutes, or until the puff pastry is deeply golden brown, visibly puffed up, and the cheese is bubbly and melted. About halfway through, rotate the baking sheets from front to back and swap their positions for even baking. If rolls are browning too quickly but seem doughy, lower oven temperature to 325°F (160°C) and extend baking time by 5-7 minutes. For extra cheesy rolls, sprinkle mozzarella on top during the last 5 minutes of baking. -
Step 17
While the rolls are still warm, melt 2 tablespoons of unsalted butter with ½ teaspoon of garlic powder. Brush this garlic butter mixture generously over the tops of the baked pizza rolls. Optionally, sprinkle with chopped fresh parsley. -
Step 18
Remove baking sheets from the oven and let the pizza rolls cool on the sheets for about 5 minutes, then transfer them to a wire cooling rack to cool further. Serve warm with extra marinara, ranch dressing, or garlic aioli for dipping.
Important Information
Nutrition Facts (Per Serving)
It is important to consider this information as approximate and not to use it as definitive health advice.
Allergy Information
Please check ingredients for potential allergens and consult a health professional if in doubt.

Leave a Comment