
Peanut Butter Chocolate Chip Cookie Cups – just reading those words likely conjures up a delightful image of sweet, nutty, and chocolatey perfection. I believe there’s a special magic that happens when classic flavors are reimagined, and these delightful cookie cups are a testament to that. We all know and love the timeless pairing of peanut butter and chocolate; it’s a culinary match made in heaven that has captured hearts for generations, evolving from simple candies to beloved desserts across various cultures. This iconic duo has long been a source of comfort and joy, and reimagining it in a new form brings a fresh wave of excitement to any baker’s kitchen.
Why We Adore Peanut Butter Chocolate Chip Cookie Cups
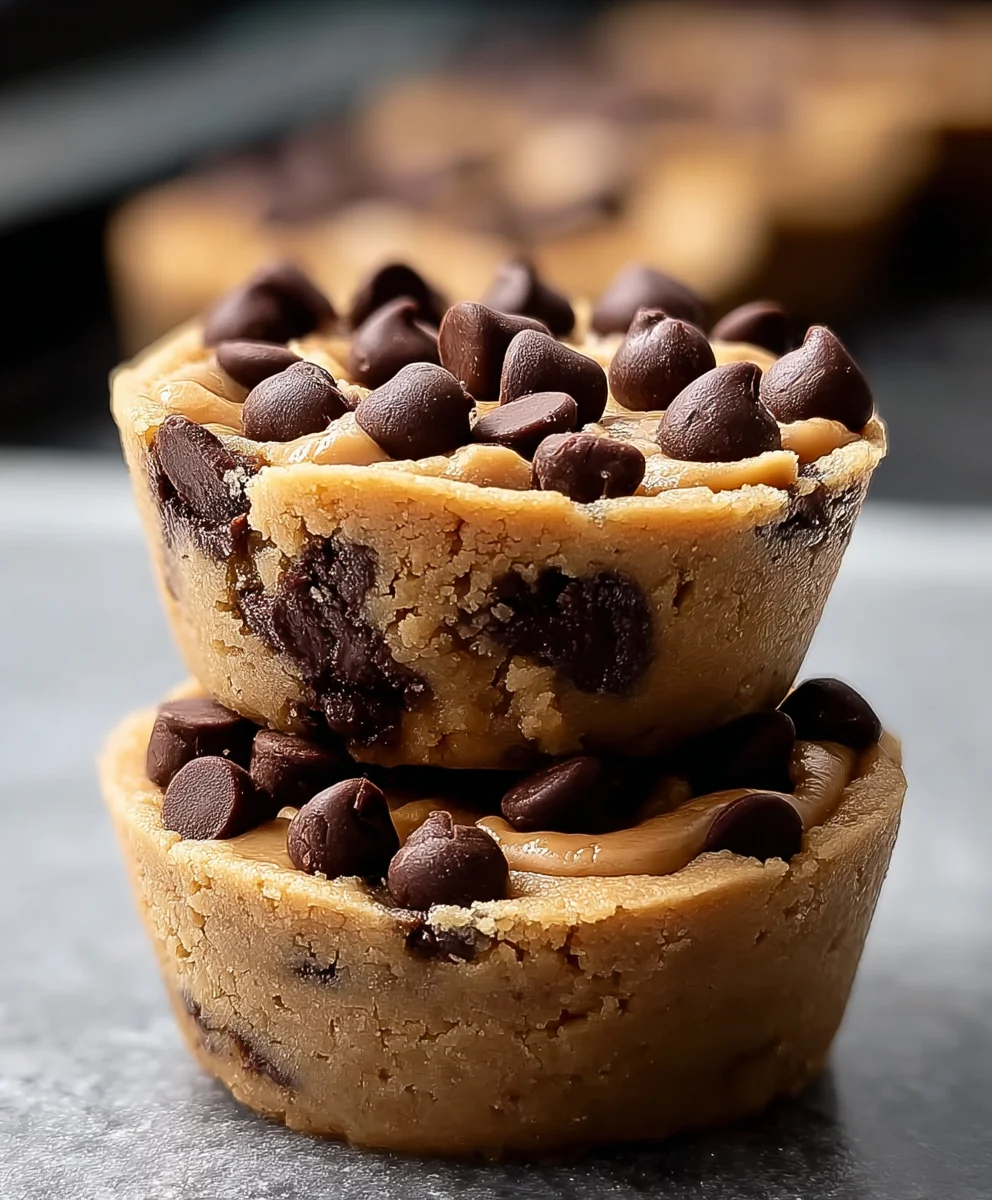
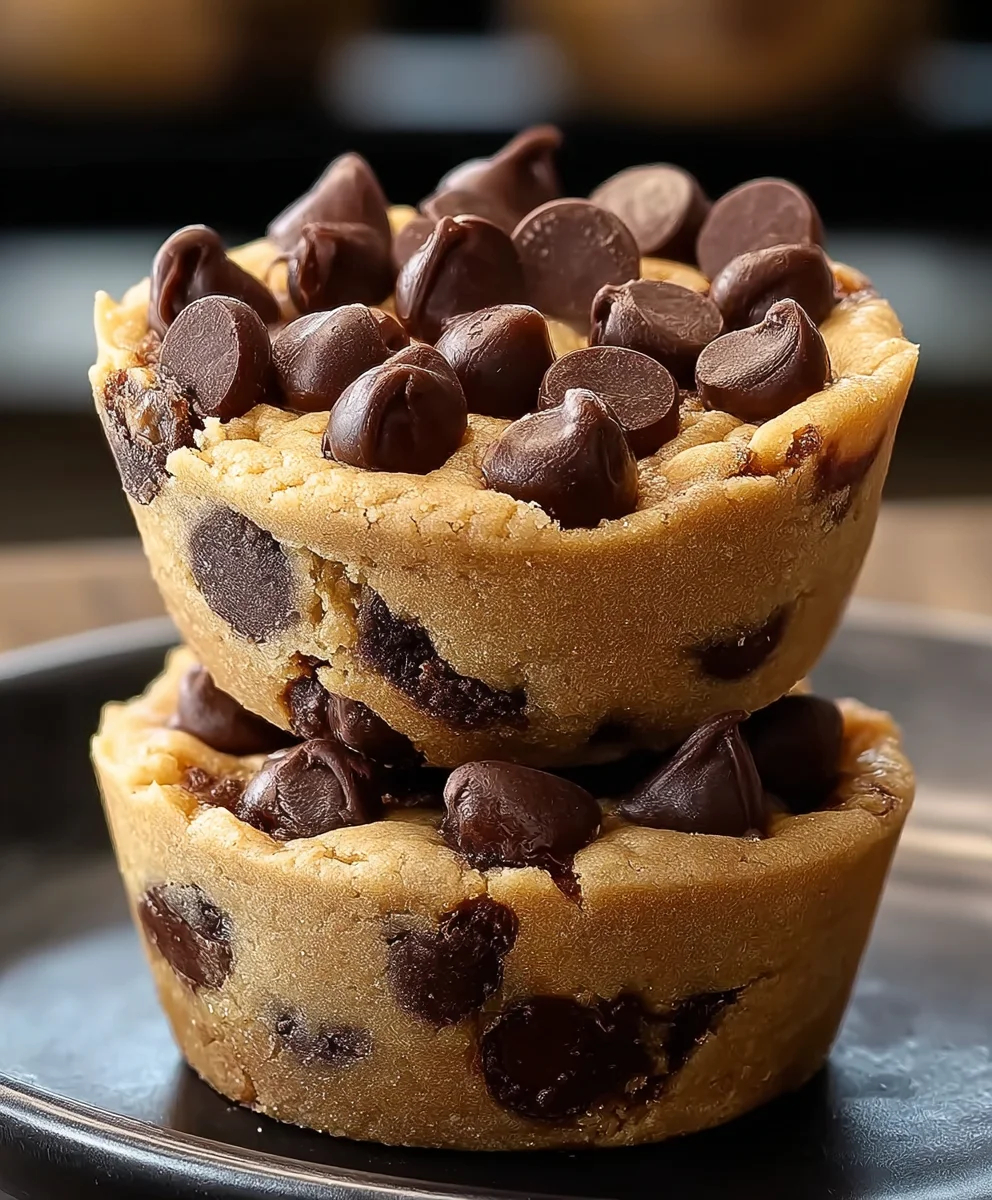
What makes these individual treats so incredibly popular? For starters, it’s the irresistible combination of textures: a soft, chewy peanut butter cookie base, perfectly baked into a cup, cradling a molten chocolate chip center that melts in your mouth. Beyond the incredible taste, these Peanut Butter Chocolate Chip Cookie Cups offer a charming, portion-controlled elegance that makes them ideal for parties, lunchboxes, or simply as a well-deserved treat after a long day. I find that they offer all the comfort of a homemade cookie with an elevated, appealing presentation. They’re surprisingly simple to create, making them a fantastic option for both novice and experienced bakers looking to impress without the fuss.

Ingredients:
- 1 cup (2 sticks or 226g) unsalted butter, softened to room temperature
- 1 cup (200g) granulated sugar
- ¾ cup (150g) packed light brown sugar
- 1 cup (256g) creamy peanut butter (I recommend a good quality, stir-before-using kind, but any creamy variety will work beautifully, just avoid the natural varieties where the oil separates excessively, as it can affect texture.)
- 2 large eggs
- 1 teaspoon pure vanilla extract
- 2 ¼ cups (270g) all-purpose flour
- 1 teaspoon baking soda
- ½ teaspoon salt
- 1 cup (180g) mini chocolate chips (optional, for mixing into the dough for an extra chocolate punch!)
- About 30-36 small chocolate squares, mini peanut butter cups, or chocolate kisses for pressing into the baked cookies (you’ll need one per cookie cup)
Equipment You’ll Need:
Before we dive into the fun of creating these delectable Peanut Butter Chocolate Chip Cookie Cups, let’s make sure we have all our tools ready. Having everything at hand makes the baking process so much smoother and more enjoyable!
- Mini muffin tin(s) – a standard 24-cup mini muffin tin will likely require baking in batches, or you might need two if you want to bake all at once.
- Electric mixer (stand mixer with paddle attachment or a handheld electric mixer) – this is truly a lifesaver for creaming butter and sugar!
- Large mixing bowl
- Medium mixing bowl
- Measuring cups and spoons
- Rubber spatula or wooden spoon
- Small cookie scoop (about 1.5 tablespoons capacity) – this ensures uniform cookie sizes, which is key for even baking.
- Wire cooling rack
- Parchment paper mini muffin liners (optional, but they make cleanup and removal incredibly easy)
Preparing Your Peanut Butter Chocolate Chip Cookie Cups Dough:
This is where the magic begins! Getting the dough just right is the foundation for our incredible Peanut Butter Chocolate Chip Cookie Cups. Pay close attention to the textures described – they are important indicators that you’re on the right track.
- First things first, let’s get our oven preheating. Preheat your oven to 375°F (190°C). While the oven warms up, prepare your mini muffin tin. If you’re using parchment paper liners, pop them into each well. If not, lightly grease each well with butter or non-stick cooking spray. I personally love the parchment liners for these; they add a professional touch and prevent sticking entirely.
- In your large mixing bowl, preferably the bowl of your stand mixer, combine the softened unsalted butter, granulated sugar, and light brown sugar. It’s absolutely crucial that your butter is at room temperature here. If it’s too cold, it won’t cream properly with the sugars, leading to a denser cookie. If it’s melted, the texture will be off. Cream these ingredients together using your electric mixer on medium speed for about 2-3 minutes, or until the mixture is wonderfully light, fluffy, and noticeably paler in color. This creaming process incorporates air into the butter and sugar, which is what gives our cookies that delightful, tender crumb.
- Now, add your creamy peanut butter to the butter and sugar mixture. Continue to beat on medium speed for another 1-2 minutes, scraping down the sides of the bowl as needed, until the peanut butter is thoroughly combined and the mixture is even fluffier and well-aerated. You should see a uniform, light brown, almost mousse-like consistency.
- Next, crack in the two large eggs, one at a time, beating well after each addition. Once the eggs are incorporated, stir in the pure vanilla extract. Beat until everything is just combined, making sure not to overmix at this stage. Overmixing after adding eggs can lead to a tougher cookie, and we’re aiming for soft, tender Peanut Butter Chocolate Chip Cookie Cups!
- In your separate medium mixing bowl, whisk together the all-purpose flour, baking soda, and salt. Whisking these dry ingredients ensures they are evenly distributed throughout the flour, so you don’t end up with pockets of salt or baking soda in your cookies. This also lightly aerates the flour.
- Gradually add the dry ingredient mixture to the wet ingredients in your large bowl. I usually add it in about three batches, mixing on low speed after each addition until just combined. The key here is to mix until just combined – as soon as you no longer see streaks of dry flour, stop mixing. Overmixing flour develops the gluten too much, which can result in tough, chewy cookies instead of the melt-in-your-mouth experience we’re going for with our Peanut Butter Chocolate Chip Cookie Cups.
- If you’ve decided to add mini chocolate chips directly into your dough (and I highly recommend it for an extra layer of chocolatey goodness!), gently fold them in with a rubber spatula at this point. Just a few folds until they are evenly distributed – no need for the electric mixer here.
Forming and Baking Your Cookie Cups:
This is where our dough transforms into the adorable, perfectly shaped “cups” that will cradle our chocolatey centers. Precision here helps ensure every single one of your Peanut Butter Chocolate Chip Cookie Cups bakes beautifully.
- Now for the fun part: scooping! Using your small cookie scoop (which holds about 1.5 tablespoons of dough), scoop the cookie dough into each prepared mini muffin well. Try to make them as uniform as possible. If you don’t have a scoop, you can use two small spoons, aiming for roughly the size of a golf ball for each dough portion. Ensure the dough fills each well about two-thirds to three-quarters of the way full. This allows room for the cookie to rise and create that perfect ‘cup’ shape when we press the chocolate in later.
- Place the filled mini muffin tin into your preheated 375°F (190°C) oven. Bake for 8-10 minutes. Baking time can vary slightly depending on your oven, so keep a close eye on them. You’re looking for the edges to be set and lightly golden brown, while the centers still look slightly soft and puffy. They might even have a faint sheen. Don’t overbake! An overbaked cookie cup will be dry and crumbly, and we want them soft and tender.
Adding the Chocolatey Goodness:
This step is critical for achieving the signature “cup” shape and incorporating the delightful chocolate center. Timing is everything here, so have your chosen chocolates ready and waiting.
- As soon as you remove the mini muffin tin from the oven, and I mean immediately, take one of your chosen chocolate squares, mini peanut butter cups, or chocolate kisses and gently press it into the center of each warm cookie. The cookies will be very soft and pliable at this stage, so be gentle but firm. The warmth of the cookie will slightly melt the chocolate, creating a beautiful, soft depression and ensuring the chocolate adheres perfectly to the cookie. This is how we create that iconic “cup” shape for our Peanut Butter Chocolate Chip Cookie Cups!
- Allow the cookie cups to remain in the muffin tin for about 5-10 minutes. This allows them to set up slightly and cool enough so they don’t fall apart when you remove them. During this time, the residual heat from the cookie will continue to gently melt the chocolate, giving it a lovely, glossy sheen.
Cooling, Storing, and Enjoying Your Peanut Butter Chocolate Chip Cookie Cups:
The final steps to ensure your cookie cups are perfectly set and ready for devouring!
- After the initial cooling period in the tin, carefully transfer the Peanut Butter Chocolate Chip Cookie Cups to a wire cooling rack to cool completely. If you used liners, they should lift out easily. If not, a small offset spatula can help gently pry them out without damaging the delicate cookie. Allowing them to cool completely on the rack is important because it helps the chocolate firm up and the cookie’s texture to fully develop. Resist the urge to eat them all while they’re still warm and gooey (though I won’t blame you if you sneak one!).
- Once fully cooled, your Peanut Butter Chocolate Chip Cookie Cups are ready to be enjoyed! They are absolutely perfect with a cold glass of milk, a cup of coffee, or simply on their own as a delightful treat.
- For storage: Store any leftover cookie cups in an airtight container at room temperature for up to 3-4 days. While they are best enjoyed within the first day or two, they will remain wonderfully soft and delicious for several days. If you find the chocolate centers have hardened, a quick 10-15 second zap in the microwave can bring back that wonderfully melty texture.
Tips for Perfect Peanut Butter Chocolate Chip Cookie Cups:
To ensure every batch of your Peanut Butter Chocolate Chip Cookie Cups turns out absolutely phenomenal, here are a few insider tips and tricks I’ve picked up along the way:
-
Room Temperature Ingredients are Key:
I cannot stress this enough! Butter, eggs, and even peanut butter (if it’s been refrigerated) should be at room temperature. This allows them to emulsify and combine seamlessly, creating a smooth, homogenous dough that bakes evenly and yields a superior texture. Cold ingredients just don’t play nice together.
-
Don’t Overmix the Dough:
This is a common pitfall in baking. Once you add the flour, mix only until the dry ingredients are just incorporated. Overmixing develops the gluten in the flour, leading to tough, dense cookies. We want tender, soft, melt-in-your-mouth Peanut Butter Chocolate Chip Cookie Cups!
-
Use a Quality Peanut Butter:
The type of peanut butter can significantly impact the flavor and texture. For this recipe, I find that creamy, shelf-stable peanut butter (like Jif or Skippy) works best, as natural peanut butter (the kind that separates) can sometimes make the dough too oily or crumbly. Make sure it’s smooth, not chunky, unless you’re intentionally going for a chunky texture.
-
Measure Flour Correctly:
Always spoon your flour into your measuring cup and then level it off with the back of a knife. Scooping directly from the bag can pack too much flour into the cup, resulting in dry, dense cookies. A kitchen scale is even better for accuracy if you have one!
-
Calibrate Your Oven:
Oven temperatures can vary widely from what they display. If you find your cookies are consistently baking too fast, too slow, or unevenly, an inexpensive oven thermometer can be a game-changer. Knowing your oven’s true temperature will help you nail baking times every time.
-
Be Quick with the Chocolate:
The moment those cookies come out of the oven, start pressing in your chocolates. They are most pliable when hot, allowing for that perfect “cup” indentation. If you wait too long, they’ll start to set, and the chocolate won’t melt as nicely or create as clean of a cup.
-
Consider Mini Liners:
While optional, using mini parchment muffin liners not only prevents sticking but also makes these cookie cups incredibly easy to handle and serve. They also look really pretty!
Variations to Try:
While these classic Peanut Butter Chocolate Chip Cookie Cups are perfect as they are, there’s always room for a little creativity! Here are some fun ways you can customize your batch and keep things interesting:
-
Different Chocolate Centers:
- Peanut Butter Cups: Instead of regular chocolate squares or kisses, use miniature Reese’s Peanut Butter Cups for an extra layer of peanut butter and chocolate decadence.
- White Chocolate: Try white chocolate squares or even white chocolate truffles for a beautiful contrast and a different flavor profile.
- Dark Chocolate: If you’re a fan of rich, intense chocolate, use high-quality dark chocolate squares (70% cocoa or higher) for a more sophisticated version of your Peanut Butter Chocolate Chip Cookie Cups.
- Caramel Kisses: For a gooey, sweet twist, try pressing caramel-filled chocolate candies into the centers.
- Peppermint Kisses: During the holidays, peppermint kisses can add a festive touch and a refreshing zing!
-
Add-ins to the Dough:
- Chopped Nuts: If you love a bit of crunch, fold in a ½ cup of finely chopped peanuts, walnuts, or pecans along with the mini chocolate chips.
- Butterscotch Chips: Replace some or all of the mini chocolate chips in the dough with butterscotch chips for a different sweet and creamy flavor.
- Toffee Bits: A handful of toffee bits can add a wonderful chewy texture and a buttery, caramelized note to your cookie cups.
-
Garnish After Cooling:
- Sea Salt Flakes: A tiny sprinkle of flaky sea salt over the melted chocolate centers after they’ve set can enhance all the flavors and provide a beautiful finish.
- Extra Chocolate Drizzle: Once the cookie cups are completely cool and the centers are set, melt a bit of extra chocolate (milk, dark, or white) and drizzle it artfully over the tops for an elegant touch.
- Chopped Peanuts: Sprinkle a few finely chopped roasted peanuts over the still-warm, slightly melted chocolate for added texture and a boost of peanut flavor.
-
Espresso Powder Boost:
For a subtle depth that enhances the chocolate flavor without making it taste like coffee, add ½ teaspoon of instant espresso powder or coffee granules to your dry ingredients. It won’t make your Peanut Butter Chocolate Chip Cookie Cups taste like coffee, but it will make the chocolate taste even more chocolatey!
-
A Touch of Spice:
A pinch of cinnamon (¼ teaspoon) or even a tiny dash of cayenne pepper (⅛ teaspoon) can add an unexpected warmth and complexity that pairs wonderfully with peanut butter and chocolate.
Experimentation is part of the fun of baking! Don’t be afraid to try some of these variations to discover your new favorite version of Peanut Butter Chocolate Chip Cookie Cups. No matter how you make them, I’m confident they’ll be a hit!
Conclusion:
And there you have it, my friends! We’ve journeyed through the simple steps to create a truly unforgettable treat, and I sincerely hope you’re as excited to make these as I am to share them. This recipe isn’t just another dessert; it’s an experience, a delightful fusion of two universally loved flavors that come together in a format that’s as charming as it is convenient. Seriously, if you’re looking to impress without stress, or simply crave something incredibly comforting and homemade, these are your new go-to. I truly believe that the magic lies in their perfect balance: the rich, salty depth of peanut butter meeting the sweet, melty pockets of chocolate, all nestled within a soft, chewy cookie cup. They offer that homemade warmth and satisfaction with an elevated presentation that makes them feel special for any occasion, big or small. Trust me on this one, they are an absolute game-changer for your dessert repertoire.
Why These Peanut Butter Chocolate Chip Cookie Cups Are a Must-Try:
What makes these Peanut Butter Chocolate Chip Cookie Cups so incredibly special and, dare I say, a must-try in every sense of the word? First, it’s the sheer ingenuity of taking two classic comfort foods – the humble cookie and the beloved cookie cup concept – and merging them into one sensational bite. You get all the nostalgic goodness of a chocolate chip cookie, infused with the creamy, nutty bliss of peanut butter, all contained in a perfect little individual serving. No slicing, no messy crumbs, just pure, unadulterated joy in a cup. They’re soft, chewy, and yield a perfect ratio of cookie to chocolate to peanut butter in every single bite. They truly stand out because they offer both familiarity and a delightful twist, making them universally appealing. Whether you’re a devout peanut butter enthusiast, a chocoholic, or just someone who appreciates a well-crafted dessert, these cups deliver. They’re surprisingly easy to prepare, making them accessible for bakers of all skill levels, and the payoff is immense. Plus, they look absolutely adorable on any dessert platter, making them perfect for entertaining, potlucks, or just a sweet afternoon pick-me-up.
Creative Serving Suggestions and Delightful Variations:
Now, while these delightful cups are absolutely perfect as they are, I love to get a little creative with serving suggestions and variations to take them to the next level. For an ultimate indulgence, I highly recommend serving them slightly warm, perhaps with a scoop of vanilla bean ice cream melting deliciously over the top. A drizzle of extra melted chocolate or a sprinkle of flaky sea salt (to enhance that sweet-salty dynamic) would also be divine. For those who enjoy a bit of textural contrast, a dollop of fresh whipped cream and a few extra chocolate chips or crushed peanuts on top would make for a show-stopping presentation. Thinking beyond the basic, why not experiment with different nut butters? Almond butter or cashew butter would offer a unique flavor profile, or even a swirl of hazelnut spread for a Nutella-inspired twist. You could also swap out the chocolate chips for white chocolate chips, butterscotch chips, or a mix of dark and milk chocolate for varying levels of sweetness. For a festive touch, especially around the holidays, consider adding some festive sprinkles or a tiny drizzle of colored icing. These cups also make fantastic edible gifts – package a few in a pretty box with a ribbon, and you’ve got a thoughtful, homemade present that anyone would adore. You can even make miniature versions using a mini muffin tin for bite-sized delights perfect for a party!
So, my dear bakers, I wholeheartedly encourage you to roll up your sleeves, preheat your ovens, and dive into making these incredible treats. I promise you, the aroma filling your kitchen will be worth every moment, and the first bite will confirm that you’ve created something truly special. Once you’ve made these scrumptious cookie cups, I would absolutely love to hear about your experience! Did you stick to the recipe, or did you try out one of my suggested variations? What was your favorite part? Please don’t hesitate to share your creations and thoughts in the comments below. Your feedback and stories inspire me, and I can’t wait to see your delicious results. Happy baking, and enjoy every single delightful mouthful!
Recipe
A delicious recipe
Ingredients
Instructions
Important Information
Nutrition Facts (Per Serving)
It is important to consider this information as approximate and not to use it as definitive health advice.
Allergy Information
Please check ingredients for potential allergens and consult a health professional if in doubt.
Leave a Comment