
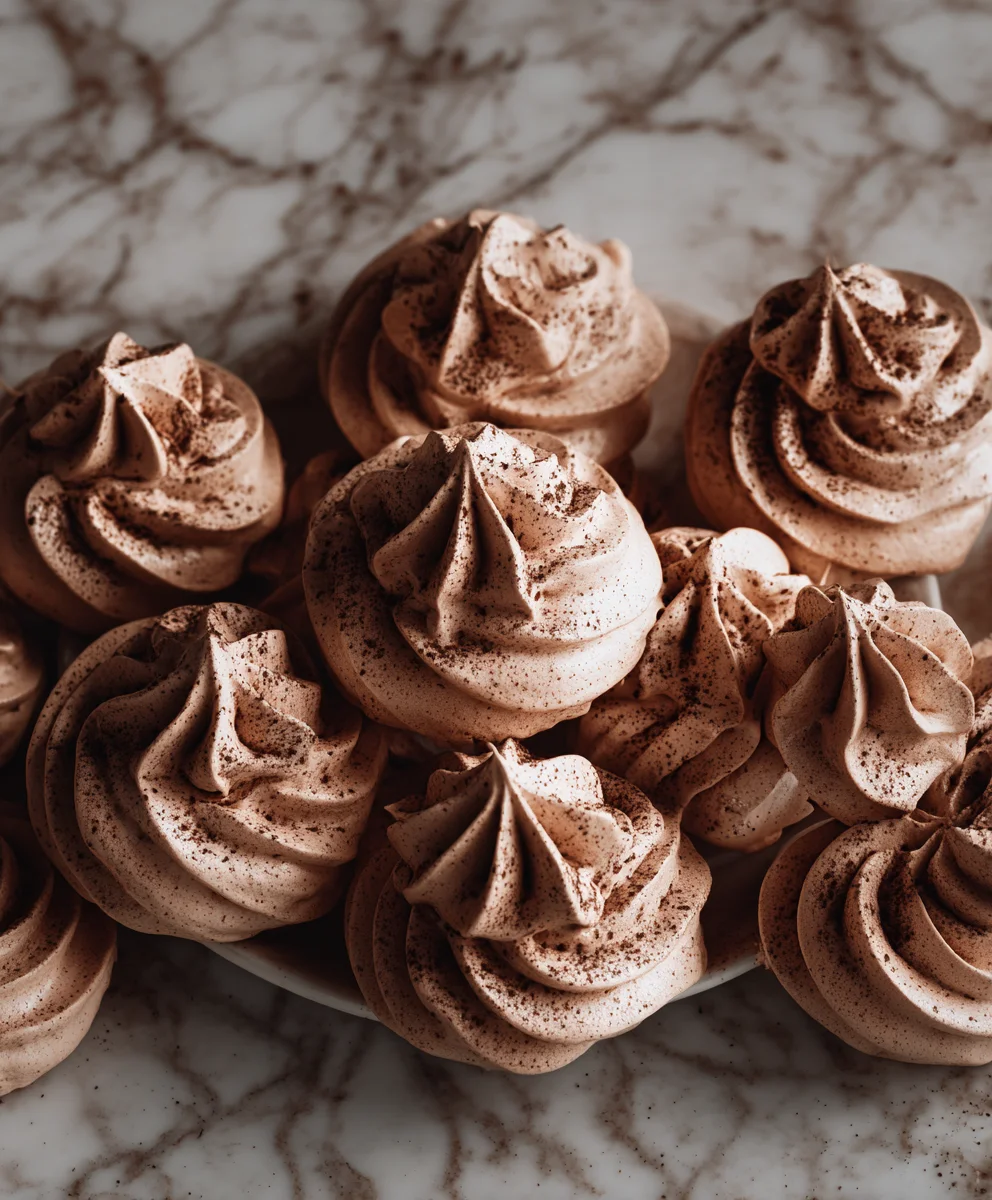
Chocolate Meringue Cookies are more than just a sweet treat; they are a delightful culinary experience, a whisper of chocolate bliss that melts delicately on your tongue. Imagine sinking your teeth into a cloud-like confection – crisp on the outside, wonderfully airy and chewy within, all infused with a deep, satisfying cocoa flavor. It’s this unique combination of ethereal texture and intense taste that makes these cookies utterly irresistible, inviting you to savor every delicate bite.
The art of meringue-making dates back centuries, with origins often debated between Swiss and Italian kitchens, where bakers mastered the delicate balance of egg whites and sugar. Over time, this elegant base evolved, embracing various flavors and forms. The addition of rich chocolate transforms the classic meringue into something truly extraordinary, elevating it from a simple sugary puff to a sophisticated dessert. While deceptively simple in appearance, the profound flavor profile and delicate structure make it a standout confection, cherished across many cultures.
Why Chocolate Meringue Cookies Captivate Hearts
People adore these cookies for countless reasons. Beyond their enchanting melt-in-your-mouth texture, they offer a naturally gluten-free option for those with dietary considerations, and their light, airy nature makes them a perfect elegant finish to any meal without being overly heavy. Each bite of these Chocolate Meringue Cookies is a testament to simple ingredients coming together to create something truly magical and memorable, leaving a lasting impression of sophisticated sweetness.

Ingredients:
Here’s everything you’ll need to create these delightfully crisp yet chewy Chocolate Meringue Cookies, a truly elegant and satisfying treat:
- 4 large egg whites: It’s absolutely crucial that these are at room temperature. This helps them whip up to their maximum volume and create a stable foam. Separate them very carefully; even a tiny speck of yolk or shell can prevent them from whipping properly, so take your time with this step. Cold eggs are harder to separate without breaking the yolk, but room temperature whites whip much better.
- 1 cup (200g) granulated sugar: Fine granulated sugar dissolves best into the egg whites, leading to a smoother, less gritty meringue. If you only have regular granulated sugar and want an even finer texture, you can pulse it in a food processor a few times to break down the crystals slightly, but be careful not to turn it into powdered sugar. The sugar not only sweetens but also stabilizes the meringue.
- 1/4 cup (22g) unsweetened cocoa powder: I highly recommend using a good quality Dutch-processed cocoa powder for a richer, deeper chocolate flavor and a beautifully dark color. Dutch-processed cocoa is less acidic and provides a smoother, mellower chocolate taste, which pairs wonderfully with the sweet meringue. Sifting is non-negotiable here to avoid any lumps in your final cookies.
- 1/2 teaspoon espresso powder (optional but highly recommended): This isn’t intended to give your cookies a coffee flavor; rather, it acts as a flavor enhancer. A small amount of espresso powder truly deepens and intensifies the chocolate notes, making the chocolate flavor much more pronounced and complex without being overpowering. It’s a wonderful secret weapon in many chocolate recipes.
- 1/2 teaspoon cream of tartar: This is our secret weapon for stabilizing the egg whites. Cream of tartar is an acidic salt that helps the egg whites achieve a stronger, more stable structure, prevents weeping, and ensures they hold their volume during whipping and baking. It’s a key ingredient for reliable meringue.
- 1/4 teaspoon fine sea salt: A small touch of fine sea salt is essential. It balances the sweetness of the sugar and helps to enhance all the other flavors, particularly the chocolate. Don’t skip this, as it makes a noticeable difference in the overall taste profile of your Chocolate Meringue Cookies.
- 1 teaspoon pure vanilla extract: Always opt for pure vanilla extract over imitation for the best possible flavor. Vanilla adds a warm, aromatic depth that complements the chocolate beautifully. Add it towards the end of the whipping process to ensure its delicate flavor isn’t lost.
- 3/4 cup (130g) mini chocolate chips or finely chopped bittersweet chocolate: Mini chocolate chips are ideal for meringues as they distribute evenly throughout the delicate mixture and don’t weigh down the meringue too much. If you’re using a chocolate bar, choose a good quality bittersweet variety and chop it very finely, ensuring pieces are small enough to pass through your piping tip and don’t cause the meringue to deflate.
Before you embark on this culinary journey, ensure all your equipment, especially the mixing bowl and whisk attachment, is impeccably clean and completely grease-free. Any trace of fat, no matter how small, can ruin your meringue and prevent the egg whites from whipping up properly. This attention to detail is the first step towards perfect Chocolate Meringue Cookies.
Getting Ready for Chocolate Meringue Cookie Perfection
-
Gather Your Tools and Preheat the Oven:
The very first step in our delightful Chocolate Meringue Cookie adventure is to get all our tools and environment ready. Begin by preheating your oven to a very low 225°F (107°C). Meringues don’t bake in the traditional sense; rather, they slowly dry out in a low oven, which allows them to become crisp all the way through without browning too quickly or becoming chewy. Line two large baking sheets with parchment paper. It is absolutely essential to use parchment paper, not wax paper, as wax paper can stick to the meringues and create a messy situation. Parchment paper ensures your delicate cookies won’t stick and can be easily removed once cooled. To help the parchment lie flat, you can dab a tiny bit of meringue under each corner of the paper before placing it on the baking sheet. Position your oven racks in the upper and lower third of your oven to allow for even heat distribution, especially if you plan to bake both sheets simultaneously.
-
Prepare Dry Ingredients:
In a small bowl, whisk together the 1/4 cup unsweetened cocoa powder, the 1/2 teaspoon espresso powder (if you are using it to enhance the chocolate flavor), and the 1/4 teaspoon fine sea salt. While you’ve measured them, it’s highly recommended to sift these together, even if they appear fine, to break up any potential lumps in the cocoa powder. This step ensures that the chocolate flavor and salt are evenly distributed throughout the meringue, preventing pockets of concentrated cocoa or salt. Setting this mixture aside for later allows for a quicker and gentler folding process when the meringue base is ready, which is crucial for maintaining the meringue’s delicate volume and airy texture.
-
Set Up Your Whipping Station:
Retrieve your stand mixer bowl (or a very large, clean glass or metal bowl if you’re using a hand mixer). It is absolutely paramount that this bowl, along with your whisk attachment (or beaters), is spotlessly clean and completely free of any grease or fat. Even a microscopic amount of fat residue can act as a defoaming agent, preventing your egg whites from whipping to stiff peaks. To ensure maximum cleanliness, you can wipe them down with a paper towel dampened with a little white vinegar or lemon juice, then dry them thoroughly before adding the egg whites. This meticulous preparation is arguably the most critical preliminary step for any successful meringue, so take the extra minute to ensure everything is pristine.
Whipping the Egg Whites to Glossy Perfection
-
Start Whipping the Egg Whites:
Carefully add your 4 large room-temperature egg whites into your meticulously cleaned mixer bowl. Begin whipping them on a medium-low speed. The initial goal here is to break up the egg whites and allow them to become foamy. You’ll notice them gradually turning opaque and developing small bubbles. As they start to get nicely foamy, which usually takes about 1-2 minutes, sprinkle in the 1/2 teaspoon of cream of tartar. As mentioned, the cream of tartar is a powerful stabilizer; it helps to strengthen the protein structure of the egg whites, enabling them to achieve a stronger, more stable structure that is vital for a robust meringue that won’t collapse during baking or cooling. Once the cream of tartar is added, increase the mixer speed to medium-high.
-
Achieving Soft Peaks:
Continue whipping the egg whites on medium-high speed. You will notice them becoming progressively whiter, increasing significantly in volume, and thickening. After a few more minutes of whipping, they will reach what we call the “soft peak” stage. At this point, if you lift the whisk attachment, the peaks will stand up but will gently curl over softly at the very top, resembling the crest of a soft wave. This texture indicates that enough air has been incorporated and the proteins are beginning to form a stable matrix. This is your cue to start adding the sugar. It’s important not to rush past this stage, as patient and consistent whipping is key to developing a strong and airy meringue structure.
-
Gradually Add the Sugar for Stiff, Glossy Peaks:
Now, with the mixer still running on medium-high speed, begin adding the 1 cup of granulated sugar, one tablespoon at a time. This gradual addition is incredibly important for two main reasons: firstly, if you dump all the sugar in at once, it can deflate your egg whites, causing them to lose the precious volume you’ve just created; and secondly, it allows each addition of sugar to properly dissolve into the egg whites. Take your time with this process, allowing about 15-20 seconds between each tablespoon of sugar. This slow incorporation typically takes about 5-7 minutes. You should be able to rub a tiny bit of the meringue between your thumb and forefinger and feel no grittiness from undissolved sugar. This smoothness is a sign of a well-made meringue.
As you continue to add the sugar and whip, the meringue will undergo a remarkable transformation. It will become incredibly thick, brilliantly white, and beautifully glossy. You are aiming for “stiff peaks” here. When you lift the whisk attachment, the peaks should stand straight up and hold their shape without collapsing or drooping in the slightest. They should appear shiny and smooth, almost like freshly fallen snow. When you tilt the mixer bowl, the meringue should not slide around or move from its position. This stiff, glossy meringue is the absolute foundation of our perfect Chocolate Meringue Cookies, so getting this stage right is crucial for achieving that characteristic crisp exterior and tender, airy interior. This stage indicates maximum aeration and stability.
Once stiff peaks are achieved and the meringue is glossy and smooth, turn off the mixer and add the 1 teaspoon of pure vanilla extract. Turn the mixer back on to medium speed and whip for just another 10-15 seconds to thoroughly incorporate the vanilla evenly throughout the meringue. Be careful not to overmix at this stage, as it can start to break down the meringue’s structure.
Gently Incorporating Chocolatey Goodness
-
Sift in the Dry Ingredients:
With your magnificent meringue base now ready – standing tall, glossy, and perfectly stiff – it’s time to infuse it with our rich chocolate flavor. Retrieve the reserved bowl containing your sifted cocoa powder, espresso powder, and salt. Hold a fine-mesh sieve directly over the meringue in the mixer bowl and sift the dry ingredients once more, directly over the top of the pristine meringue. Even though you pre-sifted them, this final sift ensures that absolutely no lumps make it into your delicate mixture and helps to distribute them as evenly as possible over the surface of the meringue, preparing it for gentle incorporation.
-
Fold in the Dry Ingredients:
Now, using a large, flexible rubber spatula, begin to gently fold the sifted cocoa mixture into the meringue. The keyword here is emphatically gently. The goal is to incorporate the dry ingredients without deflating the significant volume of air you painstakingly whipped into the egg whites. Use a classic “cut-and-fold” technique: slice the spatula down through the center of the meringue, sweep it across the bottom of the bowl, and then fold the mixture back up and over the top. Rotate the bowl slightly as you go, continuing this motion. Keep folding until the cocoa powder is just combined and you no longer see prominent streaks of white meringue, but stop as soon as it’s homogenous. Over-mixing at this stage is a common pitfall; it will quickly deflate the meringue, resulting in flat, dense cookies instead of the light, airy ones we desire. The meringue will transform into a beautiful, uniform light brown, chocolatey hue, indicating a perfect incorporation of flavor.
-
Fold in the Chocolate Chips:
Finally, sprinkle your 3/4 cup of mini chocolate chips (or finely chopped chocolate) evenly over the top of the chocolate-infused meringue. Once again, using your rubber spatula, very gently fold them into the mixture. Aim to distribute the chocolate chips as evenly as possible with just a few more careful folds. Remember, when it comes to folding meringue, less is always more. The chocolate chips will add wonderful textural contrast and delightful bursts of intense chocolate flavor to every bite, making these Chocolate Meringue Cookies truly irresistible. Be careful not to crush the chips with your spatula or overwork the meringue while incorporating them, preserving that light and airy structure.
Shaping Your Chocolate Meringue Delights
-
Prepare Your Piping Bag:
This step is where your Chocolate Meringue Cookies truly begin to take on their elegant and appealing final shape. Fit a large piping bag with your preferred tip. A large open star tip (such as an Ateco 826 or Wilton 1M) is excellent for creating beautiful, defined swirls or classic rosettes. A large round tip (like an Ateco 808) will yield neat, smooth mounds or “kisses.” If you don’t have a piping bag or decorative tips, don’t despair! You can absolutely use a large zip-top plastic bag with one corner snipped off to create a simple round opening, or even use two spoons to drop dollops of meringue onto the baking sheet. However, using a piping bag undeniably elevates the presentation and allows for more uniform shapes.
To fill the piping bag cleanly and efficiently, stand it up in a tall, sturdy glass or a pitcher. Then, fold the top edges of the bag over the rim of the glass. This creates a wide opening and helps to keep the outside of the bag clean while you’re filling it. Spoon the delicate chocolate meringue mixture into the bag, filling it only about two-thirds full. It’s important not to overfill the bag, as a too-full bag will be harder to handle, more prone to bursting, and can cause meringue to squeeze out from the wrong end. Twist the top of the bag securely to seal it, pushing the meringue down towards the tip.
-
Pipe the Meringue Cookies:
On your prepared parchment-lined baking sheets, begin to pipe the meringue into your desired shapes. For classic meringue cookies, pipe small rosettes, star shapes, or neat “kisses,” aiming for roughly 1 to 1.5 inches in diameter. When piping, apply steady, even pressure, lifting straight up as you finish each cookie to create neat peaks. Ensure you leave about 1 inch of space between each meringue on the baking sheet. While meringues don’t spread significantly during baking, this spacing allows for good air circulation around each cookie, which is crucial for even drying and achieving that perfect crisp texture.
If you’re using a round tip or simply a snipped zip-top bag, pipe small, uniform mounds. The inherent beauty of meringue lies in its ethereal and delicate quality, so don’t stress too much about achieving absolute piping perfection. Each uniquely shaped cookie will be charming in its own right. You might find that the mini chocolate chips make piping a tiny bit trickier as they can sometimes get caught in the tip; just try to guide them through as best you can. If a chocolate chip gets completely stuck, you can gently clear the tip with a toothpick or a clean finger, but try to avoid touching the meringue directly too much, as the warmth of your hands can affect its stability. Aim for consistency in size so they dry out evenly.
The Low and Slow Bake for Perfect Texture
-
Bake the Meringue Cookies:
Carefully transfer your baking sheets, laden with their beautiful piped meringues, to your preheated 225°F (107°C) oven. If you are baking on two racks simultaneously, which is often necessary, remember to rotate the sheets halfway through the baking time to ensure that all the cookies dry out evenly. Bake for approximately 60-75 minutes. It’s important to understand that meringues don’t truly “bake” in the traditional sense; instead, they slowly dry out in the low heat. This slow drying process is what gives them their characteristic light, airy, and utterly crisp texture without significant browning.
You’ll know they are done when they feel incredibly light and firm to the touch, and, most importantly, they easily lift off the parchment paper without any sticking whatsoever. If there is any resistance or stickiness when you try to lift one, it indicates that they need more drying time. The outside of the cookies should be completely firm, and if you were to carefully break one open (though it’s best to wait until they are fully cooled for optimal texture), the inside should be dry, not sticky or chewy. The exact baking time can vary depending on the nuances of your particular oven and the precise size of your piped cookies, so rely more on their feel and behavior than a strict timer. Try to resist the urge to open the oven door too frequently, especially during the first 45 minutes, as sudden temperature fluctuations can cause the delicate meringue to crack or weep, compromising its structure.
-
Cool in the Oven:
Once the baking time is complete and your meringues are wonderfully crisp and dry, turn off the oven. Here’s a crucial, often overlooked, but absolutely essential step for achieving that signature crisp, melt-in-your-mouth texture that defines perfect meringues: leave the Chocolate Meringue Cookies inside the oven as it cools down completely. To aid in the cooling process and to allow any remaining moisture to escape the oven environment, you can prop the oven door open slightly with a wooden spoon or oven-safe heatproof utensil. This slow cooling process prevents the delicate meringues from cracking due to a sudden temperature change and ensures they dry out thoroughly and evenly from the inside out. This can take anywhere from 1 to 3 hours, or even overnight, depending on the ambient temperature and humidity in your kitchen. Patience truly is a profound virtue at this stage, as this extended cooling period is fundamental to their structural integrity and their delicious, lasting crispness.
Why is this step so important for these Chocolate Meringue Cookies? The gradual decrease in temperature allows the internal structure of the meringue to set fully and calmly, without experiencing a sudden thermal shock that can lead to visible cracks on the surface. Furthermore, it allows any residual moisture that might still be trapped within the meringue to dissipate slowly, resulting in a perfectly dry, shatteringly crisp cookie. If you remove them from the oven too soon, while it’s still warm, they might absorb moisture from the air, quickly becoming chewy or sticky, which detracts from their characteristic delicate snap, especially in humid environments.
Keeping Your Chocolate Meringue Cookies Crisp
-
Storing Your Finished Cookies:
Once your Chocolate Meringue Cookies are completely cooled to room temperature – and I mean completely, not even slightly warm – they are finally ready to be enjoyed! For optimal crispness and longevity, it is absolutely essential to store them in an airtight container. Choose a container that seals tightly to prevent any air or moisture from reaching them. Place the container at room temperature, ideally in a cool, dry spot in your pantry or kitchen. It is critically important to keep these delicate cookies away from any moisture or humidity, as meringues are highly hygroscopic; they are like little sponges that will eagerly absorb moisture from the air, which will quickly turn them sticky, soft, and ruin their perfect crisp texture. If you happen to live in a particularly humid climate, you might even consider adding a small food-safe desiccant packet (like the ones found in vitamin bottles or jerky packages) to the container to absorb excess moisture, though this is usually only necessary for very long-term storage or extremely humid conditions.
When stored properly in an airtight environment, these delightful Chocolate Meringue Cookies will maintain their wonderfully crisp texture and fresh taste for up to 1 week. While they are undeniably at their absolute best when enjoyed within the first few days of baking, they will certainly remain delicious for longer if kept perfectly dry. A common mistake is to refrigerate meringues; please avoid this, as the cold, moist environment of a refrigerator will very quickly lead to them becoming soft, chewy, and losing their characteristic meringue snap. Serve them as an elegant, light treat on their own, or as a sophisticated, chocolatey accompaniment to a cup of coffee or tea. They also make a fantastic, visually appealing garnish for other desserts like ice cream sundaes, chocolate mousses, or fruit tarts, adding both crunch and rich flavor. Now, savor and enjoy the delicious fruits of your labor!
A note on troubleshooting: If, for any reason, your meringues come out chewy, sticky, or soft, it is almost always attributable to insufficient baking and drying time in the oven, or subsequent exposure to humidity. Don’t be afraid to leave them in the cooling oven for an extended period next time, or check that your storage container is truly airtight. If they cracked during the drying process, it could be due to an oven temperature that was slightly too high, or removing them from the oven too quickly while still warm. Meringue making is a delicate art, requiring precision and patience, but with these detailed steps, you’ll master your “Chocolate Meringue Cookies” and consistently achieve perfect results in no time!

Conclusion:
I genuinely believe this recipe is one you simply have to try. It’s not just another cookie recipe; it’s an experience that truly elevates the simple pleasure of baking. Imagine that first bite: a delicate, crisp shell that shatters with the gentlest pressure, immediately giving way to a wonderfully chewy, marshmallow-like interior. Then comes the intense, sophisticated chocolate flavor, perfectly balanced – rich without being overwhelming, sweet without being cloying. These aren’t heavy, dense cookies; they’re ethereal, light as air, yet they deliver a punch of decadent flavor that truly satisfies. They are impressive enough for the most special occasions, yet surprisingly simple to master, making them an absolute dream for any baker, novice or experienced. The sheer elegance they bring to any table, coupled with their irresistible taste and unique texture, makes these Chocolate Meringue Cookies an undeniable standout that I am confident will become a cherished part of your baking repertoire.
Serving Suggestions & Creative Variations:
Once you’ve mastered these beauties, the possibilities for enjoyment and adaptation don’t end there! I adore serving them as a light yet decadent accompaniment to a strong cup of coffee or a comforting mug of hot chocolate – the way the slight bitterness of the coffee contrasts with the sweet, airy cookie is just divine. They also make an absolutely stunning addition to any dessert platter, instantly elevating the entire spread with their delicate appearance and sophisticated charm. For an extra special treat, try crumbling them over a scoop of vanilla bean ice cream or a rich chocolate mousse; their crisp-chewy texture adds a fantastic counterpoint to creamy desserts, creating an interplay of textures that is simply heavenly. You could even use them as a charming garnish for a plated dessert, offering a beautiful visual appeal and a delightful crunch.
But why stop at serving? This recipe is incredibly adaptable, inviting you to experiment and personalize! For a festive twist during the holidays, a tiny drop of peppermint extract can be added to the meringue mixture for a refreshing burst of flavor that pairs wonderfully with chocolate. A sprinkle of flaky sea salt on top before baking intensifies the chocolate notes beautifully, adding a sophisticated edge that will impress even the most discerning palates. You could also experiment with different types of chocolate – perhaps white chocolate chips folded in for a striking visual contrast and a creamier taste, or even a swirl of raspberry puree through the raw meringue for a fruity zing that cuts through the richness. Get creative with food coloring for themed events, or shape them into different forms using various piping nozzles for a unique presentation. For an ultimate indulgence, consider sandwiching two cookies together with a dollop of rich chocolate ganache, or even a light, airy whipped cream infused with a hint of vanilla. Each variation opens up a new world of flavor and texture, proving just how versatile and exciting these humble meringue cookies can be. Don’t be afraid to make them your own!
Now, It’s Your Turn!
I’ve shared all my tips and tricks, and I genuinely can’t wait for you to experience the magic of baking these exquisite treats in your own kitchen. Don’t be intimidated by the delicate nature of meringue; with a little patience and the right technique, you’ll be whipping up perfect batches in no time. I promise you, the look on your loved ones’ faces when they bite into one of these heavenly confections will be utterly priceless. So, gather your ingredients, preheat your oven, and embark on this delightful baking journey. Once you’ve made your batch of Chocolate Meringue Cookies, please, please, please share your triumphs with me! I absolutely adore seeing your creations. Tell me what you thought, what variations you tried, and who you shared them with. Your feedback and photos truly make my day, and they inspire me to keep sharing more delicious recipes with you all. Remember, baking is about joy, connection, and indulging in a little bit of sweetness. I am so excited for you to discover the joy these cookies bring. Happy baking, my friends!
Best Chocolate Meringue Cookies: Melt-in-Your-Mouth Recipe!
These Chocolate Meringue Cookies are a delightful culinary experience, melting delicately on your tongue. Crisp on the outside, wonderfully airy and chewy within, they are infused with a satisfying chocolate flavor, making them utterly irresistible.
Ingredients
-
2/3 cup (4 ounces) semisweet chocolate morsels
-
2 large egg whites, at room temperature
-
2/3 cup (4 ounces) confectioners’ sugar, sifted
-
1/3 cup saltine-cracker crumbs
-
1 teaspoon pure vanilla extract
Instructions
-
Step 1
Preheat oven to 225°F (107°C). Line two large baking sheets with parchment paper. -
Step 2
Melt chocolate morsels using a microwave or double boiler. Let cool slightly. -
Step 3
In a clean stand mixer bowl, whip egg whites on medium-low speed until foamy. Gradually add sifted confectioners’ sugar, 1 tablespoon at a time, increasing speed to medium-high. Continue whipping until stiff, glossy peaks form and sugar is fully dissolved. -
Step 4
Gently fold in the slightly cooled melted chocolate, saltine-cracker crumbs, and vanilla extract until just combined. Do not overmix. -
Step 5
Pipe or drop small spoonfuls (about 1 to 1.5 inches) of meringue onto prepared baking sheets, leaving 1 inch between each. Bake for 60-75 minutes, rotating sheets halfway, until cookies are firm, light, and lift easily from parchment. -
Step 6
Turn off the oven and leave the cookies inside to cool completely for 1 to 3 hours, or overnight, with the oven door propped open slightly. This prevents cracking and ensures crispness. -
Step 7
Once completely cool, store cookies in an airtight container at room temperature for up to 1 week. Avoid refrigeration.
Important Information
Nutrition Facts (Per Serving)
It is important to consider this information as approximate and not to use it as definitive health advice.
Allergy Information
Please check ingredients for potential allergens and consult a health professional if in doubt.
-


Leave a Comment