
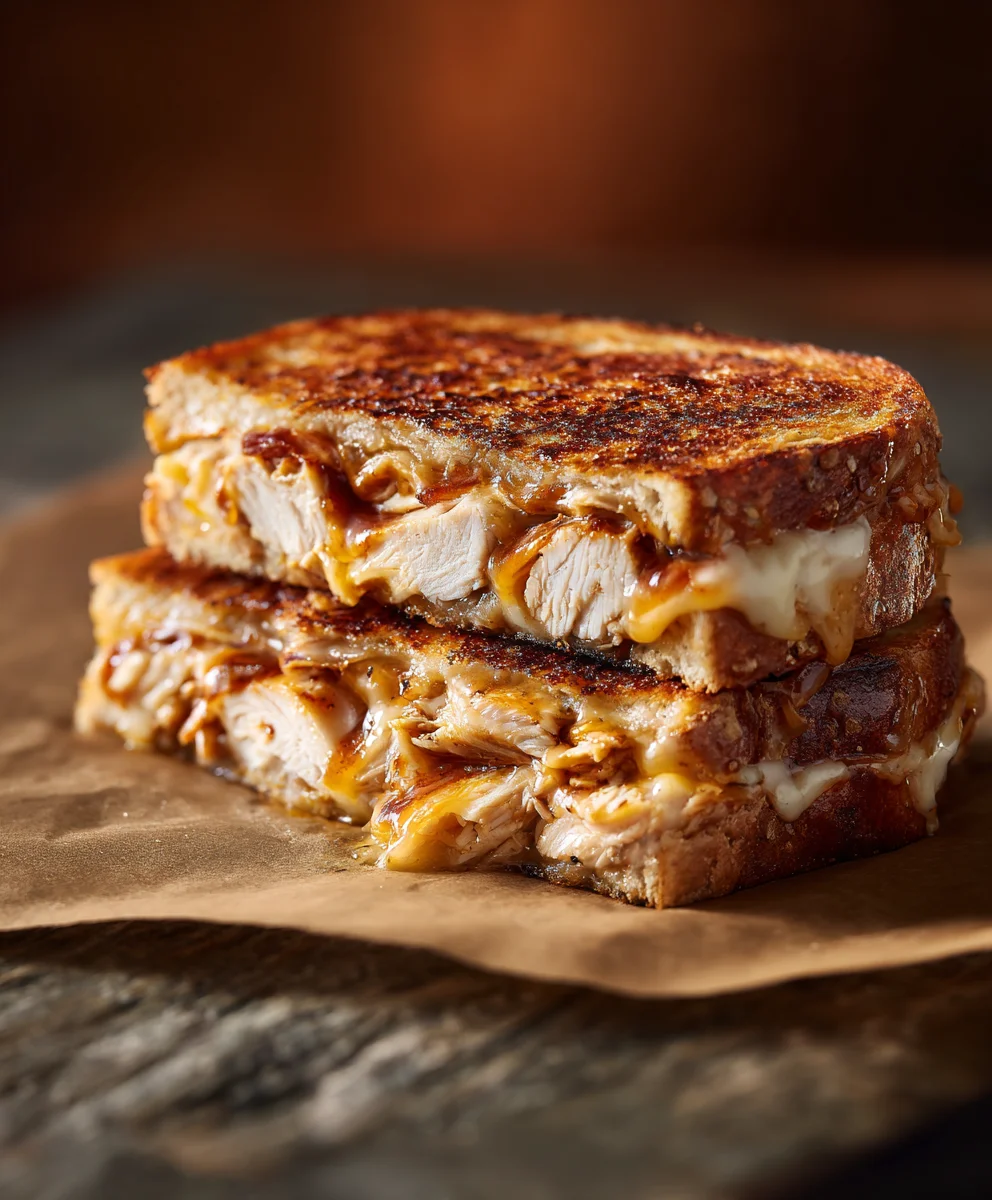
Bbq Chicken Grilled Cheese – just the name itself conjures up images of ultimate comfort and irresistible flavor, doesn’t it? I’m incredibly excited to share with you a recipe that elevates two of America’s most cherished comfort foods into a singular, extraordinary experience. Forget deciding between a classic grilled cheese sandwich and a hearty BBQ chicken dinner; with this innovative creation, you get the best of both worlds, beautifully melded together. While neither grilled cheese nor BBQ chicken holds a single, ancient origin story, their combination signifies a delightful modern culinary trend: taking beloved, familiar flavors and transforming them into something fresh and exciting for today’s palates.
People adore this dish for so many reasons. Imagine the satisfying crunch of perfectly toasted bread, giving way to an explosion of smoky, tangy barbecue chicken, all enveloped in layers of luscious, gooey, melted cheese. It’s a symphony of textures and tastes – savory, sweet, and a little bit spicy – that truly satisfies on every level. This Bbq Chicken Grilled Cheese is not just a meal; it’s an experience, offering incredible convenience for a quick weeknight dinner or a luxurious lunch, proving that gourmet flavors can be achieved with simplicity. I truly believe you’ll find this recipe becomes a fast favorite in your culinary repertoire.

Ingredients:
- For the BBQ Chicken:
- 2 large boneless, skinless chicken breasts (about 1.5 – 2 lbs total)
- 1 tablespoon olive oil
- 1 teaspoon smoked paprika
- 1 teaspoon garlic powder
- ½ teaspoon onion powder
- ½ teaspoon salt, or to taste
- ¼ teaspoon black pepper, or to taste
- ½ cup your favorite BBQ sauce, plus extra for dipping if desired
- For the Grilled Cheese:
- 8 slices sturdy sandwich bread (such as sourdough, brioche, or Texas toast – I love a good sourdough for its tang!)
- 4 tablespoons unsalted butter, softened, or mayonnaise (I often use mayo for an extra crispy, golden-brown crust!)
- 1 cup shredded sharp cheddar cheese
- 1 cup shredded Monterey Jack cheese (or a blend of your favorite meltable cheeses like Colby, pepper jack, or smoked gouda)
- ¼ small red onion, very thinly sliced (optional, but adds a lovely bite and freshness)
- 2 tablespoons fresh cilantro, chopped (optional, for a burst of herbaceous flavor)
Preparing the BBQ Chicken:
- Prepare the Chicken: First things first, let’s get our chicken ready for its BBQ transformation. Pat your boneless, skinless chicken breasts completely dry with paper towels. This is a crucial step because it helps the seasoning adhere better and promotes a nicer sear, preventing the chicken from steaming.
- Season the Chicken: In a small bowl, combine the smoked paprika, garlic powder, onion powder, salt, and black pepper. Drizzle the chicken breasts with 1 tablespoon of olive oil, ensuring they are lightly coated. Then, generously sprinkle the seasoning mixture all over the chicken, gently rubbing it in to ensure every inch is covered. Don’t be shy with the seasoning here; it builds the foundational flavor!
-
Cook the Chicken: We’re aiming for perfectly tender, juicy chicken. While there are several ways to cook chicken, grilling truly elevates the “Bbq Chicken Grilled Cheese” experience by adding that smoky char.
- Grilling Method (Recommended): Preheat your grill to medium-high heat (around 400°F / 200°C). Lightly oil the grill grates to prevent sticking. Place the seasoned chicken breasts on the hot grill. Cook for about 6-8 minutes per side, or until the internal temperature reaches 165°F (74°C) when checked with an instant-read thermometer at the thickest part of the breast. Resist the urge to move the chicken too often; let it get those beautiful grill marks! Once cooked, transfer the chicken to a cutting board and let it rest for 5-10 minutes. Resting is essential for the juices to redistribute, ensuring moist and flavorful chicken.
- Pan-Frying/Baking Alternative: If grilling isn’t an option, you can pan-fry the chicken in a hot skillet with a little olive oil until cooked through, or bake it in an oven preheated to 375°F (190°C) for 20-25 minutes. Either way, ensure it reaches 165°F (74°C) internal temperature.
- Shred or Dice the Chicken: Once the chicken has rested, it’s time to shred it. My favorite method for shredding is to use two forks: hold one fork firmly to anchor the chicken and use the other to pull and shred the meat into bite-sized pieces. Alternatively, you can finely dice the chicken. The goal is to have manageable pieces that will fit nicely within your sandwich without spilling out.
- Toss with BBQ Sauce: Place the shredded or diced chicken in a medium bowl. Pour in ½ cup of your favorite BBQ sauce and toss thoroughly until all the chicken pieces are evenly coated. This is where the magic really happens for our Bbq Chicken Grilled Cheese! Set aside.
Prepping Other Components:
- Prepare the Cheese: If your cheese isn’t already shredded, now’s the time to grate it. I always recommend shredding your own cheese from a block when possible, as pre-shredded varieties often contain anti-caking agents that can hinder smooth melting. Combine your shredded sharp cheddar and Monterey Jack cheeses in a bowl. Having a good blend of cheeses ensures both flavor depth and that perfect gooey pull.
- Slice the Red Onion (Optional): If you’re using red onion, slice it as thinly as humanly possible. A mandoline slicer works wonders here, but a very sharp knife will also do the trick. Ultra-thin slices ensure the onion provides a gentle crunch and flavor without overwhelming the sandwich. If you find raw onion too pungent, you can briefly soak the slices in cold water for 10-15 minutes, then pat dry, to mellow their bite.
- Chop the Cilantro (Optional): If adding cilantro, give it a good rinse, pat dry, and roughly chop it. This fresh herb will add a bright, zesty counterpoint to the rich BBQ chicken and cheese.
-
Prepare the Bread: Lay your eight slices of bread on a clean surface. Now, here’s a little secret for the best grilled cheese crust: butter OR mayonnaise.
- Butter Method: Spread a generous, even layer of softened unsalted butter all the way to the edges on one side of each bread slice. Don’t skimp on the butter; it’s key for that golden, crispy exterior.
- Mayonnaise Method (My personal favorite!): For an incredibly crisp and deeply golden-brown crust, spread a thin, even layer of mayonnaise (yes, mayonnaise!) on one side of each bread slice. The mayo, when heated, emulsifies beautifully and prevents burning, creating a superior crust. Trust me on this one!
Assembling the Ultimate Bbq Chicken Grilled Cheese:
- Set Up Your Assembly Line: Arrange your ingredients in a logical order: bread (butter/mayo side up), mixed cheese, BBQ chicken, red onion, cilantro, and then more cheese. This makes the assembly process smooth and efficient.
- First Layer of Cheese: Take four slices of bread, buttered/mayo-ed side down. Spread an even layer of your mixed cheese (about ¼ cup) on each of these slices. This creates a “cheese cage” on the bottom, which helps to hold the filling in place and ensures cheese melts directly onto the bread, acting like glue.
- Add the BBQ Chicken: Divide the BBQ chicken mixture evenly among the four bread slices, spreading it out to cover the cheese layer. Try to keep the chicken from going right to the very edge; leave a small border to allow the cheese to melt and seal the sandwich.
- Layer the Onion and Cilantro (Optional): If using, scatter the thin slices of red onion and chopped cilantro over the BBQ chicken. These fresh elements are a fantastic complement to the rich flavors.
- Second Layer of Cheese: Top the chicken, onion, and cilantro with another even layer of the mixed cheese (about ¼ cup per sandwich). This second layer of cheese is crucial for that gooey, melty interior and helps to seal the top piece of bread, creating a truly unified “Bbq Chicken Grilled Cheese.”
- Top with Bread: Place the remaining four slices of bread on top, buttered/mayo-ed side up. Gently press down on each sandwich to make sure all the layers are somewhat compact. You now have four beautiful, ready-to-cook Bbq Chicken Grilled Cheese masterpieces!
Cooking the Ultimate Bbq Chicken Grilled Cheese:
- Preheat Your Pan: Heat a large non-stick skillet or cast-iron pan over medium-low heat. This low and slow approach is key! If the heat is too high, the bread will burn before the cheese has a chance to fully melt and the filling to warm through. Allow the pan to heat for a good 3-5 minutes to ensure even temperature distribution. You don’t need any additional butter or oil in the pan if you’ve buttered/mayo-ed your bread generously.
- Cook the First Side: Carefully place two of the assembled sandwiches into the preheated pan (or more, depending on your pan size, without overcrowding). Cook for 4-6 minutes, or until the bottom slice is deeply golden brown and the cheese just begins to melt and ooze. Take a peek occasionally to ensure it’s browning nicely without burning. If it’s browning too quickly, lower the heat.
-
Flip and Finish: Using a wide, sturdy spatula, carefully flip the sandwiches over. Gently press down on each sandwich with the back of the spatula to ensure good contact with the pan and encourage even browning and melting. Cook for another 4-6 minutes on the second side, or until that side is also golden brown and the cheese is gloriously melted and gooey throughout the entire “Bbq Chicken Grilled Cheese.”
- Pro Tip for Max Melt: If your cheese isn’t melting as fast as your bread is browning, you can place a lid over the pan for the last minute or two of cooking. This traps the heat and creates a steamy environment, helping the cheese melt even faster without over-browning the bread. Just be sure to remove the lid for the final minute to maintain crispness.
- Don’t Rush It: Patience is truly a virtue when making grilled cheese. You want that perfect balance of crispy exterior and molten interior.
- Repeat: Remove the cooked Bbq Chicken Grilled Cheese sandwiches from the pan and repeat the process with the remaining two sandwiches.
Serving Suggestions:
- Rest and Slice: Once cooked, transfer the grilled cheese sandwiches to a cutting board. Let them rest for just a minute or two before slicing. This brief rest allows the hot cheese to set slightly, making for a cleaner cut and preventing the filling from gushing out. Slice them diagonally – it just looks better and makes for easier eating!
- Enjoy Immediately: Serve your incredible Bbq Chicken Grilled Cheese sandwiches immediately while they are still hot, crispy, and the cheese is wonderfully molten. These are truly best fresh off the pan.
- Pairing Ideas: These flavorful sandwiches are hearty enough on their own, but they also pair beautifully with a fresh green salad, a cup of creamy tomato soup, some crispy coleslaw, or a side of dill pickles to cut through the richness. And don’t forget, a little extra BBQ sauce on the side for dipping never hurts!
Conclusion:
If there’s one sandwich that truly embodies comfort, creativity, and an explosion of delightful flavors, it has to be the one we’ve just explored. This isn’t just any grilled cheese; it’s an experience, a culinary adventure that takes a beloved classic and elevates it to new, exciting heights. I truly believe that once you take that first bite, you’ll understand exactly why I’m so passionate about this dish. The combination of tender, smoky BBQ chicken, perfectly melted cheese, and golden, buttery bread creates a symphony of textures and tastes that is simply irresistible. It’s gooey, it’s savory, it’s got that delightful tang and sweetness from the BBQ sauce, and it’s wrapped up in the most satisfyingly crispy package. This recipe isn’t just about making food; it’s about crafting moments, about bringing joy to your kitchen and your dinner table.
Why This Recipe Deserves a Spot in Your Repertoire
I can’t stress enough how much of a game-changer this sandwich is. It’s incredibly satisfying, yet surprisingly easy to put together, especially if you have some leftover BBQ chicken on hand. It’s the ultimate comfort food with a gourmet twist, perfect for a cozy night in, a quick but hearty lunch, or even an impressive casual dinner. The richness of the cheese combined with the robust flavor of the BBQ chicken creates a balanced profile that will appeal to almost everyone. Seriously, prepare for compliments when you serve this! It’s a dish that feels both familiar and exciting, a testament to how a few simple ingredients can create something truly extraordinary. The warmth, the melt, the crunch – every element plays a crucial role in making this a truly memorable meal that you’ll want to revisit again and again. It’s an innovative twist on a cherished classic that manages to be both nostalgic and refreshingly new.
Serving Suggestions & Creative Pairings
While this sandwich is a star all on its own, it plays wonderfully with a variety of sides. For a classic diner feel, I love serving it alongside a bowl of creamy tomato soup – the dipping potential is off the charts! A simple green salad with a light vinaigrette can cut through the richness beautifully, offering a refreshing contrast and a burst of freshness. Crispy sweet potato fries or a vibrant coleslaw would also be fantastic accompaniments, adding extra texture and flavor dimensions that really round out the meal. Don’t forget about pickles! A few tangy dill pickle slices on the side (or even tucked inside the sandwich, if you’re feeling adventurous and love that zing) can provide a delightful counterpoint to the sweetness and smokiness of the BBQ sauce, awakening your palate. For drinks, a cold glass of iced tea, a crisp lemonade, or even a light craft beer would complement the flavors perfectly, enhancing the overall dining experience without overpowering it.
Endless Variations to Make It Your Own
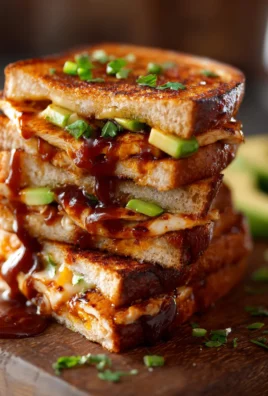
One of the best things about this recipe is its incredible versatility. Don’t be afraid to experiment and make it uniquely your own! For the cheese, while a blend of sharp cheddar and creamy Monterey Jack is fantastic, try adding a slice of smoked gouda for an extra layer of smoky depth, or some fiery pepper jack if you like a little kick. Different BBQ sauces can completely transform the flavor profile – a spicy chipotle BBQ sauce for heat lovers, a tangy Carolina mustard-based sauce for a different kind of zest, or a sweet and sticky Kansas City style for extra indulgence. You can also mix in some caramelized onions for a burst of rich sweetness, a few slices of pickled jalapeños for a spicy tang, or even some crispy bacon bits for an extra layer of savory crunch. Imagine a “Bbq Chicken Grilled Cheese” with a hint of crispy fried onions and a dollop of creamy ranch dressing inside – pure genius! You could even use different types of bread; a sturdy sourdough or a rustic Italian loaf would provide a wonderful chewiness and structure, adding another layer of complexity. Don’t limit yourself – this recipe is a canvas for your culinary creativity, inviting you to explore endless delicious possibilities.
Your Turn! Try It and Share Your Culinary Journey
Now that you have all the tools and inspiration, I wholeheartedly encourage you to step into your kitchen and give this incredible recipe a try. You won’t regret it! I truly believe this is one of those recipes that will quickly become a cherished favorite in your household, inspiring many delightful meals to come. And once you’ve experienced the magic of this particular sandwich, please don’t keep it to yourself! I would absolutely love to hear about your experience. What cheeses did you use? What variations did you try? Did you pair it with classic tomato soup or something entirely different and unexpected? Share your photos, your tips, and your triumphs in the comments section below, or tag me on your favorite social media platform (without specific links, of course!). Your feedback and creations inspire me and our entire community of food lovers, making us all better cooks. Let’s spread the grilled cheese love far and wide. Happy cooking, and enjoy every single gooey, delicious bite!

BBQ Chicken Grilled Cheese: Melty, Savory & So Delicious!
Elevate two beloved comfort foods into one extraordinary dish with this BBQ Chicken Grilled Cheese recipe! Enjoy the satisfying crunch of perfectly toasted bread, an explosion of smoky, tangy barbecue chicken, and layers of luscious, gooey, melted cheese. A symphony of textures and tastes, it’s a convenient and delicious meal that will become a fast favorite.
Ingredients
-
2 large boneless, skinless chicken breasts (1.5 – 2 lbs)
-
1 tablespoon olive oil
-
1 teaspoon smoked paprika
-
1 teaspoon garlic powder
-
½ teaspoon onion powder
-
½ teaspoon salt
-
¼ teaspoon black pepper
-
½ cup BBQ sauce
-
8 slices sturdy sandwich bread
-
4 tablespoons unsalted butter, softened, or mayonnaise
-
1 cup shredded sharp cheddar cheese
-
1 cup shredded Monterey Jack cheese
-
¼ small red onion, very thinly sliced (optional)
-
2 tablespoons fresh cilantro, chopped (optional)
Instructions
-
Step 1
Pat chicken breasts dry. In a small bowl, combine smoked paprika, garlic powder, onion powder, salt, and black pepper. Drizzle chicken with 1 tbsp olive oil, then generously rub with seasoning mixture. -
Step 2
Preheat grill to medium-high (400°F/200°C) and lightly oil grates. Cook seasoned chicken 6-8 minutes per side, until internal temperature reaches 165°F (74°C). Transfer to a cutting board and let rest 5-10 minutes. -
Step 3
Once rested, shred or finely dice the chicken. Place in a medium bowl, add ½ cup BBQ sauce, and toss until evenly coated. Set aside. -
Step 4
Grate and combine sharp cheddar and Monterey Jack cheeses. Thinly slice the red onion and chop the fresh cilantro, if using. Spread butter or mayonnaise evenly on one side of each of the 8 bread slices. -
Step 5
Lay 4 bread slices (butter/mayo side down). On each, layer ¼ cup mixed cheese, then divide the BBQ chicken mixture, followed by red onion and cilantro (if using), and another ¼ cup mixed cheese. Top with the remaining 4 bread slices (butter/mayo side up). Gently press to compact layers. -
Step 6
Heat a large non-stick skillet or cast-iron pan over medium-low heat for 3-5 minutes. Place 2 assembled sandwiches in the pan. Cook for 4-6 minutes per side, until deeply golden brown and the cheese is gloriously melted and gooey throughout. For maximum melt, cover the pan for the last minute of cooking. -
Step 7
Repeat cooking for the remaining 2 sandwiches. Transfer cooked sandwiches to a cutting board, let rest 1-2 minutes, then slice diagonally and serve immediately while hot.
Important Information
Nutrition Facts (Per Serving)
It is important to consider this information as approximate and not to use it as definitive health advice.
Allergy Information
Please check ingredients for potential allergens and consult a health professional if in doubt.

Leave a Comment