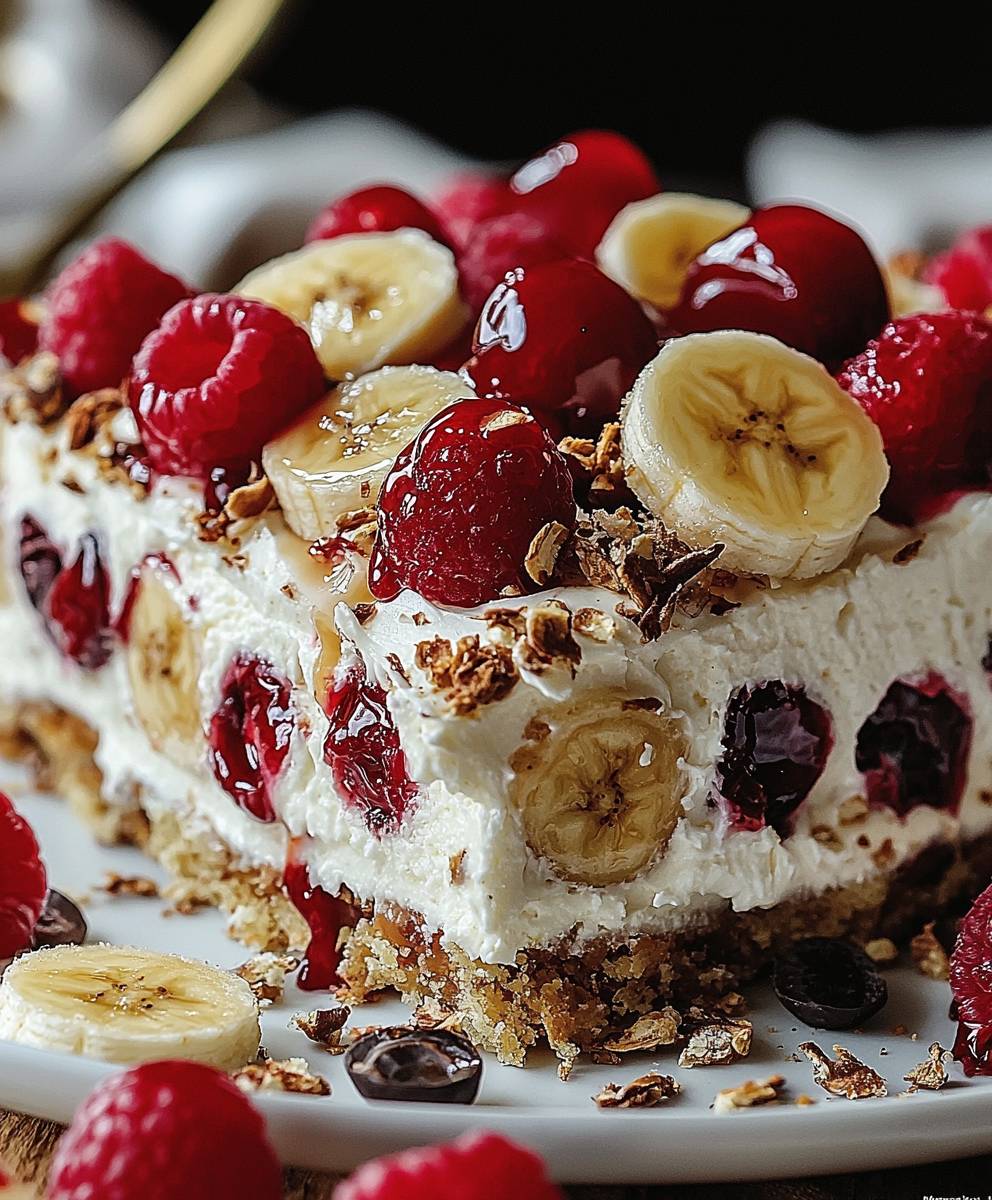
Banana Split Cake: the dessert that screams summer fun! Imagine sinking your fork into a creamy, dreamy confection that perfectly captures the essence of a classic banana split, but in cake form. This isn’t just any cake; it’s a nostalgic trip back to childhood, a celebration of simple pleasures, and a guaranteed crowd-pleaser at any gathering.
While the exact origins of Banana Split Cake are shrouded in a bit of mystery, its inspiration is clear: the iconic banana split sundae. Legend has it that the banana split was invented in 1904 by a young pharmacist’s apprentice in Latrobe, Pennsylvania. He was looking to create a show-stopping dessert, and boy, did he succeed! Our cake version takes that same spirit of playful indulgence and transforms it into an easy-to-make, no-bake delight.
What makes this cake so irresistible? It’s the symphony of flavors and textures. The creamy layers of vanilla pudding and whipped topping, the sweet burst of pineapple and strawberries, the satisfying crunch of nuts, and of course, the star of the show: ripe bananas. It’s a dessert that’s both refreshing and comforting, perfect for hot summer days or any time you’re craving a little bit of sunshine. Plus, the no-bake aspect makes it incredibly convenient no need to turn on the oven! Get ready to experience a slice of pure happiness with this incredible Banana Split Cake recipe!
Ingredients:
- For the Crust:
- 1 ½ cups vanilla wafer crumbs
- 6 tablespoons (3 ounces) unsalted butter, melted
- ¼ cup granulated sugar
- For the Cream Cheese Layer:
- 8 ounces cream cheese, softened
- 1 cup powdered sugar
- 1 teaspoon vanilla extract
- 8 ounces whipped topping, thawed (like Cool Whip)
- For the Banana Layer:
- 4-5 ripe bananas, sliced
- 2 tablespoons lemon juice (to prevent browning)
- For the Pineapple Layer:
- 20 ounces crushed pineapple, well-drained
- For the Chocolate Pudding Layer:
- 1 (3.9 ounce) package instant chocolate pudding mix
- 2 cups cold milk
- For the Strawberry Layer:
- 1 (21 ounce) can strawberry pie filling
- For the Toppings:
- 8 ounces whipped topping, thawed (for topping)
- Chocolate syrup, for drizzling
- Chopped nuts (walnuts, pecans, or peanuts), for sprinkling
- Maraschino cherries, for garnish
Preparing the Crust:
- Combine the Ingredients: In a medium bowl, combine the vanilla wafer crumbs, melted butter, and granulated sugar. Mix well until the crumbs are evenly moistened. I like to use a fork to make sure everything is properly combined.
- Press into the Pan: Press the crumb mixture evenly into the bottom of a 9×13 inch baking dish. You can use the bottom of a measuring cup or your fingers to firmly pack the crust. This helps it hold its shape and prevents it from crumbling too much when you cut the cake.
- Chill the Crust: Place the baking dish in the refrigerator and chill for at least 30 minutes. This will help the crust set and become firm. You can even chill it for longer, up to an hour or two, if you have the time.
Making the Cream Cheese Layer:
- Beat the Cream Cheese: In a large bowl, beat the softened cream cheese with an electric mixer until smooth and creamy. Make sure your cream cheese is truly softened; otherwise, you’ll end up with lumps.
- Add Powdered Sugar and Vanilla: Gradually add the powdered sugar to the cream cheese, beating until well combined. Then, stir in the vanilla extract. I always sift my powdered sugar to avoid any clumps.
- Fold in Whipped Topping: Gently fold in the whipped topping until the mixture is smooth and uniform. Be careful not to overmix, as this can deflate the whipped topping.
- Spread over Crust: Spread the cream cheese mixture evenly over the chilled crust. Make sure to cover the entire surface of the crust.
- Chill Again: Return the baking dish to the refrigerator and chill for another 30 minutes. This allows the cream cheese layer to set properly.
Assembling the Banana and Pineapple Layers:
- Prepare the Bananas: Slice the bananas into approximately ¼-inch thick rounds. Place the sliced bananas in a bowl and toss them with the lemon juice. This will prevent them from browning and keep them looking fresh.
- Arrange the Bananas: Arrange the banana slices evenly over the cream cheese layer. Try to create a single, even layer of bananas.
- Add the Pineapple: Spread the well-drained crushed pineapple evenly over the banana layer. Make sure the pineapple is thoroughly drained; otherwise, the cake can become soggy. I usually press the pineapple in a fine-mesh sieve to remove excess liquid.
Preparing the Chocolate Pudding Layer:
- Whisk Pudding and Milk: In a medium bowl, whisk together the instant chocolate pudding mix and cold milk until smooth and the pudding begins to thicken. This usually takes about 2-3 minutes.
- Spread over Pineapple: Spread the chocolate pudding evenly over the pineapple layer. Use a spatula to ensure the pudding is distributed smoothly.
- Chill Once More: Return the baking dish to the refrigerator and chill for another 30 minutes to allow the pudding to set.
Adding the Strawberry Layer and Final Touches:
- Spread Strawberry Pie Filling: Spread the strawberry pie filling evenly over the chocolate pudding layer. Make sure to cover the entire surface.
- Top with Whipped Topping: Spread the remaining 8 ounces of whipped topping evenly over the strawberry pie filling. You can use a piping bag with a decorative tip for a more elegant presentation, or simply spread it with a spatula.
- Drizzle with Chocolate Syrup: Drizzle chocolate syrup generously over the whipped topping.
- Sprinkle with Nuts: Sprinkle chopped nuts (walnuts, pecans, or peanuts) over the chocolate syrup.
- Garnish with Cherries: Garnish with maraschino cherries. Place them evenly spaced across the top of the cake.
- Chill Thoroughly: Cover the baking dish with plastic wrap and chill in the refrigerator for at least 2-3 hours, or preferably overnight, to allow all the flavors to meld together. This is crucial for the best flavor and texture.
Serving:
- Cut and Serve: Cut the Banana Split Cake into squares and serve chilled.
- Optional Garnishes: You can add extra chocolate syrup, nuts, or cherries when serving, if desired. A dollop of extra whipped cream is always a welcome addition!
Tips for Success:
- Use Ripe Bananas: Make sure your bananas are ripe but not overly ripe. They should be firm enough to slice easily but soft enough to have a good banana flavor.
- Drain the Pineapple Well: As mentioned before, draining the crushed pineapple thoroughly is essential to prevent a soggy cake.
- Chill Time is Key: Don’t rush the chilling process. Allowing each layer to set properly ensures a well-structured and flavorful cake.
- Variations: Feel free to experiment with different toppings. You could add sprinkles, mini chocolate chips, or even a drizzle of caramel sauce.
- Make Ahead: This cake is perfect for making ahead of time. It can be stored in the refrigerator for up to 2-3 days.
Enjoy your delicious Banana Split Cake! I hope you and your loved ones enjoy this delightful dessert as much as I do. It’s always a crowd-pleaser!

Conclusion:
This Banana Split Cake is truly a showstopper, and I wholeheartedly believe it deserves a place on your dessert table. It’s not just a cake; it’s a nostalgic trip back to childhood summers, a celebration of simple pleasures, and a guaranteed crowd-pleaser all rolled into one delicious package. The combination of the moist cake base, the creamy layers of pineapple and banana, the rich chocolate ganache, and the playful toppings creates a symphony of flavors and textures that will leave everyone wanting more.
Why is this a must-try? Because it’s incredibly easy to make! Seriously, even if you’re a baking novice, you can absolutely nail this recipe. The steps are straightforward, the ingredients are readily available, and the result is something that looks and tastes like it came from a professional bakery. Plus, it’s a fantastic make-ahead dessert. You can assemble it the day before you need it, allowing the flavors to meld together beautifully and saving you precious time on the day of your event.
But beyond the ease and convenience, it’s the sheer joy that this cake brings that makes it so special. It’s the kind of dessert that sparks conversation, evokes happy memories, and creates a sense of shared enjoyment. It’s perfect for birthday parties, potlucks, family gatherings, or even just a special treat for yourself on a weekend afternoon.
Looking for serving suggestions or variations? The possibilities are endless! For a truly decadent experience, serve each slice with a scoop of vanilla ice cream and a drizzle of hot fudge. You could also add a sprinkle of chopped nuts, such as pecans or walnuts, for extra crunch. If you’re feeling adventurous, try using different flavors of pudding in the filling. Butterscotch or coconut cream pudding would be delicious alternatives.
Another fun variation is to use a chocolate cake mix instead of yellow cake. This will create a richer, more intense chocolate flavor that complements the banana and pineapple perfectly. You could also add a layer of sliced strawberries to the filling for a burst of fresh, fruity flavor. And for a truly festive touch, top the cake with maraschino cherries and a sprinkle of colorful sprinkles.
Don’t be afraid to get creative and experiment with different toppings and flavors to create your own unique version of this classic dessert. The most important thing is to have fun and enjoy the process!
I’m so excited for you to try this Banana Split Cake recipe. I know you’re going to love it! Once you’ve made it, please come back and share your experience in the comments below. I’d love to hear what you thought of the recipe, what variations you tried, and how much everyone enjoyed it. Your feedback is invaluable and helps me to continue creating delicious and easy-to-follow recipes for you. So go ahead, grab your ingredients, and get baking! You won’t regret it. Happy baking!
Banana Split Cake: The Ultimate Dessert Recipe
Layered no-bake dessert featuring a vanilla wafer crust, cream cheese filling, bananas, pineapple, chocolate pudding, strawberry pie filling, whipped topping, and classic banana split toppings.
Ingredients
- 1 ½ cups vanilla wafer crumbs
- 6 tablespoons (3 ounces) unsalted butter, melted
- ¼ cup granulated sugar
- 8 ounces cream cheese, softened
- 1 cup powdered sugar
- 1 teaspoon vanilla extract
- 8 ounces whipped topping, thawed (like Cool Whip)
- 4-5 ripe bananas, sliced
- 2 tablespoons lemon juice (to prevent browning)
- 20 ounces crushed pineapple, well-drained
- 1 (3.9 ounce) package instant chocolate pudding mix
- 2 cups cold milk
- 1 (21 ounce) can strawberry pie filling
- 8 ounces whipped topping, thawed (for topping)
- Chocolate syrup, for drizzling
- Chopped nuts (walnuts, pecans, or peanuts), for sprinkling
- Maraschino cherries, for garnish
Instructions
- Prepare the Crust: In a medium bowl, combine the vanilla wafer crumbs, melted butter, and granulated sugar. Mix well until the crumbs are evenly moistened.
- Press the crumb mixture evenly into the bottom of a 9×13 inch baking dish. Use the bottom of a measuring cup or your fingers to firmly pack the crust.
- Chill the crust in the refrigerator for at least 30 minutes.
- Make the Cream Cheese Layer: In a large bowl, beat the softened cream cheese with an electric mixer until smooth and creamy.
- Gradually add the powdered sugar to the cream cheese, beating until well combined. Then, stir in the vanilla extract.
- Gently fold in the whipped topping until the mixture is smooth and uniform.
- Spread the cream cheese mixture evenly over the chilled crust.
- Return the baking dish to the refrigerator and chill for another 30 minutes.
- Assemble the Banana and Pineapple Layers: Slice the bananas into approximately ¼-inch thick rounds. Place the sliced bananas in a bowl and toss them with the lemon juice.
- Arrange the banana slices evenly over the cream cheese layer.
- Spread the well-drained crushed pineapple evenly over the banana layer.
- Prepare the Chocolate Pudding Layer: In a medium bowl, whisk together the instant chocolate pudding mix and cold milk until smooth and the pudding begins to thicken.
- Spread the chocolate pudding evenly over the pineapple layer.
- Return the baking dish to the refrigerator and chill for another 30 minutes to allow the pudding to set.
- Add the Strawberry Layer and Final Touches: Spread the strawberry pie filling evenly over the chocolate pudding layer.
- Top with the remaining 8 ounces of whipped topping.
- Drizzle chocolate syrup generously over the whipped topping.
- Sprinkle chopped nuts (walnuts, pecans, or peanuts) over the chocolate syrup.
- Garnish with maraschino cherries.
- Chill Thoroughly: Cover the baking dish with plastic wrap and chill in the refrigerator for at least 2-3 hours, or preferably overnight, to allow all the flavors to meld together.
- Cut and Serve: Cut the Banana Split Cake into squares and serve chilled.
Notes
- Use ripe but not overly ripe bananas.
- Drain the crushed pineapple thoroughly to prevent a soggy cake.
- Chill time is key for a well-structured and flavorful cake.
- Feel free to experiment with different toppings like sprinkles, mini chocolate chips, or caramel sauce.
- This cake can be made ahead of time and stored in the refrigerator for up to 2-3 days.


Leave a Comment