
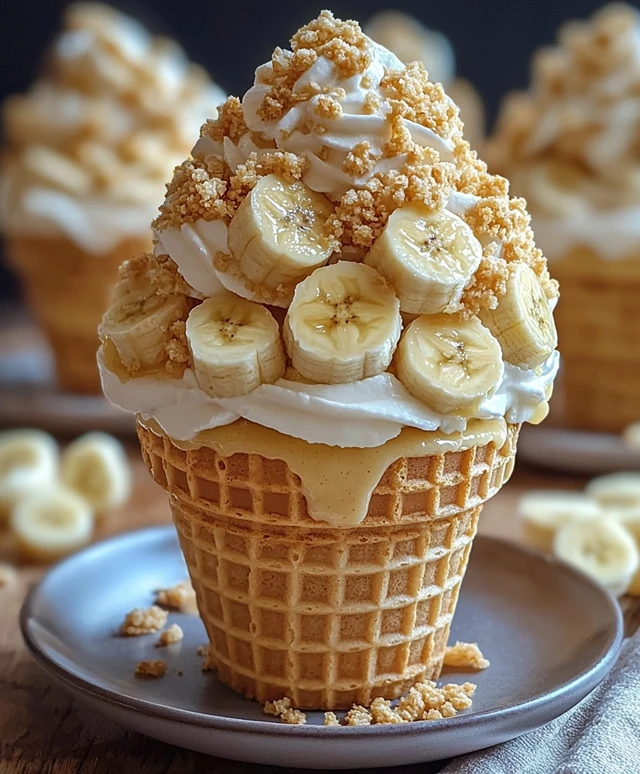
Banana Pudding Cheesecake Cones are a delightful twist on two beloved desserts that come together in a fun and portable way. Imagine the creamy, rich texture of cheesecake combined with the nostalgic flavors of banana pudding, all nestled in a crunchy cone. This recipe not only satisfies your sweet tooth but also brings a sense of joy and nostalgia, reminiscent of summer picnics and family gatherings.
Originating from the classic Southern dessert, banana pudding has long been a staple at gatherings, celebrated for its comforting flavors and creamy consistency. The addition of cheesecake elevates this dish, making it a favorite among dessert lovers. People adore Banana Pudding Cheesecake Cones for their perfect balance of sweetness and creaminess, along with the satisfying crunch of the cone. Plus, they are incredibly convenient for serving at parties or enjoying as a quick treat at home. Join me as we dive into this delicious recipe that is sure to impress your family and friends!

Ingredients:
- For the Cheesecake Filling:
- 16 oz cream cheese, softened
- 1 cup powdered sugar
- 1 teaspoon vanilla extract
- 1 cup heavy whipping cream
- 2 ripe bananas, mashed
- For the Banana Pudding:
- 2 cups whole milk
- 1/2 cup granulated sugar
- 1/3 cup cornstarch
- 1/4 teaspoon salt
- 3 large egg yolks
- 2 tablespoons unsalted butter
- 1 teaspoon vanilla extract
- For Assembly:
- 12 sugar cones
- 1 cup whipped cream (for topping)
- 1 banana, sliced (for garnish)
- 1/2 cup crushed vanilla wafers (for garnish)
Preparing the Cheesecake Filling
- In a large mixing bowl, I start by beating the softened cream cheese with an electric mixer on medium speed until its smooth and creamy. This usually takes about 2-3 minutes.
- Next, I gradually add in the powdered sugar while continuing to mix. I want to make sure there are no lumps, so I keep mixing until its well combined.
- Then, I add the vanilla extract and mix again until everything is incorporated.
- In a separate bowl, I whip the heavy cream until stiff peaks form. This usually takes about 3-5 minutes. I make sure to keep an eye on it so it doesnt turn into butter!
- Once the whipped cream is ready, I gently fold it into the cream cheese mixture. I do this in batches to keep the mixture light and fluffy.
- Finally, I fold in the mashed bananas until they are evenly distributed throughout the cheesecake filling. I set this mixture aside while I prepare the banana pudding.
Making the Banana Pudding
- In a medium saucepan, I combine the whole milk, granulated sugar, cornstarch, and salt. I whisk everything together until its smooth and there are no lumps.
- I place the saucepan over medium heat and continue to whisk constantly. Its important to keep stirring to prevent the mixture from sticking to the bottom of the pan.
- Once the mixture starts to thicken and bubble, I remove it from the heat. This usually takes about 5-7 minutes.
- In a small bowl, I whisk the egg yolks until they are well beaten. Then, I slowly pour about a cup of the hot milk mixture into the egg yolks while whisking constantly. This helps temper the eggs and prevents them from scrambling.
- After tempering the eggs, I pour the egg mixture back into the saucepan with the remaining milk mixture. I return the saucepan to the heat and continue to cook for another 2-3 minutes, stirring constantly until it thickens further.
- Once thickened, I remove the saucepan from the heat and stir in the butter and vanilla extract until they are fully melted and incorporated.
- I let the banana pudding cool for a few minutes before transferring it to a bowl. I cover it with plastic wrap, making sure the wrap touches the surface of the pudding to prevent a skin from forming. I set it aside to cool completely.
Assembling the Banana Pudding Cheesecake Cones
- Once both the cheesecake filling and banana pudding have cooled, Im ready to assemble the cones. I take a sugar cone and fill it about halfway with the cheesecake filling. I use a piping bag for a neater presentation, but a spoon works just fine too!
- Next, I add a layer of banana pudding on top of the cheesecake filling, filling the cone almost to the top.
- To finish off the cone, I add another layer of cheesecake filling, making sure to leave a little space at the top for whipped cream.
- I repeat this process for all 12 sugar cones, layering
Conclusion:
In wrapping up this delightful journey into the world of Banana Pudding Cheesecake Cones, I can confidently say that this recipe is a must-try for anyone looking to impress friends and family with a unique and delicious dessert. The combination of creamy cheesecake filling, sweet banana slices, and the nostalgic flavor of banana pudding all nestled in a crunchy cone creates a treat that is not only visually appealing but also bursting with flavor. For serving suggestions, consider topping your cones with a dollop of whipped cream and a sprinkle of crushed vanilla wafers for that extra crunch. You can also experiment with variations by adding a drizzle of chocolate or caramel sauce, or even incorporating other fruits like strawberries or blueberries for a refreshing twist. I wholeheartedly encourage you to give this Banana Pudding Cheesecake Cones recipe a try. I promise you wont be disappointed! Once youve made them, Id love to hear about your experience. Share your thoughts, any tweaks you made, or even a picture of your creations. Lets spread the joy of this delicious dessert together! Happy baking! Print
Banana Pudding Cheesecake Cones: A Delicious Twist on a Classic Dessert
- Total Time: 160 minutes
- Yield: 12 cones 1x
Description
Enjoy a delightful treat with these Banana Pudding Cheesecake Cones, featuring a creamy cheesecake filling layered with rich banana pudding, all nestled in a crunchy sugar cone. Perfect for a fun dessert experience!
Ingredients
- 16 oz cream cheese, softened
- 1 cup powdered sugar
- 1 teaspoon vanilla extract
- 1 cup heavy whipping cream
- 2 ripe bananas, mashed
- 2 cups whole milk
- 1/2 cup granulated sugar
- 1/3 cup cornstarch
- 1/4 teaspoon salt
- 3 large egg yolks
- 2 tablespoons unsalted butter
- 1 teaspoon vanilla extract
- 12 sugar cones
- 1 cup whipped cream (for topping)
- 1 banana, sliced (for garnish)
- Crushed vanilla wafers (for garnish)
Instructions
- In a large mixing bowl, beat the softened cream cheese with an electric mixer on medium speed until smooth and creamy, about 2-3 minutes. Make sure there are no lumps.
- Add the powdered sugar and vanilla extract to the cream cheese. Continue to mix until well combined and fluffy, about another 2 minutes.
- In a separate bowl, whip the heavy cream until stiff peaks form, about 3-5 minutes.
- Gently fold the whipped cream into the cream cheese mixture using a spatula, being careful not to deflate the whipped cream.
- Once combined, add the mashed bananas and fold gently until evenly distributed.
- In a medium saucepan, whisk together the whole milk, granulated sugar, cornstarch, and salt until smooth.
- In a separate bowl, whisk the egg yolks until well beaten. Gradually add a small amount of the milk mixture to the egg yolks, whisking constantly to temper the eggs.
- Pour the tempered egg yolk mixture back into the saucepan with the remaining milk mixture. Cook over medium heat, stirring constantly, until thickened and bubbling, about 5-7 minutes.
- Remove from heat and stir in the butter and vanilla extract until fully melted and combined.
- Transfer the banana pudding to a bowl, cover with plastic wrap pressed onto the surface, and let cool to room temperature. Refrigerate until chilled, about 1-2 hours.
- Once the cheesecake filling and banana pudding are chilled, take a sugar cone and place it upright in a cup or cone holder.
- Fill the bottom of the cone with a layer of cheesecake filling.
- Add a layer of banana pudding on top of the cheesecake filling.
- Repeat the layers until reaching the top of the cone, finishing with cheesecake filling.
- Top each cone with a generous dollop of whipped cream.
- Garnish with banana slices and a sprinkle of crushed vanilla wafers.
Notes
- For a lighter version, you can use low-fat cream cheese and whipped topping.
- Feel free to adjust the number of layers in each cone based on your preference.
- These cones are best enjoyed the same day they are assembled for optimal crunchiness.
- Prep Time: 30 minutes
- Cook Time: 10 minutes


Leave a Comment