
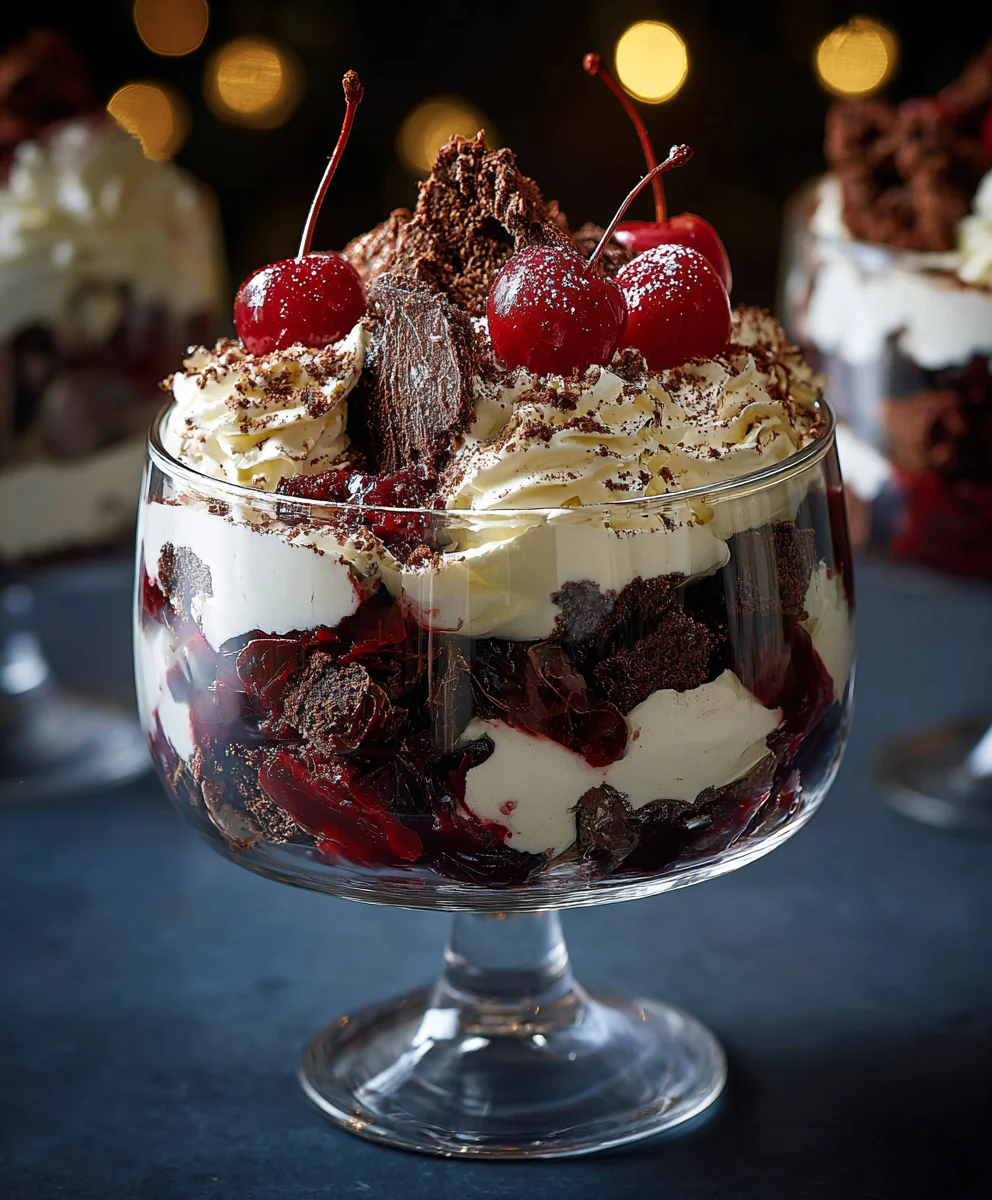
Black Forest Trifle For Christmas is more than just a dessert; it’s a magnificent centerpiece that promises to dazzle your holiday guests and delight every palate. Imagine layers of rich chocolate, plump, juicy cherries, and fluffy cream, all beautifully arranged in a stunning glass bowl. This festive season, move beyond the traditional heavy puddings and embrace a lighter, yet equally decadent, alternative that’s as impressive to look at as it is to eat. I believe a truly memorable holiday meal deserves a grand finale, and this recipe delivers exactly that.
While the classic Black Forest cake traces its roots back to the forested regions of Germany, known for its distinct blend of chocolate sponge, kirsch-soaked cherries, and whipped cream, this trifle offers a deconstructed, often simpler, yet equally luxurious take. It captures all those beloved flavors in an effortlessly elegant presentation, making it a stress-free option for your holiday entertaining. People universally adore this dish for its incredible balance—the intense chocolate contrasts beautifully with the bright tang of cherries, all softened by billows of fresh cream.
I personally adore how this dish brings together the perfect blend of textures – moist cake, tender fruit, and silky cream – creating a symphony of flavors in every spoonful. For anyone seeking a show-stopping dessert that embodies festive joy and delectable taste without hours of kitchen labor, this Black Forest Trifle For Christmas truly is the ideal choice. It’s a guaranteed crowd-pleaser that allows you more time to enjoy the celebration.

Ingredients:
- For the Chocolate Cake Base:
- 1 large (approximately 1.5 to 2 pounds) plain chocolate cake, pre-baked. I often use a simple devil’s food or chocolate sponge cake, ideally one that isn’t overly dense or fudgy. This makes soaking much easier and creates a delightful texture for your Black Forest Trifle For Christmas.
- For the Rich Cherry Filling:
- 2 (15-ounce) cans pitted tart cherries in water or light syrup, or about 3 cups fresh or frozen pitted sour cherries. If using canned, we’ll reserve the liquid!
- ½ cup granulated sugar, or adjusted to your taste. This depends heavily on the sweetness of your cherries and your personal preference.
- 2 tablespoons cornstarch. This will help us thicken our beautiful cherry sauce.
- ¼ teaspoon almond extract (optional, but it truly elevates the cherry flavor).
- 1 to 2 tablespoons Kirsch (cherry brandy) or additional reserved cherry juice for a non-alcoholic version. This adds that authentic Black Forest kick!
- For the Kirsch Syrup (for soaking the cake):
- ½ cup water.
- ¼ cup granulated sugar.
- ¼ cup Kirsch (cherry brandy), or alternatively, non-alcoholic cherry juice or a mix of water and a touch of almond extract if you prefer.
- For the Dreamy Whipped Cream Layers:
- 4 cups (2 pints) heavy cream, absolutely vital that it is very cold for best whipping results.
- ½ cup confectioners’ sugar (powdered sugar), or to taste. This dissolves beautifully and creates a smooth cream.
- 2 teaspoons pure vanilla extract.
- For the Elegant Chocolate Garnishes:
- 4 ounces bittersweet or semi-sweet chocolate. This will be for making lovely shavings or curls. I love a good quality chocolate here, it really makes a difference to the finish of your Black Forest Trifle For Christmas.
- ¼ cup unsweetened cocoa powder (optional, for dusting).
- For the Final Touches (Garnish):
- A handful of fresh cherries with stems, if available and in season, for a stunning visual appeal.
- Mint sprigs, for a fresh pop of color.
Phase 1: Preparing the Chocolate Cake Base
- Getting Your Cake Ready: First things first, let’s prepare our chocolate cake. If you’re using a store-bought cake, like I often do for speed and convenience, gently unwrap it. The goal here is to create pieces that are manageable for layering in your trifle dish. I find that cutting the cake into ¾-inch to 1-inch cubes works perfectly. You can also slice it into strips if you prefer a more structured look against the glass of your trifle bowl. Just ensure the pieces are small enough to absorb the syrup well and big enough to hold their shape in the layers. Place all your cake pieces in a large bowl for now. Remember, a trifle is all about visible layers, so uniform pieces make for a prettier presentation!
- Crafting the Kirsch Soaking Syrup: In a small saucepan, combine the ½ cup water and ¼ cup granulated sugar. Heat this over medium heat, stirring occasionally, until the sugar has completely dissolved and the mixture is clear. This usually takes just a couple of minutes. Once the sugar syrup is ready, remove it from the heat and allow it to cool slightly, just until it’s warm, not boiling hot. Now, and this is where the magic happens for our Black Forest Trifle For Christmas, stir in the ¼ cup of Kirsch. If you’re making a non-alcoholic version, substitute with an equal amount of cherry juice or even a little extra vanilla extract for flavor. The Kirsch adds that authentic, slightly boozy cherry essence that is so characteristic of Black Forest desserts.
- Soaking the Cake: Once your Kirsch syrup is prepared and slightly cooled, drizzle about two-thirds of it evenly over your chocolate cake pieces in the bowl. Use a gentle hand to toss the cake cubes or slices, ensuring they are all lightly coated and beginning to absorb that wonderful liquid. You want the cake to be moist but not soggy. We’ll save the remaining syrup for directly drizzling on the layers during assembly, which allows for more control and even distribution. Set the soaked cake aside while we move on to the next exciting component.
Phase 2: Crafting the Rich Cherry Filling
- Draining the Cherries: If you’re using canned tart cherries, drain them thoroughly, but be sure to reserve at least ½ to ¾ cup of the cherry liquid. This reserved liquid is precious and will form the base of our thick, flavorful sauce. If you’re using fresh or frozen cherries, you’ll need to add ½ cup of water or plain cherry juice to the saucepan later.
- Combining the Sauce Ingredients: In a medium saucepan, combine the reserved cherry liquid (or water/cherry juice for fresh/frozen), the ½ cup granulated sugar, and the 2 tablespoons of cornstarch. Whisk these ingredients together until the cornstarch is completely dissolved and there are no lumps. This step is crucial for a smooth, glossy sauce.
- Cooking the Cherry Base: Place the saucepan over medium heat, stirring constantly. The mixture will begin to thicken as it heats, becoming clear and bubbly. Continue to cook and stir for about 1 to 2 minutes after it starts bubbling to ensure the cornstarch is fully cooked and the sauce reaches its maximum thickness. It should be a consistency similar to a thin gravy.
- Adding the Cherries and Flavor: Remove the saucepan from the heat. Gently fold in your drained cherries (or fresh/frozen cherries). Now, stir in the ¼ teaspoon of almond extract, if using. This truly enhances the cherry notes. Finally, add the 1 to 2 tablespoons of Kirsch. If you’re making a non-alcoholic version, you can skip this or add a little extra reserved cherry juice. The warmth from the sauce will help the flavors meld beautifully.
- Cooling the Filling: Transfer the cherry filling to a separate bowl and allow it to cool completely. You can speed this up by placing it in the refrigerator. It’s really important that the cherry filling is cold before you start assembling your trifle, as warm filling can melt your beautiful whipped cream layers and make the trifle runny. This step is essential for the structural integrity of your impressive Black Forest Trifle For Christmas.
Phase 3: Whipping Up the Dreamy Cream Layers
- Prepare for Whipping: Make sure your heavy cream is very cold. I often place my mixing bowl (preferably a chilled metal bowl) and whisk attachments in the freezer for 10-15 minutes before I start. This super-chilling helps the cream whip up faster and hold its peaks better, which is exactly what we want for sturdy, luscious layers in our trifle.
- Whipping the Cream: Pour the 4 cups of very cold heavy cream into your chilled mixing bowl. Begin whipping on medium-low speed with an electric mixer, gradually increasing to medium-high speed. As the cream begins to thicken and lighten in color, sprinkle in the ½ cup of confectioners’ sugar and add the 2 teaspoons of vanilla extract.
- Achieving Stiff Peaks: Continue whipping until the cream forms stiff peaks. What does “stiff peaks” mean? When you lift the whisk out of the cream, the peaks should stand straight up and hold their shape without flopping over. Be careful not to over-whip, as you’ll end up with butter! This light and airy whipped cream is the backbone of your Black Forest Trifle For Christmas, so take your time to get it just right. Once done, cover the bowl and place it in the refrigerator immediately to keep it cold and stable until assembly.
Phase 4: Preparing the Elegant Chocolate Garnishes
- Creating Chocolate Shavings or Curls: For the classic Black Forest look, we need some beautiful chocolate garnishes. Take your 4 ounces of bittersweet or semi-sweet chocolate. If you have a chocolate bar, you can use a vegetable peeler to shave off thin curls directly from the side of the bar. Apply firm, even pressure. Another method is to use a large, sharp knife to gently scrape across the surface of the chocolate to create flakes. You can also melt a small portion of the chocolate, spread it thinly on parchment paper, let it set slightly, then use a scraper or peeler to create curls. The goal is lovely, delicate pieces of chocolate that will add texture and a sophisticated finish to your trifle.
- Keeping them Cool: Once you have your desired amount of chocolate shavings or curls, place them in a small, airtight container and store them in the refrigerator. This will keep them firm and prevent them from melting, ensuring they look perfect when you’re ready for the final garnish. You can also have a little extra cocoa powder on hand for a light dusting, which adds another layer of visual appeal and a slight bitterness that balances the sweetness.
Phase 5: The Art of Assembling Your Black Forest Trifle For Christmas
This is where all our hard work comes together! You’ll need a large, clear trifle bowl (typically 3-4 quarts) so everyone can admire your beautifully layered creation. Assembling your Black Forest Trifle For Christmas is a joyous process, like painting with delicious ingredients!
- The First Cake Layer Foundation: Carefully place about one-third of your Kirsch-soaked chocolate cake pieces into the bottom of your trifle bowl. Arrange them as evenly as possible to create a solid, appealing base. If you cut strips, you can line the sides of the bowl first for a very dramatic effect.
- A Sweet Drizzle: Remember that reserved Kirsch syrup? Now’s the time to use a little more of it! Drizzle about half of the remaining syrup evenly over this first layer of cake. This ensures every bite is infused with that wonderful Black Forest flavor.
- Generous Cherry Distribution: Spoon about one-third of your now-cooled cherry filling over the cake layer. Spread it gently to cover the cake, pushing some of the cherries towards the glass sides of the bowl. This creates a stunning visual, highlighting the vibrant red against the dark cake.
- The Cloud of Cream: Next, carefully dollop about one-third of your freshly whipped cream over the cherry layer. Using the back of a spoon or an offset spatula, gently spread the cream into an even layer, extending it to the edges of the bowl. This forms that iconic white layer that contrasts so beautifully with the dark cake and rich cherries.
- A Hint of Chocolate: Sprinkle a generous portion of your prepared chocolate shavings or curls over the whipped cream layer. This adds texture and another dimension of chocolatey goodness that is essential for our Black Forest Trifle For Christmas.
- Repeat the Layers: Now, repeat the entire layering process! Add another third of the chocolate cake, drizzle with the remaining Kirsch syrup, then another third of the cherry filling, followed by another third of the whipped cream, and another sprinkle of chocolate shavings. By the time you’re done with this second round, your trifle bowl should be looking quite impressive.
- The Grand Finale Layer: For the final layer, place the remaining chocolate cake pieces, followed by the last of the cherry filling. Top this with a generous, show-stopping layer of the remaining whipped cream. You can create decorative swirls or peaks with your spoon or an icing spatula to make it look even more inviting.
- The Final Flourish and Chilling: This is the moment to make your trifle truly shine. Artistically arrange your remaining chocolate shavings and curls on top of the final whipped cream layer. If you have fresh cherries, nestle a few on top for a burst of color and elegance. A sprig of fresh mint can also add a delightful pop of green. Once fully assembled and garnished, it is absolutely critical to chill your Black Forest Trifle For Christmas for at least 4 hours, or preferably overnight, in the refrigerator. This allows all the flavors to meld beautifully, the cake to become perfectly moist, and the layers to set firmly, ensuring easy serving. When it’s time to serve, simply scoop out generous portions with a large spoon, making sure to get a bit of every delicious layer!
Conclusion:
And there you have it, my friends! We’ve journeyed through the delightful process of creating a dessert that truly stands out, one that promises to be the crowning glory of any gathering, big or small. This isn’t just a recipe; it’s an invitation to craft a showstopper that tastes as incredible as it looks, all without the overwhelming fuss often associated with such grandeur. I truly believe that once you dive into this, you’ll understand why I’m so passionate about it. The harmonious blend of moist, rich chocolate cake, plump, tangy cherries, and the cloud-like embrace of fresh whipped cream, all layered together in a visually stunning presentation, creates an unforgettable culinary experience. It’s a dessert that speaks of celebration, of comfort, and of pure, unadulterated joy in every single spoonful. The textures are a dance on the palate – the softness of the cake, the slight chew of the cherries, the smooth, cool cream, and the delicate crunch of chocolate shavings all contribute to a symphony of sensations.
Why This Recipe Is an Absolute Must-Try:
What makes this particular trifle a non-negotiable addition to your recipe repertoire? Firstly, its profound ability to impress with minimal stress. While it looks incredibly sophisticated, the assembly process is surprisingly straightforward, relying on simple layering techniques that anyone can master. Secondly, the flavor profile is a timeless classic, reimagined in a beautiful, accessible format. The deep, cocoa notes of the chocolate, perfectly complemented by the bright, fruity burst of cherries, and tempered by the luscious, airy cream, strike an exquisite balance that caters to virtually every taste. It’s rich without being heavy, decadent yet refreshing. It’s also incredibly versatile; you can prepare many of its components ahead of time, making it an ideal choice for busy hosts who still want to deliver that homemade touch. When you pull this magnificent creation from the refrigerator, glistening with its vibrant colors and layers, you’ll feel an immense sense of accomplishment, knowing you’ve created something truly special that will be talked about long after the last bite.
Unleashing Your Creativity: Serving Suggestions & Variations
While the classic presentation in a large, elegant trifle bowl is undeniably stunning and perfect for communal sharing, don’t hesitate to think outside the bowl! For individual servings that are just as charming and offer a touch of refined elegance, consider layering the trifle in clear glass tumblers, mason jars, or even small martini glasses. These individual portions are not only beautiful but also incredibly convenient, allowing guests to grab their own delightful dessert with ease. You can even top each mini trifle with a single fresh cherry and a sprig of mint for an extra flourish. For a more casual affair, simple glass bowls work wonderfully too, showcasing those beautiful layers.
The beauty of a trifle lies in its adaptability, and this recipe is no exception. Feel free to experiment and make it your own! Here are a few ideas to spark your culinary imagination:
- Fruit Fantasies: While cherries are traditional and utterly delicious, you could certainly substitute them with other berries. Raspberries, strawberries, or a mix of summer berries would lend a different, yet equally delightful, fruity tang. For an autumn twist, consider stewed pears or spiced apples.
- Cake Base Adventures: Instead of the chocolate sponge, try using chocolate brownies for an even richer, denser base. Ladyfingers soaked in a little coffee or cherry juice could also provide a lighter texture.
- Creamy Concoctions: For a slightly tangier or richer cream, you could fold in a bit of mascarpone cheese or cream cheese with your whipped cream. A touch of almond extract in the cream can also elevate the flavor profile beautifully. For a dairy-free option, coconut cream makes a fantastic alternative.
- Chocolate Choices: Experiment with different types of chocolate shavings – dark, milk, or even white chocolate for a varied visual and taste experience. Chocolate chips, mini or regular, can also be sprinkled between layers for added texture.
- An Adult Indulgence: If you’re serving adults, a splash of Kirsch (cherry brandy) or a good quality cherry liqueur drizzled over the cake layers will truly enhance the classic Black Forest flavor and add a wonderful depth. For a non-alcoholic version, extra cherry juice works perfectly.
- Nutty Notes: A sprinkle of toasted slivered almonds or chopped pecans between the layers or on top could add a lovely crunch and a subtle nutty flavor.
No matter how you choose to personalize it, this recipe is designed to be a canvas for your creativity, allowing you to tailor it perfectly to your taste and occasion. Just imagine the sheer delight of serving this magnificent Black Forest Trifle For Christmas or any festive gathering; it truly embodies the spirit of joyful indulgence.
Your Turn to Create and Share!
Now that I’ve walked you through every delightful detail, from the layers of flavor to the endless possibilities for customization, it’s your moment to shine! I wholeheartedly encourage you to roll up your sleeves, gather your ingredients, and give this incredible trifle a try. Trust me, the smiles it will bring to the faces of your loved ones, and the sheer satisfaction you’ll feel in creating such a spectacular dessert, are absolutely priceless. Don’t be shy about experimenting with the variations I’ve suggested, or even coming up with your own unique twists. This recipe is meant to inspire, to be a starting point for your culinary adventures. Once you’ve created your masterpiece, I would absolutely love to hear about your experience! Did you stick to the classic? Did you go wild with variations? What was your favorite part of making it, or, more importantly, eating it? Please share your triumphs, your photos, and your invaluable feedback. Your stories inspire me and other home cooks in our community. So, go forth, bake, layer, chill, and most importantly, enjoy every single delicious moment of this truly sensational dessert. Happy cooking!

Amazing Non-Alcoholic Black Forest Trifle For Christmas
A magnificent centerpiece promising to dazzle holiday guests. Layers of rich chocolate cake, plump cherries, creamy vanilla pudding, and fluffy whipped cream, beautifully arranged. A lighter, yet equally decadent, alternative to traditional puddings, capturing beloved Black Forest flavors in an elegant, stress-free presentation.
Ingredients
-
1 box chocolate cake mix (or 1 homemade chocolate cake)
-
1 cup heavy cream (for whipping)
-
1/2 cup powdered sugar
-
1 teaspoon vanilla extract
-
2 cups canned or fresh cherries (pitted, with juice or syrup, plus extra for garnish)
-
1/4 cup non-alcoholic cherry juice
-
2 cups vanilla pudding (store-bought or homemade)
-
1/2 cup dark chocolate shavings
-
1 tablespoon cocoa powder (optional, for garnish)
Instructions
-
Step 1
Cut the chocolate cake into 1-inch cubes. Drizzle with 1/4 cup non-alcoholic cherry juice, tossing gently to moisten. Set aside. -
Step 2
Drain the 2 cups of canned or fresh cherries, reserving a few whole cherries for garnish. -
Step 3
In a chilled bowl, whip 1 cup cold heavy cream with 1/2 cup powdered sugar and 1 teaspoon vanilla extract until stiff peaks form. Refrigerate immediately. -
Step 4
Create 1/2 cup dark chocolate shavings or curls. Refrigerate to keep firm. -
Step 5
In a large, clear trifle bowl, place about one-third of the soaked chocolate cake cubes evenly at the bottom. -
Step 6
Spread one-third of the vanilla pudding over the cake layer, then layer one-third of the drained cherries over the pudding. -
Step 7
Carefully dollop and spread one-third of the whipped cream over the cherries. Sprinkle with a portion of the chocolate shavings. -
Step 8
Repeat the cake, pudding, cherries, cream, and chocolate shaving layers two more times, ending with a final generous layer of whipped cream on top. -
Step 9
Decorate the top with the remaining chocolate shavings, reserved fresh cherries, and an optional dusting of 1 tablespoon cocoa powder. Chill the trifle for at least 4 hours, or preferably overnight, in the refrigerator before serving to allow flavors to meld and layers to set.
Important Information
Nutrition Facts (Per Serving)
It is important to consider this information as approximate and not to use it as definitive health advice.
Allergy Information
Please check ingredients for potential allergens and consult a health professional if in doubt.

Leave a Comment