
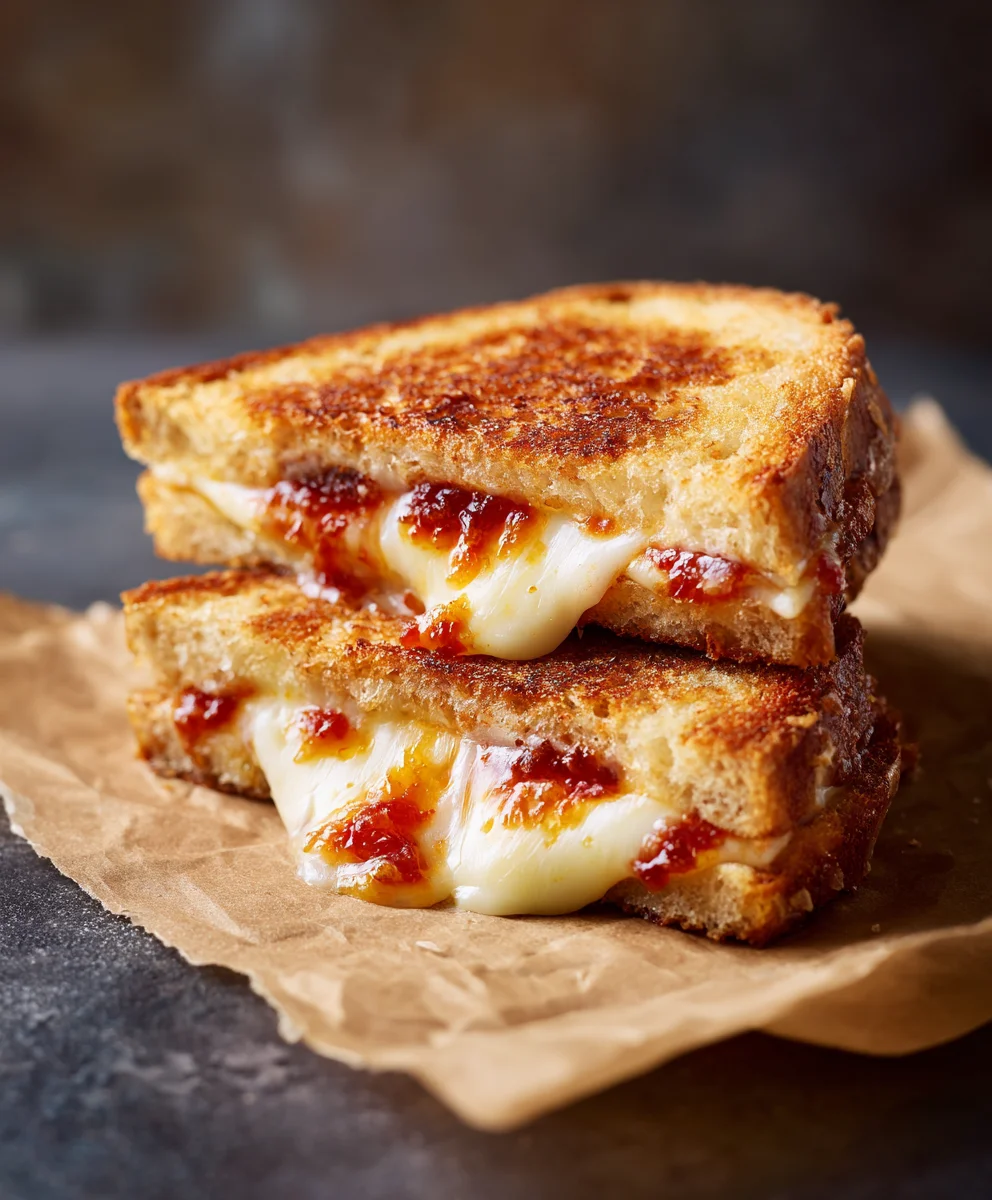
The Chutney Grilled Cheese Sandwich is not just a meal; it’s an experience, a delightful culinary fusion that elevates a beloved comfort classic into something truly extraordinary. Imagine the golden-brown crispness of perfectly toasted bread, the luscious melt of rich, gooey cheese, and then, a vibrant burst of sweet and savory chutney, adding an unexpected depth and tang that will tantalize your taste buds. This ingenious combination brings together the humble, universally adored grilled cheese with the sophisticated, aromatic flavors of traditional chutney, a condiment celebrated for its diverse heritage across South Asia and beyond. It’s a testament to how simple ingredients can converge to create a truly unforgettable dish.
I find that what makes the Chutney Grilled Cheese Sandwich so incredibly popular is its harmonious balance of textures and tastes. The familiar comforting warmth of melted cheese is perfectly complemented by the complex, often fruity and spicy notes of the chutney, transforming a quick bite into a gourmet delight. Whether you’re seeking a quick, satisfying lunch or an intriguing twist on a family favorite, this recipe promises to deliver a uniquely comforting and exciting flavor profile. It’s a dish that beautifully marries convenience with an exquisite culinary journey, inviting you to discover a new dimension of flavor in every delectable bite.

Ingredients:
- For the Chutney Grilled Cheese Sandwich:
- Bread: 4 slices of your favorite sturdy bread, such as sourdough, brioche, or a good quality artisan white bread. I find thicker slices (about ½ to ¾ inch) work best for holding up to the fillings and achieving a satisfying crunch.
- Cheese:
- 4-6 slices (about 4-6 ounces total) of sharp cheddar cheese.
- 4-6 slices (about 4-6 ounces total) of Monterey Jack or Provolone cheese. I love using a mix of cheeses for a more complex flavor profile and a superior melt. The Monterey Jack or Provolone offers an amazing stretch, while the cheddar brings a tangy punch.
- Butter: 4-6 tablespoons unsalted butter, softened to room temperature. This is crucial for achieving that beautiful golden-brown crust.
- Green Chutney: Approximately ¼ to ½ cup of homemade or high-quality store-bought green chutney. I’ll walk you through making a vibrant homemade version below, but feel free to use your favorite if you’re short on time.
- For the Homemade Green Chutney:
- 1 large bunch (about 2 cups packed) fresh cilantro, thoroughly washed and tough stems removed.
- ½ cup fresh mint leaves, thoroughly washed.
- 1-2 green chilies (like serrano or jalapeño), stems removed, roughly chopped. Adjust to your spice preference. For milder chutney, remove seeds.
- 1-inch piece fresh ginger, peeled and roughly chopped.
- 2 cloves garlic, peeled.
- ½ teaspoon roasted cumin powder.
- 1-2 tablespoons fresh lemon juice (from about ½ lemon).
- ¼ teaspoon sugar (optional, balances flavors).
- Salt to taste (start with ½ teaspoon).
- 2-3 tablespoons cold water or ice cubes (to aid blending without heating the chutney).
- Optional (but highly recommended) Caramelized Onions:
- 1 large yellow or red onion, thinly sliced.
- 1 tablespoon unsalted butter.
- 1 tablespoon olive oil.
- Pinch of salt.
- Pinch of sugar (optional, enhances caramelization).
Preparing the Homemade Green Chutney
Crafting your own green chutney truly elevates this Chutney Grilled Cheese Sandwich from good to absolutely phenomenal. It’s incredibly fresh, vibrant, and allows you to customize the spice and tang to your exact liking. Trust me, the extra few minutes are well worth it for this delicious component of your Chutney Grilled Cheese Sandwich.
- Prepare the Herbs: First things first, let’s get our fresh ingredients ready. Take your large bunch of cilantro and your mint leaves. Give them a really good wash under cold running water. I like to submerge them in a bowl of water for a few minutes to loosen any dirt, then rinse them again. Shake off excess water or use a salad spinner. For the cilantro, I usually snip off the very tough bottom stems, but the thinner, tender stems are perfectly fine to include as they pack a lot of flavor.
- Rough Chop Ingredients: Roughly chop the washed cilantro and mint. This isn’t about precision; it just helps your blender or food processor handle them better. Next, remove the stems from your green chilies and roughly chop them. If you prefer a milder chutney, you can remove the seeds and the white membrane from the chilies before chopping. Peel your ginger and garlic, and give the ginger a rough chop as well.
- Combine in Blender: Carefully transfer all your prepped ingredients – cilantro, mint, green chilies, ginger, and garlic – into the jar of a small blender or food processor. Add the roasted cumin powder, fresh lemon juice, sugar (if using), and about half a teaspoon of salt to start.
- Add Liquid and Blend: Now, for the liquid. I find that 2-3 tablespoons of very cold water or a couple of ice cubes work wonders. The cold helps to keep the chutney vibrant green by minimizing oxidation during blending. Start by adding 2 tablespoons of cold water. Secure the lid.
- Blend to a Smooth Paste: Begin to blend on a low setting, gradually increasing the speed. You’ll want to pulse it initially, scraping down the sides with a spatula as needed. Continue blending until you achieve a smooth, vibrant green paste. If it’s struggling to blend, add the remaining tablespoon of water or another ice cube, one at a time, until you reach the desired consistency. You’re aiming for a thick, spreadable chutney, not a watery sauce.
- Taste and Adjust: This is a crucial step! Open the blender and taste a small spoonful of your fresh chutney. Does it need more salt? A little more lemon juice for tang? Perhaps another pinch of sugar to balance the spice? Adjust as needed, blending briefly after each addition to incorporate. Remember, this chutney is the star flavor component of your Chutney Grilled Cheese Sandwich, so make it sing!
- Storage: Once perfected, transfer your homemade green chutney to an airtight container. It will stay fresh in the refrigerator for up to 5-7 days.
Preparing the Caramelized Onions (Optional, but Highly Recommended)
While optional, adding caramelized onions to your Chutney Grilled Cheese Sandwich introduces an incredible depth of sweetness and umami that beautifully complements the spicy tang of the chutney and the richness of the cheese. It’s a step that requires patience but yields immense flavor rewards, transforming your sandwich into a gourmet experience.
- Slice the Onion: Begin by peeling your large yellow or red onion. Place it flat on your cutting board and slice it very thinly. I like to go for about 1/8-inch thick slices. The thinner the slices, the faster and more evenly they will caramelize. Separate the rings as much as possible.
- Heat the Pan: Choose a heavy-bottomed pan, such as a cast-iron skillet or a good quality non-stick pan, that’s large enough to comfortably hold all your onion slices in a single layer (or close to it). Place it over medium-low heat. Add the tablespoon of unsalted butter and the tablespoon of olive oil. The combination of butter and oil helps prevent burning and adds flavor.
- Add Onions and Season: Once the butter has melted and the oil is shimmering, add all your thinly sliced onions to the pan. Give them a good stir to coat them evenly with the fat. Sprinkle a generous pinch of salt over the onions. The salt helps draw out moisture, which aids in the caramelization process. If you’re using sugar, add a small pinch now; it helps deepen the color and sweetness.
- The Patience Game – Low and Slow: This is where patience is key. Reduce the heat to low to medium-low. You want the onions to slowly soften, then eventually turn golden brown, not burn. Stir the onions every 5-7 minutes. Initially, they will release a lot of moisture and become translucent.
- Continue Caramelizing: As the moisture evaporates, the onions will begin to shrink and stick to the bottom of the pan. This is good! Use your spatula to scrape up these browned bits – they are packed with flavor. If the pan gets too dry or the onions start to brown too quickly, you can add a tablespoon or two of water or even a splash of vegetable broth to deglaze the pan and slow down the cooking. This also helps to lift those flavorful bits from the bottom.
- Achieve Golden Perfection: Continue to cook and stir, scraping the bottom of the pan as needed. This process can take anywhere from 30 to 45 minutes, sometimes even an hour, depending on the heat and the amount of onions. You are looking for a deep golden-brown color and a jammy, sweet, intensely savory texture. The onions will be significantly reduced in volume.
- Cool and Store: Once the caramelized onions have reached your desired color and consistency, remove the pan from the heat. Transfer them to a small bowl to cool slightly. They can be made ahead of time and stored in an airtight container in the refrigerator for up to 3-4 days. These amazing onions will be a fantastic addition to your ultimate Chutney Grilled Cheese Sandwich.
Assembling the Chutney Grilled Cheese Sandwich
The assembly phase is where your Chutney Grilled Cheese Sandwich really starts to take shape! This isn’t just about throwing ingredients together; it’s about thoughtful layering to ensure every bite is bursting with flavor and texture. Pay attention to how you apply each component for the best results.
- Prepare Your Workspace: Lay out your four slices of bread on a clean cutting board or work surface. Make sure your softened butter, cheeses (sliced or shredded), green chutney, and caramelized onions (if using) are all within easy reach.
- Butter the Bread – The Foundation of Flavor: This is a critical step for achieving that signature golden, crispy crust. Take your softened unsalted butter and spread a generous, even layer on one side of each of your four bread slices. Don’t be shy here; you want full coverage, right to the edges. This buttered side will be the exterior of your sandwich when it hits the pan.
- First Layer of Cheese (Inner Side): Flip two of your bread slices over so the unbuttered side is facing up. On each of these slices, place an even layer of Monterey Jack or Provolone cheese. I like to start with a milder, good-melting cheese directly on the bread. This creates a foundational layer of gooey goodness and acts as a barrier to keep the bread from getting soggy from the chutney.
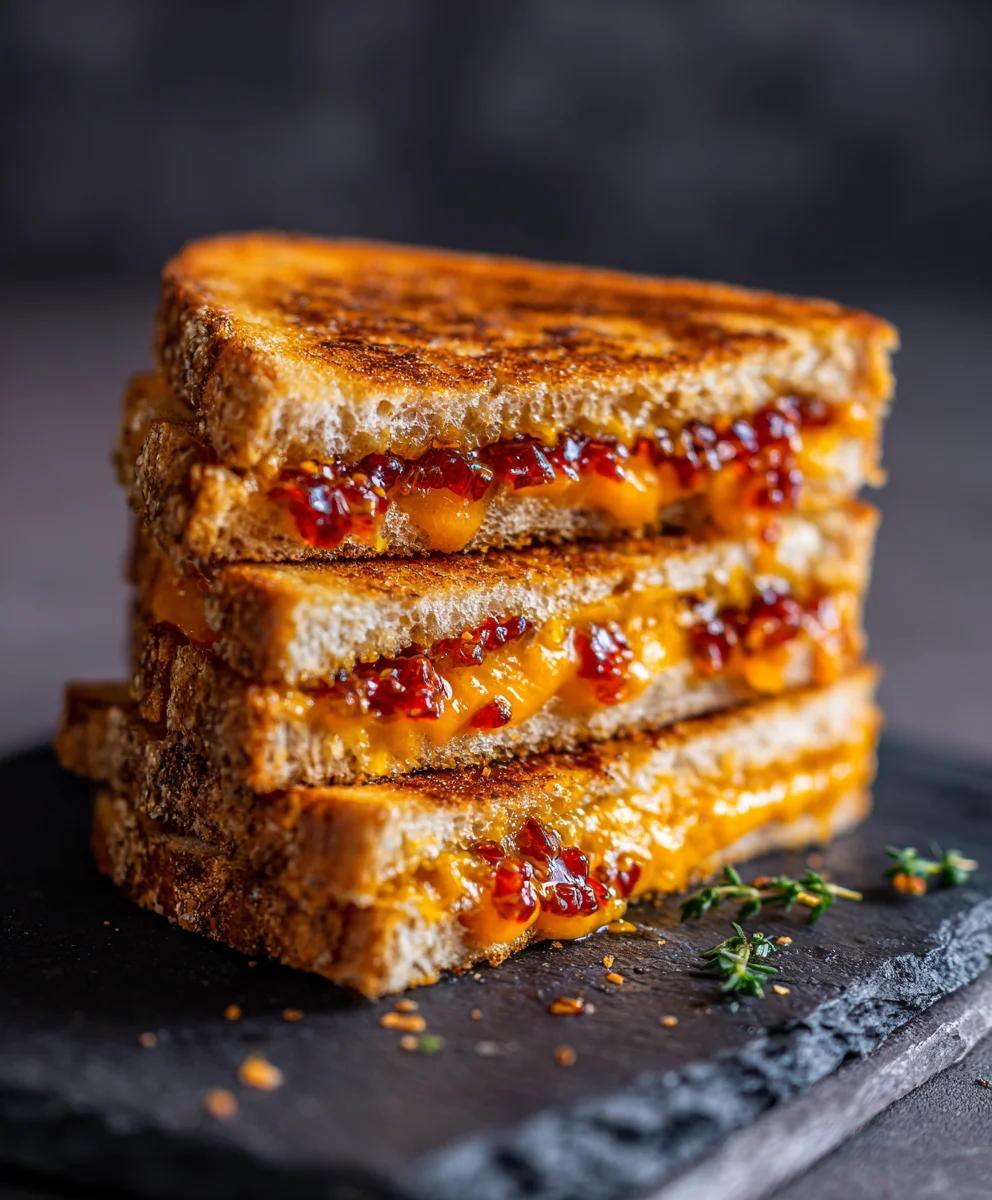
- Apply the Green Chutney: Now, spoon a generous tablespoon or two of your homemade green chutney over the cheese layer on both slices. Spread it evenly to the edges. This is where the vibrant, spicy, tangy heart of your Chutney Grilled Cheese Sandwich comes from, so don’t skimp!
- Add Caramelized Onions (If Using): If you’ve opted for the caramelized onions, now is the time to add them. Divide your beautiful, sweet, jammy onions between the two chutney-covered slices. Spread them out evenly over the chutney. This layer adds incredible depth and complexity.
- Second Layer of Cheese (Flavor Powerhouse): On top of the chutney and onions (if using), add your sharp cheddar cheese slices. This cheese brings a bolder flavor and helps to really hold everything together once melted. If you used a different cheese for the first layer, you might use your other cheese for this layer to get a good melty mix.
- Top with Remaining Bread: Take the two remaining buttered bread slices and place them butter-side-up on top of your cheese and filling layers. Gently press down on each sandwich to slightly compress the fillings. This helps the sandwich hold its shape and encourages everything to melt together cohesively during cooking. You’ve now got two glorious, un-cooked Chutney Grilled Cheese Sandwiches ready for the pan!
Cooking the Chutney Grilled Cheese Sandwich
The cooking process is where all your hard work comes to fruition, transforming your assembled creation into a perfectly golden, crispy, and gooey Chutney Grilled Cheese Sandwich. The key here is low and slow heat to ensure the cheese melts thoroughly and the bread gets deeply golden without burning.
- Preheat Your Pan: Place a large, heavy-bottomed skillet – cast iron works exceptionally well for even heat distribution, but a good quality non-stick pan is also great – over medium-low heat. Let it preheat for 2-3 minutes. This allows the pan to heat evenly across its surface, which is essential for consistent browning. Do not rush this step by using high heat; patience is paramount for the perfect Chutney Grilled Cheese Sandwich.
- Place the Sandwiches: Once the pan is gently preheated, carefully place your assembled Chutney Grilled Cheese Sandwiches into the skillet, butter-side down. Make sure there’s enough space between them if you’re cooking more than one so they don’t steam each other. You should hear a gentle sizzle, but not a fierce crackle. If it’s too loud, your pan is too hot.
- Cook the First Side – The Golden Crust: Let the sandwiches cook undisturbed for about 4-6 minutes. Resist the urge to peek or flip too early! During this time, the heat will gradually penetrate the bread, toasting it to a beautiful golden brown, while the cheese on the bottom layer will start to melt and adhere to the bread. You’ll know it’s ready to flip when the bottom crust is deeply golden, and you can see the cheese beginning to soften and possibly slightly ooze from the edges.
- The Gentle Flip: Using a wide, sturdy spatula, carefully slide it under one sandwich. With a confident, swift motion, flip the sandwich over to cook the second buttered side. Repeat with the other sandwich if cooking two. If you find the first side has browned too quickly, reduce the heat slightly for the second side.
- Cook the Second Side & Achieve Maximum Melt: Continue to cook the second side for another 4-6 minutes. Again, look for that gorgeous golden-brown color on the bread. To ensure the cheese truly melts into a luscious, gooey dream, you can gently press down on the sandwiches with your spatula a couple of times during this phase. Another excellent tip for an extra-melty interior is to cover the pan with a lid for the last 2-3 minutes of cooking. This traps the heat and creates a mini-oven effect, melting the cheese perfectly.
- Check for Doneness: Your Chutney Grilled Cheese Sandwich is ready when both sides are a uniform, inviting golden brown, and when you gently lift the sandwich, you can feel the delicious weight of thoroughly melted, gooey cheese within. There should be a slight give when you press down, indicating a soft, molten interior.
- Remove from Heat: Carefully remove the perfectly cooked Chutney Grilled Cheese Sandwiches from the pan and transfer them to a cutting board.
Finishing and Serving Your Chutney Grilled Cheese Sandwich
You’ve done it! You’ve cooked a magnificent Chutney Grilled Cheese Sandwich. Now for the final, satisfying steps before you dig in.
- A Moment of Rest: Before cutting, allow the sandwiches to rest on the cutting board for just 1-2 minutes. This brief pause is important. It allows the super-hot cheese to set slightly, preventing it from all oozing out immediately when you cut into it, and helps the molten center to stabilize.
- The Classic Cut: Using a sharp chef’s knife or a serrated knife, slice each sandwich diagonally from corner to corner. The diagonal cut isn’t just for aesthetics; it provides a better grip and allows for that classic, irresistible “cheese pull” reveal that every grilled cheese enthusiast loves.
- Serve Immediately: A Chutney Grilled Cheese Sandwich is at its absolute peak when served piping hot, straight off the pan. The contrast between the crispy, buttery exterior and the warm, gooey, flavorful interior is what makes it so irresistible.
- Serving Suggestions:
- Classic Companion: A hot bowl of creamy tomato soup is the quintessential pairing. The tangy soup perfectly complements the rich sandwich.
- Tangy Side: Serve alongside a simple green salad with a light vinaigrette to cut through the richness.
- Extra Kick: A small dollop of extra green chutney on the side for dipping, for those who crave even more of that vibrant flavor.
- Pickle Power: A few crisp pickle spears (Indian style pickles work exceptionally well here) offer a fantastic vinegary crunch.
Each bite of this Chutney Grilled Cheese Sandwich is a symphony of textures and flavors: the crunch of the buttery bread, the stretch of melted cheese, the zesty kick of the green chutney, and the sweet depth of the caramelized onions. Enjoy every glorious moment!
Conclusion:
I truly believe that what we’ve explored today isn’t just another sandwich recipe; it’s an experience, a delightful fusion that elevates humble ingredients into something truly extraordinary. This isn’t your childhood grilled cheese, though it certainly evokes that same comforting nostalgia. Instead, we’ve taken that beloved concept and infused it with vibrant, complex flavors that dance on your palate. The crispy exterior, golden-brown and buttered to perfection, gives way to a molten, gooey interior where sharp cheddar or your cheese of choice happily mingles with the sweet, savory, and often subtly spicy notes of your chosen chutney. It’s the kind of dish that surprises you with its depth, making you wonder why you hadn’t thought of combining these two culinary giants sooner. Every bite delivers a satisfying crunch, followed by that rich, tangy, and utterly addictive burst of flavor that makes this sandwich an instant classic. It’s proof that sometimes, the simplest ideas, when executed with a thoughtful twist, can become the most memorable. This recipe is a testament to the fact that comfort food doesn’t have to be bland; it can be bold, exciting, and wonderfully innovative, truly a must-try for anyone seeking a fresh take on a beloved favorite.
Now that you’ve mastered the art of creating this masterpiece, let’s talk about how to make it an even more versatile star in your kitchen. While the Chutney Grilled Cheese Sandwich is undeniably spectacular on its own, it also plays wonderfully with others. For a classic pairing, I highly recommend serving it alongside a warm, velvety bowl of roasted tomato soup. The bright acidity of the soup cuts through the richness of the sandwich beautifully, creating a harmonious and utterly comforting meal, especially on a chilly evening. A simple green salad with a light vinaigrette also makes for a refreshing counterpoint, adding a welcome crispness and a touch of healthy balance. For a fun, casual meal, try it with a side of sweet potato fries or a vibrant fruit salad.
But don’t stop there! This recipe is incredibly adaptable, inviting you to experiment and make it truly your own.
Get Creative with Cheese and Chutney:
Don’t feel limited to cheddar; try smoked gouda for a deeper, nuttier flavor, or a sharp provolone for an extra bite. A creamy Havarti or even a spicy pepper jack can introduce exciting new dimensions. And the chutney itself offers endless possibilities! While a classic mango chutney is divine, consider a fig chutney for a more sophisticated, sweet and savory profile, or an apricot chutney for a brighter, slightly tart twist. You could even explore a spicier, more robust tomato-based chutney if you’re feeling adventurous, or a vibrant cilantro chutney for a fresh, herbaceous kick.
Elevate Your Add-Ins:
Want to take it up another notch? Introduce some caramelized onions for an extra layer of sweetness and umami, or a few slices of crispy bacon for a smoky, salty crunch. Sautéed spinach or thinly sliced roasted red peppers can add color, nutrition, and another delightful texture. For a truly decadent experience, a smear of cream cheese on one slice of bread before adding the other fillings can create an unbelievably creamy interior. Think about incorporating some thinly sliced avocado after cooking for a cool, creamy finish that contrasts beautifully with the warm, gooey cheese and tangy chutney. Consider using different breads too! Sourdough offers a wonderful tang, while a hearty multigrain bread can add texture and a rustic feel. A rustic rye can add a pleasant chew and earthy flavor. You could even turn this into an open-faced melt, grilling one side, then layering the toppings and finishing under the broiler until bubbly, or use a panini press for those appealing grill marks and extra crispness.
My dearest food enthusiasts, I genuinely hope this journey into the world of the Chutney Grilled Cheese Sandwich has inspired you. It’s more than just a recipe; it’s an invitation to explore flavors, to rekindle your love for simple yet profoundly satisfying food, and to perhaps discover a new family favorite. I promise you, the moment you take that first bite, with the golden-brown crust giving way to the molten cheese and the vibrant chutney, you’ll understand why I’m so passionate about it. It’s a game-changer, a lunchtime hero, and a dinner delight all rolled into one, perfect for a quick weekday meal or a leisurely weekend brunch.
So, please, don’t just read about it. Go forth, gather your ingredients, and bring this incredible sandwich to life in your own kitchen. Experiment with your favorite cheeses, try different chutneys, and discover your perfect combination. Make it your own; let your culinary imagination run wild! And when you do, I would absolutely love to hear about your experience! Did you add a secret ingredient? Did you pair it with something unexpected? Share your culinary triumphs and creative variations in the comments below, or better yet, share your delicious photos with us on social media. Your insights and delicious pictures are what make this food community so special and vibrant. Let’s spread the joy of the Chutney Grilled Cheese Sandwich far and wide! Happy cooking, my friends!
Amazing Chutney Grilled Cheese: Your New Favorite Recipe
Elevate your comfort food with this Chutney Grilled Cheese Sandwich. Golden-brown bread, gooey melted cheese, and a vibrant burst of sweet, savory, and tangy chutney create an unforgettable culinary fusion. Includes an optional homemade green chutney and caramelized onions for gourmet flavor.
Ingredients
-
4 slices sturdy bread (sourdough, brioche, or artisan white)
-
4-6 slices (4-6 oz) sharp cheddar cheese
-
4-6 slices (4-6 oz) Monterey Jack or Provolone cheese
-
4-6 tbsp unsalted butter, softened
-
¼ to ½ cup green chutney (homemade or store-bought)
-
For Homemade Green Chutney:
-
1 large bunch (2 cups packed) fresh cilantro, washed
-
½ cup fresh mint leaves, washed
-
1-2 green chilies (serrano or jalapeño), chopped
-
1-inch piece fresh ginger, peeled, chopped
-
2 cloves garlic, peeled
-
½ tsp roasted cumin powder
-
1-2 tbsp fresh lemon juice
-
¼ tsp sugar (optional)
-
Salt to taste (start with ½ tsp)
-
2-3 tbsp cold water or ice cubes
-
For Caramelized Onions (Optional):
-
1 large yellow or red onion, thinly sliced
-
1 tbsp unsalted butter
-
1 tbsp olive oil
-
Pinch of salt
-
Pinch of sugar (optional)
Instructions
-
Step 1
Wash and roughly chop cilantro, mint, green chilies, ginger, and garlic. Combine all chutney ingredients (cilantro, mint, chilies, ginger, garlic, cumin, lemon juice, optional sugar, salt, and 2-3 tbsp cold water/ice) in a blender. Blend until a smooth, vibrant green paste forms, adding more water/ice if needed. Taste and adjust seasoning. Store in an airtight container for up to 5-7 days. -
Step 2
Thinly slice 1 large onion. Heat 1 tbsp unsalted butter and 1 tbsp olive oil in a heavy-bottomed pan over medium-low heat. Add sliced onions, a pinch of salt, and an optional pinch of sugar. Stir to coat. Cook slowly, stirring every 5-7 minutes, for 30-60 minutes, until deep golden-brown and jammy. Deglaze with water/broth if needed. Cool and store for up to 3-4 days in the refrigerator. -
Step 3
Lay out the 4 bread slices. Spread a generous, even layer of softened unsalted butter on one side of each slice (this will be the exterior). Flip two of the bread slices so the unbuttered side is up. On each of these slices, layer Monterey Jack or Provolone cheese, followed by 1-2 tablespoons of green chutney. If using, spread caramelized onions over the chutney. Top with sharp cheddar cheese slices. Place the remaining two buttered bread slices (butter-side-up) on top. Gently press to slightly compress the fillings. -
Step 4
Preheat a large, heavy-bottomed skillet over medium-low heat for 2-3 minutes. Carefully place the assembled sandwiches into the skillet, butter-side down. Cook undisturbed for about 4-6 minutes until the bottom crust is deeply golden brown and cheese begins to soften. Flip the sandwiches and cook for another 4-6 minutes until the second side is golden. Gently press with a spatula. For an extra-melty interior, cover the pan with a lid for the last 2-3 minutes of cooking. Remove from heat when both sides are golden and cheese is thoroughly melted. -
Step 5
Allow the cooked sandwiches to rest on a cutting board for 1-2 minutes before cutting. Slice each sandwich diagonally from corner to corner with a sharp knife. Serve immediately, piping hot. Pair with a hot bowl of tomato soup, a green salad, extra green chutney for dipping, or crisp pickle spears.
Important Information
Nutrition Facts (Per Serving)
It is important to consider this information as approximate and not to use it as definitive health advice.
Allergy Information
Please check ingredients for potential allergens and consult a health professional if in doubt.


Leave a Comment