
Apple Cheesecake Buns are an absolute revelation, a delightful marriage of two beloved dessert traditions: the comforting warmth of a freshly baked bun and the luscious tang of classic cheesecake. I’m thrilled to share a recipe that perfectly encapsulates this exquisite fusion, offering a unique treat that’s both familiar and wonderfully surprising. While the precise origin of combining these specific elements into one magnificent pastry might be a more recent culinary innovation, the individual components boast a rich and storied past. Apples, cherished across countless cultures, symbolize harvest and home, featuring prominently in desserts from ancient times to modern pies. Cheesecake, with its luxurious creaminess, traces its heritage back to ancient Greece, evolving through Roman banquets and European bakeries into the diverse forms we adore today. This recipe beautifully bridges that gap, offering a contemporary twist on timeless comforts.
I’ve discovered that these unique Apple Cheesecake Buns capture hearts and palates for their truly remarkable symphony of textures and flavors. Envision a tender, pillowy yeast bun, gently embracing a rich, velvety cream cheese filling, generously interspersed with soft, spiced apple chunks. The interplay of the subtly sweet bun, the bright tang of the cheesecake, and the aromatic warmth of the apples creates a complex yet utterly harmonious profile. It’s a treat that offers both comfort and a touch of sophisticated indulgence, making it ideal for any occasion, from a festive brunch to a cozy evening dessert. Get ready to impress with these truly spectacular Apple Cheesecake Buns!

Ingredients:
-
For the Enriched Yeast Dough:
- 2 ¼ teaspoons (1 packet or 7g) active dry yeast – Make sure it’s fresh for the best rise!
- ½ cup (120ml) warm whole milk – Ideally between 105-115°F (40-46°C). It should feel warm to the touch, not hot.
- ¼ cup (50g) granulated sugar, plus 1 teaspoon for activating the yeast.
- ½ teaspoon fine sea salt
- 1 large egg, at room temperature, lightly beaten.
- ¼ cup (57g) unsalted butter, melted and cooled slightly, but still liquid.
- 1 teaspoon pure vanilla extract – Because vanilla makes everything better!
- 3 cups (360g) all-purpose flour, plus more for dusting your work surface.
-
For the Luscious Apple Filling:
- 3 medium-sized apples – I love using a mix of Granny Smith for tartness and Honeycrisp for sweetness and texture. Peel, core, and dice them into small ¼-inch pieces.
- 2 tablespoons unsalted butter
- ¼ cup (50g) light brown sugar, packed.
- ½ teaspoon ground cinnamon
- ¼ teaspoon ground nutmeg – Freshly grated if you have it, it makes a huge difference!
- 1 tablespoon fresh lemon juice – This helps prevent browning and adds a lovely bright note.
- 1 tablespoon cornstarch, dissolved in 2 tablespoons cold water (this is your slurry).
-
For the Creamy Cheesecake Filling:
- 8 ounces (226g) cream cheese, full-fat, softened to room temperature. This is crucial for a lump-free filling!
- ½ cup (60g) powdered sugar (confectioners’ sugar), sifted if clumpy.
- 1 large egg yolk – This helps with structure and richness, giving it a true cheesecake texture.
- 1 teaspoon pure vanilla extract
-
For the Optional (but highly recommended!) Sweet Glaze:
- 1 cup (120g) powdered sugar, sifted.
- 2-3 tablespoons whole milk or heavy cream – Start with 2 and add more until you reach your desired consistency.
- ½ teaspoon pure vanilla extract
For the Enriched Yeast Dough: Building the Foundation for Our Apple Cheesecake Buns
- Activate the Yeast: In the bowl of your stand mixer (or a large mixing bowl if kneading by hand), combine the warm milk and the 1 teaspoon of granulated sugar. Sprinkle the active dry yeast over the top. Give it a gentle stir and let it sit for about 5-10 minutes. You’ll know your yeast is alive and ready when it gets foamy and bubbly on the surface. If it doesn’t foam, your yeast might be old, or your milk might have been too hot or too cold. This step is non-negotiable for a fluffy bun!
- Combine Wet Ingredients: To the activated yeast mixture, add the remaining ¼ cup granulated sugar, the ½ teaspoon fine sea salt, the lightly beaten egg (make sure it’s room temperature for better incorporation!), the melted and cooled butter, and the pure vanilla extract. Whisk everything together until it’s well combined.
- Incorporate the Flour: Gradually add the all-purpose flour, about a cup at a time, to the wet ingredients. With the dough hook attachment on your stand mixer, start mixing on low speed until a shaggy dough forms. If you’re mixing by hand, use a sturdy wooden spoon or a dough whisk.
- Knead the Dough: Increase the mixer speed to medium-low and knead for about 8-10 minutes. If kneading by hand, turn the dough out onto a lightly floured surface and knead vigorously for 10-15 minutes. The dough should become smooth, elastic, and pull away cleanly from the sides of the bowl (or your hands). It might feel a little sticky at first, but resist the urge to add too much extra flour. A good test for doneness is the “windowpane test”: pinch off a small piece of dough, and gently stretch it. If you can stretch it thin enough to see light through it without it tearing, your dough is perfectly kneaded!
- First Rise (Bulk Fermentation): Lightly grease a large bowl with a little oil or cooking spray. Place the kneaded dough into the bowl, turning it once to coat the top. Cover the bowl tightly with plastic wrap or a clean kitchen towel. Let the dough rise in a warm, draft-free place for 1 to 1 ½ hours, or until it has visibly doubled in size. Patience is key here! A good spot is often a slightly warm oven (turned off, of course) or near a sunny window.
Preparing the Luscious Apple Filling: The Sweet and Tart Heart
- Sauté the Apples: While your dough is on its first rise, melt the 2 tablespoons of unsalted butter in a medium saucepan over medium heat. Add your diced apples and cook, stirring occasionally, for 5-7 minutes until they start to soften but still have a bit of bite. We don’t want mushy apples just yet!
- Sweeten and Spice: Stir in the packed light brown sugar, ground cinnamon, ground nutmeg, and fresh lemon juice. Continue to cook for another 3-5 minutes, allowing the sugar to dissolve and create a lovely syrup around the apples. The aroma filling your kitchen will be absolutely delightful.
- Thicken the Filling: Give your cornstarch slurry (1 tablespoon cornstarch dissolved in 2 tablespoons cold water) a quick stir to ensure it’s fully combined. Pour it into the simmering apple mixture, stirring constantly. Cook for 1-2 minutes, or until the mixture thickens to a glossy, syrupy consistency. It should coat the back of a spoon.
- Cool Completely: Remove the apple filling from the heat and transfer it to a shallow bowl or plate. Spread it out a bit to help it cool faster. It is crucial that the apple filling is completely cool before you use it in the buns. Warm filling can melt the cream cheese and cause issues with the dough. You can pop it in the refrigerator to speed this process up, stirring occasionally.
Whipping Up the Creamy Cheesecake Filling: The Signature Swirl
- Ensure Room Temperature Cream Cheese: In a medium mixing bowl, make sure your full-fat cream cheese is at room temperature. This is the single most important tip for a smooth, lump-free filling. If it’s too cold, you’ll end up with stubborn little lumps of cream cheese, and we definitely don’t want that!
- Combine Ingredients: Add the sifted powdered sugar, the large egg yolk, and the pure vanilla extract to the softened cream cheese.
- Whip Until Smooth: Using an electric hand mixer or a stand mixer with the paddle attachment, beat the mixture on medium speed for 2-3 minutes. Scrape down the sides of the bowl frequently. Continue beating until the filling is incredibly smooth, light, and fluffy, with absolutely no lumps visible. This creamy texture is what will give our Apple Cheesecake Buns their signature luxurious feel. Set this aside until you’re ready to assemble.
Assembling Your Irresistible Apple Cheesecake Buns: The Creative Part!
- Prepare for Assembly: Once your dough has doubled in size, gently punch it down to release the air. Turn the dough out onto a lightly floured work surface. Using a sharp knife or a bench scraper, divide the dough into two equal pieces. This makes it a bit easier to handle.
- Roll Out the Dough: Take one piece of dough and roll it out into a large rectangle, approximately 12×18 inches (30×45 cm). Aim for an even thickness, about ¼-inch thick. Keep your surface lightly floured to prevent sticking.
- Spread the Cheesecake Filling: Evenly spread half of the creamy cheesecake filling over the entire surface of the rolled-out dough, leaving a small ½-inch border along one of the long edges. This border will help seal the bun later.
- Layer the Apple Filling: Spoon half of the completely cooled apple filling over the cheesecake layer. Spread it out as evenly as possible, again, leaving that same ½-inch border on the long edge that you left clear of cheesecake filling.
- Roll Up the Dough: Starting from the long edge opposite the ½-inch border, carefully and tightly roll the dough into a log. Work slowly and evenly to ensure a nice, uniform roll. Once rolled, gently pinch the seam closed along that ½-inch border to seal the log.
- Slice the Buns: Using a sharp knife or, my preferred method, unflavored dental floss (seriously, it gives the cleanest cuts!), cut the log into 9 equal pieces, each about 1 to 1 ½ inches thick. To use floss, slide a piece under the log, cross the ends over the top, and pull firmly to slice. Repeat the rolling and slicing process with the second piece of dough and the remaining fillings.
- Arrange for Second Rise: Lightly grease a 9×13 inch baking dish (or two 8×8 inch dishes). Arrange the sliced buns cut-side up in the prepared baking dish, leaving a little space between each one. They will expand during the second rise and baking.
- Second Rise (Proofing): Cover the baking dish loosely with plastic wrap or a clean kitchen towel. Let the buns rise in a warm, draft-free place for another 30-45 minutes, or until they look visibly puffy and have nearly doubled in size. This final rise is crucial for light and airy buns!
Baking Your Golden-Brown Apple Cheesecake Buns: The Moment of Truth
- Preheat Oven: About 15 minutes before your buns are ready for the oven, preheat your oven to 375°F (190°C).
- Bake to Perfection: Place the baking dish into the preheated oven. Bake for 25-30 minutes, or until the buns are beautifully golden brown on top and cooked through. If you notice them browning too quickly, you can loosely tent the dish with aluminum foil for the last 10 minutes of baking. The internal temperature should reach 200-205°F (93-96°C) when tested with an instant-read thermometer for optimal doneness.
- Cool Slightly: Once baked, remove the Apple Cheesecake Buns from the oven and let them cool in the baking dish for about 10-15 minutes before glazing. This allows them to set up slightly and prevents the glaze from melting away completely.
Finishing Touch: The Sweet Glaze: The Crown Jewel
- Whisk the Glaze: While the buns are cooling slightly, prepare your glaze. In a small bowl, combine the sifted powdered sugar, 2 tablespoons of milk or cream, and the pure vanilla extract. Whisk vigorously until smooth and lump-free. If the glaze is too thick, add more milk or cream a tiny bit at a time (½ teaspoon at a time) until you reach a pourable but still thick consistency. If it’s too thin, add a little more powdered sugar.
- Drizzle and Serve: Drizzle the glaze generously over the warm Apple Cheesecake Buns. The warmth of the buns will help the glaze set just slightly, creating a beautiful sheen. Serve them warm, perhaps with an extra sprinkle of cinnamon if you’re feeling fancy. These buns are best enjoyed fresh, though leftovers (if you have any!) can be stored in an airtight container at room temperature for up to 2 days, or in the refrigerator for up to 4 days. Reheat briefly in the microwave for that fresh-baked experience! Trust me, you’ll want to share these delightful treats, or maybe, just maybe, keep them all to yourself!

Conclusion:
So, there you have it – my absolute favorite recipe for these truly irresistible Apple Cheesecake Buns! I honestly can’t stress enough how much joy these bring. They are not just any ordinary baked good; they are a delightful symphony of flavors and textures that dance on your palate. Imagine the fluffy, slightly sweet dough, perfectly encasing a creamy, tangy cheesecake filling, all dotted with tender, spiced apple pieces. It’s the kind of treat that transforms an ordinary morning coffee into a special occasion, or makes an afternoon tea feel utterly luxurious. What makes them a must-try, in my humble opinion, is their unique combination of comfort and sophistication. They hit all the right notes – the warmth of spiced apples, the richness of cheesecake, and the satisfying chew of a freshly baked bun. Trust me, once you take that first bite, you’ll understand why I’m so passionate about them. They’re surprisingly approachable to make, and the reward for your efforts is truly magnificent.
Now, let’s talk about how to best enjoy these little masterpieces. While they are undeniably divine straight out of the oven, still warm and slightly gooey, they also hold up beautifully at room temperature for a couple of days.
For the Ultimate Indulgence:
I highly recommend serving them lightly warmed, perhaps with a dusting of powdered sugar or a delicate drizzle of caramel sauce for an extra touch of sweetness. If you’re feeling particularly decadent, a scoop of vanilla bean ice cream melting alongside a warm bun is an experience you won’t soon forget – it turns a simple bun into a sophisticated dessert. They pair wonderfully with a strong cup of coffee or a comforting mug of hot apple cider, especially as the seasons change and cooler weather beckons. But don’t stop there! These buns are incredibly versatile. You could experiment with different fruit fillings; imagine pear and ginger, or even mixed berries for a summer twist. A sprinkle of chopped nuts – pecans or walnuts – added to the topping before baking would introduce a lovely crunch. For an extra spicy kick, feel free to increase the cinnamon or add a pinch of nutmeg or allspice to the apple mixture. You could even swap out the cream cheese for mascarpone for a richer, less tangy filling. The possibilities are truly endless, and that’s part of the fun of baking!
I genuinely hope that reading through this has inspired you to roll up your sleeves and give these fantastic Apple Cheesecake Buns a try in your own kitchen. There’s something incredibly satisfying about baking from scratch, and even more so when the result is this utterly delicious. Don’t be intimidated; follow the steps, enjoy the process, and savor the incredible aroma that will undoubtedly fill your home. When you pull these golden beauties from the oven, you’ll feel an immense sense of accomplishment, and your taste buds will thank you profusely.
Share Your Baking Journey!
I would absolutely love to hear about your experience! Did you try any variations? What did your family and friends think? Please, don’t hesitate to share your photos and stories. Connecting with fellow food enthusiasts and seeing your creations truly makes my day. Tag me, comment below, or simply drop a line to let me know how your baking adventure went. Your feedback and personal touches are always appreciated, and they often inspire new ideas for all of us. Let’s create some delicious memories together with these amazing Apple Cheesecake Buns!
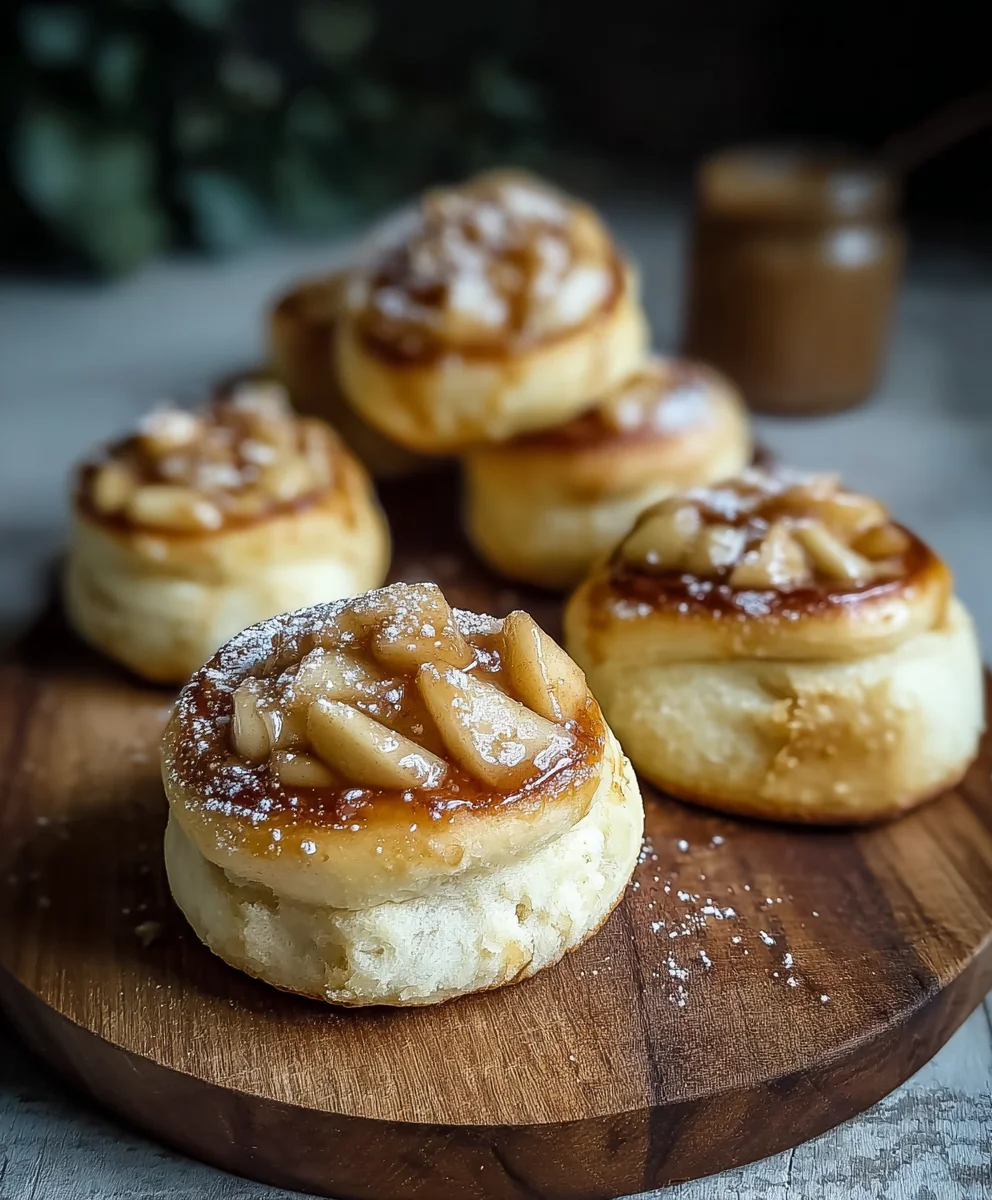
Irresistible Apple Cheesecake Buns
Apple Cheesecake Buns are a delightful marriage of tender, pillowy yeast buns, a rich, velvety cream cheese filling, and soft, spiced apple chunks. This recipe offers a unique treat combining the comforting warmth of a freshly baked bun and the luscious tang of classic cheesecake, perfect for any occasion.
Ingredients
-
2 ¼ tsp (7g) active dry yeast
-
½ cup (120ml) warm whole milk
-
¼ cup (50g) granulated sugar
-
1 tsp granulated sugar
-
½ tsp fine sea salt
-
1 large egg, room temperature
-
¼ cup (57g) unsalted butter, melted
-
1 tsp pure vanilla extract
-
3 cups (360g) all-purpose flour
-
3 medium fresh apples (e.g., Granny Smith, Honeycrisp), peeled, cored, diced
-
2 tbsp unsalted butter
-
¼ cup (50g) light brown sugar, packed
-
½ tsp ground cinnamon
-
¼ tsp ground nutmeg
-
1 tbsp fresh lemon juice
-
1 tbsp cornstarch
-
2 tbsp cold water
-
8 oz (226g) full-fat cream cheese, softened
-
½ cup (60g) powdered sugar
-
1 large egg yolk
-
1 tsp pure vanilla extract
-
1 cup (120g) powdered sugar (for glaze)
-
2-3 tbsp whole milk or heavy cream (for glaze)
-
½ tsp pure vanilla extract (for glaze)
Instructions
-
Step 1
In a stand mixer bowl, combine ½ cup warm milk, 1 tsp granulated sugar, and 2 ¼ tsp active dry yeast. Let sit for 5-10 minutes until foamy. -
Step 2
Add ¼ cup granulated sugar, ½ tsp sea salt, 1 large egg, ¼ cup melted butter, and 1 tsp vanilla extract to the yeast mixture. Gradually add 3 cups all-purpose flour and mix with a dough hook on low speed until a shaggy dough forms. -
Step 3
Increase mixer speed to medium-low and knead for 8-10 minutes until the dough is smooth and elastic. Lightly grease a large bowl, place dough in it, cover, and let rise in a warm, draft-free place for 1-1.5 hours until doubled in size. -
Step 4
Melt 2 tbsp unsalted butter in a saucepan over medium heat. Add 3 diced fresh apples and cook for 5-7 minutes until softened. Stir in ¼ cup light brown sugar, ½ tsp ground cinnamon, ¼ tsp ground nutmeg, and 1 tbsp fresh lemon juice. Cook for 3-5 more minutes. Add a slurry of 1 tbsp cornstarch dissolved in 2 tbsp cold water, stir, and cook for 1-2 minutes until thickened. Transfer to a shallow dish and cool completely. -
Step 5
In a medium bowl, combine 8 oz softened cream cheese, ½ cup powdered sugar, 1 large egg yolk, and 1 tsp vanilla extract. Beat with an electric mixer on medium speed for 2-3 minutes until incredibly smooth and lump-free. -
Step 6
Gently punch down the risen dough, divide it into two equal pieces on a lightly floured surface. Roll one piece into a 12×18 inch (30×45 cm) rectangle, ¼-inch thick. Spread half of the cheesecake filling over the dough, leaving a ½-inch border on one long edge. Spoon half of the cooled apple filling over the cheesecake layer, also leaving the border clear. -
Step 7
From the long edge opposite the border, tightly roll the dough into a log. Pinch the seam closed. Cut the log into 9 equal 1 to 1 ½ inch thick pieces. Repeat the process with the second dough piece and remaining fillings. -
Step 8
Lightly grease a 9×13 inch baking dish. Arrange the sliced buns cut-side up, spaced apart. Cover loosely and let rise in a warm place for 30-45 minutes until visibly puffy and nearly doubled in size. -
Step 9
Preheat oven to 375°F (190°C). Bake for 25-30 minutes, or until golden brown and cooked through (internal temperature 200-205°F / 93-96°C). Tent with foil if browning too quickly. Let buns cool in the baking dish for 10-15 minutes before glazing. -
Step 10
In a small bowl, whisk together 1 cup sifted powdered sugar, 2-3 tbsp whole milk or heavy cream, and ½ tsp vanilla extract until smooth. Drizzle the glaze generously over the warm Apple Cheesecake Buns. Serve warm. Store leftovers in an airtight container at room temperature for up to 2 days, or refrigerated for up to 4 days, reheating briefly in the microwave for a fresh-baked experience.
Important Information
Nutrition Facts (Per Serving)
It is important to consider this information as approximate and not to use it as definitive health advice.
Allergy Information
Please check ingredients for potential allergens and consult a health professional if in doubt.

Leave a Comment