
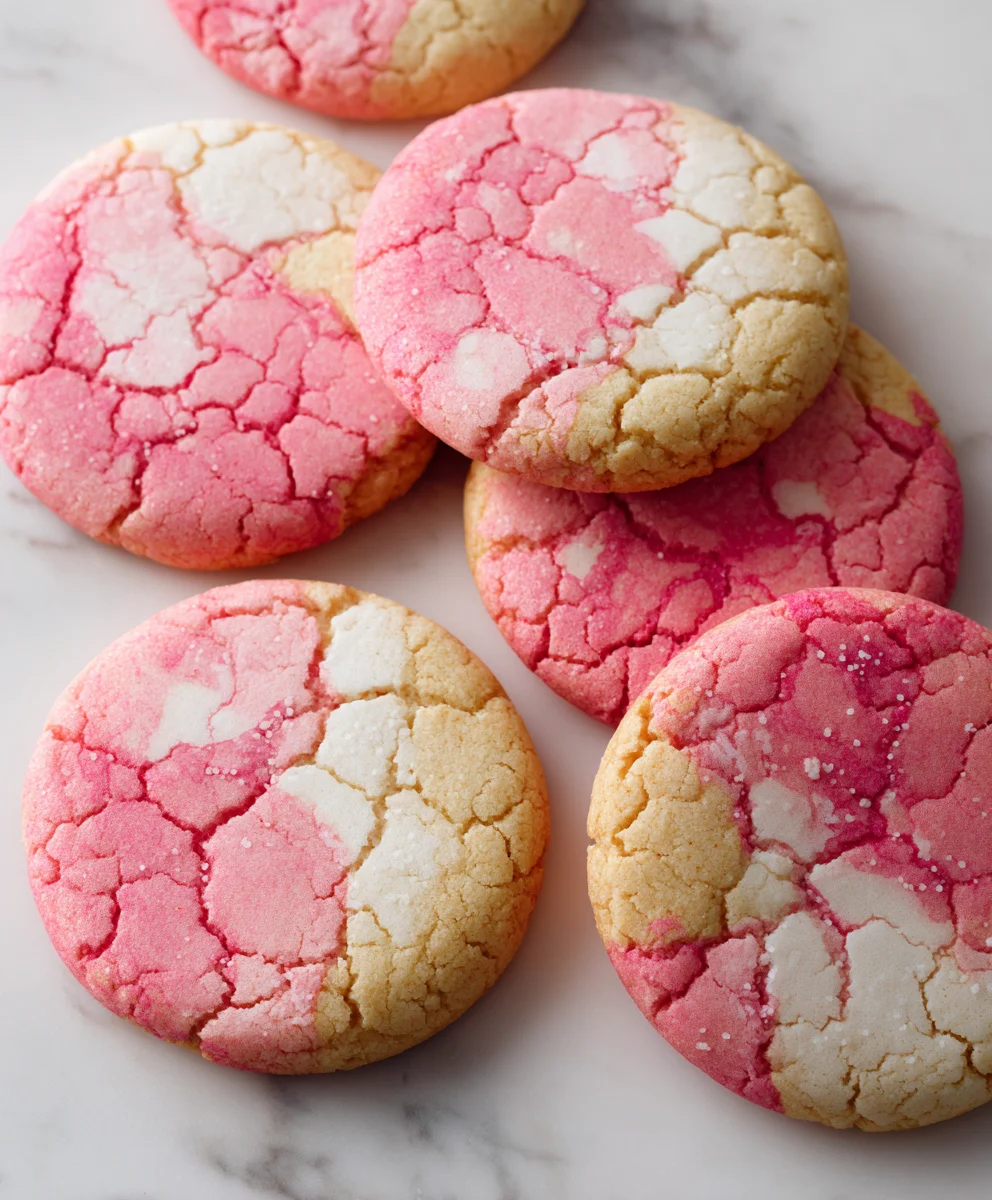
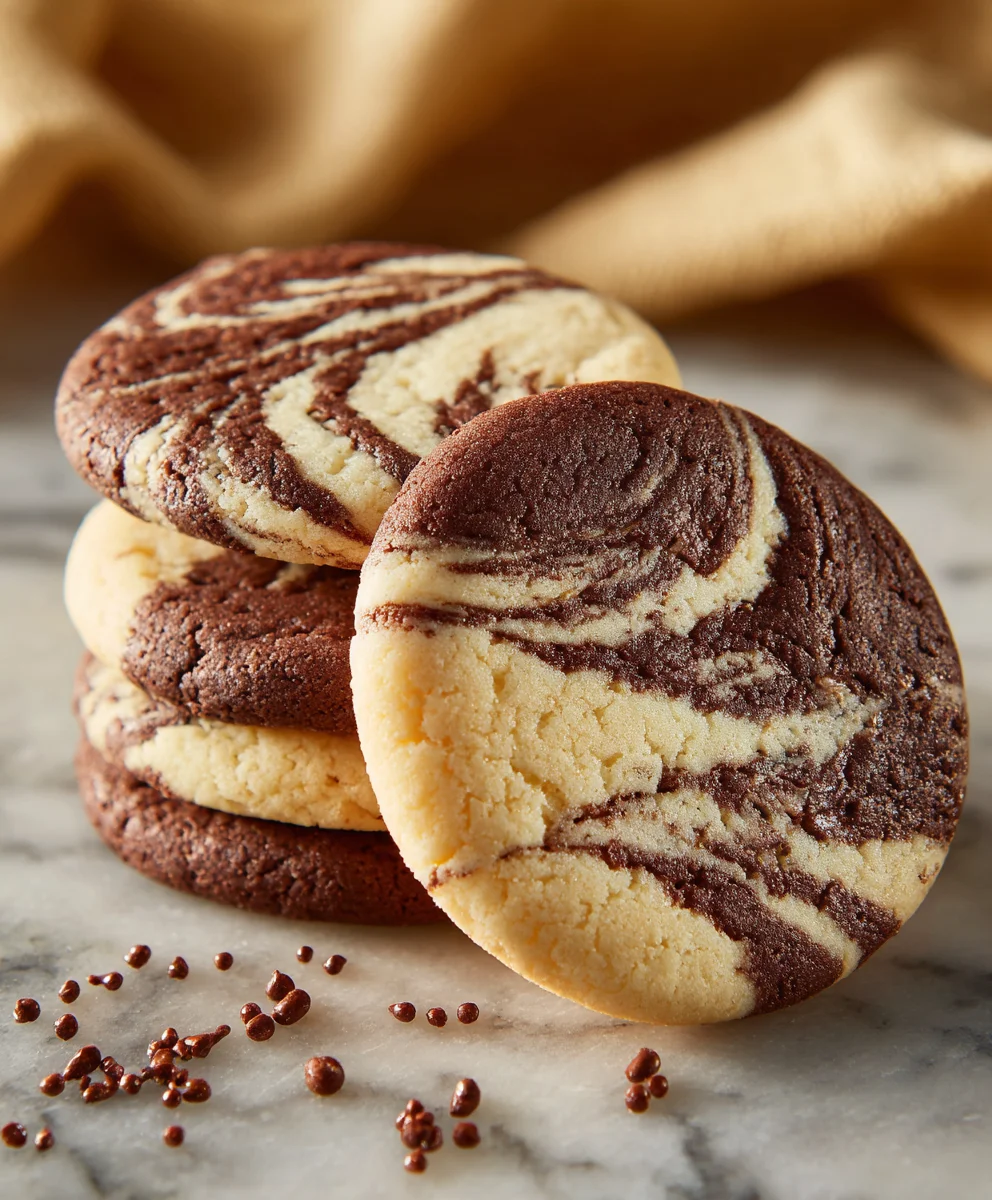
Marbled Sugar Cookies are more than just a delightful treat; they are a miniature work of art, each one a unique canvas of color and sweetness. Have you ever wished your classic cookie recipe could also double as a conversation starter? These visually stunning cookies achieve precisely that, captivating guests with their elegant swirls and vibrant patterns before they even take their first bite. While the humble sugar cookie has graced dessert tables for centuries, a beloved staple originating from Pennsylvania Dutch communities, this marbled rendition takes that comforting familiarity and elevates it to an entirely new level of sophistication.
Why do people adore Marbled Sugar Cookies so much?
Beyond their undeniable aesthetic appeal, these cookies offer the perfect balance of a tender, buttery texture that melts in your mouth, coupled with a subtly sweet flavor that is never overwhelming. They are incredibly versatile, making them ideal for holiday platters, elegant parties, or simply a fun baking project with family. The process of creating the beautiful marbled effect is surprisingly simple, adding an exciting, creative dimension to traditional baking. I find immense joy in seeing the unique patterns emerge, making every batch of Marbled Sugar Cookies a unique and delightful experience. Get ready to impress with this truly special recipe!

Ingredients:
- 3 cups (360g) All-Purpose Flour: I always make sure to level it properly. This is the foundation of our Marbled Sugar Cookies, providing structure.
- 1 teaspoon Baking Powder: Just a touch, to give our cookies a little lift and tenderness without making them cakey.
- 1/2 teaspoon Salt: Essential for balancing the sweetness and enhancing all the other flavors. Don’t skip it!
- 1 cup (226g) Unsalted Butter, softened: Make sure it’s truly softened, but not melted. It should give slightly when pressed. This is key for creaming properly and achieving that melt-in-your-mouth texture.
- 1 1/2 cups (300g) Granulated Sugar: Our primary sweetener. It will cream beautifully with the butter.
- 2 large Eggs: At room temperature, please! Room temperature eggs emulsify better with the butter and sugar, leading to a smoother, more uniform dough.
- 1 teaspoon Vanilla Extract: Use good quality vanilla! It makes a world of difference in the overall flavor of these classic cookies.
- Gel Food Coloring: Your choice of colors! I recommend gel food coloring over liquid because it’s much more concentrated, meaning you’ll use less and avoid adding too much moisture to your dough. Pick two or three contrasting colors for the best marbled effect. Think blues, purples, and pinks for a vibrant look, or earthy tones for a more subtle swirl.
- Extra All-Purpose Flour: For dusting your work surface and rolling pin.
Preparing the Classic Sugar Cookie Dough
- Whisk Dry Ingredients: In a medium bowl, whisk together the 3 cups of all-purpose flour, 1 teaspoon of baking powder, and 1/2 teaspoon of salt. I like to use a wire whisk to ensure everything is thoroughly combined and aerated. Set this aside for now. This preliminary step ensures that the leavening and seasoning are evenly distributed throughout your dough, which will translate to consistent texture and flavor in every bite of your Marbled Sugar Cookies.
- Cream Butter and Sugar: In a large mixing bowl, preferably using a stand mixer fitted with the paddle attachment, or with a hand mixer, cream together the softened unsalted butter and granulated sugar. I usually start on a low speed to incorporate them gently, then increase to medium-high. You want to beat them until the mixture becomes wonderfully light, fluffy, and visibly pale – this process typically takes anywhere from 3 to 5 minutes, sometimes even longer depending on your mixer. This step is absolutely crucial for the texture of your Marbled Sugar Cookies, as it incorporates air, contributing to a tender crumb and preventing a dense, hard cookie. Don’t rush it! Scrape down the sides of the bowl periodically to ensure even mixing.
- Add Eggs and Vanilla: Once the butter and sugar mixture is light and fluffy, crack in the two large eggs, one at a time, mixing well after each addition. Make sure each egg is fully incorporated before adding the next. Then, stir in the 1 teaspoon of vanilla extract. Continue mixing on medium speed until everything is well combined and the mixture looks smooth and creamy. The vanilla adds that comforting, familiar flavor that we all love in a sugar cookie.
- Gradually Add Dry Ingredients: With the mixer on low speed, gradually add the dry ingredients mixture (flour, baking powder, salt) to the wet ingredients. Do this in three separate additions, mixing just until combined after each. Be very careful not to overmix the dough! Overmixing develops the gluten in the flour too much, which can result in tough, chewy cookies instead of the tender, delicate Marbled Sugar Cookies we’re aiming for. Stop mixing as soon as you see no more streaks of dry flour. The dough will be soft and pliable.
Dividing and Coloring the Dough
- Divide the Dough: Gently transfer the prepared sugar cookie dough onto a clean, lightly floured surface. Now, we need to divide this dough into as many portions as you have chosen colors for your marbled effect. For example, if you’re using three colors, divide the dough into three roughly equal pieces. I usually eyeball it, but you could use a kitchen scale for absolute precision if you prefer.
- Color Each Portion: Take one portion of dough and flatten it slightly. Using a toothpick or a small spoon, add a small amount of your chosen gel food coloring to the center of the dough. Remember, gel colors are highly concentrated, so start with a tiny dot – you can always add more if needed.
-
Knead in Color: Now, comes the fun part! Gently fold and knead the dough by hand until the color is evenly distributed throughout that portion. This might take a few minutes. You’ll notice the dough becoming a vibrant, uniform hue. If you want a deeper color, add a tiny bit more gel food coloring and continue kneading. Repeat this process for each remaining portion of dough, using a different color for each. I always make sure to use clean hands or wear gloves, and sometimes even change gloves between colors to prevent accidental mixing before the marbling stage.
Tips for Coloring Dough:
- Gloves are Your Friend: Gel food coloring can temporarily stain your hands, so wearing disposable gloves is a great idea.
- Don’t Over-Knead: While you need to mix the color in thoroughly, try not to over-knead the dough. We want to keep it tender.
- Achieving Desired Shades: If you’re aiming for pastel Marbled Sugar Cookies, use very little color. For bolder, more dramatic swirls, you’ll need a bit more.
Creating the Marbled Effect and Shaping the Cookies
- Prepare for Marbling: Once all your dough portions are beautifully colored, it’s time to bring them together for the marbled effect. Lightly dust your work surface with a little extra flour. You want to make sure the dough doesn’t stick, but not so much flour that it dries out the dough.
-
Combine Dough for Marbling: Take each colored portion of dough and flatten it slightly into a rectangle or disc. Now, you have a few options for creating your marbled pattern:
- Stack and Twist (My Favorite for Swirls): Lay one colored dough piece on top of another, and then add the third (if using three colors) on top of that. Gently press them together. Now, twist the stack of dough a few times, just enough to start swirling the colors. You can then gently fold the twisted dough in half and twist again. This method creates beautiful, defined swirls.
- Strips and Swirl: Roll each colored dough portion into a long rope, about 1 inch thick. Lay the ropes side-by-side, pressing them gently together. Then, gently twist the combined ropes to intertwine the colors. You can then fold the twisted rope in half and twist again.
- Random Blob Method: Pinch off small, random pieces of each colored dough and place them haphazardly together on your work surface. Gently press them to adhere. This creates a more organic, abstract marble.
The key here is to combine the colors without fully blending them. We want distinct streaks of color to achieve the “Marbled Sugar Cookies” look.
- Gently Knead (Minimal): After combining the colors using one of the methods above, very gently knead or fold the dough just a couple of times. This helps to further integrate the colors into a marbled pattern, but you must be careful not to overdo it, or your colors will blend completely into a single, muddy hue, defeating the purpose of our beautiful Marbled Sugar Cookies. You’re aiming for distinct veins and swirls, not a uniform color.
- Roll the Dough: Place the marbled dough onto your lightly floured surface. Using a rolling pin, roll the dough out evenly to a thickness of about 1/4 inch. For consistent baking and cookie texture, it’s really important that the thickness is uniform across the entire sheet of dough. If the dough gets too sticky, dust your rolling pin and surface with a tiny bit more flour. As you roll, you’ll see the beautiful marbled patterns emerge!
- Cut Out Cookies: Choose your favorite cookie cutters! Stars, circles, squares, hearts – any shape will look stunning with the marbled design. Dip your cookie cutter into a little flour before each cut to prevent sticking. Press the cutter firmly into the dough, then lift straight up. Place the cut Marbled Sugar Cookies onto baking sheets lined with parchment paper or silicone baking mats, leaving about 1 to 2 inches between each cookie to allow for slight spreading. Gather the scraps, gently press them together (again, without overworking), and re-roll once or twice to cut out more cookies. Keep in mind that the re-rolled scraps might have less defined marbling, but they’ll still be delicious!
- Chill the Cut Cookies: This step is non-negotiable for perfectly shaped Marbled Sugar Cookies! Once all your cookies are cut and on the baking sheets, place the sheets in the refrigerator for at least 15-20 minutes, or even up to an hour. Chilling the dough helps firm up the butter, which prevents the cookies from spreading too much in the oven, ensuring they maintain their crisp edges and beautiful marbled shapes. You can also place them in the freezer for 5-10 minutes if you’re short on time.
Baking Our Marbled Sugar Cookies
- Preheat Oven: While your cookies are chilling, preheat your oven to 375°F (190°C). Make sure to give your oven enough time to fully reach the target temperature for even baking.
- Bake the Cookies: Transfer the chilled baking sheets to the preheated oven. Bake for 8 to 12 minutes, depending on the thickness of your cookies and the power of your oven. I always keep a close eye on them! You’ll know they are done when the edges are just set and very lightly golden. The centers should still look soft and slightly puffy. Do not overbake, or your Marbled Sugar Cookies will be hard and dry instead of tender and soft. If baking multiple sheets, rotate them halfway through baking for even browning.
- Cool on Baking Sheet: Once baked, remove the baking sheets from the oven and let the cookies cool on the sheets for about 5 minutes. They are quite delicate when hot, so this brief cooling period allows them to firm up slightly.
- Transfer to Wire Rack: After 5 minutes, carefully transfer the Marbled Sugar Cookies from the baking sheets to a wire rack to cool completely. Allowing them to cool on a wire rack ensures air circulation, preventing them from getting soggy on the bottom and helping them achieve that perfect crisp-tender texture.
Tips for Perfect Marbled Sugar Cookies
- Room Temperature Ingredients: I cannot stress this enough – soft butter and room temperature eggs are vital for a smooth, uniform dough that creams beautifully.
- Don’t Overmix: After adding the flour, mix only until just combined. Overmixing develops gluten, leading to tough cookies. We want tender, melt-in-your-mouth Marbled Sugar Cookies!
- Chill, Chill, Chill: Chilling the dough, especially after cutting, is the secret weapon against spreading. It ensures your cookie shapes stay defined and your marbling remains crisp.
- Even Thickness: Rolling your dough to an even 1/4-inch thickness is important for consistent baking. If some cookies are thicker than others, they’ll bake unevenly.
- Storage: Once completely cooled, store your beautiful Marbled Sugar Cookies in an airtight container at room temperature for up to a week. They also freeze wonderfully for up to 3 months. Just make sure they are completely cool before freezing in an airtight container or freezer bag.
- Flavor Variations: Feel free to experiment! You can add a teaspoon of almond extract along with the vanilla for a different flavor profile, or even a little citrus zest (lemon or orange) to your dough for a bright, refreshing twist. These simple additions can elevate your Marbled Sugar Cookies even further.
Conclusion:
Well, my fellow baking enthusiasts, we’ve reached the sweet end of our journey through this delightful recipe, and I truly hope you’re as excited as I am about the prospect of bringing these magnificent creations to life in your own kitchen. If there’s one recipe I’d confidently label as a true showstopper – easy enough for a beginner yet impressive enough for a seasoned baker – it’s this one. These aren’t just any ordinary cookies; they are a canvas of flavor and art, a testament to how simple ingredients can transform into something truly extraordinary. I firmly believe that once you experience the sheer joy of pulling a tray of these perfectly baked, visually stunning treats from your oven, you’ll understand exactly why this recipe is an absolute must-try. The combination of a tender, buttery sugar cookie base, infused with just the right hint of vanilla, and the mesmerizing swirl of colors makes every bite an experience for both the eyes and the palate.
What truly elevates these cookies, making them stand head and shoulders above many other simple bakes, is their incredible versatility and undeniable charm. They possess that magical quality of being both nostalgically comforting and elegantly sophisticated all at once. Imagine the delighted gasps when you present a platter of these beautiful cookies; they truly make a statement without requiring hours of intricate decorating or specialized tools. The process itself is wonderfully therapeutic, allowing your creativity to flow freely as you craft each unique pattern. No two cookies will ever be exactly alike, and that, my friends, is where a significant part of their unique appeal lies. They are an expression of spontaneous artistry, proof that some of the most beautiful things in life don’t need to be meticulously planned. I promise you, the effort, minimal as it is, yields a reward that tastes and looks like pure joy.
When it comes to serving these beauties, the possibilities are as endless as your imagination. Of course, they are absolutely divine on their own, perhaps with a tall, cold glass of milk, a comforting cup of hot chocolate on a chilly evening, or alongside your morning coffee for a little extra spark of delight. However, their elegance also makes them perfect candidates for more elaborate presentations. Consider stacking them carefully in decorative boxes or cellophane bags tied with a pretty ribbon; they make for heartfelt, homemade gifts that are always met with smiles and appreciation. They’re fantastic for school bake sales, office potlucks, or as a vibrant addition to any holiday dessert table. For a truly unforgettable dessert spread, arrange them artfully on a tiered stand, letting their vibrant colors pop amongst other treats. You could even use them as edible place cards for a special dinner party, carefully piping each guest’s initial onto a cookie before the marbling sets.
But let’s talk about variations – this is where you can truly make this recipe your own! While vanilla is a classic for a reason, don’t hesitate to experiment with different flavor extracts in your dough. A touch of almond extract can add a delightful warmth, while lemon zest or orange extract can bring a bright, zesty twist that’s incredibly refreshing. Peppermint extract makes them perfect for the festive season, or a hint of coconut can transport you to a tropical paradise. And the colors! Oh, the colors! You can tailor your palette to any occasion. Think vibrant reds and greens for Christmas, soft pastels for Easter or a spring celebration, bold blues and whites for a winter wonderland theme, or even spooky oranges and blacks for Halloween. For an extra touch of sparkle, lightly sprinkle edible glitter or fine sanding sugar onto the cookies immediately after marbling, but before baking, to give them a magical shimmer that catches the light beautifully. You could also make these into delightful cookie sandwiches by spreading a thin layer of your favorite jam or a tangy cream cheese frosting between two cookies. The options are limitless, and each variation simply enhances the magic of these Marbled Sugar Cookies.
Now, it’s your turn! I have poured my heart into sharing this wonderful recipe with you, and my greatest hope is that you will take the leap and try it out. Don’t be shy about experimenting, about letting your own creative spirit guide your hands as you swirl those colors into existence. Baking, for me, is an act of love and a source of immense joy, and I truly want that experience for you too. So, gather your ingredients, put on your favorite apron, and prepare to create something truly beautiful and delicious. And please, please, please, once you’ve baked your batch, I would absolutely love to hear all about your experience! Did you try a new color combination? Did you add a unique flavor extract? What was your favorite part of the process? Share your stories, your triumphs, and even your funny mishaps in the comments below. Better yet, snap a photo of your magnificent creations and share them with the world! Let’s inspire each other with our baking adventures. I am so excited for you to discover the simple elegance and profound satisfaction that comes from mastering these delightful cookies. Happy baking!
Marbled Sugar Cookies
Marbled Sugar Cookies are a delightful, visually stunning treat with tender, buttery texture. Each cookie is a unique canvas of colorful swirls, perfect for any occasion. This recipe elevates the classic sugar cookie with an exciting, creative dimension.
Ingredients
-
3 cups (360g) All-Purpose Flour
-
1 tsp Baking Powder
-
1/2 tsp Salt
-
1 cup (226g) Unsalted Butter, softened
-
1 1/2 cups (300g) Granulated Sugar
-
2 large Eggs, room temp
-
1 tsp Vanilla Extract
-
Gel Food Coloring, assorted colors
-
Extra All-Purpose Flour
Instructions
-
Step 1
In a medium bowl, whisk together 3 cups all-purpose flour, 1 tsp baking powder, and 1/2 tsp salt. Set aside. -
Step 2
In a large mixing bowl, cream softened unsalted butter and granulated sugar until light, fluffy, and pale (3-5 minutes). Scrape down the sides of the bowl. -
Step 3
Beat in 2 large eggs, one at a time, mixing well after each. Stir in 1 tsp vanilla extract until smooth. -
Step 4
Gradually add dry ingredients to the wet mixture on low speed, mixing just until combined. Do not overmix. -
Step 5
Divide dough into portions (one for each chosen gel food coloring). Add a small amount of gel food coloring to each portion and gently knead by hand until the color is evenly distributed and vibrant. (Wearing gloves is recommended). -
Step 6
Lightly flour your work surface. Combine colored dough portions using a stacking, rope, or random blob method to create marbled patterns. Gently knead/fold the combined dough 1-2 times to integrate colors without fully blending. -
Step 7
Roll the marbled dough evenly to 1/4 inch thickness. Cut cookies using floured cookie cutters. Place on parchment-lined baking sheets, leaving 1-2 inches between each cookie. Re-roll scraps gently if desired. -
Step 8
Chill cut cookies on baking sheets in the refrigerator for at least 15-20 minutes (or freezer for 5-10 minutes) to prevent spreading during baking. -
Step 9
Preheat oven to 375°F (190°C). Bake chilled cookies for 8-12 minutes, until edges are lightly golden and centers are set but still soft. Do not overbake. -
Step 10
Cool on baking sheets for 5 minutes, then carefully transfer to a wire rack to cool completely.
Important Information
Nutrition Facts (Per Serving)
It is important to consider this information as approximate and not to use it as definitive health advice.
Allergy Information
Please check ingredients for potential allergens and consult a health professional if in doubt.

Leave a Comment