
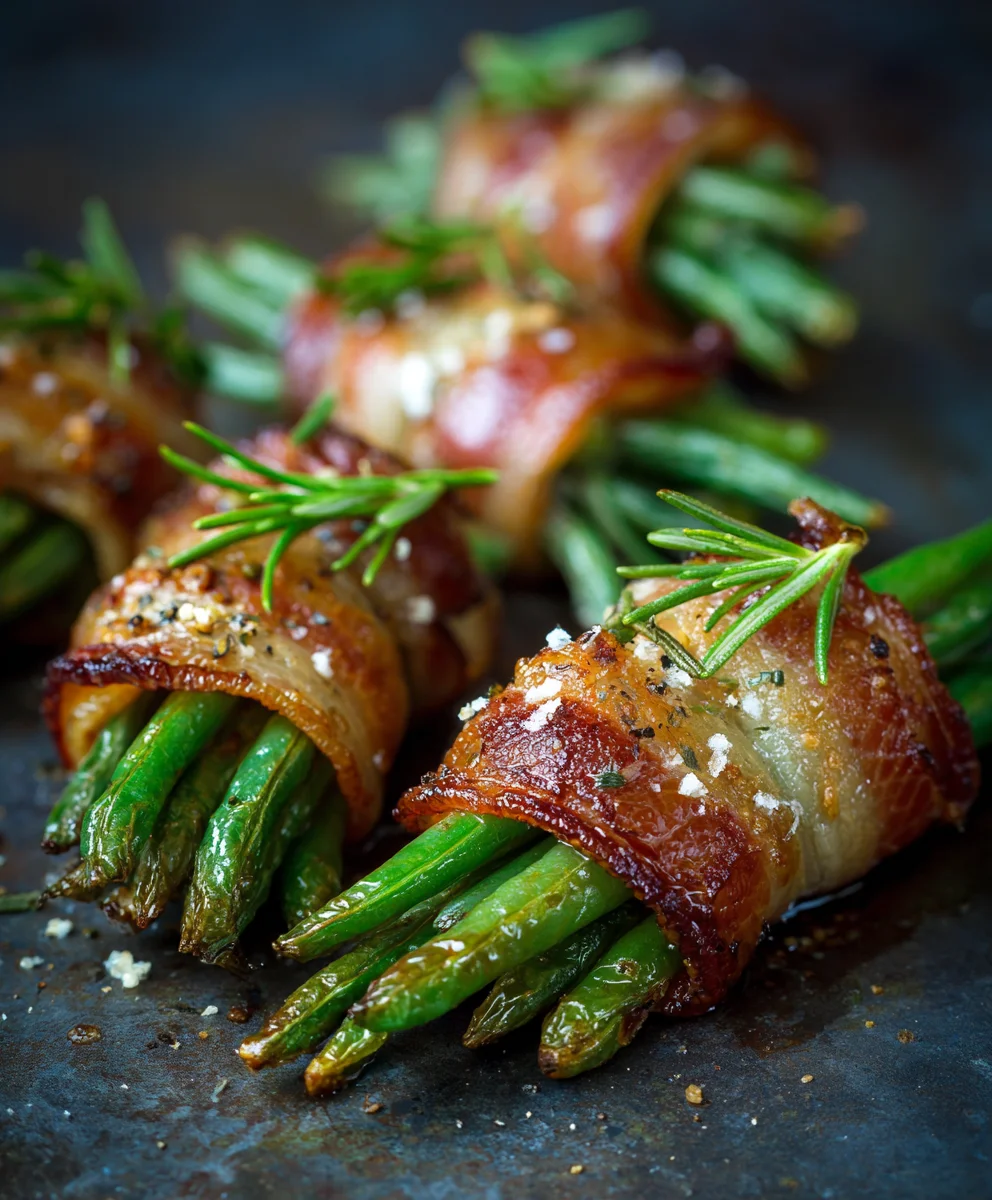
Green Bean Bundles are not just a side dish; they are a charming culinary creation that consistently steals the show at any gathering. There’s something undeniably special about these petite parcels, each one a testament to simple ingredients coming together in perfect harmony. While their precise historical origin might be debated amongst culinary enthusiasts, these delightful bundles have firmly established themselves as a beloved staple, particularly cherished across American holiday tables and family potlucks. They evoke a sense of warmth, generosity, and thoughtful preparation, making them much more than just a vegetable accompaniment.
Why Do We Love Green Bean Bundles So Much?
The answer lies in their utterly irresistible combination of flavors and textures. Picture this: perfectly crisp-tender green beans, gently seasoned, lovingly wrapped in a savory strip of smoky bacon, often glazed with a hint of brown sugar or maple syrup that caramelizes beautifully as it bakes. This creates an exquisite sweet and savory balance that truly tantalizes the taste buds. The delightful crunch of the bacon paired with the fresh snap of the beans offers a textural experience that is both satisfying and addictive. Moreover, their elegant presentation and easy, individual serving size make them a crowd-pleaser, effortlessly elevating any meal. I find that Green Bean Bundles are an ingenious way to transform a humble vegetable into an unforgettable dish that guests eagerly anticipate.

Ingredients:
- Fresh Green Beans: 2 pounds (about 900g), preferably slender and firm, trimmed of their tough ends. I always recommend fresh for the best texture in our Green Bean Bundles.
- Bacon: 1 pound (about 450g), regular or thin-cut. Avoid thick-cut here, as it can be challenging to wrap tightly and cook through evenly without overcooking the beans.
- Brown Sugar: 1/2 cup (100g), packed. This is essential for that lovely sweet caramelization.
- Unsalted Butter: 1/4 cup (57g), melted. Butter adds richness and helps the glaze cling beautifully.
- Soy Sauce: 2 tablespoons. The savory backbone of our incredible glaze, providing depth and umami.
- Garlic Powder: 1 teaspoon. A quick and easy way to infuse a wonderful garlicky aroma and taste without mincing fresh garlic.
- Black Pepper: 1/2 teaspoon, freshly ground if possible, for a subtle warmth and spice.
- Salt: 1/2 teaspoon (optional, for blanching water).
- Wooden Toothpicks: A small box, indispensable for securing our Green Bean Bundles.
Preparing Your Green Beans for Perfection:
- First things first, let’s get those beautiful green beans ready. Start by thoroughly washing your 2 pounds of fresh green beans under cool running water. I find that a good rinse helps to remove any lingering dirt or debris, ensuring they’re sparkling clean and ready for their starring role in our delightful Green Bean Bundles. You want them as fresh and clean as possible to absorb all the wonderful flavors we’re about to introduce.
- Next, it’s time for trimming. This might seem like a small step, but it makes a significant difference in the final presentation and eating experience of our Green Bean Bundles. You’ll want to snap or trim off the tough, stringy stem ends of each green bean. Some people prefer to leave the very tip on the other end, but I personally like to trim both ends for a cleaner, more refined look and a uniformly tender bite. Aim for consistency in length as much as possible, as this will greatly help with uniform cooking and make your finished bundles look absolutely stunning on the plate.
- Now, for a little trick that ensures your green beans are perfectly tender-crisp, yet still vibrantly green: blanching! Bring a large pot of lightly salted water to a rolling boil. While the water is heating up, prepare an ice bath in a large bowl – this means a generous amount of ice cubes and plenty of cold water. This sudden temperature change is absolutely crucial for achieving the desired texture and color.
- Once your water is boiling vigorously, carefully add the trimmed green beans to the pot. Let them cook for just 3 to 4 minutes. You’re not trying to cook them through completely here; we’re just aiming for that tender-crisp stage, also known as al dente. They should still retain their bright green color and a pleasant, slight bite when tasted. Overcooking them now will result in mushy beans later in the baking process, which is something we definitely want to avoid for our delicious Green Bean Bundles. We want them to hold their shape and offer a satisfying crunch.
- As soon as the 3-4 minutes are up, immediately drain the green beans using a colander. Without any delay, plunge them into the prepared ice bath. This step is incredibly important as it immediately halts the cooking process, preventing them from overcooking and locking in that gorgeous, vibrant green color. Let them sit in the ice bath for about 5 minutes, or until they are completely cooled to the touch. This ensures they don’t continue to cook from residual heat.
- Once thoroughly chilled, drain the green beans again, and this time, lay them out on a clean kitchen towel or several layers of paper towels. Gently pat them dry. Removing excess moisture is an absolutely key step, as it helps the bacon crisp up beautifully during baking and prevents the bundles from becoming soggy. Trust me, a little extra effort here pays off immensely in the texture and overall quality of your finished Green Bean Bundles. Dry beans mean crispier bacon, and who doesn’t love crispy bacon?
Crafting Your Irresistible Bacon Bundles:
- Preheat your oven to 375°F (190°C). As the oven heats up, take a moment to prepare your baking vessel. Line a large baking sheet with parchment paper or aluminum foil for effortless cleanup. If you opt for aluminum foil, I often give it a light spray with non-stick cooking spray, just to be extra sure the delicious, sticky glaze doesn’t adhere too much. For optimal results, you could also place an oven-safe wire rack on top of the prepared baking sheet; this brilliant trick allows air to circulate all around the bundles, promoting even crisping of the bacon and preventing a soggy bottom.
- Now, let’s talk bacon. For these exquisite Green Bean Bundles, I wholeheartedly recommend using regular or thin-cut bacon. While thick-cut bacon is undeniably delicious on its own, it tends to take a much longer time to cook and crisp up sufficiently around the green beans. This can sometimes result in undercooked bacon or, worse, overcooked and mushy beans. So, for the very best results and cooking efficiency, stick with the standard, more manageable cuts. Lay out your strips of bacon on a clean cutting board, ready for wrapping.
- It’s assembly time! This is where the magic truly begins to take shape for our Green Bean Bundles. Take about 8 to 10 of your blanched and thoroughly dried green beans. Group them together neatly, ensuring they are fairly uniform in length. This consistency is not just for aesthetic appeal; it’s also incredibly important for helping them cook evenly within the bundle, ensuring every bite is perfect.
- Carefully wrap one strip of bacon around the center of each green bean bundle. Start at one end of the bacon strip and coil it snugly around the middle of the green beans. You want it to be tight enough to hold the beans together securely but not so tight that it squeezes or crushes them excessively. The ultimate goal here is to create a compact, attractive, and stable package that will hold its form during baking.
- Secure each bacon-wrapped bundle with a wooden toothpick. Push the toothpick straight through the bacon and the green beans, ensuring it goes all the way through and comes out the other side. This is an absolutely crucial step for holding the bundle together firmly as the bacon cooks, shrinks, and renders its fat. Don’t be shy; make sure that toothpick is secure! If you happen to have particularly long bundles, or if your bacon strips are on the shorter side, you might even consider using two toothpicks per bundle, placed closer to each end, for extra reinforcement.
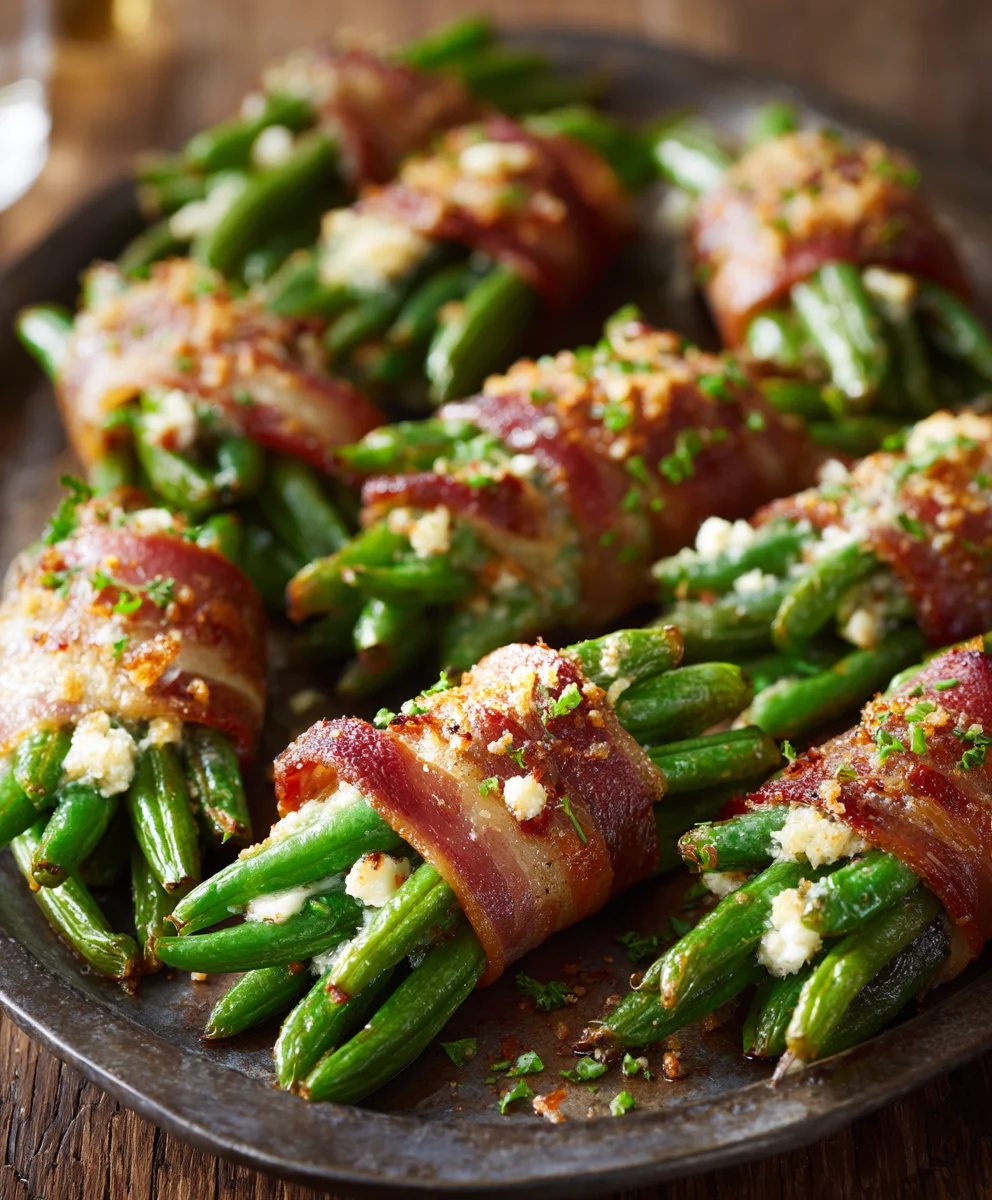
- As you finish wrapping each individual Green Bean Bundle, place it seam-side down on your prepared baking sheet or wire rack. Arrange them in a single layer, ensuring there’s a little bit of space between each one. This strategic spacing is incredibly important for proper air circulation, which, in turn, helps the bacon get wonderfully crispy all around. Do not overcrowd the pan; if necessary, utilize two baking sheets to give them ample room. We are aiming for gorgeous, crispy Green Bean Bundles, not sad, steamed ones!
- Repeat this delightful process until all your green beans and bacon strips are used up. Depending on the size of your bundles and the specific length of your bacon strips, you should end up with approximately 15-20 beautiful Green Bean Bundles. This step can be quite meditative and satisfying, as you see your delicious creations come to life. Enjoy the process of crafting each perfect bundle!
Whipping Up That Irresistible Sweet and Savory Glaze:
- While your oven is preheating to the perfect temperature and your meticulously crafted Green Bean Bundles are patiently waiting on the baking sheet, let’s prepare the undeniable star of the show – the glaze! This exquisite sweet and savory concoction is precisely what truly elevates these bundles from merely good to absolutely unforgettable. It’s the secret sauce that brings all the flavors together in harmony.
- In a small saucepan, combine all the glorious glaze ingredients: the 1/2 cup of packed brown sugar, the 1/4 cup of melted unsalted butter, the 2 tablespoons of rich soy sauce, the 1 teaspoon of fragrant garlic powder, and the 1/2 teaspoon of freshly ground black pepper. Each ingredient plays a vital role in creating a balanced and deeply flavorful glaze for our Green Bean Bundles.
- Place the saucepan over medium-low heat. Whisk the ingredients together continuously and gently until the brown sugar has completely dissolved and the entire mixture is smooth, cohesive, and beautifully uniform. You are aiming for a silky, easily pourable consistency, definitely not grainy. This process usually takes about 2-3 minutes of gentle whisking. Keep a close eye on it during this time to prevent it from scorching, especially the butter and sugar mixture, which can easily burn and develop an unpleasant taste if left unattended.
- Once the glaze is perfectly smooth, simmering gently, and you can see no more sugar granules, remove it from the heat. Give it one last good whisk just before you’re ready to use it, ensuring everything is perfectly emulsified. The inherent warmth of the glaze will help it spread beautifully and effortlessly over your waiting Green Bean Bundles. The incredible aroma filling your kitchen right now from this glaze alone should be a tantalizing preview of the deliciousness to come!
Baking Your Perfect Green Bean Bundles:
- With your oven happily preheated to 375°F (190°C) and your delightful sweet and savory glaze ready to make its appearance, it’s time to get these scrumptious Green Bean Bundles into the oven for their grand transformation. Carefully transfer the baking sheet with your assembled bundles into the preheated oven. Place it on the middle rack for even cooking.
- Initial Bake for Bacon Crispness: Let the Green Bean Bundles bake for an initial period of 15 minutes. During this crucial first phase, the bacon will begin to render its fat, shrink slightly, and start to crisp up around the tender green beans. This initial baking time allows the bacon to get a significant head start on its journey to crisp perfection before we introduce the sweet and sticky glaze. You’ll notice the bacon beginning to turn a lovely golden color and develop those desirable crispy edges.
- After the first 15 minutes have elapsed, carefully remove the baking sheet from the oven. Now, it’s time for that glorious glaze! Using a pastry brush, generously brush the prepared sweet and savory glaze over each individual Green Bean Bundle. Make every effort to get a good, even coating on all visible sides of the bacon. Don’t be shy with the glaze; we want every bundle to be thoroughly infused with that incredible, balanced sweet and savory flavor that makes these Green Bean Bundles so addictive.
- Return the glazed Green Bean Bundles to the oven and continue baking for another 10-15 minutes. It’s important to keep a very close eye on them during this stage, as the sugar content in the glaze can caramelize quite quickly, and we certainly don’t want it to burn. We’re aiming for a beautiful, sticky, golden-brown finish, not a charred one. The glaze will start to thicken and adhere wonderfully to the bacon.
- Second Glaze Application (Optional, but highly recommended for maximum flavor and shine!): For an extra layer of irresistible deliciousness and a truly glistening, professional-looking finish, I like to remove the bundles from the oven a second time after these 10-15 minutes. Give them another liberal brushing with any remaining glaze. This second application really helps to build up that wonderful sweet and savory crust, ensuring every single bite is bursting with concentrated flavor and a beautiful sheen. This is the secret to truly spectacular Green Bean Bundles.
- Place the bundles back into the oven for a final 5-10 minutes, or until the bacon is wonderfully crispy and perfectly rendered, and the glaze has caramelized to a deep, rich, golden-brown hue. The green beans inside should be tender but still retain a slight, satisfying bite – never mushy. The key here is visual inspection and your nose: look for perfectly rendered, crispy bacon and a sticky, bubbly, fragrant glaze that has set beautifully. The total baking time will typically range from 30-40 minutes, but remember that ovens can vary, so always trust your eyes and nose!
- Once your Green Bean Bundles are cooked to absolute perfection, carefully remove them from the oven. Let them rest on the baking sheet for a few minutes before transferring them to a serving platter. This brief resting period allows the magnificent glaze to set slightly and for the bundles to cool down just enough to be handled comfortably. The aroma filling your kitchen right now should be absolutely divine and will have everyone eagerly anticipating a taste!
Serving Suggestions and Tips for Your Green Bean Bundles:
- Serving with Care – Don’t Forget the Toothpicks! Before you present your gorgeous Green Bean Bundles to eager diners, remember to remove the wooden toothpicks from each and every bundle! While they performed an excellent job of holding everything together securely during the cooking process, they are most definitely not meant to be eaten. I usually transfer them to a beautiful serving platter, and then, one by one, carefully pull out each toothpick. This small but crucial step makes them much more enjoyable and safe for your guests or family.
- Perfect Pairings for Any Occasion: These Green Bean Bundles are incredibly versatile and make a truly fantastic side dish for a wide array of meals. They pair wonderfully with classic comfort foods like roasted chicken, elegant grilled steaks, succulent pork tenderloin, or even substantial holiday centerpieces such as a glazed ham or a majestic roasted turkey. Their irresistible sweet and savory profile complements rich meats beautifully, adding a delightful burst of flavor, a pleasing textural contrast, and a touch of sophisticated elegance to any plate. They are especially popular and become a cherished tradition during Thanksgiving and Christmas feasts, offering a refreshing and vibrant alternative to heavier, creamier casserole dishes.
- Make-Ahead Magic – Your Future Self Will Thank You! One of the absolute best things about these Green Bean Bundles is that you can accomplish a significant portion of the prep work in advance, making mealtime or entertaining much less stressful! You can wash, trim, blanch, and thoroughly dry the green beans up to 2 days ahead of time, storing them neatly in an airtight container in the refrigerator. Even better, you can completely assemble the bundles – wrapping the green beans in bacon and securing them with toothpicks – up to 24 hours in advance. Store the unbaked bundles on a baking sheet, covered loosely with plastic wrap to prevent them from drying out, in the refrigerator. When you’re ready to bake, simply prepare the glaze and proceed with the baking instructions from that point. This make-ahead capability is a huge time-saver, particularly when you’re hosting a dinner party or navigating the hustle and bustle of a major holiday meal!
- Storage and Reheating for Delicious Leftovers: If you happen to be fortunate enough to have any leftover Green Bean Bundles (which, I must confess, is a rare occurrence in my household!), they can be stored safely in an airtight container in the refrigerator for up to 3-4 days. To reheat them and bring them back to their crispy glory, I highly recommend placing them on a baking sheet in a preheated oven at 350°F (175°C) for about 10-15 minutes, or until they are thoroughly heated through and the bacon crisps up beautifully once more. You can also achieve a fantastic crisping effect using an air fryer at 350°F (175°C) for approximately 5-7 minutes. However, please avoid reheating them in the microwave, as it tends to make the bacon soggy and diminishes that delightful texture we worked so hard to achieve.
- Flavor Variations to Explore and Personalize:
- Spicy Kick: If you, like me, love a little bit of heat to awaken the palate, consider adding a pinch of red pepper flakes (about 1/4 to 1/2 teaspoon) to your glaze mixture. It provides a wonderful, exciting contrast to the sweetness of the brown sugar.
- Herbal Infusion: For an earthy, aromatic twist that complements the bacon beautifully, incorporate some dried herbs like thyme or rosemary into the glaze. About 1/2 teaspoon would be a good starting point to infuse a subtle, fragrant note.
- Maple Glaze Alternative: For a different kind of rich sweetness and a lovely autumnal aroma that pairs exceptionally well with bacon, swap out half of the brown sugar for pure maple syrup. The result is a uniquely comforting flavor profile for your Green Bean Bundles.
- Citrus Brightness: A tiny squeeze of fresh orange or lemon juice (approximately 1 teaspoon) added to the glaze right at the very end can work wonders to brighten up the flavors beautifully, cutting through the richness and adding a delightful zing.
- Choosing Your Green Beans Wisely: While fresh green beans are undeniably the gold standard and provide the very best texture for this recipe, you can certainly use frozen whole green beans in a pinch. If opting for frozen, ensure they are completely thawed and, most importantly, patted very, very dry before you proceed with blanching (which I still highly recommend, even for frozen, to ensure an even and tender texture). They might be slightly softer than fresh, but they will still make wonderfully delicious Green Bean Bundles when properly prepared.
- Bacon Quality Matters Immensely: The quality of your bacon truly makes a remarkable difference in the overall success and deliciousness of these Green Bean Bundles. Opt for good quality bacon that is known to render its fat well and crisp up nicely. While bacon is inherently fatty, try to avoid overly fatty strips if possible, as excessive grease can sometimes make the bundles less pleasant and harder for the glaze to adhere.
- Uniformity for Cooking Success: Strive your absolute best to make the green bean bundles roughly the same size and thickness. This attention to detail is paramount, as it ensures they cook evenly in the oven, preventing some from being undercooked while others are overdone. If you find you have some significantly larger or smaller bundles, you might want to separate them onto different sections of the baking sheet or even use a second pan and adjust cooking times for each group accordingly. Consistency in bundle size is truly a secret weapon for achieving perfectly cooked, uniformly delicious Green Bean Bundles every single time.
- Don’t Rush the Glazing Process: While it might be tempting to pour all the glorious glaze on at once in a single go, taking the time for two separate applications, as instructed in the baking steps, truly builds up that luscious, sticky, and deeply flavorful coating. The initial baking period allows the bacon to begin crisping and rendering its fat, and then the glaze adheres beautifully and caramelizes wonderfully, rather than simply running off. This layered approach is key to an exceptional Green Bean Bundle.
- Confidence in Your Culinary Skills: Please, do not be intimidated by what might seem like a fancy side dish! These Green Bean Bundles, while looking incredibly impressive and elegant, are surprisingly straightforward and forgiving to make. Follow these detailed steps, and you’ll be creating a show-stopping side dish that will undoubtedly earn you rave reviews and requests for the recipe. Enjoy every single bite of your perfectly prepared, utterly irresistible Green Bean Bundles – they’re worth every bit of effort!
Conclusion:
There are countless recipes out there, but every now and then, you stumble upon one that truly stands out, one that promises to become a permanent fixture in your culinary repertoire. This recipe for Green Bean Bundles is, without a doubt, one of those treasures. It’s not just a side dish; it’s a delightful experience waiting to happen. From the moment those crisp-tender green beans are nestled within savory strips of bacon, brushed with a touch of sweetness, and then baked to golden perfection, you’ll understand exactly what I mean. The incredible synergy of textures—the slight snap of the beans, the satisfying chewiness of the bacon—and the symphony of flavors—the earthy notes of the beans, the salty richness of the bacon, all balanced by a hint of brown sugar or maple glaze—is simply irresistible. It elevates any meal, transforming a simple gathering into a memorable feast. It’s surprisingly easy to prepare, making it a fantastic option for both seasoned cooks looking for a reliable crowd-pleaser and novice chefs eager to impress without stress. This dish consistently receives rave reviews, and I promise you, once you taste them, you’ll be adding them to your list of favorite recipes too.
Now that you’re hopefully convinced these Green Bean Bundles are a game-changer, let’s talk about how to make them even more versatile and perfect for any occasion. While they shine as a classic holiday side, gracing Thanksgiving or Christmas tables with their elegant presence, don’t relegate them solely to special events. They are absolutely fabulous alongside a simple weeknight roasted chicken, grilled steak, or baked salmon, adding a touch of gourmet flair to an everyday meal. Imagine them next to a juicy pork tenderloin, the sweetness of the glaze complementing the savory meat beautifully. For an appetizer twist, consider making smaller bundles, perhaps with thinner cuts of bacon, and serving them with a dipping sauce like a creamy aioli or a spicy sriracha mayo.
And the beauty of this recipe lies in its adaptability! Feel free to experiment with the glaze: a touch of balsamic vinegar can add a wonderful tang, or a pinch of red pepper flakes can introduce a subtle heat. For a smoky kick, try using applewood smoked bacon. If you’re looking to add another layer of flavor, a sprinkle of garlic powder or onion powder in the glaze can be absolutely divine.
Want to elevate the presentation even further?
Garnish your finished bundles with fresh chopped parsley or chives for a pop of color and freshness. You could even arrange them artfully on a platter, perhaps crisscrossing them for visual appeal. For those who enjoy a bit of cheese, a dusting of freshly grated Parmesan or a crumble of feta right after they come out of the oven, while still warm, would melt perfectly and add another dimension of savory delight. And if you’re catering to a vegetarian crowd, while the bacon is truly key to the traditional recipe, you could adapt the concept by wrapping blanched green beans in strips of puff pastry or even grilled halloumi cheese, offering a creative, albeit different, interpretation of the bundle idea, though the bacon version remains the undisputed champion for its iconic flavor.
So, my dear fellow food enthusiasts, I implore you: don’t just read about these magnificent Green Bean Bundles, make them! Clear your schedule, gather your ingredients, and prepare for a truly rewarding culinary experience. I promise you, the aroma filling your kitchen as they bake will be intoxicating, and the first bite will confirm that you’ve discovered a new favorite. Cooking should be an adventure, a creative outlet, and most importantly, a source of joy to be shared. These bundles encapsulate all of that. They are simple enough not to overwhelm, yet elegant enough to impress.
Once you’ve whipped up your own batch, I would absolutely love to hear about your experience. Did you stick to the classic recipe, or did you put your own unique twist on it with one of the variations I suggested, or perhaps even one of your own brilliant ideas?
What did your family and friends think?
Did they ask for seconds, or even for the recipe itself? Please don’t hesitate to share your stories, your tips, and especially your photos! Seeing your culinary creations brings me so much happiness and inspires others to get into the kitchen. Your feedback helps our community grow and thrive, and it’s wonderful to see how different people interpret and enjoy the same dish. Let’s celebrate the art of home cooking together. Happy cooking, and I can’t wait to see your fantastic Green Bean Bundles!
Beef-Wrapped Green Bean Bundles: Perfect Holiday Side!
Beef-Wrapped Green Bean Bundles are a delightful holiday side dish featuring crisp-tender green beans lovingly wrapped in savory beef bacon, glazed with a sweet and savory brown sugar-soy sauce mixture, and baked to caramelized perfection. This elegant and crowd-pleasing recipe, known for transforming a humble vegetable into an unforgettable dish, was a standout at a recent Thanksgiving dinner, earning ‘restaurant quality’ praise.
Ingredients
-
2 pounds (900g) Fresh Green Beans, trimmed
-
1 pound (450g) Beef Bacon, regular or thin-cut strips
-
1/2 cup (100g) packed Brown Sugar
-
1/4 cup (57g) Unsalted Butter, melted
-
2 tablespoons Soy Sauce
-
1 teaspoon Garlic Powder
-
1/2 teaspoon Black Pepper
-
1/2 teaspoon Salt (optional, for blanching)
-
Wooden Toothpicks
Instructions
-
Step 1
Wash and trim 2 pounds of fresh green beans. Blanch in boiling lightly salted water for 3-4 minutes until tender-crisp. Immediately transfer to an ice bath for 5 minutes, then drain and pat thoroughly dry. -
Step 2
Preheat oven to 375°F (190°C). Line a baking sheet (with a wire rack if desired). Group 8-10 dried green beans and wrap tightly with one strip of beef bacon. Secure each bundle with a wooden toothpick. Place bundles seam-side down, spaced apart, on the prepared baking sheet. Repeat for all beans and beef bacon (yields 15-20 bundles). -
Step 3
In a small saucepan, combine brown sugar, melted butter, soy sauce, garlic powder, and black pepper. Whisk over medium-low heat for 2-3 minutes until sugar dissolves and glaze is smooth. Remove from heat. -
Step 4
Bake bundles in the preheated oven for 15 minutes. Remove, brush generously with the prepared glaze. Return to oven and bake for another 10-15 minutes, watching closely. For maximum flavor, remove again, brush with any remaining glaze, and bake for a final 5-10 minutes. Bake until beef bacon is crispy and glaze is golden-brown and sticky (total 30-40 minutes). Remove from oven and let rest for a few minutes before serving. -
Step 5
Remove wooden toothpicks before serving. These bundles pair well with roasted meats. Leftovers can be stored in the refrigerator for 3-4 days. Reheat in a 350°F (175°C) oven for 10-15 minutes or an air fryer for 5-7 minutes to re-crisp; avoid microwave reheating.
Important Information
Nutrition Facts (Per Serving)
It is important to consider this information as approximate and not to use it as definitive health advice.
Allergy Information
Please check ingredients for potential allergens and consult a health professional if in doubt.


Leave a Comment