
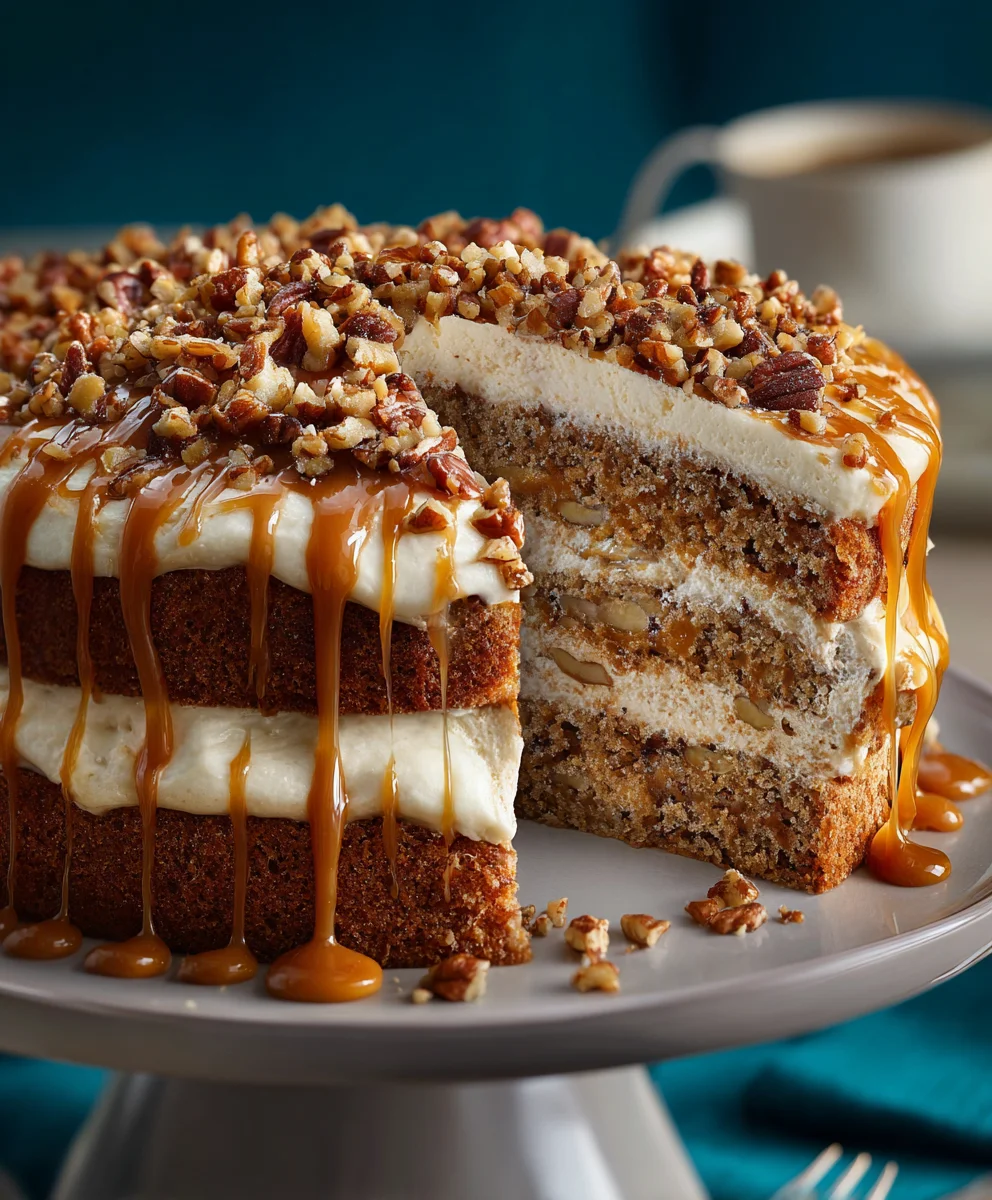
Banana Pecan Caramel Layer Cake Extravaganza is not just a dessert; it’s an experience, a symphony of flavors that promises to transform any occasion into something truly special. Imagine the soft, moist crumb of a perfectly baked banana cake, infused with the subtle sweetness of ripe bananas. Now, picture that layered with a luscious, buttery caramel, and generously studded with crunchy, toasted pecans.
This magnificent creation takes inspiration from beloved Southern dessert traditions, where the comforting richness of bananas meets the earthy elegance of pecans, all brought together with a decadent caramel. It’s a testament to the power of simple, high-quality ingredients harmonizing to create something extraordinary. People adore this cake not just for its incredible taste—the perfect balance of sweet, savory, and nutty notes—but also for its show-stopping presentation. Each slice reveals layers of pure indulgence, making it an absolute centerpiece.
Whether you’re celebrating a milestone or simply craving a truly unforgettable treat, this Banana Pecan Caramel Layer Cake Extravaganza is designed to impress and delight. I am incredibly excited to guide you through crafting this masterpiece in your own kitchen.

Ingredients:
Oh, my dear friends, get ready for a truly spectacular baking adventure! This “Banana Pecan Caramel Layer Cake Extravaganza” is a symphony of flavors and textures, and every single ingredient plays a crucial role in its delicious success. Please make sure all your cold ingredients, like butter, cream cheese, and eggs, are at room temperature unless otherwise specified. This is a critical step for a smooth, homogenous batter and frosting.
For the Banana Pecan Cake Layers:
- 3 cups (360g) All-Purpose Flour: Sifting this is non-negotiable for a light, airy cake texture. Trust me, it makes a world of difference! It helps to remove any lumps and ensures the flour is evenly incorporated, preventing dense spots in your beautiful cake.
- 2 teaspoons Baking Soda: Our main leavening agent, ensuring that beautiful rise and a tender crumb, especially when combined with the acidic buttermilk.
- 1 teaspoon Baking Powder: A little extra lift, working in tandem with the baking soda for perfect height and an open, fluffy texture. This double action ensures a consistently light cake.
- 1 teaspoon Fine Sea Salt: Essential for balancing all the sweetness and enhancing the banana and pecan flavors. Salt is a flavor enhancer, not just a seasoning, and it’s vital for a well-rounded taste profile.
- 1 ½ teaspoons Ground Cinnamon: Lending a warm, comforting aroma and taste that pairs perfectly with banana. The spice adds a layer of complexity without overpowering the natural fruit flavor.
- ½ teaspoon Freshly Grated Nutmeg: Just a hint adds depth and a touch of sophisticated spice that complements the cinnamon beautifully. Freshly grated nutmeg has a far superior aroma to pre-ground, so I highly recommend it here.
- 1 cup (226g) Unsalted Butter, softened to room temperature: Quality butter makes for a rich, flavorful cake. Room temperature is absolutely key for creaming properly with the sugars, allowing it to trap air and create that essential light texture.
- 1 ½ cups (300g) Granulated Sugar: Providing the primary sweetness and contributing to the cake’s moistness and structure. It helps to create that delicate crumb we’re aiming for.
- ½ cup (100g) Light Brown Sugar, packed: Adds a deeper, molasses-rich sweetness and extra moisture, which bananas adore. The slight acidity in brown sugar also works wonders with the leavening agents.
- 3 Large Eggs, at room temperature: Our binders, bringing everything together smoothly and providing structure. Room temperature eggs emulsify better with the butter and sugar, leading to a smoother batter.
- 2 teaspoons Pure Vanilla Extract: Use the good stuff here; it really shines through! A high-quality vanilla extract will elevate all the other flavors in your cake.
- 1 ½ cups (approximately 3-4 very ripe large bananas) Mashed Very Ripe Bananas: The riper, the better! Look for bananas with plenty of brown spots and even some black patches on the peel; they’re sweeter and more fragrant, offering the most intense banana flavor. Mash them well with a fork, but a few small lumps are perfectly fine and add a lovely texture.
- ½ cup (120ml) Buttermilk, at room temperature: Its acidity reacts with the leavening agents, creating a wonderfully tender crumb and adding a subtle tang. If you don’t have buttermilk, you can make a quick substitute by adding 1 ½ teaspoons of lemon juice or white vinegar to regular milk and letting it sit for 5-10 minutes until it slightly curdles.
- 1 cup (120g) Toasted Pecans, coarsely chopped: Toasting them beforehand truly brings out their nutty flavor and gives them a crispier texture. Don’t skip this step! It adds an irreplaceable crunch and depth to every bite.
For the Cream Cheese Frosting:
- 1 cup (226g) Unsalted Butter, softened to room temperature: Again, room temperature is crucial for a smooth, lump-free frosting. It ensures the butter creams beautifully with the other ingredients.
- 16 ounces (452g) Full-Fat Cream Cheese, chilled: This is an important distinction! Unlike the butter, we want our cream cheese to be nicely chilled to help maintain its structure and prevent the frosting from becoming too soft or runny. Using full-fat cream cheese is also non-negotiable for the best flavor and consistency.
- 6 cups (720g) Powdered Sugar (Confectioners’ Sugar), sifted: Sifting is vital to avoid any pesky lumps in your glorious frosting. No one wants a gritty frosting! Add it gradually to avoid a sugar cloud in your kitchen.
- 2 teaspoons Pure Vanilla Extract: A generous amount for that classic, irresistible cream cheese frosting flavor.
- ¼ teaspoon Fine Sea Salt: Just a pinch to cut through the sweetness and enhance the overall taste, making the frosting balanced and addictive.
For the Salted Caramel Sauce (or use your favorite store-bought brand if time is short, but homemade is divine!):
- 1 cup (200g) Granulated Sugar: The base of our golden caramel. This will melt down to create the rich, amber liquid.
- ¼ cup (60ml) Water: Helps dissolve the sugar, making the caramelization process more controlled and less prone to crystallization compared to a dry caramel method.
- ¾ cup (180ml) Heavy Cream, warmed: Warming it prevents the mixture from seizing when added to the hot sugar. It also helps to create a smooth, creamy texture.
- 4 tablespoons (56g) Unsalted Butter, cut into 4 pieces: Adds richness, a lovely sheen, and helps to stabilize the caramel emulsion, making it incredibly smooth.
- 1 teaspoon Flaky Sea Salt or Fine Sea Salt: Absolutely essential for that irresistible salted caramel goodness. The salt crystals provide a delightful textural contrast and perfectly balance the sweetness. Adjust to your preference!
For the Pecan Praline Crunch (optional, but highly recommended for the “Extravaganza” factor!):
- ½ cup (100g) Granulated Sugar: For creating that wonderfully crisp praline, forming the sugary shell around the pecans.
- 2 tablespoons Water: To help dissolve the sugar initially, ensuring an even melt.
- ¾ cup (90g) Toasted Pecans, roughly chopped: The star of our crunch! Already toasted, they’ll become even more fragrant when coated in caramel.
- 1 tablespoon Unsalted Butter: For a little extra flavor, to help with the praline’s sheen, and to prevent sticking.
- Pinch of Fine Sea Salt: Just to enhance the nutty sweetness and cut any overly sweet notes, similar to its role in the caramel.
For Assembly & Garnish:
- ½ cup (60g) Additional Toasted Pecans, roughly chopped: For sprinkling on top and between layers, adding visual appeal and extra nutty flavor.
- Extra Salted Caramel Sauce: For an additional decadent drizzle over the finished cake. Because honestly, can you ever have too much caramel?
Step-by-Step Instructions:
Alright, bakers, let’s get our hands (happily) dirty! This recipe for the “Banana Pecan Caramel Layer Cake Extravaganza” might look like it has a few steps, but each one is straightforward, and the result is so unbelievably worth it. I’ve broken it down into manageable sections to make your baking journey smooth and enjoyable.
Phase 1: Crafting the Salted Caramel Sauce (Can be made a day or two in advance!)
- Prepare Your Cream: In a small saucepan or microwave-safe bowl, gently warm your heavy cream. It doesn’t need to be boiling, just warm to the touch (around 100-110°F or 38-43°C). Set it aside. Having it warm will prevent the sugar from seizing up into a solid block when you add it later, making your life much easier and ensuring a smooth caramel.
- Caramelize the Sugar: In a medium, heavy-bottomed saucepan (important! a heavy bottom helps prevent scorching and distributes heat more evenly), combine the granulated sugar and water. Stir gently just to moisten all the sugar. Place the saucepan over medium heat. Do not stir once it starts to boil! Interfering with the boiling sugar can cause crystallization, which we definitely want to avoid.
- Watch for That Golden Hue: Allow the sugar mixture to boil undisturbed. You’ll see it bubble vigorously. Be patient. After a few minutes, the edges will start to turn a light amber color. As it continues to cook, this color will spread towards the center. Swirl the pan gently from time to time if the color seems uneven, but do not use a spoon or spatula to stir it, as this can introduce sugar crystals back into the solution and cause the whole batch to seize.
- Achieve the Perfect Caramel Color: Continue cooking until the caramel reaches a beautiful, deep amber color—think old penny or rich maple syrup. This usually takes about 8-12 minutes from when it starts boiling. Be vigilant! Sugar can go from perfect to burnt in a matter of seconds. A burnt smell means you need to start over; unfortunately, there’s no saving burnt caramel. The deeper the color, the more intense the flavor, but don’t push it too far!
- Carefully Add Cream and Butter: Once your caramel is the right color, immediately remove the pan from the heat. Slowly and carefully pour the warm heavy cream into the hot sugar mixture while whisking constantly. The mixture will bubble up vigorously and steam heavily, so be extremely cautious! Stand back and protect your hands. Keep whisking until it calms down and is smooth. The high heat of the sugar hitting the cooler cream causes this reaction. Next, add the pieces of butter one at a time, whisking until each piece is fully incorporated and the sauce is glossy and smooth.
- Season with Salt: Stir in the flaky sea salt. Taste and adjust if necessary; I usually find 1 teaspoon to be perfect, but some prefer a bit more or less depending on their desired saltiness. The salt truly makes the caramel sing!
- Cool and Store: Pour the finished salted caramel sauce into a heat-proof jar or container. Let it cool completely at room temperature. As it cools, it will thicken significantly. If it’s too thick after cooling, you can gently reheat it in a microwave for 10-15 second intervals, stirring in between, until it reaches your desired pourable consistency. This homemade caramel is truly a highlight of our “Banana Pecan Caramel Layer Cake Extravaganza” and can be stored in the refrigerator for up to 2 weeks.
Phase 2: Baking the Banana Pecan Cake Layers
- Preheat and Prepare: Preheat your oven to 350°F (175°C). Grease and flour three 8-inch round cake pans. For extra insurance against sticking, I always recommend lining the bottoms of the pans with parchment paper circles. This ensures a clean release, which is absolutely essential for a beautiful layer cake and prevents any heartbreak when unmolding.
- Combine Dry Ingredients: In a large bowl, whisk together the sifted all-purpose flour, baking soda, baking powder, salt, ground cinnamon, and freshly grated nutmeg. Whisk for at least 30 seconds to ensure everything is evenly distributed. This dry mixture is critical for even leavening and flavor. Set aside.
- Cream Butter and Sugars: In the bowl of a stand mixer fitted with the paddle attachment (or using a powerful hand mixer), cream together the softened unsalted butter, granulated sugar, and light brown sugar on medium-high speed until light, fluffy, and pale in color, about 3-5 minutes. This step is called creaming, and it incorporates air into the butter, which contributes significantly to the cake’s tender and airy texture. Scrape down the sides of the bowl frequently to ensure even mixing.
- Add Eggs and Vanilla: Reduce the mixer speed to medium and add the eggs one at a time, beating well after each addition until fully incorporated. Each egg should be thoroughly mixed in before the next is added to create a stable emulsion. Scrape down the sides of the bowl as needed to catch any unmixed ingredients. Beat in the pure vanilla extract, letting its aromatic warmth blend into the mixture.
- Incorporate Bananas: With the mixer on low speed, add the mashed very ripe bananas to the wet mixture and beat until just combined. Don’t worry if the mixture looks a little curdled at this point; the high moisture content of the bananas can cause this, but it will come together once the dry ingredients are added. Just ensure the bananas are evenly distributed.
- Alternate Dry and Wet: With the mixer on low speed, add about one-third of the dry ingredients to the wet mixture, mixing until just combined. Then, pour in half of the buttermilk, mixing until just incorporated. Repeat with another third of the dry ingredients, the remaining buttermilk, and finally, the last third of the dry ingredients. Mix only until no streaks of flour remain. Overmixing will develop the gluten in the flour and result in a tough, chewy cake, so mix gently and minimally! The goal is just to incorporate the ingredients.
- Fold in Pecans: Remove the bowl from the mixer and, using a rubber spatula, gently fold in the toasted, coarsely chopped pecans. Give it a few turns to distribute them evenly throughout the batter. This step should be done by hand to prevent crushing the nuts and overworking the batter.
- Divide and Bake: Divide the batter evenly among your three prepared cake pans. For truly precise, even layers that stack beautifully, I like to use a kitchen scale to weigh the batter into each pan. Bake for 25-30 minutes, or until a wooden skewer or toothpick inserted into the center of a cake comes out clean. If it comes out with moist crumbs, bake for a few more minutes.
- Cool the Cakes: Once baked, remove the cakes from the oven and let them cool in their pans on a wire rack for about 10-15 minutes. This allows them to firm up slightly and makes them less fragile. Then, carefully invert the cakes onto the wire rack, peel off the parchment paper, and let them cool completely before frosting. Attempting to frost warm cakes is a recipe for disaster—your frosting will melt and slide right off! Patience is a virtue here.
Phase 3: Crafting the Cream Cheese Frosting
This frosting is the perfect creamy, tangy counterpoint to the sweet banana cake and rich caramel. Remember the chilled cream cheese! It’s the secret to a stable and pipeable cream cheese frosting.
- Cream Butter: In the bowl of a stand mixer fitted with the paddle attachment, beat the softened unsalted butter on medium speed for about 2-3 minutes until very light and fluffy. This aerates the butter, creating a lighter, more ethereal frosting and ensuring a smooth start.
- Add Chilled Cream Cheese: Add the chilled, full-fat cream cheese (cut into chunks for easier mixing) to the butter. Beat on medium-low speed until just combined and smooth. Be careful not to overmix here; overbeating cream cheese can make your frosting runny and lose its structure, as it breaks down the emulsifiers in the cheese. You want it smooth, but stop as soon as it’s homogenous.
- Incorporate Powdered Sugar: Gradually add the sifted powdered sugar, about 1 cup at a time, with the mixer on low speed. This prevents a sugar cloud from engulfing your kitchen! Once all the sugar is added, increase the speed to medium-high and beat for another 1-2 minutes until light and fluffy. Scrape down the sides of the bowl frequently to ensure all ingredients are well incorporated and there are no lumps of unmixed sugar.
- Flavor and Finish: Beat in the pure vanilla extract and the pinch of fine sea salt. Give it one final beat on medium speed for about 30 seconds to ensure it’s silky smooth. Your cream cheese frosting is now ready to spread! If it seems a little too soft from your kitchen’s temperature, pop it in the fridge for 15-20 minutes to firm up slightly before frosting.
Phase 4: Creating the Pecan Praline Crunch
This adds an incredible textural contrast and another layer of nutty, caramelized flavor to our “Banana Pecan Caramel Layer Cake Extravaganza.” It’s an extra step that truly elevates the entire cake.
- Caramelize Sugar for Praline: In a medium, heavy-bottomed saucepan, combine the granulated sugar and water. As with the caramel sauce, stir gently to moisten the sugar, then place over medium heat. Let it boil undisturbed until it reaches a rich amber color, swirling the pan occasionally if needed to ensure even caramelization. Watch it carefully, as smaller amounts of sugar can caramelize more quickly.
- Add Pecans and Butter: Once the sugar is a deep amber, immediately remove from heat. Stir in the roughly chopped toasted pecans and the tablespoon of unsalted butter and a pinch of salt. Stir quickly and vigorously with a heat-proof spatula or wooden spoon to coat the pecans evenly with the hot caramel. Work swiftly, as the caramel will begin to set quickly.
- Cool and Break: Immediately pour the pecan mixture onto a silicone mat or a piece of parchment paper lightly greased with butter or cooking spray. Spread it into a thin, even layer using an offset spatula or the back of a spoon. Let it cool completely until it’s hard and brittle, about 20-30 minutes, or even faster if placed in the fridge.
- Crunch it Up: Once hardened, break the pecan praline into smaller pieces. You can either chop it roughly with a sharp knife or place it in a sturdy zip-top bag and gently crush it with a rolling pin or the bottom of a heavy pan. We’re looking for varying sizes of crunchy bits – some larger shards for texture, and some smaller crumbles for consistent flavor, not a fine powder. Set aside for assembly. This crunch will be a delightful surprise in every bite of your cake.
Phase 5: Assembling the “Banana Pecan Caramel Layer Cake Extravaganza”
This is where all our hard work comes together into a masterpiece! Take your time, enjoy the process, and admire your culinary creation. This multi-layered assembly is what truly makes it an “Extravaganza.”
- Level Your Cakes: If your cake layers have domed tops, use a long, serrated knife or a specialized cake leveler to carefully trim them so they are flat. This ensures a stable and professional-looking layer cake that won’t lean or slide. A level cake is a happy cake!
- First Layer Down: Place one cake layer on your chosen serving plate or cake stand. If using a cake turntable (which I highly recommend for easier frosting), place a small dollop of frosting in the center of the stand first, then adhere the cake to it to prevent it from sliding around during assembly.
- Pipe a Frosting Dam: Spoon about 1 ½ cups of cream cheese frosting onto the first cake layer. Using an offset spatula, spread it evenly to the edges. Then, using a piping bag fitted with a round tip (or simply snip a ½-inch corner off a sturdy Ziploc bag), pipe a dam (a continuous ring of frosting) around the absolute perimeter of the cake layer. This dam is crucial; it will act as a sturdy barrier to hold in our delicious, luscious caramel and pecan filling.
- Fill with Caramel and Pecans: Spoon about ½ cup of the cooled salted caramel sauce inside the frosting dam. Smooth it out gently with the back of a spoon or a small offset spatula, ensuring it doesn’t touch the dam. Sprinkle generously with about ¼ cup of the additional toasted pecans and ¼ cup of the pecan praline crunch. This creates an explosion of flavor and texture in the very center of your cake.
- Second Layer and Repeat: Carefully place the second cake layer on top, gently pressing down to secure it and ensure it’s level. Repeat the frosting dam, caramel, pecans, and praline steps precisely as you did for the first layer. Take your time to align the layers for a straight cake.
- Third Layer and Crumb Coat: Place the final cake layer on top. Now, apply a very thin, almost translucent, layer of cream cheese frosting all over the top and sides of the entire cake. This is called a “crumb coat,” and its purpose is absolutely essential: it traps any loose crumbs, preventing them from showing up in your pristine final decorative layer. Don’t worry about neatness here, just cover the whole cake thinly.
- Chill for Crumb Coat: Transfer the crumb-coated cake to the refrigerator for 20-30 minutes, or until the frosting is firm to the touch. This crucial step helps stabilize the entire cake structure and makes applying the final, thicker layer of frosting much, much easier and cleaner. Don’t skip this!
- Final Frosting: Once the crumb coat is firm, apply the remaining cream cheese frosting to the top and sides of the cake. Use an offset spatula or a bench scraper to create smooth sides and a beautiful, even top. Take your time to get it as smooth as you like. Remember, a homemade cake has charm, so don’t strive for machine-like perfection unless you want to!
- Decorate and Drizzle: Now for the fun part! Drizzle generously with more of your glorious salted caramel sauce. Let some drip alluringly down the sides for a truly decadent look. Sprinkle the remaining toasted pecans and pecan praline crunch around the top edge or wherever your heart desires for a final flourish. For an extra touch of “Extravaganza,” you can even pipe small swirls of caramel around the edge or add a few whole pecans.
- Chill to Set: For best results and clean slicing, refrigerate the “Banana Pecan Caramel Layer Cake Extravaganza” for at least 1-2 hours to allow the frosting and caramel to fully set and the flavors to meld beautifully. This also makes slicing much easier and cleaner.
- Serve and Enjoy: When ready to serve, let the cake sit at room temperature for about 30 minutes for the frosting and cake to soften slightly, bringing out the best flavors and textures. Slice, serve, and bask in the glory of your extraordinary creation! This “Banana Pecan Caramel Layer Cake Extravaganza” is truly a showstopper and worth every delightful moment of effort.

Conclusion:
As we wrap up our journey through this incredible recipe, I truly hope you’re feeling inspired to roll up your sleeves and dive into the magnificent world of the Banana Pecan Caramel Layer Cake Extravaganza. This isn’t just a dessert; it’s an experience, a celebration of textures and flavors that dance together in perfect harmony. From the moment you take that first bite, you’ll understand why I insist this cake is a non-negotiable addition to your baking repertoire. Imagine a supremely moist, tender banana cake, rich with the natural sweetness of ripe fruit, providing the perfect foundation. Then, visualize a generous layer of crunchy, toasted pecans, adding that irresistible textural contrast that makes every mouthful exciting. And finally, envision a cascade of decadent, buttery caramel, weaving its way through each layer and enrobing the entire creation in a glorious, golden sheen.
This cake is a must-try because it simply delivers on every front. It’s comforting and nostalgic, yet undeniably elegant and show-stopping. It’s the kind of dessert that elicits gasps of delight and immediate requests for the recipe. Whether you’re marking a special occasion, hosting a gathering of loved ones, or simply craving a truly exceptional treat to elevate an ordinary day, this cake rises to the challenge with unparalleled grace. The aroma alone, as it bakes and cools, is enough to fill your home with a warmth and sweetness that promises pure bliss. I believe in baking with heart, and this recipe, while requiring a bit of love and attention, rewards you tenfold with a creation that is not only visually stunning but also profoundly delicious.
Serving Suggestions & Variations to Elevate Your Experience:
While the Banana Pecan Caramel Layer Cake Extravaganza is absolutely magnificent on its own, a few thoughtful additions can transform it into an even more unforgettable dessert. I love to serve a slice with a small scoop of high-quality vanilla bean ice cream – the cold, creamy ice cream melting into the rich cake is simply divine. A dollop of freshly whipped cream, perhaps lightly sweetened with a hint of vanilla or a touch of bourbon, also makes a fantastic accompaniment, cutting through the richness beautifully. For a truly luxurious touch, consider adding a final drizzle of warm caramel sauce just before serving, along with a scattering of extra toasted pecan halves for added crunch and visual appeal. A thin slice of candied banana or a sprig of fresh mint can also add a sophisticated garnish.
Don’t be afraid to experiment with variations to make this cake uniquely yours! If pecans aren’t your favorite, walnuts or even toasted almonds would make an excellent substitute, offering a slightly different nutty profile. For those who adore a hint of spice, a pinch of nutmeg or a dash of cinnamon in the cake batter could add another layer of warmth. While my recipe features a particular frosting, a classic cream cheese frosting would also be an incredibly delicious choice, offering a tangy counterpoint to the sweet banana and caramel. If you’re looking for a simpler presentation for a casual gathering, consider transforming this recipe into cupcakes. The baking time will be significantly reduced, but you’ll still get all the incredible flavors in a convenient, individual serving. Alternatively, a sheet cake version, while perhaps not as dramatic in height, offers ease of serving for larger crowds without compromising on taste.
Your Turn: Bake, Enjoy, and Share!
Now, it’s your moment to shine! I genuinely encourage you to set aside some time, gather your ingredients, and embark on the joyous journey of baking this extraordinary cake. Don’t be intimidated by the layers or the caramel; I’ve broken down each step to be as clear and achievable as possible. The reward for your efforts will be a dessert that not only tastes incredible but also fills you with immense pride. There’s a special kind of magic that happens when you create something so delicious with your own hands, and then share it with people you care about. That’s what baking, for me, is all about. This Banana Pecan Caramel Layer Cake Extravaganza is designed to bring smiles, warmth, and pure culinary delight to any table it graces.
Once you’ve experienced the magic of this recipe, I would absolutely love to hear about it! Please don’t hesitate to share your baking journey with me. Tag me on social media with your beautiful creations, tell me about your favorite serving suggestions, or simply drop a comment to let me know how much you (and your lucky tasters!) enjoyed it. Your feedback and experiences are incredibly valuable, and they inspire me to continue sharing delicious recipes with our wonderful community. Happy baking, my friends, and get ready for a truly unforgettable treat!
Frequently Asked Questions (FAQs)
Can I make the Banana Pecan Caramel Layer Cake Extravaganza ahead of time?
Yes, absolutely! This cake is actually quite flexible for make-ahead preparation, which is a huge plus for entertaining. You can bake the cake layers a day or two in advance. Once completely cooled, wrap each layer tightly in plastic wrap and store at room temperature. The caramel sauce and frosting can also be prepared ahead of time and stored in the refrigerator (the caramel will need to be gently reheated and the frosting brought to room temperature and re-whipped before assembly). Assembled, the cake is best enjoyed within 2-3 days.
How should I store leftover cake?
To keep any leftover slices fresh and delicious, cover them tightly with plastic wrap or place them in an airtight cake container. You can store the cake at room temperature for up to 2 days, especially if your kitchen isn’t too warm. For longer storage, up to 5 days, I recommend refrigerating it. Just remember to bring refrigerated slices to room temperature for about 30-60 minutes before serving to ensure the cake’s best flavor and softest texture.
Can I freeze this cake?
You certainly can! Freezing is a fantastic option for longer storage or to get a head start. The unfrosted cake layers freeze beautifully. Once completely cooled, wrap each individual layer tightly in plastic wrap, then an additional layer of aluminum foil, and freeze for up to 2 months. Thaw them in the refrigerator overnight before frosting and assembling. You can also freeze individual slices of the frosted cake by wrapping them well; they make for a delightful, quick treat whenever a craving strikes!
What if I don’t like pecans or have allergies?
No problem at all! This recipe is quite adaptable. If pecans aren’t your preference, or if you have a nut allergy, you can easily substitute them with other nuts like walnuts or toasted almonds for a similar crunch and flavor profile. If you need to omit nuts entirely due to allergies, you could replace them with toasted coconut flakes for a different but equally delicious texture, or simply leave them out for a simpler cake.
Can I make this into cupcakes?
Absolutely! This recipe adapts wonderfully to cupcakes. Simply divide the prepared batter evenly among lined cupcake tins, filling each cup about two-thirds full. The baking time will be significantly shorter than for full cake layers, typically ranging from 18-25 minutes, depending on your oven. Keep a close eye on them and test for doneness with a toothpick inserted into the center of a cupcake (it should come out clean). Once cooled, you can frost them as you would the layer cake for individual portions of this amazing dessert.
Banana Pecan Caramel Layer Cake Extravaganza
An unforgettable multi-layered dessert experience, combining moist banana cake infused with ripe bananas, luscious buttery caramel, and crunchy toasted pecans. Inspired by Southern traditions, this show-stopping cake balances sweet, savory, and nutty notes for a truly decadent treat.
Ingredients
-
3 cups (360g) All-Purpose Flour, sifted
-
2 teaspoons Baking Soda
-
1 teaspoon Baking Powder
-
1 teaspoon Fine Sea Salt
-
1 ½ teaspoons Ground Cinnamon
-
½ teaspoon Freshly Grated Nutmeg
-
1 cup (226g) Unsalted Butter, softened
-
1 ½ cups (300g) Granulated Sugar
-
½ cup (100g) Light Brown Sugar, packed
-
3 Large Eggs, room temp
-
2 teaspoons Pure Vanilla Extract
-
1 ½ cups Mashed Very Ripe Bananas (approx. 3-4 large)
-
½ cup (120ml) Buttermilk, room temp (or milk + 1 ½ tsp lemon juice/vinegar)
-
1 cup (120g) Toasted Pecans, coarsely chopped
-
1 cup (226g) Unsalted Butter, softened (for frosting)
-
16 ounces (452g) Full-Fat Cream Cheese, chilled
-
6 cups (720g) Powdered Sugar, sifted
-
2 teaspoons Pure Vanilla Extract (for frosting)
-
¼ teaspoon Fine Sea Salt (for frosting)
-
1 cup (200g) Granulated Sugar (for caramel)
-
¼ cup (60ml) Water (for caramel)
-
¾ cup (180ml) Heavy Cream, warmed (for caramel)
-
4 tablespoons (56g) Unsalted Butter, cut into 4 pieces (for caramel)
-
1 teaspoon Flaky Sea Salt or Fine Sea Salt (for caramel)
-
½ cup (100g) Granulated Sugar (for praline, optional)
-
2 tablespoons Water (for praline, optional)
-
¾ cup (90g) Toasted Pecans, roughly chopped (for praline, optional)
-
1 tablespoon Unsalted Butter (for praline, optional)
-
Pinch of Fine Sea Salt (for praline, optional)
-
½ cup (60g) Additional Toasted Pecans, roughly chopped (for garnish)
-
Extra Salted Caramel Sauce (for drizzle)
Instructions
-
Step 1
1. Warm heavy cream; set aside. 2. Combine sugar and water in a heavy saucepan. Heat over medium without stirring until boiling, then cook undisturbed until deep amber (8-12 mins). 3. Remove from heat. Slowly and carefully whisk warm cream into hot sugar (mixture will bubble). Whisk until smooth. 4. Add butter pieces one at a time, whisking until incorporated and glossy. Stir in salt. 5. Pour caramel into a heat-proof container and cool completely. Store refrigerated for up to 2 weeks. -
Step 2
1. Preheat oven to 350°F (175°C). Grease and flour three 8-inch round cake pans; line bottoms with parchment paper. 2. Whisk sifted flour, baking soda, baking powder, salt, cinnamon, and nutmeg in a large bowl; set aside. 3. Cream softened butter, granulated sugar, and light brown sugar in a stand mixer until light and fluffy (3-5 mins). Scrape bowl. 4. Add eggs one at a time, beating well after each. Beat in vanilla extract. 5. On low speed, add mashed bananas and mix until just combined. 6. Alternately add dry ingredients and buttermilk to wet mixture, beginning and ending with dry. Mix on low until just combined; do not overmix. 7. Gently fold in toasted, chopped pecans. 8. Divide batter evenly among prepared pans. 9. Bake 25-30 minutes, or until a toothpick inserted into the center comes out clean. 10. Cool cakes in pans on a wire rack for 10-15 minutes, then invert, remove parchment, and cool completely. -
Step 3
1. Beat softened unsalted butter in a stand mixer until very light and fluffy (2-3 mins). 2. Add chilled, full-fat cream cheese (cut into chunks). Beat on medium-low until just combined and smooth; do not overmix. 3. Gradually add sifted powdered sugar on low speed, then increase to medium-high and beat 1-2 minutes until light and fluffy. Scrape bowl. 4. Beat in vanilla extract and salt. If too soft, chill for 15-20 minutes. -
Step 4
1. Combine sugar and water in a heavy saucepan. Heat over medium until rich amber. 2. Remove from heat. Quickly stir in toasted pecans, butter, and a pinch of salt until coated. 3. Immediately pour onto a silicone mat or greased parchment paper. Spread thin and let cool completely until hard and brittle. 4. Once hardened, break into smaller pieces/crumbles. Set aside. -
Step 5
1. Level cake layers if domed. 2. Place first cake layer on serving plate. Spoon 1 ½ cups frosting onto layer, spread evenly. Pipe a continuous frosting dam around the perimeter. 3. Inside the dam, spoon ½ cup cooled salted caramel sauce. Sprinkle with ¼ cup toasted pecans and ¼ cup pecan praline crunch. 4. Place second cake layer on top and repeat frosting dam, caramel, pecans, and praline steps. 5. Place final cake layer on top. Apply a thin “crumb coat” of frosting over the entire cake. 6. Refrigerate crumb-coated cake for 20-30 minutes until firm. 7. Apply remaining frosting to the top and sides, smoothing as desired. 8. Drizzle generously with extra salted caramel sauce. Sprinkle remaining toasted pecans and pecan praline crunch on top. 9. Refrigerate for at least 1-2 hours to set. 10. Before serving, let cake sit at room temperature for 30 minutes. Slice and enjoy.
Important Information
Nutrition Facts (Per Serving)
It is important to consider this information as approximate and not to use it as definitive health advice.
Allergy Information
Please check ingredients for potential allergens and consult a health professional if in doubt.
Leave a Comment