
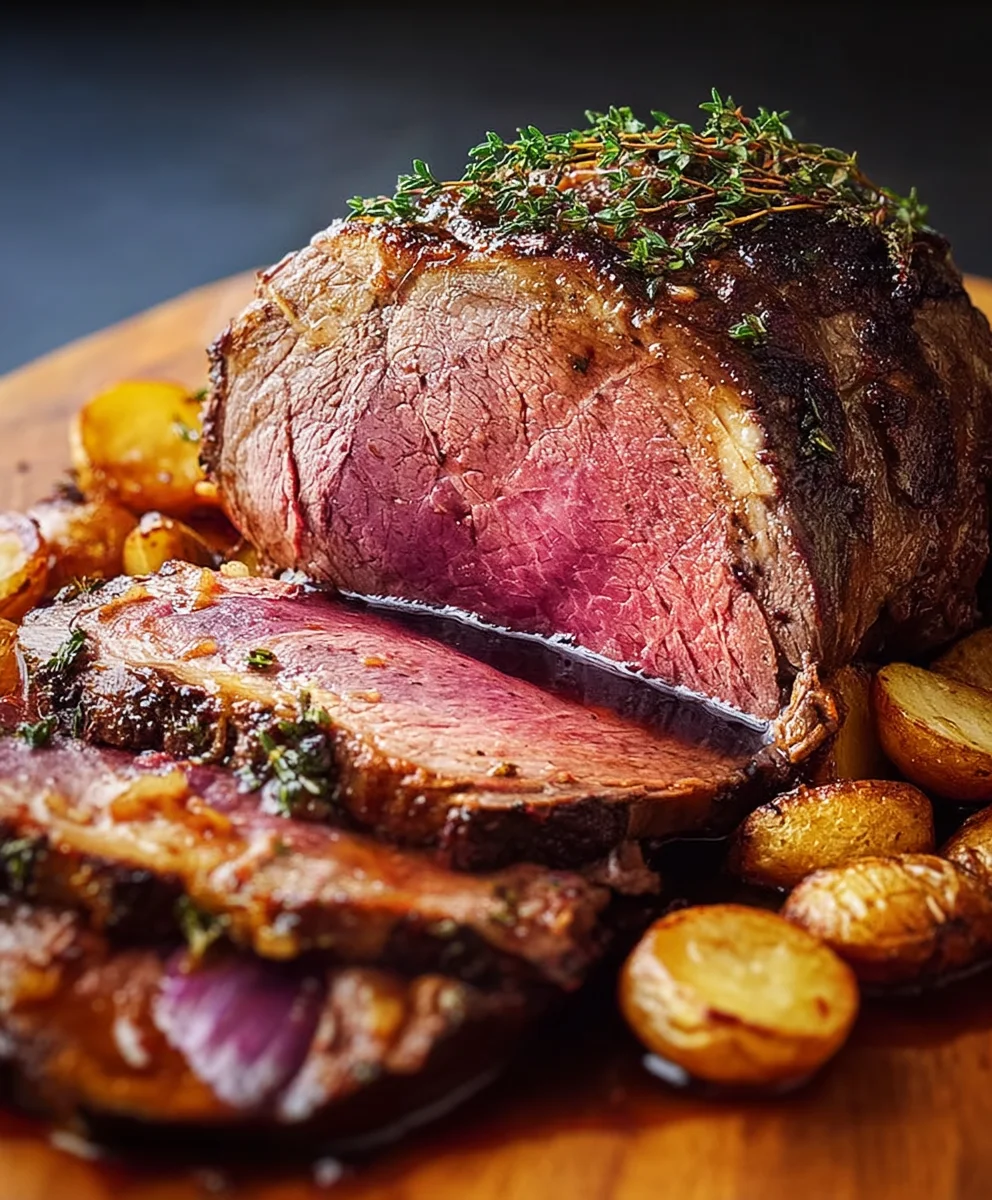
Perfect Roast Beef. There’s something truly magical about bringing a glorious, perfectly cooked roast to the table, isn’t there? It’s not just a meal; it’s an event, a celebration, and often the cherished centerpiece of family gatherings, holidays, and traditional Sunday dinners. I understand that the idea of achieving that ideal, succulent tenderness with a golden, savory crust might seem like a daunting culinary challenge, but I assure you, it’s absolutely achievable with the right guidance.
Why We Cherish This Classic
This classic dish boasts a rich heritage, particularly revered in British culture where the ‘Sunday Roast’ is an enduring institution, symbolizing comfort and togetherness. People adore roast beef for its profound, savory taste, the incredible melt-in-your-mouth texture when prepared correctly, and the intoxicating aroma that fills your home as it cooks. There’s an undeniable satisfaction in slicing through a perfectly rested joint, revealing that desired blush-pink interior. It’s a dish that promises both culinary delight and warm memories.
My aim is to demystify the process, helping you confidently create your own truly Perfect Roast Beef that will impress everyone at your table, making every bite a testament to simple elegance and delicious perfection.

Ingredients:
- 1 (3-4 pound) boneless beef roast, such as top round, sirloin tip, or eye of round. For the most “Perfect Roast Beef” experience, I often gravitate towards a top round for its excellent balance of flavor and leanness, while still being quite tender when cooked correctly.
- 2 tablespoons olive oil or other high-smoke point oil (vegetable, canola).
- 1 tablespoon coarse sea salt or kosher salt.
- 1 teaspoon freshly ground black pepper.
- 4-6 cloves garlic, peeled and smashed (optional, but highly recommended for aromatic depth).
- 2 sprigs fresh rosemary (optional, adds beautiful herbaceous notes).
- 4 sprigs fresh thyme (optional, complements the beef wonderfully).
- 1 large onion, quartered (optional, for the roasting pan to add flavor to drippings).
- 2 carrots, roughly chopped (optional, for the roasting pan).
- 2 celery stalks, roughly chopped (optional, for the roasting pan).
For the Optional Pan Gravy:
- 2 tablespoons all-purpose flour or 1 tablespoon cornstarch mixed with 2 tablespoons cold water (for a gluten-free option).
- 2 cups beef broth, low sodium.
- ½ cup dry red wine (optional, adds richness and complexity).
- Salt and pepper to taste.
Phase 1: Preparing Your Perfect Roast Beef
- Bring to Room Temperature: This is a crucial first step that many overlook, but I promise it makes a difference for achieving “Perfect Roast Beef.” About 1.5 to 2 hours before you plan to cook, remove the beef roast from the refrigerator. Place it on a platter or cutting board, uncovered, and let it sit at room temperature. This allows the meat to cook more evenly from edge to center. If the meat is too cold when it hits the hot pan or oven, the exterior will cook much faster than the interior, leading to a less uniform doneness.
- Pat Dry, Very Dry: Once the beef has come to room temperature, use paper towels to thoroughly pat every surface of the roast completely dry. This step is absolutely vital for developing that beautiful, crispy, flavorful crust through the Maillard reaction. Moisture on the surface will steam the meat rather than sear it, preventing that gorgeous brown crust we’re aiming for.
- Season Generously: Drizzle the roast all over with the olive oil. Use your hands to rub it evenly across all surfaces. Then, sprinkle the coarse sea salt and freshly ground black pepper generously over the entire roast. Don’t be shy with the seasoning! The salt not only flavors the meat but also helps to create that desirable crust. If using, press the smashed garlic cloves, rosemary sprigs, and thyme sprigs directly onto the beef, or tuck them into crevices on top. I find that rubbing the herbs into the oil helps their aromatics infuse deeply into the meat.
- Preheat Your Oven: Position an oven rack in the lower-middle position and preheat your oven to a very high temperature, 450°F (230°C). This initial high heat blast is key for creating that coveted crust before we lower the temperature for even cooking.
- Prepare Roasting Pan (Optional Aromatics): If you’re planning to make gravy or simply want to add more flavor to your drippings, place the quartered onion, chopped carrots, and chopped celery in the bottom of a sturdy roasting pan. This layer of aromatics will slightly elevate the roast, preventing it from sitting directly in its own juices and steaming, which again helps with crust development. It also provides a fantastic base for your pan gravy later on.
- Sear the Roast: This is another non-negotiable step for flavor development. Heat a large, heavy-bottomed, oven-safe skillet (cast iron works beautifully here) over medium-high to high heat until it’s smoking lightly. Add about 1 tablespoon of olive oil to the hot pan. Carefully place the seasoned beef roast in the hot skillet. Sear aggressively on all sides, including the ends, for 2-3 minutes per side, until a deep, dark brown crust has formed. You’re looking for a rich, mahogany color here – don’t rush it! This searing process locks in juices and creates incredible depth of flavor. Once seared, if not using an oven-safe skillet, carefully transfer the roast to the prepared roasting pan with the optional vegetables.
Phase 2: The Roasting Process – Achieving Perfection
- Initial High Heat Roast: Immediately transfer the roasting pan (or oven-safe skillet) with the seared beef to the preheated 450°F (230°C) oven. Roast for 15-20 minutes. This high heat continues to develop that fantastic crust and kick-starts the cooking process.
-
Lower Temperature and Continue Roasting: After the initial high-heat blast, reduce the oven temperature to 325°F (160°C). It is crucial NOT to open the oven door during this temperature change, simply adjust the dial. Continue to roast the beef until it reaches your desired internal temperature. This is where a good meat thermometer becomes your best friend. Insert a reliable probe thermometer into the thickest part of the roast, avoiding any bone if present.
- Rare: 120-125°F (49-52°C)
- Medium-Rare: 125-130°F (52-54°C) – My personal preference for “Perfect Roast Beef.”
- Medium: 130-135°F (54-57°C)
Keep in mind that the roast will continue to cook and its internal temperature will rise by 5-10 degrees Fahrenheit during the resting period (this is called carry-over cooking). So, remove it from the oven when it’s about 5-10 degrees below your target final temperature. For a 3-4 pound roast, this phase usually takes about 1 to 1.5 hours, but always rely on your thermometer, not just time.
- The Importance of Resting: This step is just as critical as the searing. Once the roast reaches its target temperature, remove it from the oven. Carefully transfer the roast to a clean cutting board and loosely tent it with aluminum foil. Let it rest for at least 20-30 minutes, or even up to 45 minutes for a larger roast. Do not skip this! Resting allows the muscle fibers to relax and the juices, which have been pushed to the center during cooking, to redistribute evenly throughout the meat. If you slice it too soon, those precious juices will run out onto your cutting board, leaving you with dry meat. This resting period is essential for a truly “Perfect Roast Beef” that is juicy and tender from edge to edge.
Phase 3: Crafting a Simple Pan Gravy (Optional but Recommended)
- Prepare the Pan Drippings: While the roast is resting, you can make an incredible pan gravy. Carefully pour off any excess fat from the roasting pan, leaving behind about 2 tablespoons of flavorful drippings and the browned bits (fond) stuck to the bottom. If you used the optional vegetables, you can leave them in or strain them out now for a smoother gravy later. I usually leave them in for now and strain them out at the end.
- Create a Roux (or Slurry): Place the roasting pan on the stovetop over medium heat (you might need to place it across two burners if it’s large). If using flour, sprinkle the 2 tablespoons of all-purpose flour into the drippings. Whisk constantly for 1-2 minutes until a light brown paste, known as a roux, forms. This will cook out the raw flour taste. If using cornstarch, you’ll add the slurry in step 12.
- Deglaze and Whisk: Slowly pour in the beef broth and, if using, the red wine into the pan, whisking continuously to scrape up all those flavorful browned bits from the bottom of the pan. These “fond” pieces are packed with concentrated beef flavor. Continue whisking until the gravy begins to thicken and is smooth. If using a cornstarch slurry, whisk it in now and continue to cook for 1-2 minutes until the gravy thickens to your desired consistency.
- Simmer and Season: Bring the gravy to a gentle simmer and let it cook for 5-10 minutes, allowing the flavors to meld and the gravy to thicken further. If you left the vegetables in, you can now strain the gravy through a fine-mesh sieve into a clean saucepan for an extra smooth consistency. Press on the solids in the sieve to extract maximum flavor. Taste the gravy and adjust seasoning with salt and pepper as needed. Sometimes a tiny pinch of sugar or a splash of Worcestershire sauce can also enhance the flavor profile. This rich, savory gravy is the ideal accompaniment to your “Perfect Roast Beef.”
Phase 4: Slicing and Serving Your Perfect Roast Beef
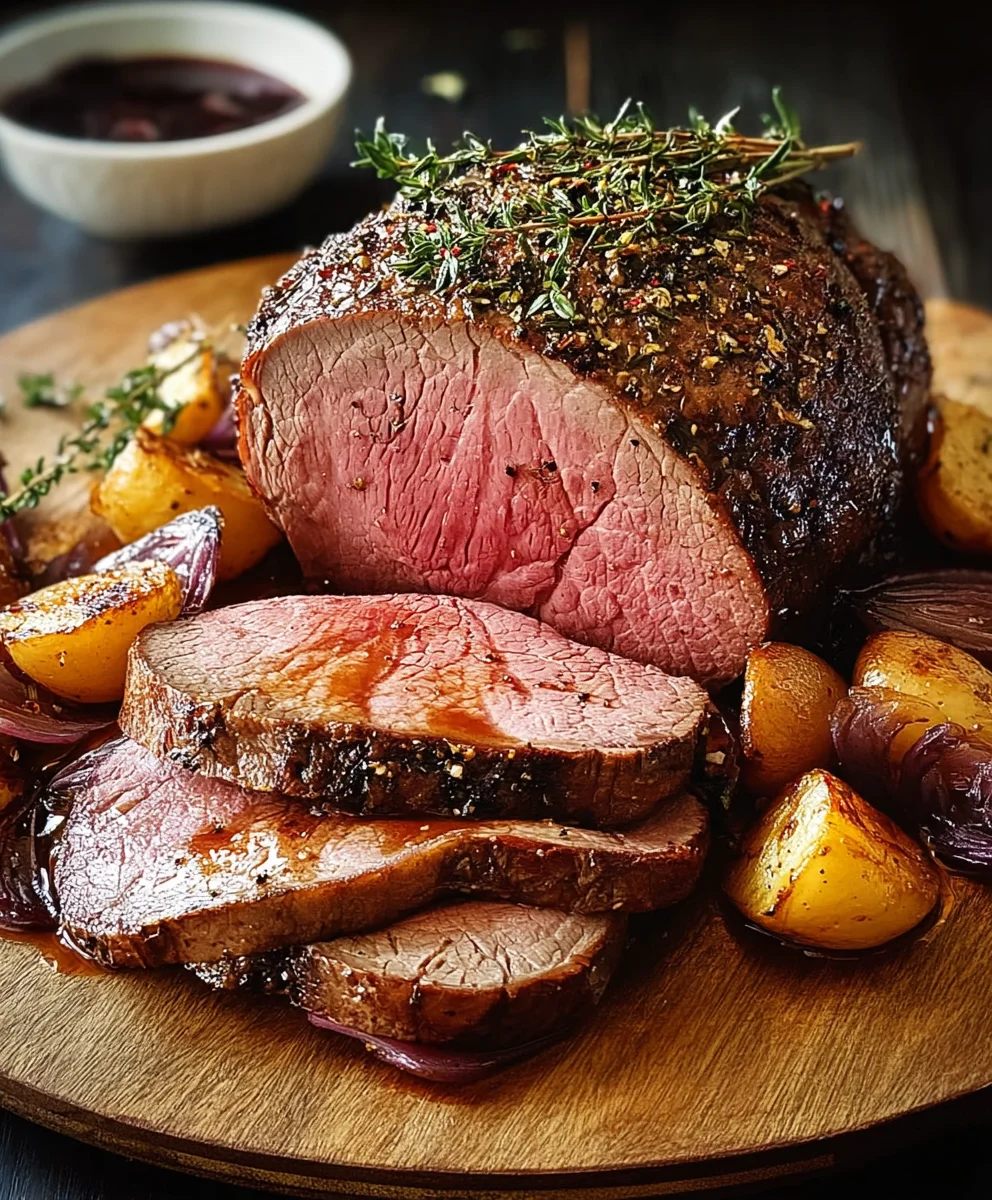
- Slice Against the Grain: Once the roast has fully rested, it’s time to slice and reveal your masterpiece. Using a sharp carving knife, identify the grain of the meat (the direction the muscle fibers run). To ensure the most tender bites, you must slice the roast thinly, against the grain. Slicing against the grain shortens the muscle fibers, making each piece much easier to chew and enjoy.
- Serve Immediately: Arrange the beautifully sliced “Perfect Roast Beef” on a serving platter. Drizzle with some of the warm pan gravy, or serve the gravy on the side. I love serving my roast beef with classic sides like creamy mashed potatoes, roasted root vegetables, or a fresh green salad. The tender, juicy slices of beef, kissed with herbs and garlic, are truly a delight.
- Storage and Reheating (if any is left!): Leftover roast beef can be stored in an airtight container in the refrigerator for up to 3-4 days. To gently reheat, slice the beef thinly and warm it in a skillet with a splash of beef broth or in a low oven (around 250°F / 120°C) until just warmed through, taking care not to overcook and dry it out. It’s also fantastic cold for sandwiches! Enjoy your incredible “Perfect Roast Beef.”
Conclusion:
And there you have it! We’ve journeyed together through the simple yet incredibly rewarding process of creating what I genuinely believe will become your go-to recipe for a show-stopping meal. This isn’t just another beef recipe; it’s a culinary experience designed to impress with minimal fuss. I’ve poured my heart into perfecting these steps, ensuring that even a novice cook can achieve results that taste like they came straight from a gourmet kitchen. The aroma alone as it cooks will have everyone gathered around, eager for a taste. I promise you, the rich, savory flavors and the melt-in-your-mouth texture will elevate any dinner, turning an ordinary evening into something truly special and memorable. It’s the kind of dish that garners compliments and requests for seconds, making you feel like a master chef without breaking a sweat, all while delivering a meal that looks and tastes absolutely magnificent.
What makes this particular method so unique and why it’s an absolute must-try lies in its ability to consistently deliver a beautiful, savory crust on the outside while maintaining a tender, juicy, and perfectly pink interior. No more guessing games, no more dry, overcooked meat! We’ve unlocked the secrets to achieving that ideal balance, transforming a humble cut of beef into a magnificent centerpiece that will be the highlight of any gathering. This recipe isn’t just about cooking; it’s about crafting an experience, a moment of shared joy around the dinner table where everyone feels indulged. Imagine slicing into that perfectly cooked roast, juices glistening, ready to be devoured with anticipation. It’s truly a sight to behold and an even better taste sensation, confirming that a little attention to detail goes a long way in the kitchen. I’ve heard countless stories from friends and family who, after trying this method, declared they’d never go back to their old ways – it’s that transformative.
Now, while the star of the show, your perfectly cooked beef, can certainly stand alone and speak for itself, I love pairing it with some classic accompaniments to complete the meal and create a truly grand spread. For a traditional spread that everyone adores, consider serving generous slices alongside creamy mashed potatoes or crispy roasted potatoes that have been tossed with fragrant herbs like rosemary and thyme. A vibrant green vegetable, such as tender-crisp asparagus or buttery green beans, adds a lovely pop of color, essential nutrients, and a refreshing textural contrast to the richness of the meat. And, of course, no roast beef dinner is truly complete without a rich, savory gravy made from the pan drippings – it’s the final touch that ties all the flavors together, creating a symphony for your taste buds. Don’t forget a side of fluffy Yorkshire puddings if you’re feeling ambitious; they’re surprisingly easy to make and absolutely delightful for soaking up all those delicious juices.
But don’t feel constrained by tradition! This recipe is incredibly versatile, allowing for creative exploration beyond the classic pairings. For a different twist, you could experiment with various herb rubs before roasting; a spicy Cajun blend could add a fiery kick and Southern flair, or a Mediterranean mix of oregano, basil, and garlic could transport your taste buds to sunnier climes. You could also think about the incredible potential for leftovers: thinly sliced beef makes gourmet sandwiches with a creamy horseradish sauce on a crusty baguette, or diced into a hearty beef stew for a comforting meal. Think about turning it into savory tacos with a vibrant salsa and pickled onions for an unexpected fusion meal. The possibilities are truly endless, and this foundational recipe provides the ideal canvas for your culinary creativity, ensuring that whether you stick to the classics or venture into new flavor territories, the quality of your roast beef will shine through.
So, I implore you, dear reader, to give this recipe a try. Set aside an afternoon, gather your ingredients, and embark on this delicious adventure; you won’t regret it. I am confident that you will achieve nothing less than the most Perfect Roast Beef you’ve ever tasted, solidifying your reputation as a kitchen wizard among your friends and family. Once you’ve mastered it and savored every last bite, please come back and share your experience with me! I absolutely adore seeing your creations and hearing about your successes. Did you try a new side dish? Experiment with a different rub or cooking time? Tag me on social media or leave a comment below with your thoughts and photos. Your culinary journey is important to me, and I can’t wait to celebrate your delicious achievements. Happy cooking, and prepare to impress!
Frequently Asked Questions
How long does it take to cook roast beef per pound?
The cooking time for roast beef per pound can vary significantly based on the cut, your desired doneness (rare, medium, well), and your oven’s specific calibration. As a general guideline for a medium-rare roast, you might look at approximately 15-20 minutes per pound at a higher initial temperature (e.g., 400°F/200°C) followed by a rest, or a longer, slower cook at a lower temperature (e.g., 250°F/120°C) which could be 25-30 minutes per pound. However, the most reliable way to achieve your desired doneness is always to use a meat thermometer. Pull the roast from the oven when it’s 5-10 degrees below your target internal temperature, as it will continue to cook during the crucial resting period.
What cut of beef is best for roast beef?
For a truly spectacular roast beef, several cuts stand out due to their inherent tenderness and rich flavor. The most popular and highly recommended choices include:
- Rib Roast (Standing Rib Roast/Prime Rib): Often considered the king of roasts, it’s incredibly tender and flavorful with excellent marbling throughout.
- Top Sirloin Roast: A leaner, more economical option that still delivers great taste and tenderness when cooked correctly.
- Eye of Round Roast: Very lean and best suited for slow roasting or cooking to medium-rare to prevent it from becoming dry.
- Bottom Round Roast (Rump Roast): Can be a bit tougher, but excellent for slower cooking methods, often benefiting from marinating.
- Tenderloin: The most tender cut, but also the most expensive and very lean, requiring careful cooking to avoid drying out.
For this particular recipe, a Rib Roast or Top Sirloin will consistently give you phenomenal, melt-in-your-mouth results.
How do you get a tender roast beef?
Achieving a wonderfully tender roast beef involves a few key steps that, when followed, make all the difference:
- Choose the Right Cut: Start with a naturally tender cut like a rib roast or top sirloin, which have good marbling and less connective tissue.
- Season Generously: Salt helps to break down muscle fibers and tenderize the meat, and a good rub adds depth of flavor.
- Don’t Overcook: This is arguably the most crucial step. Overcooking will dry out and toughen even the most tender cut. Always use a reliable meat thermometer!
- Rest the Meat: After cooking, let the roast rest, tented loosely with foil, for at least 15-20 minutes (longer for larger roasts). This allows the juices to redistribute throughout the meat, resulting in a more tender and juicy slice.
- Slice Against the Grain: Always slice roast beef against the grain of the muscle fibers. This shortens the fibers, making each bite much more tender and easier to chew.
Following these tips, especially using a thermometer and allowing for proper resting, will ensure a consistently tender result every time.
Can you really get Perfect Roast Beef every time?
Absolutely! While there are always variables in cooking, by diligently following a well-tested recipe like ours and paying close attention to internal temperatures, you can consistently achieve truly Perfect Roast Beef. The key is understanding your oven’s quirks, using a reliable meat thermometer to guide your cooking, and allowing for adequate resting time once the roast is out of the oven. Our recipe focuses on precise temperatures and techniques that minimize guesswork, giving you the confidence to produce a fantastic roast every single time, without fail. Practice makes perfect, of course, but with this comprehensive guide, you’re set up for tremendous success from the very first attempt!
How do I store leftover roast beef?
Leftover roast beef should be stored promptly and correctly to maintain its freshness, flavor, and safety.
- Cool Quickly: Allow the roast beef to cool to room temperature (this should not take longer than 2 hours) before storing.
- Airtight Container: Transfer any remaining slices or larger pieces into an airtight container to prevent air exposure and maintain moisture.
- Refrigerate: Store the container in the refrigerator for 3-4 days.
- Freeze: For longer storage, wrap individual portions tightly in plastic wrap, then an additional layer of aluminum foil, and place in a freezer-safe bag or container. It can be frozen for 2-3 months without significant loss of quality. Thaw frozen roast beef in the refrigerator overnight before gently reheating.
Leftovers are incredibly versatile and make fantastic ingredients for sandwiches, salads, or quickly warmed in a rich gravy.
Perfect Roast Beef Recipe: Tender, Juicy & Flavorful Beef
Achieve tender, juicy, and flavorful roast beef with a golden, savory crust. This guide demystifies the process for a perfect, memorable meal, ideal for family gatherings or Sunday dinners.
Ingredients
-
1 (4 pound) boneless beef top round roast, with nice marbling
-
3 tablespoons olive oil or other high-smoke point oil (vegetable, canola)
-
1 tablespoon coarse sea salt or kosher salt
-
1 teaspoon freshly ground black pepper
-
4-6 cloves garlic, peeled and smashed (optional)
-
2 sprigs fresh rosemary (optional)
-
4 sprigs fresh thyme (optional)
-
1 large onion, quartered (optional, for roasting pan)
-
2 carrots, roughly chopped (optional, for roasting pan)
-
2 celery stalks, roughly chopped (optional, for roasting pan)
-
FOR OPTIONAL PAN GRAVY:
-
2 tablespoons all-purpose flour or 1 tablespoon cornstarch mixed with 2 tablespoons cold water (for gluten-free)
-
2 cups beef broth, low sodium
-
½ cup non-alcoholic red wine alternative or additional beef broth with a splash of balsamic vinegar
-
Salt and pepper to taste
Instructions
-
Step 1
Remove beef roast from refrigerator 1.5-2 hours before cooking to reach room temperature. Pat thoroughly dry with paper towels. -
Step 2
Rub roast with 2 tbsp olive oil. Season generously with 1 tbsp coarse sea salt, 1 tsp black pepper, 4-6 smashed garlic cloves, 2 sprigs rosemary, and 4 sprigs thyme. -
Step 3
If making gravy, place 1 quartered onion, 2 chopped carrots, and 2 chopped celery stalks in a sturdy roasting pan. -
Step 4
Preheat oven to 450°F (230°C). Heat 1 tbsp olive oil in a large, oven-safe skillet over medium-high heat. Sear roast aggressively on all sides for 2-3 minutes per side until a deep, dark brown crust forms. Transfer to the prepared roasting pan if not using an oven-safe skillet. -
Step 5
Immediately transfer roast to the preheated 450°F oven. Roast for 15-20 minutes. Reduce oven temperature to 325°F (160°C) and continue roasting until a meat thermometer inserted into the thickest part reads 120-135°F (49-57°C) (125-130°F for medium-rare is recommended). Rely on thermometer, not just time. -
Step 6
Remove roast from oven. Transfer to a cutting board, tent loosely with foil, and let rest for 20-30 minutes. (Internal temperature will rise 5-10°F during rest, known as carry-over cooking). -
Step 7
While roast rests, pour off excess fat from roasting pan, leaving ~2 tbsp drippings. Place pan over medium heat. Whisk in 2 tbsp all-purpose flour for 1-2 minutes until a roux forms. Slowly whisk in 2 cups low-sodium beef broth and ½ cup non-alcoholic red wine alternative (or additional beef broth + splash balsamic vinegar), scraping up browned bits. Simmer for 5-10 minutes until thickened. Strain for smoothness if desired. Season to taste with salt and pepper. -
Step 8
Slice roast thinly against the grain. Serve immediately with warm pan gravy and your favorite sides. Store leftovers in an airtight container for 3-4 days; reheat gently or serve cold.
Important Information
Nutrition Facts (Per Serving)
It is important to consider this information as approximate and not to use it as definitive health advice.
Allergy Information
Please check ingredients for potential allergens and consult a health professional if in doubt.


Leave a Comment