
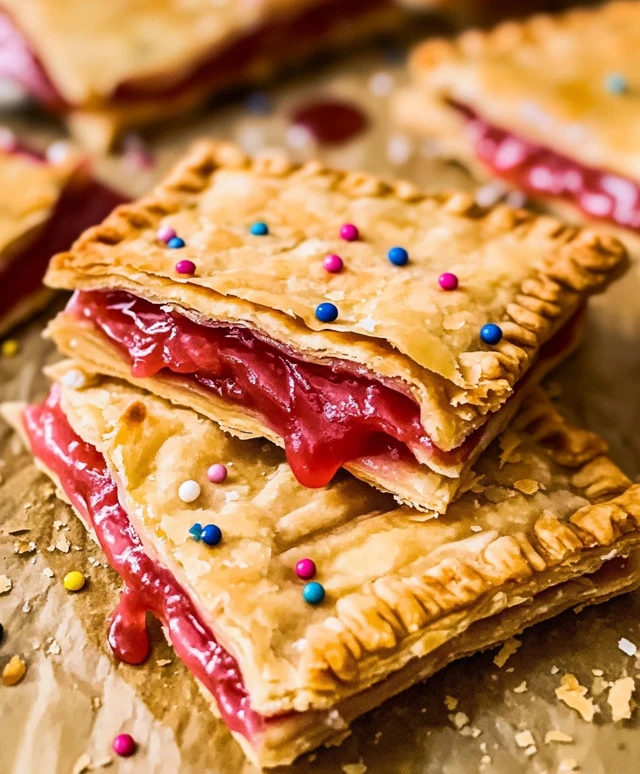
Homemade Pop Tarts are a delightful twist on a beloved childhood classic, bringing nostalgia and creativity into your kitchen. These sweet pastries, originally created in the 1960s, have become a staple in many households, often enjoyed as a quick breakfast or a satisfying snack. The beauty of homemade Pop Tarts lies in their versatility; you can customize the filling to suit your taste, whether you prefer fruity jams, rich chocolate, or even savory options.
People adore this dish not only for its delicious taste and flaky texture but also for the convenience it offers. Making your own Pop Tarts allows you to control the ingredients, ensuring a fresher and healthier alternative to store-bought versions. Plus, the joy of crafting these pastries from scratch adds a personal touch that elevates the experience. So, roll up your sleeves and get ready to indulge in the delightful world of homemade Pop Tarts!

Ingredients:
- For the Dough:
- 2 cups all-purpose flour
- 1/4 teaspoon salt
- 1 tablespoon granulated sugar
- 1/2 cup unsalted butter, chilled and cubed
- 1/4 cup cold water
- For the Filling:
- 1/2 cup fruit preserves or jam (your choice of flavor)
- 1 tablespoon cornstarch (optional, for thicker filling)
- 1 tablespoon lemon juice (optional, enhances flavor)
- For the Glaze:
- 1 cup powdered sugar
- 2 tablespoons milk (or more for desired consistency)
- 1/2 teaspoon vanilla extract
- Sprinkles (optional, for decoration)
Preparing the Dough
- In a large mixing bowl, combine the all-purpose flour, salt, and granulated sugar. Whisk together until well mixed.
- Add the chilled, cubed unsalted butter to the flour mixture. Using a pastry cutter or your fingers, cut the butter into the flour until the mixture resembles coarse crumbs. You should see small pea-sized pieces of butter throughout.
- Gradually add the cold water, one tablespoon at a time, mixing gently with a fork until the dough begins to come together. You may not need all the water, so add it slowly.
- Once the dough has formed, turn it out onto a lightly floured surface. Knead it gently just until it holds together, being careful not to overwork it.
- Divide the dough into two equal portions, shape each into a disk, and wrap them in plastic wrap. Refrigerate for at least 30 minutes to allow the dough to chill and firm up.
Preparing the Filling
- While the dough is chilling, prepare your filling. If you are using fruit preserves or jam, you can use it as is. For a thicker filling, mix the preserves with cornstarch and lemon juice in a small bowl until well combined.
- Set the filling aside to allow the flavors to meld while the dough continues to chill.
Rolling Out the Dough
- After the dough has chilled, remove one disk from the refrigerator. On a lightly floured surface, roll out the dough to about 1/8-inch thickness.
- Using a sharp knife or a pizza cutter, cut the rolled dough into rectangles measuring approximately 3 inches by 4 inches. You should be able to get about 6-8 rectangles from one disk of dough.
- Transfer half of the rectangles to a parchment-lined baking sheet, leaving space between each piece.
- Place about 1 tablespoon of your prepared filling in the center of each rectangle on the baking sheet, being careful not to overfill.
- Roll out the second disk of dough in the same manner and cut out an equal number of rectangles. Place these rectangles over the filled ones to create a top layer.
- Using a fork, press down the edges of each Pop Tart to seal them. This will also create a decorative pattern on the edges.
- Using a sharp knife, make a few small slits on the top of each Pop Tart to allow steam to escape during baking.
Baking the Pop Tarts
- Preheat your oven to 350°F (175°C).
- Once the oven is preheated, place the baking sheet with the assembled Pop Tarts in the oven.
- Bake for 20-25 minutes, or until the edges are golden brown and the tops are lightly browned.
- Remove the Pop Tarts from the oven and allow them to cool on the baking sheet for about 5 minutes before transferring them to a wire rack to cool completely.
Preparing the Glaze
- In a medium bowl, combine the powdered sugar, milk, and vanilla extract. Whisk until
Conclusion:
In summary, this Homemade Pop Tarts recipe is a delightful and creative way to enjoy a classic treat that can be customized to suit your taste. The flaky, buttery crust combined with your choice of sweet fillings makes these pastries a must-try for anyone looking to elevate their breakfast or snack game. Whether you opt for traditional flavors like strawberry or blueberry, or venture into more adventurous combinations like chocolate hazelnut or lemon curd, the possibilities are endless. For serving suggestions, consider pairing your Homemade Pop Tarts with a side of fresh fruit or a dollop of whipped cream for an extra indulgent experience. You can also experiment with different glazes and toppings, such as sprinkles or crushed nuts, to add a personal touch to each pastry. We encourage you to try this recipe and share your experience with friends and family. Not only will you impress them with your baking skills, but you’ll also create lasting memories around the kitchen table. Don’t forget to share your creations on social media and tag us, as we love to see how you make these Homemade Pop Tarts your own! Happy baking! Print
Homemade Pop Tarts: Easy Recipes for Delicious Treats
- Total Time: 60 minutes
- Yield: 12 Pop Tarts 1x
Description
Homemade Pop Tarts filled with your choice of fruit preserves, topped with a sweet glaze, and perfect for breakfast or a snack!
Ingredients
“`html
- 2 cups all-purpose flour
- 1/4 teaspoon salt
- 1 tablespoon granulated sugar
- 1/2 cup unsalted butter, chilled and cubed
- 1/4 cup cold water
- 1/2 cup fruit preserves or jam (your choice of flavor)
- 1 tablespoon cornstarch (optional, for thicker filling)
- 1 tablespoon lemon juice (optional, enhances flavor)
- 1 cup powdered sugar
- 2 tablespoons milk (or more for desired consistency)
- 1/2 teaspoon vanilla extract
- Sprinkles (optional, for decoration)
“`
Instructions
“`html
- In a large mixing bowl, combine the all-purpose flour, salt, and granulated sugar. Whisk together until well mixed.
- Add the chilled, cubed unsalted butter to the flour mixture. Using a pastry cutter or your fingers, cut the butter into the flour until the mixture resembles coarse crumbs. You should see small pea-sized pieces of butter throughout.
- Gradually add the cold water, one tablespoon at a time, mixing gently with a fork until the dough begins to come together. You may not need all the water, so add it slowly.
- Once the dough has formed, turn it out onto a lightly floured surface. Knead it gently just until it holds together, being careful not to overwork it.
- Divide the dough into two equal portions, shape each into a disk, and wrap them in plastic wrap. Refrigerate for at least 30 minutes to allow the dough to chill and firm up.
- While the dough is chilling, prepare your filling. If you are using fruit preserves or jam, you can use it as is. For a thicker filling, mix the preserves with cornstarch and lemon juice in a small bowl until well combined.
- Set the filling aside to allow the flavors to meld while the dough continues to chill.
- After the dough has chilled, remove one disk from the refrigerator. On a lightly floured surface, roll out the dough to about 1/8-inch thickness.
- Using a sharp knife or a pizza cutter, cut the rolled dough into rectangles measuring approximately 3 inches by 4 inches. You should be able to get about 6-8 rectangles from one disk of dough.
- Transfer half of the rectangles to a parchment-lined baking sheet, leaving space between each piece.
- Once the Pop Tarts are completely cool, drizzle the glaze over the top of each one. If desired, sprinkle with colorful sprinkles for decoration.
“`
Notes
“`html
- You can customize the filling with any flavor of fruit preserves or jam you prefer.
- For a more intense flavor, consider adding spices like cinnamon or nutmeg to the dough.
- Store any leftover Pop Tarts in an airtight container at room temperature for up to 3 days.
“`
- Prep Time: 30 minutes
- Cook Time: 25 minutes


Leave a Comment