
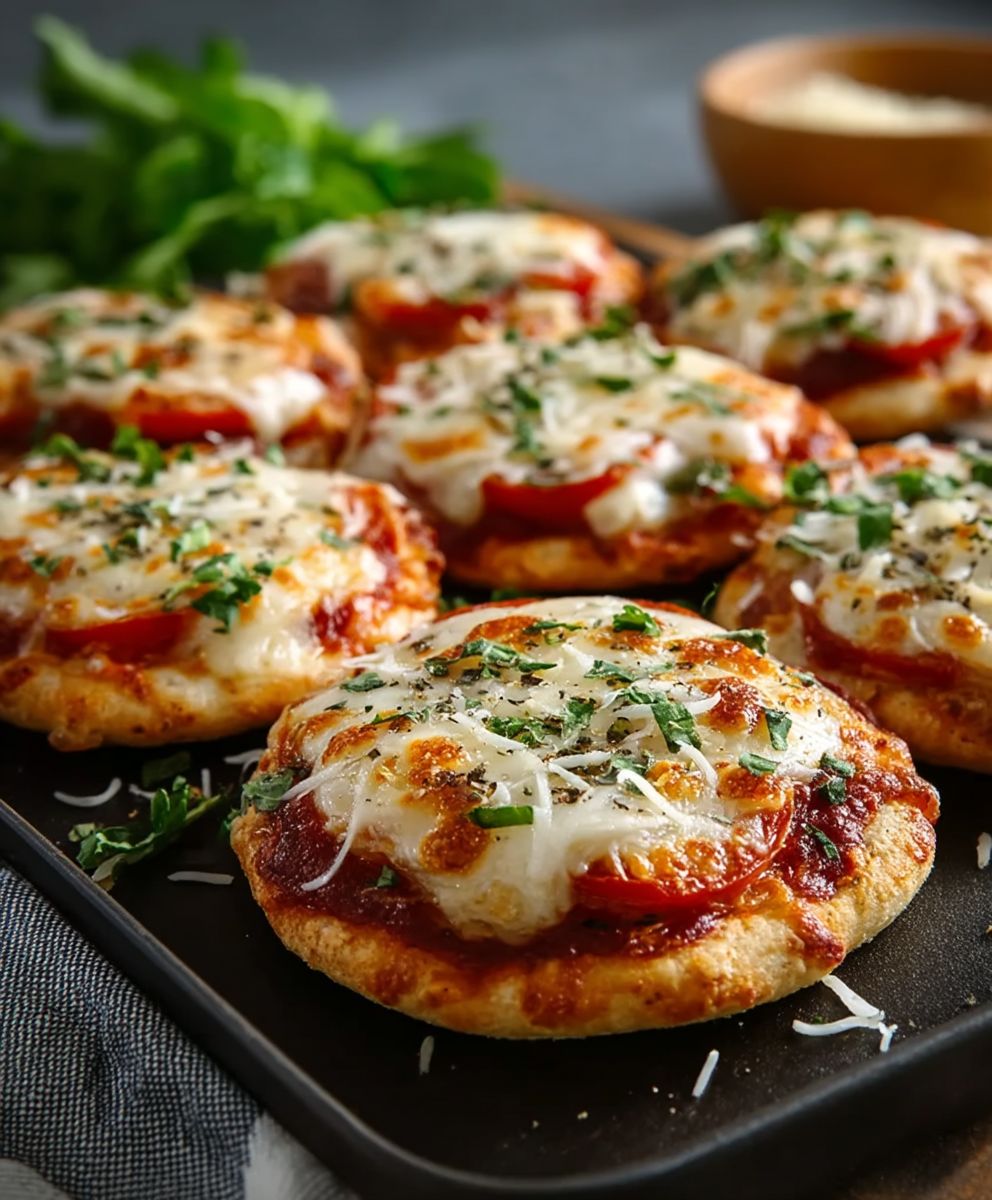
Gluten Free Mini Pizzas: the answer to your pizza cravings without the gluten! Are you tired of missing out on pizza night? Do you long for that cheesy, saucy goodness but struggle to find a satisfying gluten-free alternative? Well, look no further! These bite-sized delights are not only incredibly delicious but also surprisingly easy to make, perfect for a quick lunch, a fun appetizer, or even a kid-friendly dinner.
Pizza, in its various forms, has a rich history dating back to ancient civilizations. From flatbreads topped with herbs and oils to the modern marvel we know and love, pizza has always been a symbol of communal eating and simple pleasures. While the Neapolitan pizza is often considered the gold standard, regional variations abound, each with its unique character and charm. But what if you can’t enjoy the traditional version? That’s where our Gluten Free Mini Pizzas come in!
People adore pizza for its customizable nature, its comforting flavors, and its sheer convenience. The combination of a crispy crust, tangy tomato sauce, melted cheese, and your favorite toppings is simply irresistible. These mini pizzas capture all of that magic, but with a gluten-free twist. The crust is perfectly crisp and sturdy enough to hold all your favorite toppings. Plus, they’re incredibly fun to make and eat! Get ready to experience pizza joy all over again, gluten-free style!

Ingredients:
- For the Gluten-Free Pizza Dough:
- 1 ½ cups gluten-free all-purpose flour blend (make sure it contains xanthan gum)
- 1 teaspoon baking powder
- ½ teaspoon salt
- 1 teaspoon sugar
- 1 tablespoon olive oil
- ¾ cup warm water (about 105-115°F)
- 1 teaspoon active dry yeast
- For the Pizza Sauce:
- 1 (15 ounce) can tomato sauce
- 1 teaspoon dried oregano
- ½ teaspoon dried basil
- ¼ teaspoon garlic powder
- ¼ teaspoon onion powder
- Pinch of red pepper flakes (optional)
- Salt and pepper to taste
- For the Toppings:
- 1 ½ cups shredded mozzarella cheese
- Your favorite pizza toppings! (Examples: pepperoni, cooked sausage, sliced mushrooms, bell peppers, black olives, onions, spinach, cherry tomatoes)
- Optional: Fresh basil leaves for garnish
Preparing the Gluten-Free Pizza Dough
Okay, let’s get started with the most important part: the gluten-free pizza dough! Don’t be intimidated; it’s easier than you think. Gluten-free dough can be a little different to work with than regular dough, but with a few tips and tricks, you’ll be making delicious mini pizzas in no time.
- Activate the Yeast: In a small bowl, combine the warm water and active dry yeast. Give it a gentle stir and let it sit for about 5-10 minutes, or until it becomes foamy. This step is crucial to ensure your yeast is alive and kicking, which will help your dough rise properly. If the yeast doesn’t foam, it might be old, and you’ll need to use fresh yeast.
- Combine Dry Ingredients: In a large mixing bowl, whisk together the gluten-free all-purpose flour blend, baking powder, salt, and sugar. Make sure everything is well combined. This ensures that the baking powder is evenly distributed, which will help the pizzas rise evenly.
- Add Wet Ingredients: Add the olive oil and the yeast mixture to the dry ingredients. Using a wooden spoon or a stand mixer with a dough hook attachment, mix until a shaggy dough forms. The dough will be quite sticky, and that’s perfectly normal for gluten-free dough.
- Knead the Dough (Sort Of!): Gluten-free dough doesn’t develop gluten like regular dough, so we don’t need to knead it in the traditional sense. Instead, lightly flour a clean surface with gluten-free flour. Turn the dough out onto the floured surface and gently pat it into a ball. Then, gently knead it for about 2-3 minutes. This helps to bring the dough together and make it a bit smoother. If the dough is too sticky, add a little more gluten-free flour, a tablespoon at a time, until it’s manageable.
- Let the Dough Rest: Place the dough back in the mixing bowl, cover it with plastic wrap or a clean kitchen towel, and let it rest in a warm place for about 30 minutes. This allows the dough to relax and the baking powder to do its thing, resulting in a lighter and fluffier pizza crust.
Making the Pizza Sauce
While the dough is resting, let’s whip up a quick and easy pizza sauce. You can definitely use store-bought sauce if you’re short on time, but homemade sauce is so much more flavorful and takes just minutes to prepare.
- Combine Ingredients: In a small saucepan, combine the tomato sauce, dried oregano, dried basil, garlic powder, onion powder, and red pepper flakes (if using).
- Simmer the Sauce: Bring the sauce to a simmer over medium heat. Reduce the heat to low and let it simmer for about 10-15 minutes, stirring occasionally. This allows the flavors to meld together and the sauce to thicken slightly.
- Season to Taste: Season the sauce with salt and pepper to taste. Give it a good stir and set it aside.
Assembling and Baking the Mini Pizzas
Now for the fun part: assembling and baking the mini pizzas! This is where you can get creative with your toppings and customize each pizza to your liking.
- Preheat the Oven: Preheat your oven to 425°F (220°C). Line a baking sheet with parchment paper. This will prevent the pizzas from sticking and make cleanup a breeze.
- Divide the Dough: After the dough has rested, lightly flour your hands and the work surface again. Gently punch down the dough to release any air bubbles. Divide the dough into 8-10 equal pieces, depending on how large you want your mini pizzas to be.
- Shape the Pizzas: Roll each piece of dough into a small ball. Then, using your fingers or a rolling pin, flatten each ball into a small circle, about 3-4 inches in diameter. Don’t worry if they’re not perfectly round; rustic pizzas are just as delicious!
- Transfer to Baking Sheet: Carefully transfer the pizza crusts to the prepared baking sheet, leaving a little space between each one.
- Add the Sauce: Spoon a generous amount of pizza sauce onto each crust, spreading it evenly and leaving a small border around the edge.
- Add the Cheese: Sprinkle a generous amount of shredded mozzarella cheese over the sauce on each pizza.
- Add Your Favorite Toppings: Now it’s time to get creative with your toppings! Add your favorite pizza toppings, such as pepperoni, cooked sausage, sliced mushrooms, bell peppers, black olives, onions, spinach, cherry tomatoes, or anything else your heart desires.
- Bake the Pizzas: Bake the mini pizzas in the preheated oven for 12-15 minutes, or until the crusts are golden brown and the cheese is melted and bubbly. Keep a close eye on them, as baking times may vary depending on your oven.
- Garnish and Serve: Once the pizzas are done, remove them from the oven and let them cool for a few minutes before serving. Garnish with fresh basil leaves, if desired. Serve immediately and enjoy!
Tips for Gluten-Free Pizza Success
Here are a few extra tips to help you make the best gluten-free mini pizzas:
- Use a Good Gluten-Free Flour Blend: Not all gluten-free flour blends are created equal. Look for a blend that contains xanthan gum, which helps to bind the dough and give it structure.
- Don’t Overwork the Dough: Gluten-free dough can become tough if it’s over-kneaded. Gently knead it for just a few minutes to bring it together.
- Use Warm Water: Warm water helps to activate the yeast and create a better rise. Make sure the water isn’t too hot, or it will kill the yeast.
- Let the Dough Rest: Resting the dough allows it to relax and the baking powder to do its thing, resulting in a lighter and fluffier crust.
- Preheat the Oven: A hot oven is essential for creating a crispy crust. Make sure your oven is fully preheated before baking the pizzas.
- Don’t Overload the Toppings: Too many toppings can make the crust soggy. Use a moderate amount of toppings to ensure a crispy crust.
Variations and Additions
Want to mix things up? Here are a few ideas for variations and additions:
- Different Cheeses: Experiment with different cheeses, such as provolone, cheddar, or Parmesan.
- Pesto Sauce: Use pesto sauce instead of tomato sauce for a different flavor profile.
- White Pizza: Skip the tomato sauce altogether and make a white pizza with olive oil, garlic, and herbs.
- Spicy Pizza: Add a pinch of red pepper flakes to the sauce or sprinkle some chili oil on top of the pizzas after baking.
- Vegetarian Pizza: Load up the pizzas with your favorite vegetables, such as mushrooms, bell peppers, onions, spinach, and artichoke hearts.
- Hawaiian Pizza: Add ham and pineapple for a classic Hawaiian pizza.
I hope you enjoy making these gluten-free mini pizzas! They’re perfect for parties, snacks, or a fun family dinner. Don’t be afraid to experiment with different toppings and find your favorite combinations. Happy baking!
Conclusion:
And there you have it! These Gluten Free Mini Pizzas are truly a game-changer for anyone seeking a delicious, satisfying, and entirely gluten-free pizza experience. I know, I know, gluten-free can sometimes be a bit underwhelming. But trust me on this one. The crispy, yet slightly chewy crust, combined with your favorite toppings, creates a flavor explosion that will have you reaching for seconds (and maybe even thirds!).
Why is this recipe a must-try? Well, beyond the obvious gluten-free benefits, it’s incredibly versatile. Whether you’re catering to dietary restrictions, looking for a fun family activity, or simply craving a personalized pizza experience, these mini pizzas deliver. They’re quick to prepare, easy to customize, and perfect for parties, snacks, or even a light meal. Plus, let’s be honest, who can resist a mini pizza? They’re just so darn cute and perfectly portioned!
But the real magic lies in the taste. The gluten-free crust, when prepared correctly, achieves a delightful texture that rivals traditional pizza crusts. It’s sturdy enough to hold your toppings without becoming soggy, yet tender enough to melt in your mouth. And because they’re mini, you get more crust-to-topping ratio in every bite a definite win in my book!
Ready to get creative? Here are a few serving suggestions and variations to inspire you:
Serving Suggestions & Variations:
* Classic Margherita: Keep it simple and elegant with fresh mozzarella, basil leaves, and a drizzle of olive oil.
* Pepperoni Power: A timeless favorite! Load them up with pepperoni slices for a spicy kick.
* Veggie Delight: Sauté your favorite vegetables like mushrooms, bell peppers, onions, and olives for a healthy and flavorful option.
* Hawaiian Heat: Embrace the sweet and savory combination of ham and pineapple, with a touch of jalapeño for added heat.
* BBQ Chicken: Shredded chicken tossed in BBQ sauce, red onion, and cilantro make for a delicious and unique pizza.
* Dessert Pizzas: Don’t forget about dessert! Spread Nutella or peanut butter on the crust, top with sliced bananas or strawberries, and sprinkle with chocolate chips.
For a fun twist, consider setting up a pizza-making station where everyone can customize their own mini pizzas. This is a fantastic activity for kids’ parties or family gatherings. You can provide a variety of toppings and sauces, and let everyone unleash their inner pizza chef!
I’m confident that you’ll absolutely love these Gluten Free Mini Pizzas. They’re a delicious, convenient, and versatile option for anyone looking for a gluten-free pizza alternative. The recipe is straightforward, the ingredients are readily available, and the results are simply amazing.
So, what are you waiting for? Gather your ingredients, preheat your oven, and get ready to embark on a mini pizza adventure! I’m so excited for you to try this recipe and experience the joy of homemade, gluten-free pizza.
And most importantly, I want to hear about your experience! Did you try any fun variations? Did you make them for a special occasion? Share your photos and stories in the comments below. I can’t wait to see what you create! Happy pizza-making!
Gluten Free Mini Pizzas: Delicious & Easy Recipe!
Easy and delicious gluten-free mini pizzas perfect for parties, snacks, or a fun family dinner. Customize with your favorite toppings!
Ingredients
- 1 ½ cups gluten-free all-purpose flour blend (make sure it contains xanthan gum)
- 1 teaspoon baking powder
- ½ teaspoon salt
- 1 teaspoon sugar
- 1 tablespoon olive oil
- ¾ cup warm water (about 105-115°F)
- 1 teaspoon active dry yeast
- 1 (15 ounce) can tomato sauce
- 1 teaspoon dried oregano
- ½ teaspoon dried basil
- ¼ teaspoon garlic powder
- ¼ teaspoon onion powder
- Pinch of red pepper flakes (optional)
- Salt and pepper to taste
- 1 ½ cups shredded mozzarella cheese
- Your favorite pizza toppings! (Examples: pepperoni, cooked sausage, sliced mushrooms, bell peppers, black olives, onions, spinach, cherry tomatoes)
- Optional: Fresh basil leaves for garnish
Instructions
- Activate the Yeast: In a small bowl, combine the warm water and active dry yeast. Stir gently and let sit for 5-10 minutes, until foamy.
- Combine Dry Ingredients: In a large bowl, whisk together the gluten-free flour, baking powder, salt, and sugar.
- Add Wet Ingredients: Add olive oil and yeast mixture to dry ingredients. Mix until a shaggy dough forms (it will be sticky).
- Knead the Dough (Sort Of!): Lightly flour a clean surface with gluten-free flour. Turn the dough out and gently pat into a ball. Knead gently for 2-3 minutes. Add more flour if too sticky, a tablespoon at a time.
- Let the Dough Rest: Place dough back in the bowl, cover, and let rest in a warm place for 30 minutes.
- Make the Pizza Sauce: Combine tomato sauce, oregano, basil, garlic powder, onion powder, and red pepper flakes (if using) in a small saucepan.
- Simmer the Sauce: Bring to a simmer over medium heat, then reduce heat to low and simmer for 10-15 minutes, stirring occasionally.
- Season to Taste: Season the sauce with salt and pepper.
- Preheat the Oven: Preheat oven to 425°F (220°C). Line a baking sheet with parchment paper.
- Divide the Dough: After the dough has rested, lightly flour your hands and the work surface again. Gently punch down the dough to release any air bubbles. Divide the dough into 8-10 equal pieces, depending on how large you want your mini pizzas to be.
- Shape the Pizzas: Roll each piece of dough into a small ball. Then, using your fingers or a rolling pin, flatten each ball into a small circle, about 3-4 inches in diameter. Don’t worry if they’re not perfectly round; rustic pizzas are just as delicious!
- Transfer to Baking Sheet: Carefully transfer the pizza crusts to the prepared baking sheet, leaving a little space between each one.
- Add the Sauce: Spoon a generous amount of pizza sauce onto each crust, spreading it evenly and leaving a small border around the edge.
- Add the Cheese: Sprinkle a generous amount of shredded mozzarella cheese over the sauce on each pizza.
- Add Your Favorite Toppings: Now it’s time to get creative with your toppings! Add your favorite pizza toppings, such as pepperoni, cooked sausage, sliced mushrooms, bell peppers, black olives, onions, spinach, cherry tomatoes, or anything else your heart desires.
- Bake the Pizzas: Bake for 12-15 minutes, or until crusts are golden brown and cheese is melted and bubbly.
- Garnish and Serve: Let cool slightly before serving. Garnish with fresh basil, if desired.
Notes
- Use a gluten-free flour blend that contains xanthan gum.
- Don’t overwork the dough.
- Use warm water (not too hot) to activate the yeast.
- Let the dough rest for a lighter crust.
- Preheat the oven for a crispy crust.
- Don’t overload the toppings.
- Experiment with different cheeses, sauces, and toppings.


Leave a Comment