
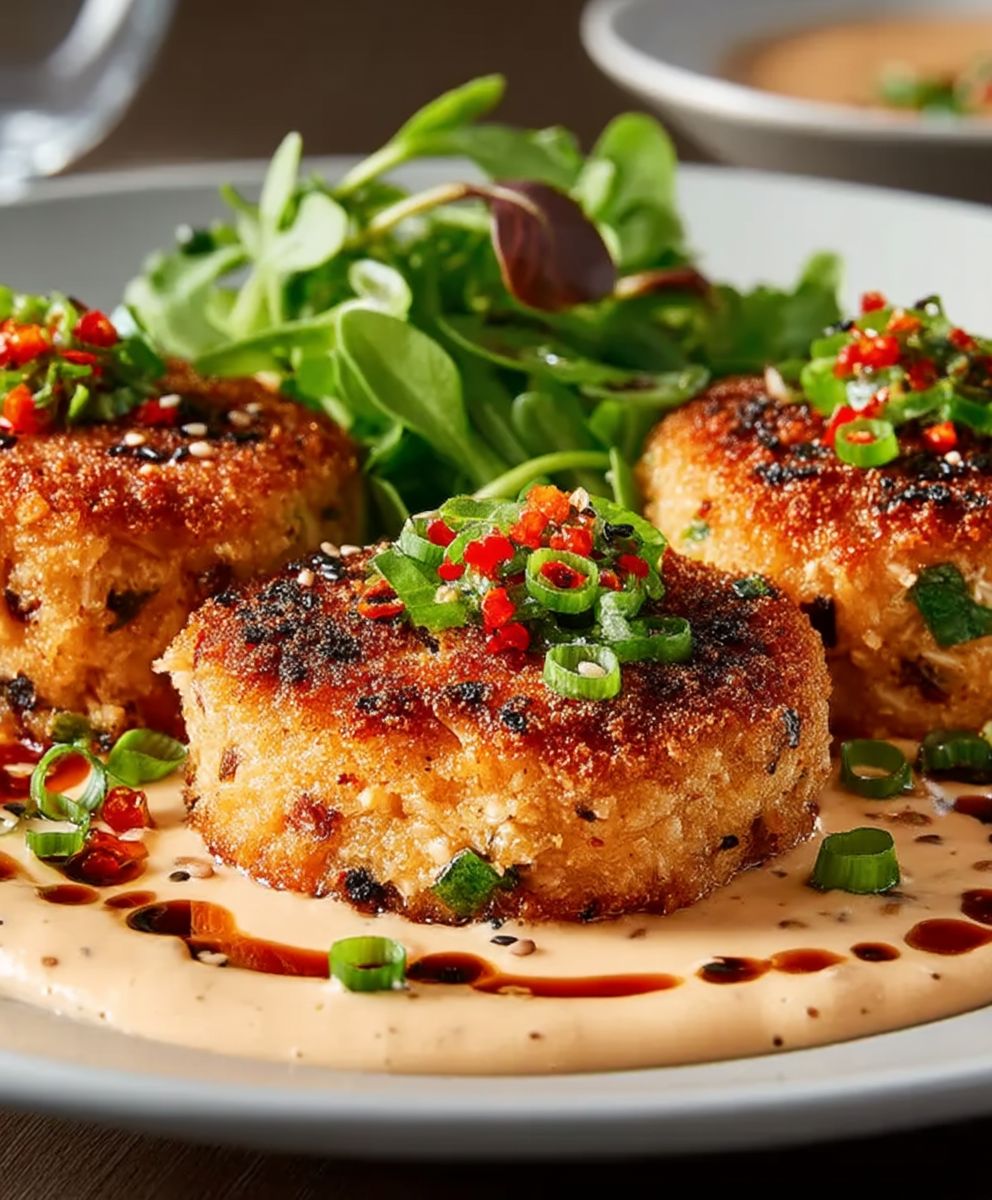
Tuna Cakes: Crispy on the outside, tender on the inside, and bursting with savory flavor, these aren’t your average canned tuna creation! Forget dry, bland patties we’re talking about a culinary experience that will transform your perception of this humble pantry staple. Have you ever wondered how to elevate simple ingredients into something truly special? These delightful cakes are the answer.
While the exact origins of tuna cakes are a bit murky, similar fish cakes have been enjoyed in coastal communities around the world for centuries. They represent a resourceful way to utilize leftover fish and create a satisfying and nutritious meal. Think of them as a delicious testament to culinary ingenuity, born from a desire to minimize waste and maximize flavor.
What makes these little gems so irresistible? It’s a combination of factors. The crispy exterior provides a delightful textural contrast to the soft, flaky tuna within. The addition of herbs, spices, and perhaps a touch of lemon zest brightens the flavor profile, creating a symphony of tastes that dance on your palate. Plus, they are incredibly convenient! Perfect for a quick lunch, a light dinner, or even a crowd-pleasing appetizer, these tuna cakes are a versatile dish that fits seamlessly into any lifestyle. Get ready to discover your new favorite way to enjoy tuna!

Ingredients:
- For the Tuna Cakes:
- 2 (5 ounce) cans tuna in water, drained well
- 1/2 cup mayonnaise
- 1/4 cup finely chopped red onion
- 1/4 cup finely chopped celery
- 1/4 cup chopped fresh parsley
- 1 large egg, lightly beaten
- 1/2 cup panko bread crumbs, plus more for coating
- 1 tablespoon Dijon mustard
- 1 teaspoon lemon juice
- 1/2 teaspoon Old Bay seasoning
- 1/4 teaspoon black pepper
- Pinch of cayenne pepper (optional)
- 2 tablespoons olive oil, for cooking
- For the Lemon-Dill Aioli (optional):
- 1/2 cup mayonnaise
- 1 tablespoon lemon juice
- 1 tablespoon chopped fresh dill
- 1 clove garlic, minced
- 1/4 teaspoon salt
- 1/8 teaspoon black pepper
Preparing the Tuna Mixture:
Okay, let’s get started! The first thing we need to do is prepare the tuna mixture. This is where all the delicious flavors come together, so pay close attention!
- Drain the Tuna: This is super important! You want to make sure you drain the tuna really, really well. I usually press it against the side of the strainer with a spoon to get out as much water as possible. Excess water will make your tuna cakes soggy, and nobody wants that!
- Combine the Ingredients: In a medium-sized bowl, add the drained tuna, mayonnaise, red onion, celery, parsley, egg, panko bread crumbs, Dijon mustard, lemon juice, Old Bay seasoning, black pepper, and cayenne pepper (if using).
- Mix Gently: Now, gently mix all the ingredients together until they are just combined. Be careful not to overmix, as this can make the tuna cakes tough. You want everything to be nicely incorporated, but still have some texture.
- Taste and Adjust: This is your chance to be a chef! Taste the mixture and adjust the seasonings as needed. Maybe you want a little more Old Bay, or a touch more lemon juice. Don’t be afraid to experiment and make it your own!
- Chill the Mixture: Cover the bowl with plastic wrap and refrigerate the tuna mixture for at least 30 minutes. This will help the tuna cakes hold their shape better when you cook them. I sometimes chill it for an hour or even longer if I have the time. It really makes a difference!
Forming the Tuna Cakes:
Now that our tuna mixture is nice and chilled, it’s time to form the tuna cakes. This part is pretty straightforward, but a few tips can help you get perfect, evenly sized cakes.
- Prepare a Work Surface: Line a baking sheet with parchment paper. This will prevent the tuna cakes from sticking and make cleanup a breeze.
- Portion the Mixture: Using a spoon or ice cream scoop, portion out the tuna mixture into equal-sized portions. I usually aim for about 1/4 cup of mixture per tuna cake. This will give you about 6-8 tuna cakes, depending on the size.
- Shape the Cakes: Gently shape each portion into a round, flat cake. You can use your hands or a spatula to help shape them. Aim for about 1/2 inch thick.
- Coat with Panko: Place some extra panko bread crumbs in a shallow dish. Gently dredge each tuna cake in the panko bread crumbs, making sure to coat both sides evenly. The panko will give the tuna cakes a nice crispy crust when they are cooked.
- Place on Baking Sheet: Place the coated tuna cakes on the prepared baking sheet.
Cooking the Tuna Cakes:
Alright, we’re almost there! Now it’s time to cook those beautiful tuna cakes. I prefer to pan-fry them for a nice golden-brown crust, but you can also bake them if you prefer a healthier option.
Pan-Frying Instructions:
- Heat the Oil: Heat the olive oil in a large skillet over medium heat. You want the oil to be hot enough so that the tuna cakes sizzle when they hit the pan, but not so hot that they burn.
- Cook the Tuna Cakes: Carefully place the tuna cakes in the hot skillet, making sure not to overcrowd the pan. Cook for about 3-4 minutes per side, or until they are golden brown and heated through.
- Don’t Move Them Too Soon: Resist the urge to flip the tuna cakes too early! Let them cook for a few minutes on each side to develop a nice crust before flipping.
- Remove and Drain: Remove the cooked tuna cakes from the skillet and place them on a paper towel-lined plate to drain any excess oil.
Baking Instructions (Optional):
- Preheat the Oven: Preheat your oven to 375°F (190°C).
- Prepare the Baking Sheet: Lightly grease a baking sheet with olive oil or cooking spray.
- Place Tuna Cakes on Baking Sheet: Place the coated tuna cakes on the prepared baking sheet.
- Bake: Bake for 15-20 minutes, or until they are golden brown and heated through.
Making the Lemon-Dill Aioli (Optional):
While the tuna cakes are cooking, you can whip up a quick and easy Lemon-Dill Aioli. This creamy sauce adds a bright and tangy flavor that perfectly complements the tuna cakes. But it’s totally optional, they are delicious on their own too!
- Combine Ingredients: In a small bowl, combine the mayonnaise, lemon juice, dill, garlic, salt, and pepper.
- Mix Well: Mix all the ingredients together until they are well combined.
- Taste and Adjust: Taste the aioli and adjust the seasonings as needed. You can add more lemon juice for a tangier flavor, or more dill for a fresher taste.
- Chill (Optional): For best results, chill the aioli in the refrigerator for at least 30 minutes before serving. This will allow the flavors to meld together.
Serving the Tuna Cakes:
Finally, the moment we’ve all been waiting for! It’s time to serve those delicious tuna cakes. There are so many ways to enjoy them, so get creative!
- As an Appetizer: Serve the tuna cakes as an appetizer with the Lemon-Dill Aioli for dipping.
- In a Salad: Top a bed of mixed greens with the tuna cakes and a light vinaigrette for a healthy and satisfying salad.
- On a Bun: Serve the tuna cakes on a toasted bun with lettuce, tomato, and your favorite condiments for a delicious tuna burger.
- With a Side Dish: Serve the tuna cakes with a side of roasted vegetables, rice, or quinoa for a complete meal.
No matter how you choose to serve them, I hope you enjoy these tuna cakes as much as I do! They’re a quick, easy, and delicious way to enjoy tuna, and they’re perfect for a weeknight meal or a special occasion.
Conclusion:
Well, there you have it! I truly believe these Tuna Cakes are a must-try for anyone looking for a quick, easy, and incredibly flavorful meal. They’re not just your average tuna dish; the combination of fresh herbs, zesty lemon, and that satisfying crispy exterior elevates them to something truly special. I’ve made these countless times, and they’re always a hit, even with people who claim they don’t like tuna!
Why You Absolutely Need to Make These Tuna Cakes:
First and foremost, they’re incredibly versatile. Need a light lunch? Tuna Cakes. A quick weeknight dinner? Tuna Cakes. A tasty appetizer for a gathering? You guessed it Tuna Cakes! They come together in under 30 minutes, making them perfect for those busy days when you don’t have a lot of time to spend in the kitchen. Plus, they’re packed with protein and healthy fats, making them a nutritious and satisfying option.
But the real magic lies in the flavor. The bright, fresh herbs and lemon zest perfectly complement the richness of the tuna, creating a balanced and delicious taste that will leave you wanting more. And that crispy exterior? It’s the perfect textural contrast to the tender, flaky interior. Trust me, once you try these, you’ll be hooked!
Serving Suggestions and Variations:
The possibilities are endless when it comes to serving these Tuna Cakes. My personal favorite is to serve them on a bed of mixed greens with a dollop of creamy dill sauce. The coolness of the greens and the tanginess of the dill sauce perfectly complement the richness of the cakes.
But don’t feel limited to that! You can also serve them:
* As sliders: Place them on mini brioche buns with some lettuce, tomato, and your favorite sauce.
* With a side of roasted vegetables: Asparagus, broccoli, or sweet potatoes would all be delicious.
* On top of a salad: Add them to a Caesar salad or a simple green salad for a protein-packed meal.
* With a spicy mayo: Mix some sriracha or chili garlic sauce into your mayonnaise for a kick.
* As part of a brunch spread: Serve them alongside eggs, avocado toast, and fresh fruit.
And if you’re feeling adventurous, you can easily customize the recipe to your liking. Try adding different herbs, such as parsley, chives, or cilantro. You can also add a pinch of red pepper flakes for a little heat. Or, if you’re not a fan of lemon, you can substitute lime juice instead.
For a healthier twist, you can bake the Tuna Cakes instead of frying them. Simply preheat your oven to 375°F (190°C), place the cakes on a baking sheet lined with parchment paper, and bake for 15-20 minutes, or until golden brown.
Now It’s Your Turn!
I’m so excited for you to try this recipe and experience the deliciousness of these Tuna Cakes for yourself. I truly believe they’ll become a staple in your kitchen, just like they have in mine.
So, what are you waiting for? Gather your ingredients, follow the simple steps, and get ready to enjoy a truly amazing meal. And don’t forget to share your experience with me! I’d love to hear how they turned out and what variations you tried. Leave a comment below or tag me on social media I can’t wait to see your creations! Happy cooking! I hope you enjoy this Tuna Cakes recipe as much as I do!
Tuna Cakes: The Ultimate Guide to Delicious and Easy Recipes
Crispy, flavorful tuna cakes, great as an appetizer, salad topping, or tuna burger. Easy and ready in under an hour!
Ingredients
- 2 (5 ounce) cans tuna in water, drained well
- 1/2 cup mayonnaise
- 1/4 cup finely chopped red onion
- 1/4 cup finely chopped celery
- 1/4 cup chopped fresh parsley
- 1 large egg, lightly beaten
- 1/2 cup panko bread crumbs, plus more for coating
- 1 tablespoon Dijon mustard
- 1 teaspoon lemon juice
- 1/2 teaspoon Old Bay seasoning
- 1/4 teaspoon black pepper
- Pinch of cayenne pepper (optional)
- 2 tablespoons olive oil, for cooking
- 1/2 cup mayonnaise
- 1 tablespoon lemon juice
- 1 tablespoon chopped fresh dill
- 1 clove garlic, minced
- 1/4 teaspoon salt
- 1/8 teaspoon black pepper
Instructions
- Prepare the Tuna Mixture: Drain the tuna really well, pressing it against the side of a strainer with a spoon. In a medium bowl, combine the drained tuna, mayonnaise, red onion, celery, parsley, egg, 1/2 cup panko bread crumbs, Dijon mustard, lemon juice, Old Bay seasoning, black pepper, and cayenne pepper (if using).
- Mix gently until just combined. Taste and adjust seasonings as needed.
- Cover and refrigerate the tuna mixture for at least 30 minutes.
- Form the Tuna Cakes: Line a baking sheet with parchment paper. Portion out the tuna mixture into equal-sized portions (about 1/4 cup each).
- Gently shape each portion into a round, flat cake (about 1/2 inch thick).
- Place extra panko bread crumbs in a shallow dish. Dredge each tuna cake in the panko, coating both sides evenly. Place on the prepared baking sheet.
- Cook the Tuna Cakes (Pan-Frying): Heat olive oil in a large skillet over medium heat. Carefully place the tuna cakes in the hot skillet, being careful not to overcrowd the pan. Cook for 3-4 minutes per side, or until golden brown and heated through.
- Remove and drain on a paper towel-lined plate.
- Cook the Tuna Cakes (Baking – Optional): Preheat oven to 375°F (190°C). Lightly grease a baking sheet. Place the coated tuna cakes on the baking sheet. Bake for 15-20 minutes, or until golden brown and heated through.
- Make the Lemon-Dill Aioli (Optional): In a small bowl, combine mayonnaise, lemon juice, dill, garlic, salt, and pepper. Mix well. Taste and adjust seasonings. Chill for at least 30 minutes before serving (optional).
- Serve: Serve the tuna cakes as an appetizer with the Lemon-Dill Aioli, in a salad, on a bun as a tuna burger, or with a side dish.
Notes
- Draining the tuna well is crucial to prevent soggy tuna cakes.
- Chilling the tuna mixture helps the cakes hold their shape.
- Don’t overmix the tuna mixture, as this can make the cakes tough.
- Adjust seasonings to your preference.
- Pan-frying gives the tuna cakes a crispier crust, but baking is a healthier option.
- The Lemon-Dill Aioli is optional but adds a bright and tangy flavor.
- Tuna cakes can be stored in the refrigerator for up to 3 days.

Leave a Comment