
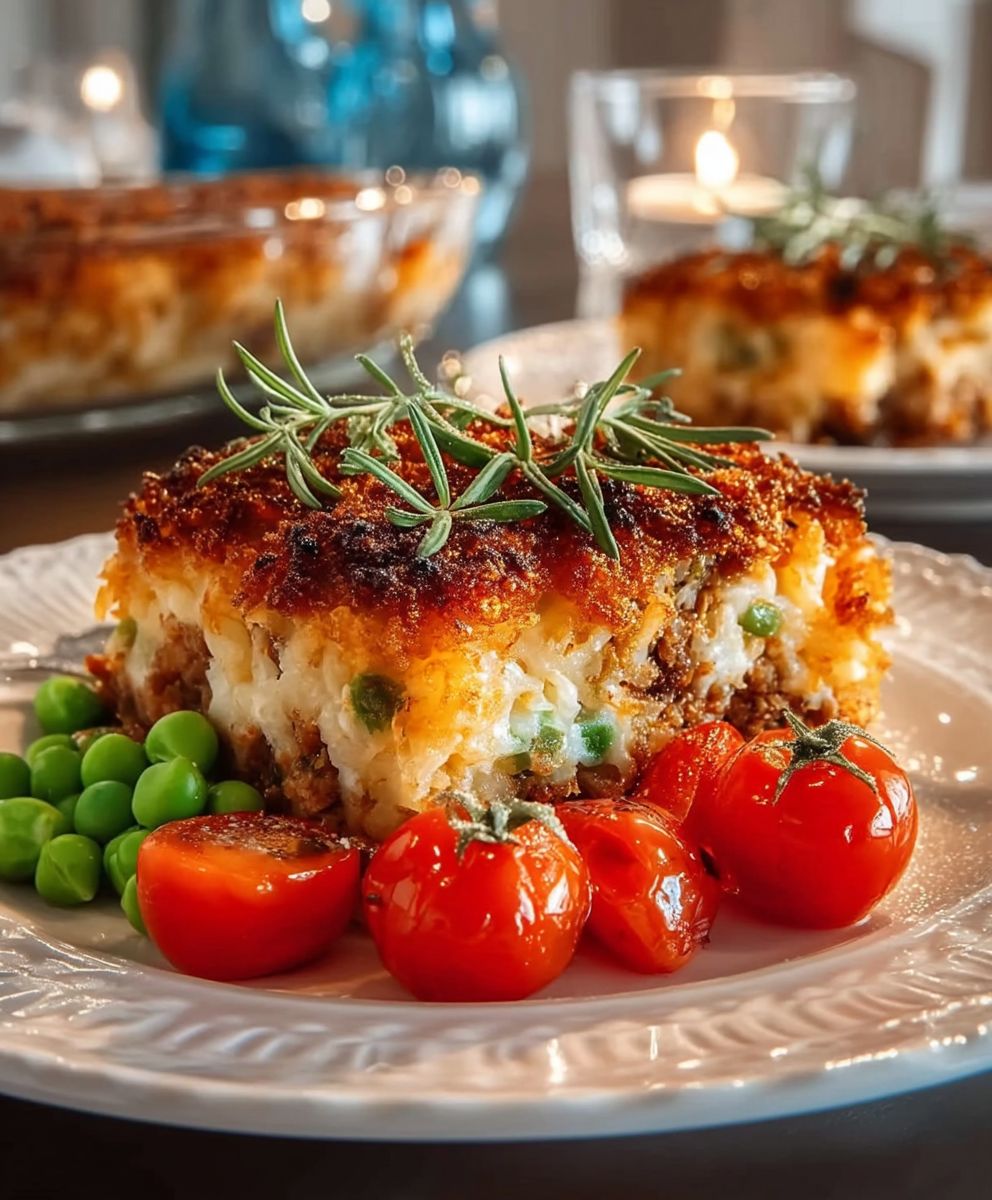
Arancini rice ball casserole: imagine all the crispy, cheesy goodness of traditional arancini, but without the tedious rolling and frying! This recipe transforms the beloved Italian street food into a comforting, crowd-pleasing casserole that’s perfect for weeknight dinners or potlucks. Forget spending hours shaping individual rice balls; this streamlined version delivers the same incredible flavor with minimal effort.
Arancini, meaning “little oranges” in Italian, have a rich history rooted in Sicilian cuisine. Believed to have originated in the 10th century during Arab rule, these fried rice balls were initially a way to preserve saffron-infused rice. Over time, they evolved to include various fillings like ragu, mozzarella, and peas, becoming a symbol of Sicilian culinary ingenuity. While traditionally deep-fried to golden perfection, our arancini rice ball casserole offers a healthier and more convenient alternative without sacrificing that authentic taste.
What makes arancini so irresistible? It’s the delightful combination of textures the crispy exterior giving way to a creamy, flavorful rice center, often oozing with melted cheese. People adore the savory filling and the satisfying crunch. This casserole captures all of those elements in a single dish. Plus, it’s incredibly versatile! You can customize the filling to your liking, using leftover risotto, adding different cheeses, or incorporating your favorite vegetables. Get ready to experience the magic of arancini in a whole new way with this easy and delicious casserole!

Ingredients:
- For the Risotto:
- 2 tablespoons olive oil
- 1 small onion, finely chopped
- 1 ½ cups Arborio rice
- ½ cup dry white wine (optional)
- 6 cups hot chicken broth (or vegetable broth for vegetarian option)
- ½ cup grated Parmesan cheese, plus more for topping
- 2 tablespoons butter
- Salt and freshly ground black pepper to taste
- For the Filling:
- 1 pound ground beef (or Italian sausage, casings removed)
- 1 small onion, finely chopped
- 2 cloves garlic, minced
- 1 (28 ounce) can crushed tomatoes
- 1 (15 ounce) can tomato sauce
- 1 teaspoon dried oregano
- ½ teaspoon dried basil
- ½ teaspoon sugar
- Salt and freshly ground black pepper to taste
- 8 ounces mozzarella cheese, cut into ½-inch cubes
- ½ cup frozen peas (optional)
- For the Breading and Assembly:
- 3 large eggs, beaten
- 2 cups breadcrumbs (Italian seasoned preferred)
- ½ cup grated Parmesan cheese
- Vegetable oil, for drizzling
- Fresh parsley, chopped, for garnish (optional)
Making the Risotto
Okay, let’s start with the heart of our Arancini Casserole the risotto! Don’t be intimidated; it’s easier than you think. The key is patience and constant stirring. Trust me, it’s worth it!
- Sauté the Onion: In a large, heavy-bottomed pot or Dutch oven, heat the olive oil over medium heat. Add the chopped onion and cook until softened and translucent, about 5-7 minutes. You don’t want it to brown, just become nice and tender.
- Toast the Rice: Add the Arborio rice to the pot and cook, stirring constantly, for about 2-3 minutes. This toasting process helps the rice release its starches, which is what gives risotto its creamy texture. You’ll notice the rice becoming slightly translucent around the edges.
- Deglaze (Optional): If you’re using white wine, pour it into the pot and stir until it’s completely absorbed by the rice. This adds a lovely depth of flavor, but it’s perfectly fine to skip this step if you prefer.
- Add the Broth Gradually: Now comes the crucial part. Add about 1 cup of the hot chicken broth to the rice, stirring constantly until the liquid is almost completely absorbed. The rice should be simmering gently, not boiling vigorously.
- Continue Adding Broth: Continue adding the broth, one cup at a time, stirring constantly and allowing each addition to be almost completely absorbed before adding the next. This process will take about 20-25 minutes. The rice is done when it’s creamy and tender, but still has a slight bite to it (al dente).
- Stir in Cheese and Butter: Once the rice is cooked, remove the pot from the heat. Stir in the ½ cup of grated Parmesan cheese and the butter. Season with salt and freshly ground black pepper to taste. The butter and cheese will melt into the risotto, making it even creamier and richer.
- Cool the Risotto: Spread the risotto out on a baking sheet to cool slightly. This will make it easier to handle when assembling the casserole. You can even refrigerate it for a faster cooling process.
Preparing the Meat Sauce
Next up, let’s get that delicious meat sauce simmering. This is where we’ll build layers of flavor that complement the creamy risotto perfectly.
- Brown the Meat: In a large skillet or Dutch oven, brown the ground beef (or Italian sausage) over medium-high heat. Break it up with a spoon as it cooks. Drain off any excess grease.
- Sauté Aromatics: Add the chopped onion and minced garlic to the skillet and cook until softened, about 5 minutes. The aroma should be amazing at this point!
- Add Tomatoes and Seasonings: Stir in the crushed tomatoes, tomato sauce, dried oregano, dried basil, and sugar. Season with salt and freshly ground black pepper to taste. The sugar helps to balance the acidity of the tomatoes.
- Simmer the Sauce: Bring the sauce to a simmer, then reduce the heat to low, cover, and cook for at least 30 minutes, or up to an hour. The longer it simmers, the more the flavors will meld together. Stir occasionally to prevent sticking.
- Add Peas (Optional): If you’re using frozen peas, stir them into the sauce during the last 5 minutes of cooking.
Assembling the Arancini Casserole
Now for the fun part putting it all together! This is where the magic happens, and our individual components transform into a comforting and satisfying casserole.
- Preheat Oven: Preheat your oven to 375°F (190°C).
- Prepare Baking Dish: Lightly grease a 9×13 inch baking dish.
- Layer Risotto: Spread half of the cooled risotto evenly over the bottom of the prepared baking dish.
- Add Mozzarella: Sprinkle the mozzarella cheese cubes evenly over the risotto layer.
- Layer Meat Sauce: Pour the meat sauce over the mozzarella cheese, spreading it evenly.
- Layer Remaining Risotto: Spread the remaining risotto over the meat sauce, trying to cover it completely. This can be a little tricky, but do your best to create an even layer.
- Prepare Egg Wash: In a shallow bowl, whisk the beaten eggs.
- Prepare Breadcrumb Mixture: In another shallow bowl, combine the breadcrumbs and ½ cup of grated Parmesan cheese.
- Top with Breadcrumbs: Dip your hands in the egg wash and then the breadcrumb mixture. Gently press the breadcrumbs onto the top of the risotto layer. You can also sprinkle the breadcrumbs over the top and then gently press them down. This will create a nice, crispy crust.
- Drizzle with Oil: Drizzle the top of the casserole with vegetable oil. This will help the breadcrumbs brown nicely.
- Bake: Bake in the preheated oven for 25-30 minutes, or until the top is golden brown and the casserole is heated through.
- Rest: Let the casserole rest for 10 minutes before serving. This allows the flavors to meld together even more and makes it easier to slice.
- Garnish (Optional): Garnish with fresh chopped parsley, if desired.
Tips and Variations
Want to customize your Arancini Casserole? Here are a few ideas:
- Vegetarian Option: Substitute the ground beef with cooked lentils or mushrooms for a vegetarian version. You can also use vegetable broth instead of chicken broth.
- Spicy Kick: Add a pinch of red pepper flakes to the meat sauce for a little heat.
- Different Cheeses: Experiment with different cheeses in the filling, such as provolone, fontina, or even a little bit of ricotta.
- Add Vegetables: Stir in some chopped vegetables, such as carrots, celery, or bell peppers, to the meat sauce for added nutrients and flavor.
- Make it Ahead: You can assemble the casserole ahead of time and refrigerate it for up to 24 hours before baking. Just add a few extra minutes to the baking time.
Serving Suggestions
This Arancini Casserole is a complete meal on its own, but it also pairs well with a simple side salad or some crusty bread for dipping in the sauce. Enjoy!
Conclusion:
So there you have it! This Arancini Rice Ball Casserole isn’t just another weeknight dinner; it’s a flavor explosion waiting to happen. I truly believe this recipe is a must-try because it takes all the comforting deliciousness of classic arancini that crispy exterior, the creamy, cheesy rice, and the savory filling and transforms it into a simple, bakeable casserole that’s perfect for busy weeknights or potlucks. Forget standing over a hot stove, meticulously rolling and frying individual rice balls. This casserole gives you all the taste with a fraction of the effort.
Why is this Arancini Rice Ball Casserole a game-changer? It’s incredibly versatile. You can easily adapt the filling to suit your preferences. Not a fan of peas? Swap them out for some chopped mushrooms or roasted red peppers. Want to add a little kick? A pinch of red pepper flakes or a drizzle of hot sauce will do the trick. Plus, it’s a fantastic way to use up leftover risotto or cooked rice. Talk about reducing food waste!
Beyond the ease of preparation and the customizable filling, the texture is simply divine. The top layer gets beautifully golden and slightly crispy in the oven, while the inside remains wonderfully creamy and cheesy. It’s a symphony of textures that will have everyone coming back for seconds (and maybe even thirds!).
Serving Suggestions and Variations:
This casserole is delicious on its own, but you can definitely elevate it with some simple accompaniments. A fresh green salad with a light vinaigrette is a perfect counterpoint to the richness of the casserole. A side of crusty bread for soaking up all that delicious sauce is also highly recommended.
For variations, consider these ideas:
* Meat Lover’s Arancini Casserole: Add cooked Italian sausage, ground beef, or shredded chicken to the filling.
* Vegetarian Delight: Load it up with roasted vegetables like zucchini, eggplant, and bell peppers.
* Seafood Sensation: Incorporate cooked shrimp, scallops, or crabmeat for a luxurious twist.
* Spicy Arancini Casserole: Add some Calabrian chili paste or a generous pinch of red pepper flakes to the rice mixture.
* Different Cheeses: Experiment with different cheeses in the rice mixture. Fontina, provolone, or even a smoked gouda would be delicious.
I’m so excited for you to try this recipe! I know you’ll love how easy it is to make and how incredibly flavorful it is. It’s a guaranteed crowd-pleaser that will quickly become a family favorite.
Now it’s your turn!
I truly hope you give this Arancini Rice Ball Casserole a try. Once you do, please come back and share your experience in the comments below. I’d love to hear what variations you tried, what your family thought, and any tips or tricks you discovered along the way. Your feedback is invaluable and helps other readers discover new and exciting ways to enjoy this recipe. Don’t be shy let me know what you think! Happy cooking!
Arancini Rice Ball Casserole: A Delicious and Easy Recipe
Creamy risotto, rich meat sauce, and crispy breadcrumb topping combine in this easy Arancini Casserole. All the flavors of arancini, deconstructed for simple baking!
Ingredients
- 2 tablespoons olive oil
- 1 small onion, finely chopped
- 1 ½ cups Arborio rice
- ½ cup dry white wine (optional)
- 6 cups hot chicken broth (or vegetable broth for vegetarian option)
- ½ cup grated Parmesan cheese, plus more for topping
- 2 tablespoons butter
- Salt and freshly ground black pepper to taste
- 1 pound ground beef (or Italian sausage, casings removed)
- 1 small onion, finely chopped
- 2 cloves garlic, minced
- 1 (28 ounce) can crushed tomatoes
- 1 (15 ounce) can tomato sauce
- 1 teaspoon dried oregano
- ½ teaspoon dried basil
- ½ teaspoon sugar
- Salt and freshly ground black pepper to taste
- 8 ounces mozzarella cheese, cut into ½-inch cubes
- ½ cup frozen peas (optional)
- 3 large eggs, beaten
- 2 cups breadcrumbs (Italian seasoned preferred)
- ½ cup grated Parmesan cheese
- Vegetable oil, for drizzling
- Fresh parsley, chopped, for garnish (optional)
Instructions
- In a large, heavy-bottomed pot or Dutch oven, heat the olive oil over medium heat. Add the chopped onion and cook until softened and translucent, about 5-7 minutes.
- Add the Arborio rice to the pot and cook, stirring constantly, for about 2-3 minutes.
- If using white wine, pour it into the pot and stir until it’s completely absorbed by the rice.
- Add about 1 cup of the hot chicken broth to the rice, stirring constantly until the liquid is almost completely absorbed.
- Continue adding the broth, one cup at a time, stirring constantly and allowing each addition to be almost completely absorbed before adding the next. This process will take about 20-25 minutes. The rice is done when it’s creamy and tender, but still has a slight bite to it (al dente).
- Once the rice is cooked, remove the pot from the heat. Stir in the ½ cup of grated Parmesan cheese and the butter. Season with salt and freshly ground black pepper to taste.
- Spread the risotto out on a baking sheet to cool slightly. You can even refrigerate it for a faster cooling process.
- In a large skillet or Dutch oven, brown the ground beef (or Italian sausage) over medium-high heat. Break it up with a spoon as it cooks. Drain off any excess grease.
- Add the chopped onion and minced garlic to the skillet and cook until softened, about 5 minutes.
- Stir in the crushed tomatoes, tomato sauce, dried oregano, dried basil, and sugar. Season with salt and freshly ground black pepper to taste.
- Bring the sauce to a simmer, then reduce the heat to low, cover, and cook for at least 30 minutes, or up to an hour. Stir occasionally to prevent sticking.
- If you’re using frozen peas, stir them into the sauce during the last 5 minutes of cooking.
- Preheat your oven to 375°F (190°C).
- Lightly grease a 9×13 inch baking dish.
- Spread half of the cooled risotto evenly over the bottom of the prepared baking dish.
- Sprinkle the mozzarella cheese cubes evenly over the risotto layer.
- Pour the meat sauce over the mozzarella cheese, spreading it evenly.
- Spread the remaining risotto over the meat sauce, trying to cover it completely.
- In a shallow bowl, whisk the beaten eggs.
- In another shallow bowl, combine the breadcrumbs and ½ cup of grated Parmesan cheese.
- Dip your hands in the egg wash and then the breadcrumb mixture. Gently press the breadcrumbs onto the top of the risotto layer. You can also sprinkle the breadcrumbs over the top and then gently press them down.
- Drizzle the top of the casserole with vegetable oil.
- Bake in the preheated oven for 25-30 minutes, or until the top is golden brown and the casserole is heated through.
- Let the casserole rest for 10 minutes before serving.
- Garnish with fresh chopped parsley, if desired.
Notes
- Vegetarian Option: Substitute the ground beef with cooked lentils or mushrooms for a vegetarian version. You can also use vegetable broth instead of chicken broth.
- Spicy Kick: Add a pinch of red pepper flakes to the meat sauce for a little heat.
- Different Cheeses: Experiment with different cheeses in the filling, such as provolone, fontina, or even a little bit of ricotta.
- Add Vegetables: Stir in some chopped vegetables, such as carrots, celery, or bell peppers, to the meat sauce for added nutrients and flavor.
- Make it Ahead: You can assemble the casserole ahead of time and refrigerate it for up to 24 hours before baking. Just add a few extra minutes to the baking time.
- Serving Suggestions: This Arancini Casserole is a complete meal on its own, but it also pairs well with a simple side salad or some crusty bread for dipping in the sauce.

Leave a Comment