
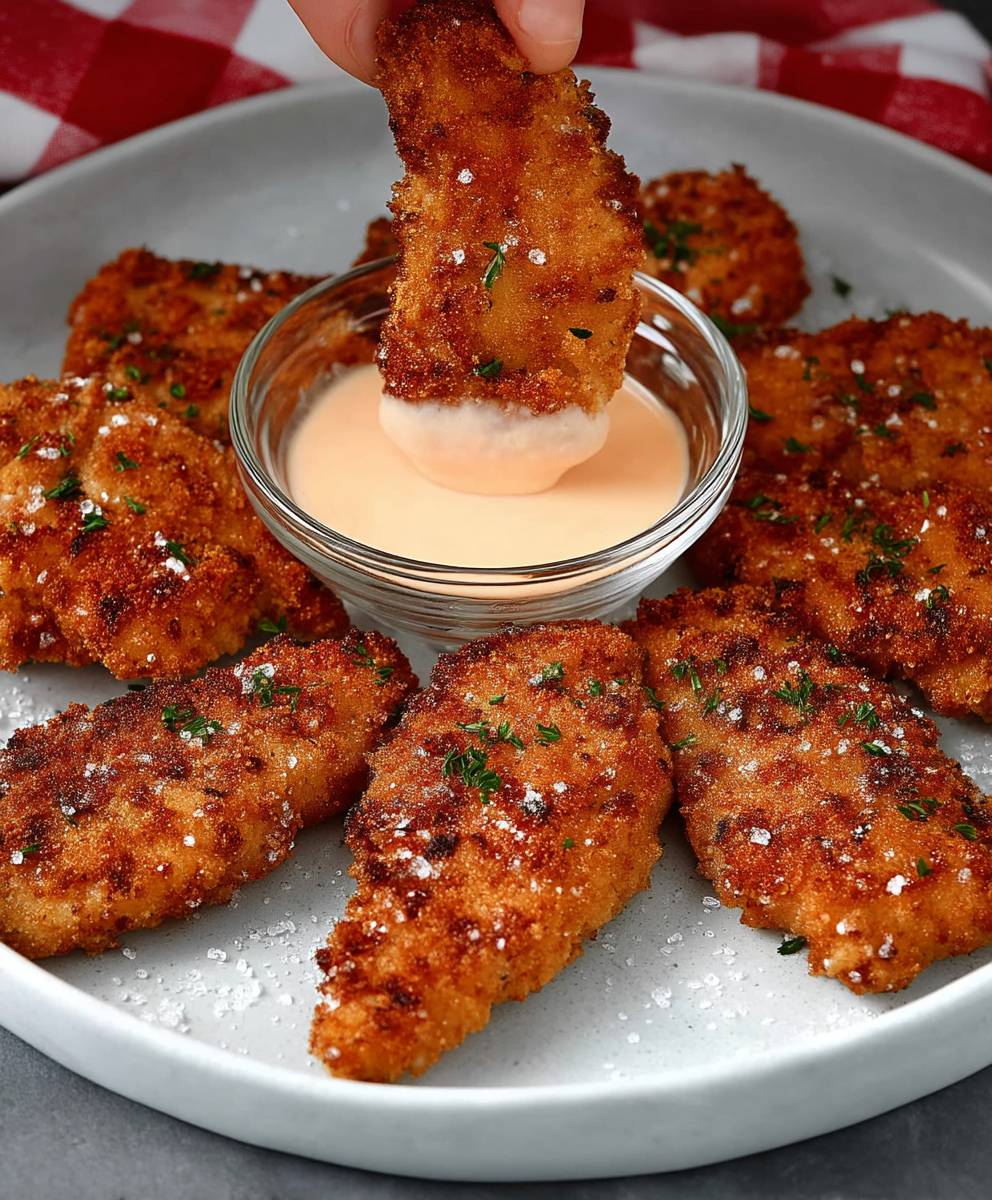
Frozen Chicken Tenders: the ultimate weeknight dinner savior! Let’s be honest, we all have those evenings when cooking from scratch feels like climbing Mount Everest. That’s where these golden, crispy delights swoop in to rescue us from culinary despair. But did you know that the humble chicken tender, a staple in American cuisine, has evolved from simple chicken strips to a versatile and beloved comfort food?
While the exact origins are debated, many believe chicken tenders gained popularity in the latter half of the 20th century, quickly becoming a family favorite. Their appeal lies in their simplicity and satisfying crunch. Who can resist that perfectly seasoned breading giving way to juicy, tender chicken inside? It’s a textural masterpiece!
What truly makes frozen chicken tenders a winner is their incredible convenience. They’re quick to prepare, requiring minimal effort, and can be paired with a variety of sides, from classic fries and coleslaw to healthy salads and roasted vegetables. Whether you’re a busy parent, a student on a budget, or simply craving a delicious and easy meal, frozen chicken tenders are a guaranteed crowd-pleaser. So, let’s dive into the best ways to cook these frozen wonders to crispy, golden perfection!

Ingredients:
- 1 bag (approximately 25-30 ounces) frozen chicken tenders
- 1/4 cup olive oil (or vegetable oil)
- 1 teaspoon garlic powder
- 1 teaspoon onion powder
- 1/2 teaspoon paprika
- 1/4 teaspoon black pepper
- 1/4 teaspoon salt (or to taste)
- Optional: Your favorite dipping sauce (BBQ, honey mustard, ranch, etc.)
- Optional: Fresh parsley, chopped (for garnish)
Preparing the Chicken Tenders:
Okay, let’s get started! We’re going to make these frozen chicken tenders taste like they came straight from a restaurant. The key is even cooking and a little bit of extra flavor. I’m going to show you how to do it in the oven, which is my preferred method for crispy and evenly cooked tenders. You can also use an air fryer if you prefer, but I’ll focus on the oven method here.
- Preheat your oven to 400°F (200°C). This is crucial! A hot oven ensures that the chicken tenders cook quickly and get nice and crispy. Make sure your oven is fully preheated before you put the tenders in.
- Prepare a baking sheet. Line a baking sheet with parchment paper. This prevents the chicken tenders from sticking and makes cleanup a breeze. You can also use aluminum foil, but parchment paper tends to work better for preventing sticking.
- Arrange the frozen chicken tenders on the baking sheet. Spread the chicken tenders out in a single layer on the prepared baking sheet. Make sure they’re not overlapping, as this will prevent them from cooking evenly. Give them a little space to breathe!
- Drizzle with olive oil. Drizzle the olive oil (or vegetable oil) evenly over the chicken tenders. This helps them to brown and crisp up nicely in the oven. Don’t be shy, but don’t overdo it either you want a light coating, not a swimming pool of oil.
- Season the chicken tenders. In a small bowl, combine the garlic powder, onion powder, paprika, black pepper, and salt. Mix well. Then, sprinkle this seasoning mixture evenly over the chicken tenders. Make sure each tender gets a good coating of the spices. This is where we add that extra flavor that makes these tenders special!
Cooking Process:
Now for the magic! We’re going to bake these tenders to golden-brown perfection. Keep an eye on them, as cooking times can vary slightly depending on your oven.
- Bake the chicken tenders. Place the baking sheet in the preheated oven and bake for 20-25 minutes, or until the chicken tenders are golden brown and cooked through. Flip the tenders halfway through the cooking time (around 10-12 minutes) to ensure even browning on both sides.
- Check for doneness. The internal temperature of the chicken tenders should reach 165°F (74°C). You can use a meat thermometer to check this. Insert the thermometer into the thickest part of a tender. If it’s not quite there, return the tenders to the oven for a few more minutes.
- Crisp them up (optional). If you want extra crispy chicken tenders, you can broil them for the last 1-2 minutes of cooking time. Keep a very close eye on them, as they can burn quickly under the broiler. Just a minute or two under the broiler will give them that extra bit of crunch.
Serving and Enjoying:
The best part! Now it’s time to enjoy your delicious, crispy chicken tenders. Get your favorite dipping sauce ready and prepare for a flavor explosion!
- Remove from the oven. Carefully remove the baking sheet from the oven and let the chicken tenders cool for a minute or two before serving. This will prevent you from burning your mouth!
- Serve with your favorite dipping sauce. Serve the chicken tenders immediately with your favorite dipping sauce. BBQ sauce, honey mustard, ranch dressing, or even a simple ketchup are all great options. The choice is yours!
- Garnish (optional). If you’re feeling fancy, you can garnish the chicken tenders with some fresh chopped parsley. This adds a pop of color and a touch of freshness.
- Enjoy! Dig in and enjoy your perfectly cooked, flavorful chicken tenders! They’re great as a snack, a quick meal, or even as part of a larger dish.
Air Fryer Instructions (Alternative Method):
If you prefer using an air fryer, here’s how to cook your frozen chicken tenders to crispy perfection:
- Preheat your air fryer to 400°F (200°C). Most air fryers require a preheating step for optimal results. Check your air fryer’s manual for specific instructions.
- Arrange the frozen chicken tenders in the air fryer basket. Place the chicken tenders in a single layer in the air fryer basket. Avoid overcrowding the basket, as this will prevent them from cooking evenly. You may need to cook them in batches.
- Drizzle with olive oil (optional). While not strictly necessary, a light drizzle of olive oil can help the chicken tenders crisp up even more.
- Season the chicken tenders (optional). You can use the same seasoning mixture as described above for the oven method. Sprinkle it evenly over the chicken tenders before cooking.
- Air fry the chicken tenders. Air fry for 10-15 minutes, flipping halfway through, or until the chicken tenders are golden brown and cooked through. The exact cooking time will depend on your air fryer and the size of the tenders.
- Check for doneness. As with the oven method, the internal temperature of the chicken tenders should reach 165°F (74°C). Use a meat thermometer to check.
- Serve and enjoy! Remove the chicken tenders from the air fryer and serve immediately with your favorite dipping sauce.
Tips and Variations:
Here are a few extra tips and variations to help you customize your chicken tenders:
- Spice it up! Add a pinch of cayenne pepper or red pepper flakes to the seasoning mixture for a little extra heat.
- Garlic lover? Add an extra clove of minced garlic to the seasoning mixture for a more intense garlic flavor.
- Lemon pepper tenders. Add a teaspoon of lemon pepper seasoning to the seasoning mixture for a zesty twist.
- Parmesan crusted. Before baking, dip the chicken tenders in a mixture of grated Parmesan cheese and breadcrumbs for a crispy, cheesy crust.
- Honey garlic glaze. In the last few minutes of cooking, brush the chicken tenders with a mixture of honey, garlic, and soy sauce for a sweet and savory glaze.
- Serve them in a wrap. Cut the cooked chicken tenders into smaller pieces and serve them in a wrap with lettuce, tomato, and your favorite sauce.
- Make a chicken tender salad. Top a bed of lettuce with the cooked chicken tenders, chopped vegetables, and your favorite dressing for a quick and easy salad.
- Chicken tender sliders. Serve the chicken tenders on mini slider buns with coleslaw and a drizzle of BBQ sauce for a fun and delicious appetizer.
- Don’t thaw the tenders. It’s best to cook the chicken tenders directly from frozen. Thawing them can make them soggy.
- Adjust cooking time as needed. Cooking times may vary depending on your oven or air fryer. Keep an eye on the tenders and adjust the cooking time as needed to ensure they are cooked through and golden brown.
Storage Instructions:
If you have any leftover chicken tenders (which is unlikely!), here’s how to store them:
- Refrigerate. Store leftover chicken tenders in an airtight container in the refrigerator for up to 3-4 days.
- Reheat. Reheat the chicken tenders in the oven, air fryer, or microwave until heated through. For best results, reheat them in the oven or air fryer to maintain their crispiness.
- Freeze. You can also freeze cooked chicken tenders for longer storage. Place them in a single layer on a baking sheet and freeze until solid. Then, transfer them to a freezer-safe bag or container. They can be stored in the freezer for up to 2-3 months.
I hope you enjoy this recipe! Let me know in the comments if you have any questions or if you try any of the variations. Happy cooking!
Conclusion:
So there you have it! I truly believe this method for elevating your frozen chicken tenders is a game-changer. Forget those sad, soggy, and bland tenders you might be used to. This technique delivers crispy, flavorful perfection every single time. It’s quick, it’s easy, and it transforms a simple freezer staple into a satisfying and genuinely enjoyable meal. Honestly, once you try this, you might never go back to cooking them any other way.
But why is this a must-try? Well, beyond the incredible texture and enhanced flavor, it’s about reclaiming those weeknight dinners. It’s about having a reliable, delicious option that you can whip up in minutes, even when you’re short on time and energy. It’s about turning a potentially disappointing meal into something that everyone at the table will actually rave about. And let’s be honest, who doesn’t want that?
Serving Suggestions and Variations:
The beauty of these amped-up frozen chicken tenders is their versatility. They’re fantastic on their own with your favorite dipping sauces think classic BBQ, honey mustard, ranch, or even a spicy sriracha mayo. But don’t stop there!
* Tender Sandwiches: Pile them high on toasted buns with lettuce, tomato, and your sauce of choice for a quick and satisfying sandwich. Add some crispy bacon for an extra layer of deliciousness!
* Chicken Tender Salad: Slice the tenders and toss them into a vibrant salad with mixed greens, cherry tomatoes, cucumbers, and a light vinaigrette. It’s a surprisingly healthy and flavorful option.
* Chicken Tender Wraps: Wrap them in tortillas with shredded cheese, salsa, and sour cream for a fun and easy lunch or dinner.
* Chicken Tender Nachos: Top tortilla chips with the cooked tenders, melted cheese, jalapenos, and all your favorite nacho toppings for a crowd-pleasing appetizer.
* Spice It Up: Experiment with different seasonings! Add a pinch of cayenne pepper or chili powder to the tenders before cooking for a spicy kick. Or try a blend of garlic powder, onion powder, and paprika for a more savory flavor.
* Gluten-Free Option: Many brands offer gluten-free frozen chicken tenders, making this recipe accessible to those with dietary restrictions. Just be sure to check the label.
I’m so excited for you to try this recipe and experience the difference for yourself. It’s a simple tweak that makes a world of difference.
So, what are you waiting for? Head to your freezer, grab a bag of frozen chicken tenders, and get cooking! I promise you won’t be disappointed.
And most importantly, I want to hear about your experience! Did you try any of the variations? What dipping sauces did you use? What did your family think? Share your photos and comments below. I can’t wait to see how you make this recipe your own! Happy cooking!
Frozen Chicken Tenders: The Ultimate Guide to Cooking & Enjoying Them
Crispy and flavorful oven-baked (or air-fried) frozen chicken tenders, seasoned to perfection. A quick and easy way to elevate a simple freezer staple!
Ingredients
- 1 bag (approximately 25-30 ounces) frozen chicken tenders
- 1/4 cup olive oil (or vegetable oil)
- 1 teaspoon garlic powder
- 1 teaspoon onion powder
- 1/2 teaspoon paprika
- 1/4 teaspoon black pepper
- 1/4 teaspoon salt (or to taste)
- Optional: Your favorite dipping sauce (BBQ, honey mustard, ranch, etc.)
- Optional: Fresh parsley, chopped (for garnish)
Instructions
- Preheat your oven to 400°F (200°C).
- Line a baking sheet with parchment paper.
- Arrange the frozen chicken tenders on the baking sheet in a single layer.
- Drizzle with olive oil (or vegetable oil).
- In a small bowl, combine garlic powder, onion powder, paprika, black pepper, and salt. Mix well.
- Sprinkle the seasoning mixture evenly over the chicken tenders.
- Bake for 20-25 minutes, or until golden brown and cooked through, flipping halfway through.
- Check for doneness: internal temperature should reach 165°F (74°C).
- (Optional) Broil for the last 1-2 minutes for extra crispiness, watching carefully to prevent burning.
- Remove from oven, let cool slightly, and serve with your favorite dipping sauce. Garnish with fresh parsley if desired.
- Preheat your air fryer to 400°F (200°C).
- Arrange the frozen chicken tenders in a single layer in the air fryer basket. Avoid overcrowding.
- (Optional) Drizzle with olive oil.
- (Optional) Sprinkle with the seasoning mixture.
- Air fry for 10-15 minutes, flipping halfway through, or until golden brown and cooked through.
- Check for doneness: internal temperature should reach 165°F (74°C).
- Remove from the air fryer and serve immediately with your favorite dipping sauce.
Notes
- Do not thaw the chicken tenders before cooking.
- Cooking times may vary depending on your oven or air fryer. Adjust as needed.
- For extra crispy tenders, broil for the last minute or two in the oven, or drizzle with a little extra oil in the air fryer.
- Spice it up by adding a pinch of cayenne pepper or red pepper flakes to the seasoning mixture.
- Leftovers can be stored in the refrigerator for 3-4 days or frozen for 2-3 months. Reheat in the oven or air fryer for best results.


Leave a Comment