
Bell Pepper Onion Scarpaccia: Have you ever tasted a dish that perfectly captures the essence of summer in every single bite? This savory Italian tart, bursting with sweet bell peppers and caramelized onions, is exactly that! It’s a simple yet elegant dish that’s incredibly versatile, perfect as an appetizer, a light lunch, or a delightful side dish.
Scarpaccia, originating from Tuscany, is a rustic dish with humble beginnings. The name itself, meaning “old shoe” or “bad leather,” hints at its origins as a way to use up leftover vegetables. Don’t let the name fool you, though! This dish is anything but unpleasant. Over time, it has evolved into a beloved staple of Italian cuisine, celebrated for its simplicity and deliciousness.
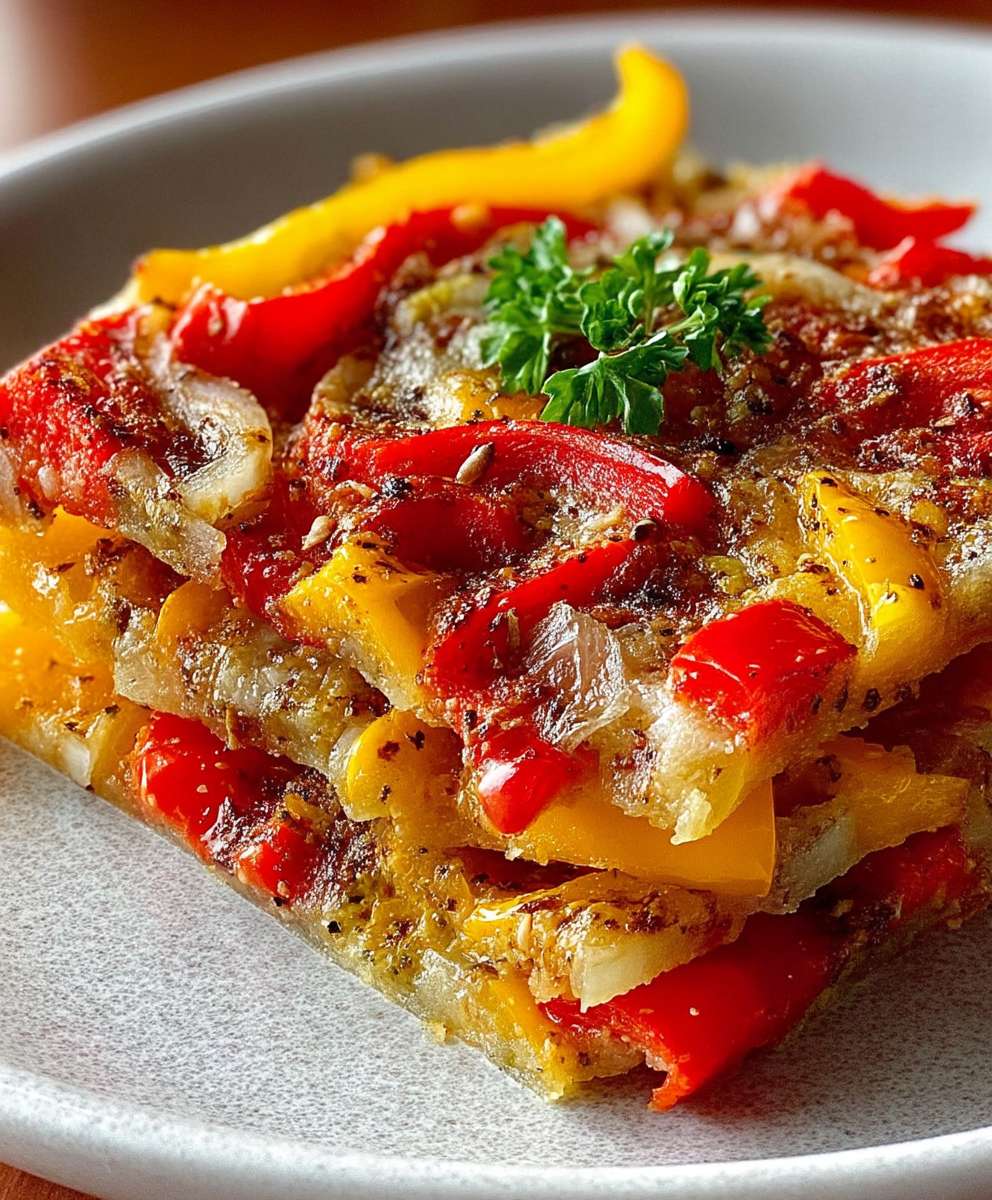
People adore Bell Pepper Onion Scarpaccia for its delightful combination of flavors and textures. The sweetness of the bell peppers and onions, slowly caramelized to perfection, creates a symphony of taste that dances on your palate. The slightly crisp edges of the tart contrast beautifully with the soft, yielding interior. Plus, it’s incredibly easy to make, requiring minimal ingredients and effort. Whether you’re a seasoned chef or a beginner in the kitchen, you can easily whip up this crowd-pleasing dish. So, are you ready to experience the magic of authentic Italian cooking? Let’s get started!

Ingredients:
- 3 large bell peppers (a mix of red, yellow, and orange is visually appealing), cored, seeded, and thinly sliced
- 2 large yellow onions, thinly sliced
- 4 cloves garlic, minced
- 1/4 cup olive oil, plus more for drizzling
- 1 cup all-purpose flour
- 1 1/2 cups water
- 1 teaspoon salt
- 1/2 teaspoon black pepper
- 1/4 cup grated Parmesan cheese (optional, but highly recommended)
- 2 tablespoons fresh thyme leaves (or 1 teaspoon dried thyme)
- 1 tablespoon fresh rosemary, finely chopped (or 1 teaspoon dried rosemary)
- Pinch of red pepper flakes (optional, for a little heat)
- 1/4 cup chopped fresh parsley, for garnish
Preparing the Vegetables:
1. First things first, let’s get those veggies prepped! Wash your bell peppers thoroughly. Then, using a sharp knife, carefully cut around the stem to remove the core. Slice the peppers in half and remove all the seeds and membranes. Now, thinly slice each pepper half into strips about 1/4 inch wide. Don’t worry if they’re not perfectly uniform; a little variation adds character!
2. Next up, the onions. Peel your onions and slice them thinly. I find that slicing them in half from pole to pole first, then laying the flat side down and slicing creates nice, even half-moon shapes.
3. Mince your garlic. You can use a garlic press or finely chop it with a knife. I prefer mincing with a knife because it releases more of the garlic’s oils and flavor.
Sautéing the Vegetables:
1. Now, grab a large skillet (at least 12 inches) and heat 1/4 cup of olive oil over medium heat. Make sure the oil is shimmering before you add the onions.
2. Add the sliced onions to the skillet and cook, stirring occasionally, until they become soft and translucent, about 8-10 minutes. You want them to be nicely softened but not browned.
3. Add the sliced bell peppers to the skillet with the onions. Continue to cook, stirring occasionally, until the peppers are tender-crisp, about 8-10 minutes more. Again, you don’t want them to be mushy, just nicely softened.
4. Add the minced garlic, thyme, rosemary, and red pepper flakes (if using) to the skillet. Cook for another minute or two, stirring constantly, until the garlic is fragrant. Be careful not to burn the garlic, as it will become bitter. Season with salt and pepper to taste. Remember, you can always add more seasoning later, so start with a little and adjust as needed.
5. Remove the skillet from the heat and set aside. We’ll come back to this delicious mixture later.
Preparing the Batter:
1. In a large bowl, whisk together the flour, water, salt, and pepper until you have a smooth batter. Make sure there are no lumps! If you have lumps, you can try using an immersion blender or straining the batter through a fine-mesh sieve.
2. If you’re using Parmesan cheese, stir it into the batter now. The Parmesan adds a lovely savory note and helps the scarpaccia brown nicely.
Assembling and Baking the Scarpaccia:
1. Preheat your oven to 400°F (200°C). While the oven is preheating, grease a 9×13 inch baking dish with olive oil. You can also use a round cake pan or a cast-iron skillet. The important thing is that the dish is well-greased to prevent the scarpaccia from sticking.
2. Pour the batter into the prepared baking dish, spreading it evenly across the bottom.
3. Spoon the sautéed vegetable mixture over the batter, distributing it evenly. Don’t worry if the vegetables sink into the batter a bit; that’s perfectly fine.
4. Drizzle the top of the scarpaccia with a generous amount of olive oil. This will help it brown beautifully and add a lovely richness.
5. Bake in the preheated oven for 30-40 minutes, or until the scarpaccia is golden brown and the batter is set. A toothpick inserted into the center should come out clean. Keep an eye on it towards the end of the baking time to make sure it doesn’t burn. If it starts to brown too quickly, you can tent it with foil.
6. Remove the scarpaccia from the oven and let it cool slightly before slicing and serving. This will allow the flavors to meld together and make it easier to cut.
Serving and Enjoying:
1. Garnish the scarpaccia with chopped fresh parsley before serving. This adds a pop of color and freshness.
2. Slice the scarpaccia into squares or wedges and serve warm or at room temperature. It’s delicious on its own as a light meal or snack, or as a side dish to grilled meats or fish.
3. Scarpaccia is also great served with a simple green salad. The bright, fresh flavors of the salad complement the savory richness of the scarpaccia perfectly.
4. Leftovers can be stored in the refrigerator for up to 3 days. Reheat in the oven or microwave before serving.
5. Enjoy your homemade Bell Pepper Onion Scarpaccia! I hope you love this recipe as much as I do. It’s a simple, rustic dish that’s packed with flavor and perfect for any occasion.
Tips and Variations:
* Add other vegetables: Feel free to add other vegetables to the scarpaccia, such as zucchini, eggplant, or mushrooms. Just make sure to adjust the cooking time accordingly.
* Use different herbs: Experiment with different herbs, such as oregano, basil, or marjoram.
* Add cheese: In addition to Parmesan cheese, you can also add other cheeses, such as mozzarella, provolone, or ricotta.
* Make it gluten-free: Use a gluten-free flour blend instead of all-purpose flour.
* Add a spicy kick: Increase the amount of red pepper flakes or add a pinch of cayenne pepper.
* Make it vegan: Omit the Parmesan cheese or use a vegan Parmesan alternative.
* Serve with a dipping sauce: Try serving the scarpaccia with a dipping sauce, such as marinara sauce, pesto, or a simple yogurt sauce.
* Make mini scarpaccias: Bake the batter in muffin tins for individual servings. This is great for parties or appetizers.
* Use different types of onions: Try using red onions or shallots for a different flavor.
* Add olives: Kalamata olives or other briny olives would be a delicious addition.
* Make it ahead: The vegetable mixture can be prepared ahead of time and stored in the refrigerator for up to 2 days. The batter can also be made ahead of time and stored in the refrigerator for up to 1 day. Just be sure to whisk the batter again before using it.
* Freezing: While I haven’t personally tried freezing scarpaccia, it should freeze well. Let it cool completely, then wrap it tightly in plastic wrap and foil. Freeze for up to 2 months. Thaw in the refrigerator overnight before reheating.
Serving Suggestions:
* Serve as a side dish with roasted chicken, grilled fish, or steak.
* Serve as a vegetarian main course with a side salad.
* Serve as an appetizer at a party or gathering.
* Pack it in a lunchbox for a healthy and delicious meal.
* Enjoy it for breakfast with a fried egg on top.
* Serve it with a glass of chilled white wine or a refreshing spritzer.
Why This Recipe Works:
This recipe works because it’s simple, versatile, and packed with flavor. The combination of sweet bell peppers, savory onions, and fragrant herbs creates a delicious and satisfying dish that’s perfect for any occasion. The batter is light and airy, allowing the vegetables to shine. The olive oil adds richness and helps the scarpaccia brown beautifully. And the Parmesan cheese (if using) adds a lovely savory note. The recipe is also easy to customize to your own tastes and preferences. You can add different vegetables, herbs, or cheeses to create your own unique version of scarpaccia. The possibilities are endless!
Conclusion:
So, there you have it! This Bell Pepper Onion Scarpaccia is truly a must-try recipe, and I’m not just saying that. From the vibrant colors to the incredible depth of flavor, it’s a dish that’s guaranteed to impress. The sweetness of the caramelized onions perfectly complements the slightly bitter bell peppers, all held together by a simple yet satisfying batter. It’s a rustic, comforting, and surprisingly elegant dish all rolled into one.
But why is it *really* a must-try? Because it’s incredibly versatile! It’s perfect as a light lunch, a flavorful side dish, or even a vegetarian main course. Plus, it’s relatively quick and easy to make, using ingredients you likely already have in your pantry. No fancy techniques or hard-to-find items required! It’s the kind of recipe you can whip up on a weeknight when you’re short on time but still want something delicious and homemade.
Serving Suggestions and Variations
Now, let’s talk about how you can enjoy this delightful Scarpaccia. I personally love serving it warm, straight from the oven, with a simple green salad dressed with a lemon vinaigrette. The acidity of the lemon cuts through the richness of the Scarpaccia beautifully. You could also add a dollop of creamy ricotta cheese on top for an extra layer of indulgence.
But the possibilities don’t stop there! Feel free to experiment with different variations to suit your taste.
* Spice it up: Add a pinch of red pepper flakes to the batter for a little kick.
* Cheese, please!: Sprinkle some grated Parmesan or Pecorino Romano cheese over the top before baking for a salty, savory crust.
* Herb it up: Incorporate fresh herbs like thyme, rosemary, or oregano into the batter for added aroma and flavor.
* Veggie boost: Add other vegetables like zucchini, eggplant, or mushrooms to the mix for a heartier Scarpaccia. Just be sure to adjust the cooking time accordingly.
* Sweet touch: For a sweeter version, add a drizzle of honey or maple syrup after baking.
I’ve even tried making mini Scarpaccias in muffin tins, which are perfect for appetizers or party snacks. The key is to have fun and make it your own!
I truly believe that this Bell Pepper Onion Scarpaccia will become a staple in your kitchen. It’s a simple, satisfying, and endlessly adaptable recipe that’s perfect for any occasion. It’s a dish that celebrates the beauty of fresh, seasonal ingredients and the joy of home cooking.
So, what are you waiting for? Grab your ingredients, preheat your oven, and get ready to experience the magic of Scarpaccia! I’m confident that you’ll love it as much as I do.
And most importantly, I want to hear about your experience! Did you try the recipe? Did you make any variations? What did you think? Please share your thoughts and photos in the comments below. I’m always eager to learn from my readers and see how you’ve put your own spin on my recipes. Happy cooking! I can’t wait to hear all about your Scarpaccia adventures!
Bell Pepper Onion Scarpaccia: A Delicious & Easy Recipe
A rustic Italian baked dish with sweet bell peppers and onions in a simple, savory batter. Perfect as a side or light meal.
Ingredients
- 3 large bell peppers (mix of red, yellow, orange), cored, seeded, thinly sliced
- 2 large yellow onions, thinly sliced
- 4 cloves garlic, minced
- 1/4 cup olive oil, plus more for drizzling
- 1 cup all-purpose flour
- 1 1/2 cups water
- 1 teaspoon salt
- 1/2 teaspoon black pepper
- 1/4 cup grated Parmesan cheese (optional)
- 2 tablespoons fresh thyme leaves (or 1 teaspoon dried thyme)
- 1 tablespoon fresh rosemary, finely chopped (or 1 teaspoon dried rosemary)
- Pinch of red pepper flakes (optional)
- 1/4 cup chopped fresh parsley, for garnish
Instructions
- Prepare Vegetables: Slice bell peppers and onions thinly. Mince garlic.
- Sauté Vegetables: Heat 1/4 cup olive oil in a large skillet over medium heat. Add onions and cook until soft and translucent (8-10 minutes). Add bell peppers and cook until tender-crisp (8-10 minutes). Add garlic, thyme, rosemary, and red pepper flakes (if using). Cook for 1-2 minutes until fragrant. Season with salt and pepper. Remove from heat.
- Prepare Batter: In a large bowl, whisk together flour, water, salt, and pepper until smooth. Stir in Parmesan cheese (if using).
- Assemble and Bake: Preheat oven to 400°F (200°C). Grease a 9×13 inch baking dish with olive oil. Pour batter into the dish, spreading evenly. Spoon sautéed vegetable mixture over the batter, distributing evenly. Drizzle with olive oil.
- Bake: Bake for 30-40 minutes, or until golden brown and a toothpick inserted into the center comes out clean.
- Cool and Serve: Let cool slightly before slicing and serving. Garnish with chopped fresh parsley. Serve warm or at room temperature.
Notes
- Variations: Add other vegetables (zucchini, eggplant, mushrooms). Use different herbs (oregano, basil, marjoram). Add other cheeses (mozzarella, provolone, ricotta). Make it gluten-free with gluten-free flour. Add more red pepper flakes for spice. Make it vegan by omitting Parmesan.
- Make Ahead: Vegetable mixture can be prepared up to 2 days ahead. Batter can be made 1 day ahead.
- Freezing: Cool completely, wrap tightly, and freeze for up to 2 months. Thaw overnight in the refrigerator before reheating.
- Serving Suggestions: Serve as a side dish, vegetarian main course, or appetizer. Enjoy for breakfast with a fried egg. Serve with a salad or dipping sauce (marinara, pesto, yogurt sauce).
- Tips: Don’t burn the garlic. Grease the baking dish well. Tent with foil if browning too quickly.


Leave a Comment